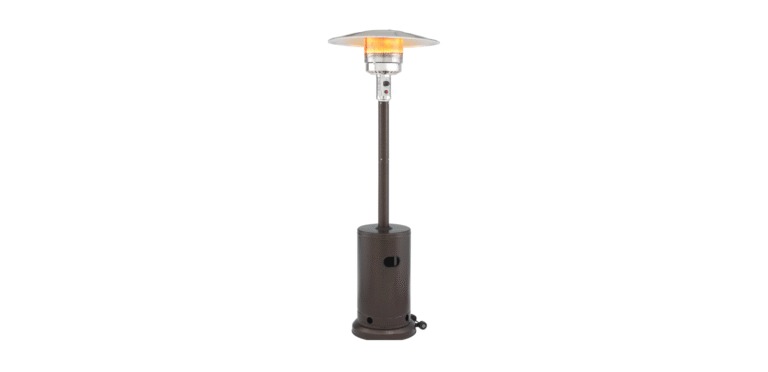
Insignia NS-PSH48BR3 Standing Patio Heater
Safety Instructions
- Never install or remove a propane cylinder while the heater is lit, near flame, other ignition sources, or while the heater is hot to the touch.
- This heater is red hot during use and can ignite flammables too close to the burner.
- Keep flammables at least three feet (1 m) from sides and three feet (1 m) from top.
- Keep gasoline and other flammable liquids and vapors well away from the heater.
- Store the propane cylinder outdoors in a well-ventilated space out of reach of children.
- Never store the propane cylinder in an enclosed area (house, garage, etc.).
- If the heater is to be stored indoors, disconnect the propane cylinder for outdoor storage.
- This heater is a combustion appliance. All combustion appliances produce carbon monoxide (CO) during the combustion process.
- This product is designed to produce extremely minute, non-hazardous amounts of CO if used and maintained according to all warnings and instructions. Do not block air flow into or out of the heater.
- Carbon Monoxide (CO) poisoning produces flu-like symptoms, watery eyes, headaches, dizziness, fatigue, and possibly death.
- You can’t see it, and you can’t smell it. It’s an invisible killer. If these symptoms are present during operation of this product, get fresh air immediately!
- Never use inside the house, or other unventilated or enclosed areas.
- This heater consumes air (oxygen). Do not use in unventilated or enclosed areas to avoid endangering your life.
- Never leave the heater unattended when hot or in use.
- Keep out of reach of children.
- Keep all connections and fittings clean. Make sure the propane cylinder valve outlet is clean.
- During setup, check all connections and fittings for leaks using soapy water. Never use a flame.
- Use as a heating appliance only. Never alter in any way or use with any device.
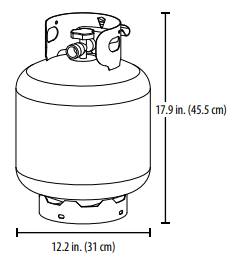
Standard 20 lbs. tank size
Features
- 48,000 BTU and aluminum reflector shield creates a heat diameter of 14.7 ft (4.5 m) to keep heat localized where you need it
- Propane fuel source with 20 lb (9 kg) capacity burns clean
- Adjustable power control lets you choose a higher or lower level of heat
- The electric igniter turns your heater on at the push of a button
- Auto Shutoff detects when the gas tank is low on fuel and turns your heater off
- The Auto Gas flow shut-off mechanism stops gas flow automatically if a burner flames out because of the wind
- Attached wheels and anti-tilt technology make your heater portable and safe
- 4.6 ft (1.4 m) hose gives you flexible placement options
Dimensions
Package contents
- Standing Patio Heater
- CSA regulator with hose
- User Guide
Parts
- A Reflector panel (3)

- B Reflector plate (1)

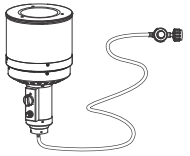
- C Head assembly (1) with E Gas hose (1) and F Regulator (1) pre-installed

- D Cylinder housing (1)

- G Upper pole (1)

- H Lower pole (1) I

- I Support bracket (3)

- J Wheel kit (1)

- K Base (1)

Hardware
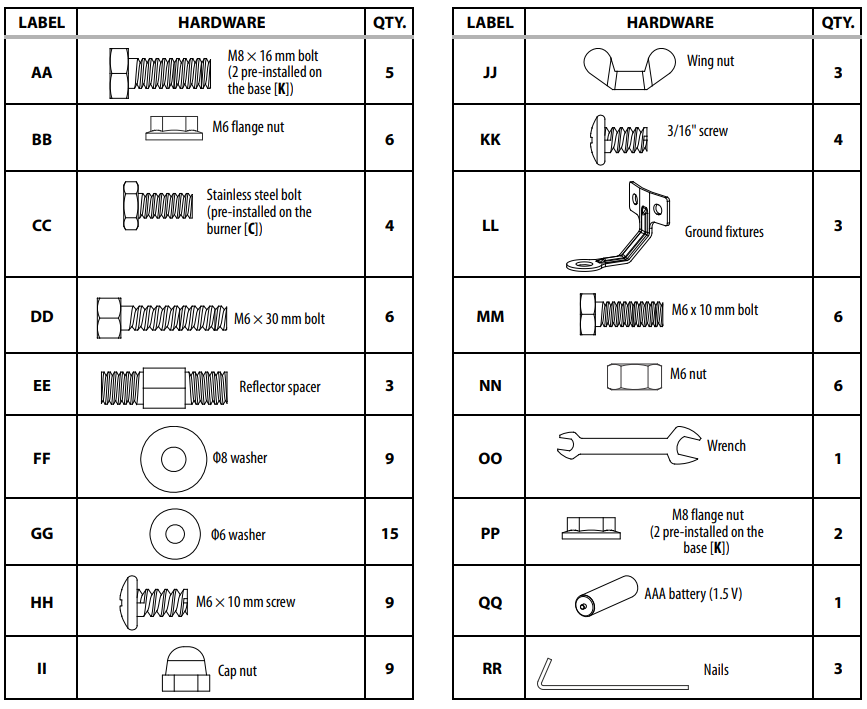
You may receive more hardware than you need.
Assembly
You will need the following tools to assemble your new patio heater
- Phillips screwdriver with a medium blade
- Wrench (6 × 8 mm)
- Leak detection solution
Assembling your patio heater
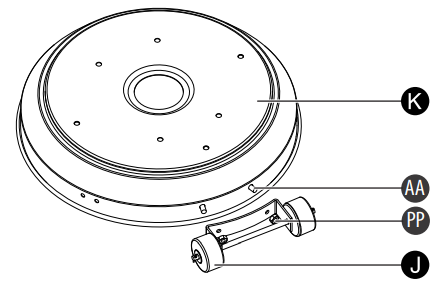
- Remove the two M8 × 16 mm bolts (AA) and the two M8 flange nuts (PP) from the base (K).
- From the inside of the base, insert the bolts through the base and into the wheel kit.
- Finger-tighten the flange nuts onto the bolts.

Attach the ground fixer
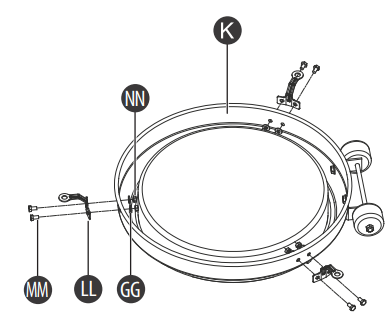
- From the outside of the base, align the holes in a ground fixture (LL) with the holes in the base (K), then insert two M6 × 10 mm bolts (MM) through the holes in the fixtures and into the holes on the base.
- From the inside of the base, slide a Φ6 washer (GG) onto each bolt, then secure the fixture to the base with an M6 nut (NN).

- Attach the other two ground fixtures.

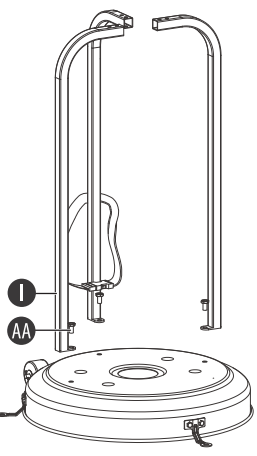
- Align a support bracket (l) with the support hole on the base, then insert an M8 x 16 mm bolt (AA) through the bracket and into the base.

- Loosely tighten the bolts.
- Attach the other two support brackets.

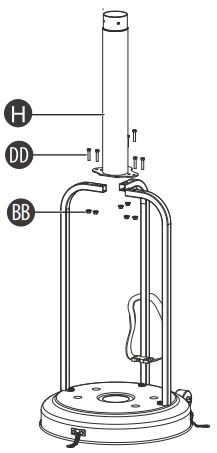
- Attach the lower pole (H) to the support brackets using six M6 × 30 mm bolts (DD) and six M6 flange nuts (BB). Fully tighten all of the bolts.

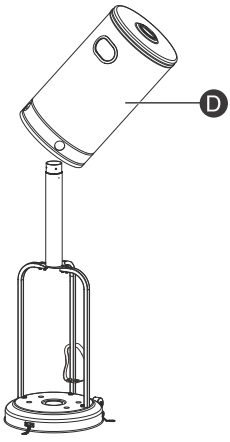
Install the cylinder housing
- Slide the cylinder housing (D) onto the pole assembly.

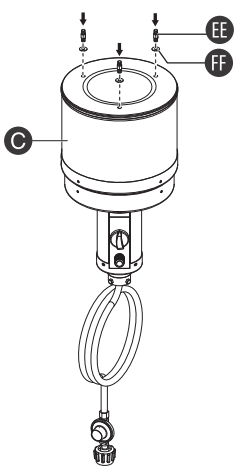
Attach reflector spacers and washers
- Attach three reflector spacers (EE) and three Ø8 washers (FF) to the top of the head assembly (C). Tighten the reflector spacers.

Attach the head assembly.
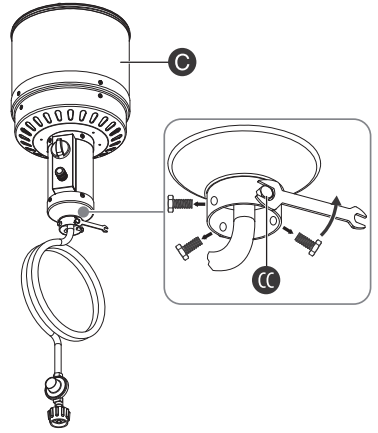
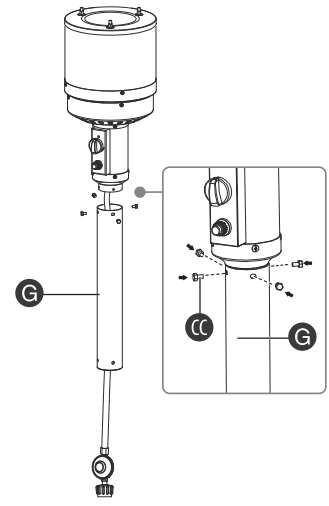
- Remove the four M6 × 10 mm stainless steel bolts (CC) from the head assembly (C).

- Insert the head assembly hose into the upper pole (G), then secure the head assembly to the pole with the stainless steel bolts (CC).

Combine the poles 
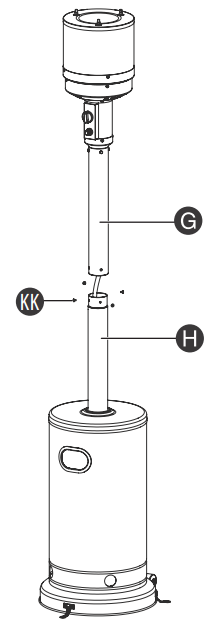
- Insert the upper pole (G) onto the lower pole (H). Make sure that the warning label is in the opposite direction from the wheels.

- Secure the poles with four 3/16″ screws (KK).
Assemble the reflector panels and plate
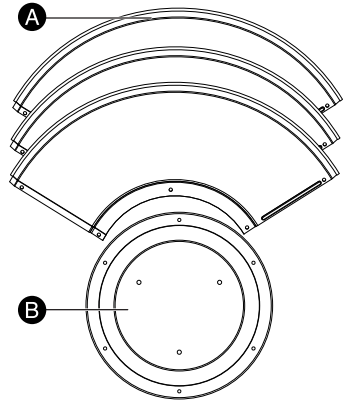
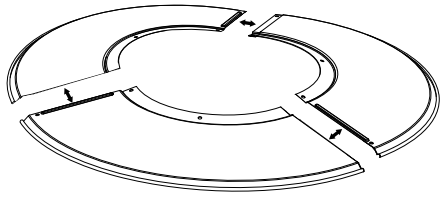
- Remove the protective cover on the three reflector panels (A) and the reflector plate (B).

- Slide the reflector panels (A) together.

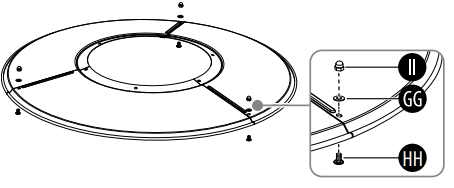
- Insert one M6 x 10 mm screw (HH) through the screw hole on the bottom of the outer edge of each of the panels.
- Slide one Φ6 washer (GG) over the threaded end of the screw, then loosely screw a cap nut (II) over the screw.

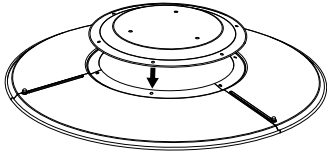
- Place the reflector plate in the center of the assembled panels.

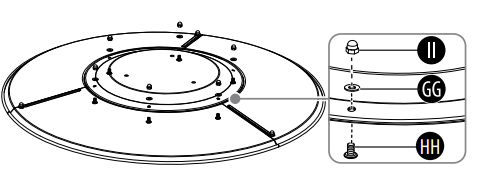
- Insert one M6 x 10 mm screw (HH) through the screw hole on the bottom of the inner edge of each of the panels.
- Slide one Φ6 washer (GG) over the threaded end of the screw, then screw a cap nut (II) over the screw.

- Tighten all the cap nuts.
Attach the reflector assembly to the head assembly 
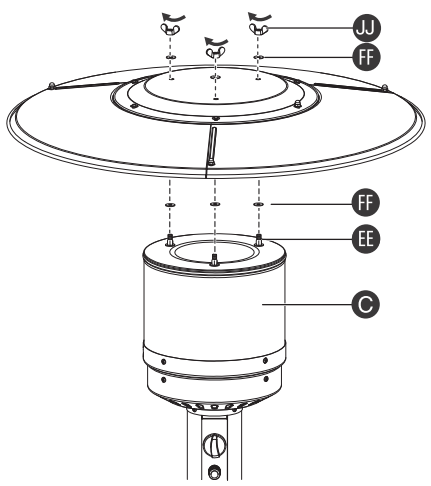
- Place three Ø8 washers (FF) over the threaded reflector spacers on the head assembly.
- Place the reflector assembly so that the holes on the assembly slide over the three reflector spacers (EE).

- Place three Ø8 washers (FF) over the threaded reflector spacers that extend through the reflector plate, then secure the reflector assembly to the head assembly with three wing nuts (JJ).
Install the propane cylinder.
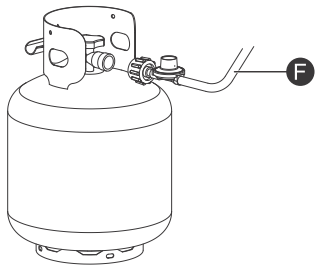
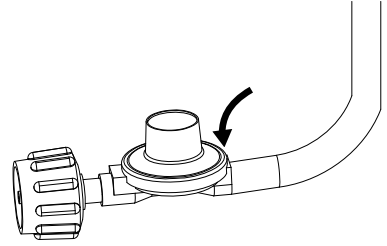
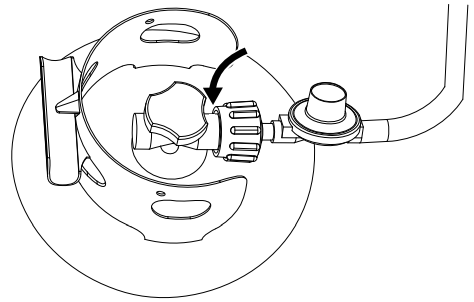
- Hold the regulator (F) in one hand and insert the nipple into the valve outlet. Make sure that the nipple is centered in the valve outlet. The coupling nut connects to the large outside threads on the valve outlet.

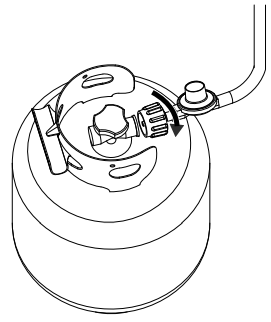
- Hand-tighten the coupling nut clockwise until it comes to a full stop. Firmly tighten by hand only.

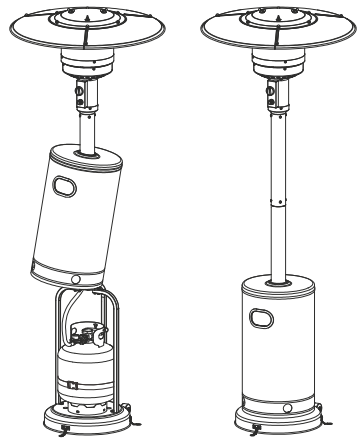
- Slide the cylinder housing up, then insert the propane cylinder into your heater and secure it with the strap on the support bracket. Slide the cylinder housing back down.

To disconnect the cylinder
- Fully close the tank valve by turning it clockwise. Turn the coupling nut counterclockwise until the regulator assembly detaches.

Install the battery
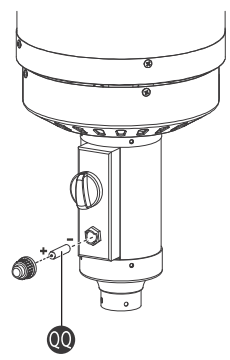
- Unscrew the switch button, insert the AAA battery (QQ) into the battery compartment, and screw the switch button back in.

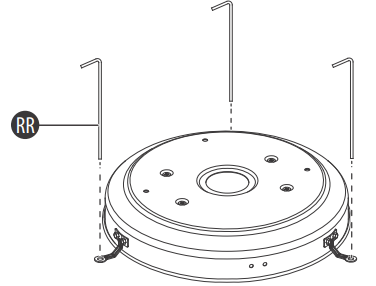
- Secure the base to the ground with three nails (RR).

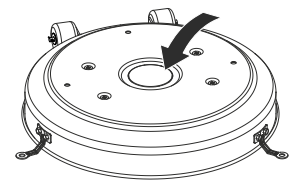
- To improve stability, fill the bucket with sand, soil, or water.

- To improve stability, fill the bucket with sand, soil, or water.
Test for gas leaks
- Use a leak detection solution. OR Make a two to three-ounce leak detection solution (one part liquid dishwashing detergent and three parts water).
- Make sure that all patio heaters and light valves are OFF.
- Apply several drops of the solution where the hose attaches to the regulator.

- Apply several drops of the solution where the regulator connects to the cylinder.

- Turn the cylinder valve ON.
- If bubbles occur, turn the cylinder valve OFF, then:
- If the leak is at the hose/regulator connection, tighten the connection and perform another leak test. If you continue to see bubbles, contact Customer Care for a replacement hose.
- If the leak is at the regulator/cylinder valve connection, disconnect, reconnect, and perform another leak check. If you continue to see bubbles after several attempts, the cylinder valve is defective and should be returned to the cylinder’s place of purchase.
Usage
- There is adequate fresh air ventilation.
- Your heater is away from gasoline or other flammable liquids or vapors.
- Your heater is away from windows, air intake openings, sprinklers, and other water sources.
- The top and sides of your heater are at least three ft. (one meter) away from combustible materials.
- Your heater is on a hard and level surface.
- There are no signs of spider or insect nests on or in your heater.
- All burner passages are clear.
- All air circulation passages are clear.
- Children and adults have been alerted to the hazards of high surface temperatures and should stay away to avoid burns or clothing ignition.
- Young children are carefully supervised when they are in the area of your heater.
- Clothing or other protective material is not hung from your heater or placed on or near your heater.
- Any guard or other protective device removed while servicing your heater has been replaced prior to operating your heater.
- You inspect your heater before use and have a qualified service person inspect it at least annually.
- The control compartment, burner, and circulating air passageways of your heater are clean.
Before turning on the gas
- Make sure that the surrounding areas are free of combustible materials, gasoline, and other flammable vapors or liquids.
- Make sure that there is no obstruction to air ventilation.
- Make sure that all gas connections are tight and there are no leaks.
- Make sure that the cylinder cover is clear of debris.
- Make sure that any component removed during assembly or servicing is replaced and fastened prior to starting.
Before lighting your heater
- Inspect your heater before each use and have a qualified service person inspect it at least annually.
- If you are relighting a hot heater, always wait at least five minutes.
- Inspect the visible portion of the hose before each use. If the hose leaks, you must replace it before operation. Only use the replacement hose assembly specified by the manufacturer.
- You must use the pressure regulator and hose assembly supplied with your heater. Only use replacement pressure regulators and hose assemblies specified by the manufacturer.
Lighting your heater
- Turn on the valve on the gas cylinder.
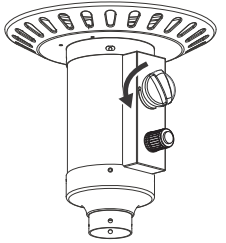
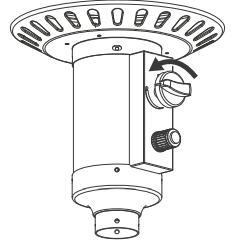
- Push in and turn the control knob to the HIGH (maximum) position (counter-clockwise 90º).

- Holding down the control knob, press the igniter button several times until the main flame is ignited. Release the control knob 10 seconds after ignition.
- Turn the control knob to LOW (minimum) and leave it there for five minutes or more before turning the knob to the temperature setting you want.

- If the burner flame goes out, turn off your heater. Wait at least five minutes or more to let the gas dissipate, then repeat steps 2 to 4.
Adjusting the flame
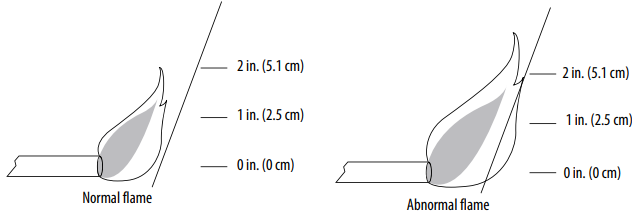
Turn the control knob counter-clockwise to increase the flame or clockwise to decrease the flame.
Turning your heater off
- Turn the cylinder valve clockwise to OFF and disconnect the regulator.
Shutting down checklist
After you turn off your heater, make sure that
- The gas control is in the OFF position.
- The propane cylinder valve is OFF.
- During periods of extended inactivity or when transporting, disconnect the gas line.
Maintenance
Checking the gas hose
Inspect the gas hose once a month to check for cracks or signs of deterioration caused by exposure to outside temperature extremes and flexing. Replace the hose with a new PVC hose if there are any cracks or leaks in the hose.
Cleaning your heater
To enjoy years of outstanding performance from your heater, make sure that you perform the following maintenance activities regularly:
- Keep the exterior surfaces clean.
- Use warm, soapy water for cleaning. Never use flammable or corrosive cleaning agents.
- While cleaning your heater, make sure that you keep the area around the burner assembly dry at all times. Do not submerge the control valve assembly. If the gas control is submerged in water, do NOT use it. It must be replaced.
- Keep the area around your heater clear and free from combustible materials, gasoline, and other flammable vapors and liquids.
- Do not obstruct the flow of combustion and ventilation air.
- Keep the ventilation opening(s) on the cylinder enclosure free and clear from debris.
- Air flow must be unobstructed. Keep controls, burner, and circulating air passageways clean.
Checking for leaks and blockages
Check the visible portions of the hose assembly located within the confines of the heater post. Inspect the entire hose assembly at least annually, disassembling the reflector and burner. Inspect the hose assembly for evidence of excessive abrasion, cuts, or wear. Suspected areas should be leak tested. Reassemble the reflector and burner after checking for leaks.
Signs of blockages
- Your heater does NOT reach the temperature you want.
- The heater glow is excessively uneven.
- Your heater makes popping noises.
- Spiders and insects can nest in the burner or orifices.
- This dangerous condition can damage your heater and render it unsafe for use.
- Clean the burner holes by using a heavy-duty pipe cleaner.
- Compressed air may help clear away smaller particles.
- Carbon deposits may create a fire hazard.
- Clean the dome and burner screen with warm, soapy water if any carbon deposits develop.
Storage
Storing between uses
- Turn the control knob OFF.
- Disconnect the propane source.
- Store your heater upright in an area sheltered from direct contact with inclement weather (such as rain, sleet, hail, snow, dust, and debris).
- Secure your heater to a stationary surface (such as a pole) to help keep the wind from blowing it over.
- You can cover your heater to protect exterior surfaces and to help prevent build-up in air passages.
Storing llong-termor transporting
During periods of extended inactivity or when transporting
- Turn the control knob OFF.
- Disconnect the propane source and move it to a secure, well-ventilated location outdoors.
- Store your heater upright in an area sheltered from direct contact with inclement weather (such as rain, sleet, hail, snow, dust, wind, and debris).
- You can cover your heater to protect exterior surfaces and to help prevent build-up in air passages.
- Never leave the propane cylinder exposed to direct sunlight or excessive heat.
Servicing
- Only a qualified service person should repair gas Insignia NS-PSH48BR3 Standing Patio Heater passages and associated components.
Specifications
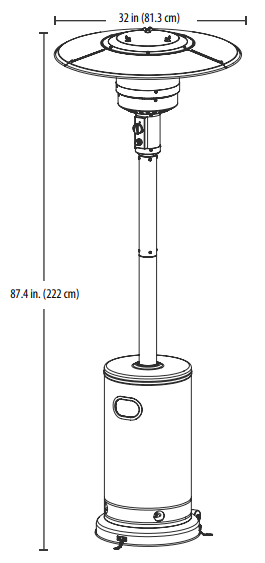
- Dimensions: (H × W × D) 87 × 32 × 32 in. (222 × 81.3 × 81.3 cm)
- Weight (without gas tank): NS-PSH48BR3: 36.15 lbs. (16.5 kg) NS-PSH48SS3: 33.73 lbs. (15.3 kg)
- Fuel type: Propane
- Compatible propane cylinder: Standard 20 lbs. 17.9 in. (45.5 cm) height × 12.2 in. (31 cm) diameter
- Heat rating: 48,000 BTU
- Battery type: AAA Alkaline 1.5 V
- Battery life: Over 10,000 ignition cycles
- Operating altitude range: 0 to 2,000 ft. (0 to 609.6 m)
- Run time Approx: 11 hours per tank
Troubleshooting
Legal notices
FCC Statement
This device complies with Part 15 of the FCC Rules. Operation Insignia NS-PSH48BR3 Standing Patio Heater is subject to the following two conditions: (1) this device may not cause harmful interference, and (2) this device must accept any interference received, including interference that may cause undesired operation.
FCC Caution
Changes or modifications not expressly approved by the Insignia NS-PSH48BR3 Standing Patio Heater party responsible for compliance could void the user’s authority to operate this equipment.
EMC guidance
- Don’t use near active HF Insignia NS-GLSBFSCW1 Glass Scale surgical equipment or the RF shielded room of an ME system for magnetic resonance imaging, where the intensity of EM disturbances is high.
- Use of accessories, transducers, and cables other than those specified or provided by the manufacturer of this equipment could result in increased electromagnetic emissions or decreased electromagnetic immunity of this equipment and result in improper operation.
- Otherwise, degradation of the performance of this equipment could result.
One-Year Warranty
Definitions
The Distributor* of Insignia-branded products warrants to you, the original purchaser of this new Insignia-branded product (“Product”), that the Product shall be Insignia NS-PSH48BR3 Standing Patio Heater free of defects in the original manufacturer of the material or workmanship for one (1) year from the date of your purchase of the Product (“Warranty Period”).
How to obtain warranty service?
If you purchased the Product at a Best Buy retail store Insignia NS-PSH48BR3 Standing Patio Heater location or from a Best Buy online website, please take your original receipt and the Product to any Best Buy store. Make sure that you place the Product in its original packaging or packaging that provides the same amount of protection as the original packaging. To obtain warranty service, in the United States and Canada, call 1-877-467-4289. Call agents may diagnose and correct the issue over the phone.
Where is the warranty valid?
This warranty is valid only in the United States and Canada at Best Buy branded retail stores or websites to the original purchaser of the product in the country where the original purchase was made.
Customer Support
- Ph: 1-877-467-4289
- Website: www.insigniaproducts.com
INSIGNIA is a trademark of Best Buy and its affiliated companies. Distributed by Best Buy Purchasing, LLC 7601 Penn Ave South, Richfield, MN 55423 U.S.A.
©2021 Best Buy. All rights reserved.
FAQs
What type of fuel does the NS-PSH48BR3 patio heater use?
The heater runs on liquid propane (LP) gas, which is normally provided by a standard 20-pound propane tank (not included).
What is the maximum heat output?
This type is perfect for outside places like patios, decks, or backyard seating areas because it can provide up to 48,000 BTUs of heat.
How large an area can it heat?
Depending on wind, temperature, and location, the heater may heat up to 200–250 square feet.
Is this patio heater safe for indoor use?
No. Only well-ventilated outdoor spaces are suitable for using this heater. There is a significant carbon monoxide risk when using it indoors or in enclosed areas.
How long will a full propane tank last?
On high heat, a common 20-pound propane tank will last 8 to 10 hours. Depending on usage and environmental factors, the runtime will change.
How do I move the heater?
Wheels are integrated into the base of several variants. Before travelling, always disconnect the tank, cut off the gas supply, and let the unit cool.
Can this heater be used during windy conditions?
Although it is resistant to wind, flame stability may be impacted by powerful gusts. If the wind speed is more than 10 to 15 mph, place the heater in a protected outdoor location.
Do I need tools for assembly?
Typically, you’ll need basic equipment like an adjustable wrench and a Philips screwdriver. It usually takes one person 30 to 60 minutes to assemble.


