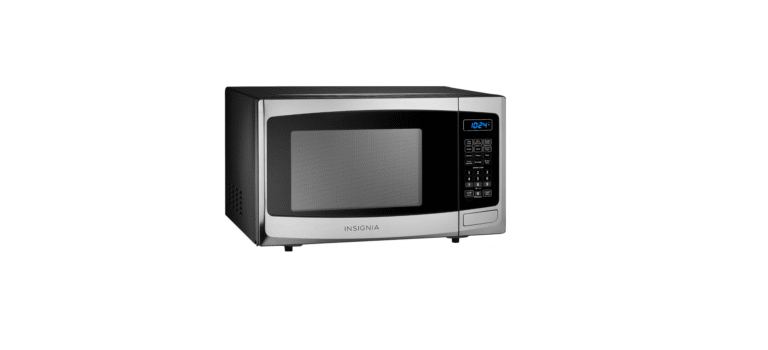
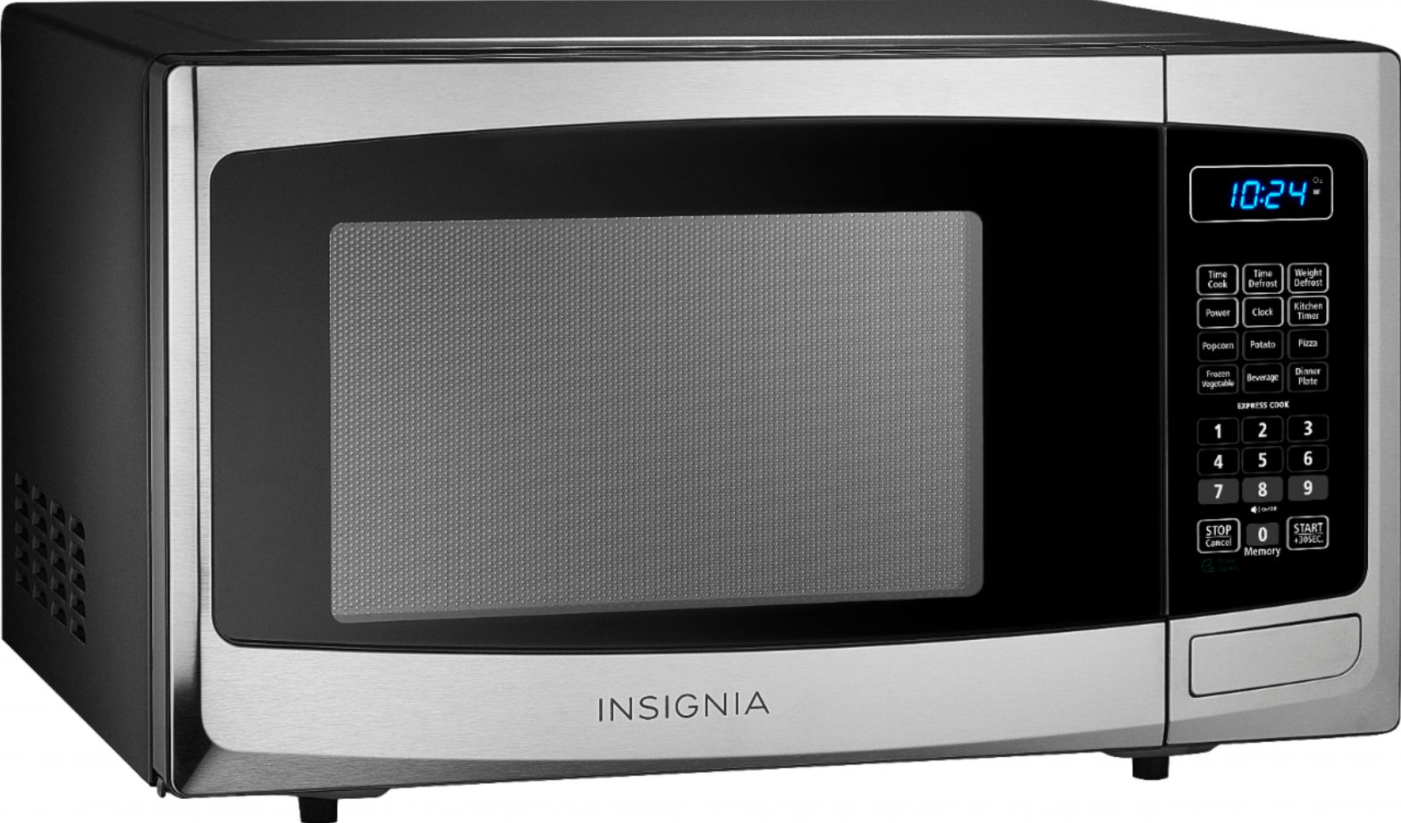
INSIGNIA NS-MW09SS8 0.9 Cu. Ft. Microwave
Introduction
Congratulations on your purchase of a high-quality Insignia product. Your NS-MW11BK0 represents the state of the art in microwave design and is designed for reliable and trouble-free performance.
Safety Instructions
- Install or locate this appliance only by the provided installation instructions.
- Some products, such as whole eggs and sealed containers (for example, closed glass jars, cannot explode and should not be heated in this microwave.
- Use this appliance only for its intended use as described in the manual.
- Do not use corrosive chemicals or vapors in this appliance.
- As with any appliance, close supervision is necessary when used by children.
- Do not operate this appliance if it has a damaged cord or plug, if it is not working properly, or if it has been damaged or dropped.
- Do not cover or block any openings on the appliance.
- Remove wire twist-ties from paper or plastic bags before placing them in the oven.
- Do not use the cavity for storage purposes. Do not leave paper products, cooking utensils, or food in the cavity when not in use.
- Do not overheat the liquid.
- Stir the liquid both before and halfway through heating it.
- Do not use straight-sided containers with narrow necks.
- Use extreme care when inserting a spoon or other utensil into the container.
Grounding instructions
This appliance must be grounded. In the event of an electrical short circuit, grounding reduces the risk of electric shock by providing an escape wire for the electric current. This appliance is equipped with a cord having a grounding wire with a grounding plug. The plug must be plugged into an outlet that is properly installed and grounded.
- A short power supply cord is provided to reduce the risks resulting from becoming entangled in or tripping over a longer cord.
- Longer cord sets or extension cords are available and may be used if care is exercised in their use.
- If a long cord or extension cord is used:
- The marked electrical rating of the cord set or extension cord should be at least as great as the electrical rating of the appliance.
- The extension cord must be a grounding-type 3-wire cord.
- The longer cord should be arranged so that it will not drape over the countertop or tabletop, where it can be pulled on by children or tripped over unintentionally.y
Radio interference
- Operation of the microwave oven may cause interference to your radio, TV, or similar equipment.
- When there is interference, it may be reduced or eliminated by taking the following measures:
- Clean the door and sealing surface of the oven.
- Reorient the receiving antenna of the radio or television.
- Move the microwave oven away from the receiver.
- Plug the microwave oven into a different outlet so that the microwave and receiver are on different branch circuits.
- Relocate the microwave oven with respect to the receiver.
- Do not attempt to operate this oven with the door open since operation can result in harmful exposure to microwave energy. It is important not to defeat or tamper with the safety interlocks.
- Do not place any object between the oven front face and the door, or allow soil or cleaner residue to accumulate on sealing surfaces.
- Do not operate the oven if it is damaged. It is particularly important that the oven door closes properly and that there is no damage to the:
- The oven should not be adjusted or repaired by anyone except properly qualified service personnel.
Cookware and Materials Test
- Fill a microwave-safe container with 1 cup (250 ml) of cold water, along with the cookware or materials in question.
- Cook on maximum power for one minute. Do not exceed one minute cooking time.
- Carefully feel the cookware or material. If the empty cookware or material is warm, do not use it for microwave cooking.
Materials you can use
| MATERIAL | REMARKS |
| Browning dish | Follow the manufacturer’s instructions. The bottom of the browning dish must be at least 3/16-in. (5mm) above the turntable. Incorrect usage may cause the turntable to break. |
| Dinnerware | Use microwave-safe only. Follow the manufacturer’s instructions. Do not use cracked or chipped dishes. |
| Glass jars | Always remove the lid. Use only to heat food until just warm. Most glass jars are not heat-resistant and may break. |
| Glassware | Use heat-resistant oven glassware only. Make sure there is no metallic trim. Do not use cracked or chipped dishes. |
| Oven cooking bags | Follow the manufacturer’s instructions. Do not close with a metal tie. Make slits to allow steam to escape. |
| Paper plates and cups | Use for short–term cooking/warming only. Do not leave the oven unattended while cooking. |
| Paper towels | Use to cover food for reheating and absorbing fat. Use with supervision for short-term cooking only. |
| Parchment paper | Use as a cover to prevent splattering or a wrap for steaming. |
| Plastic | Use only if labeled “Microwave Safe.” Follow the manufacturer’s instructions. Some plastic containers soften as the food inside gets hot. “Boiling bags” and tightly closed plastic bags should be slit, pierced, or vented, as indicated on the package. |
| Plastic wrap | Use microwave-safe only. Use to cover food during cooking to retain moisture. Do not allow plastic wrap to touch food. |
| Thermometers | Use microwave-safe only (such as meat and candy thermometers). |
| Wax paper | Use as a cover to prevent splattering and retain moisture. |
Materials to be avoided
| MATERIAL | REMARKS |
| Aluminum foil | May cause an electric spark. Use a microwave-safe dish instead. |
| Aluminum tray | May cause an electric spark. Use a microwave-safe dish instead. |
| Food carton with a metal handle | May cause an electric spark. Use a microwave-safe dish instead. |
| Metal or metal-trimmed utensils | Metal shields the food from microwave energy. The metal trim may cause arcing. |
| Metal twist ties | It may cause an electric spark and could cause a fire in the oven. |
| Paper bags | May cause a fire in the oven. |
| Plastic foam | Plastic foam may melt or contaminate the liquid inside when exposed to high temperatures. |
| Wood | Wood will dry out when used in the microwave oven and may split or crack. |
Features
- 1,000 W of power quickly heats food
- Six presets easily cook your favorite foods
- 12.4-inch (31.5 cm) turntable helps evenly heat food
- Internal LED light shows your food
- Eleven power levels heat food to perfection
- Black plastic finish looks great with any décor
- Stylish blue LED display provides easy control
Package contents
- Countertop Microwave
- Turntable (with ring)
- User Guide
Description
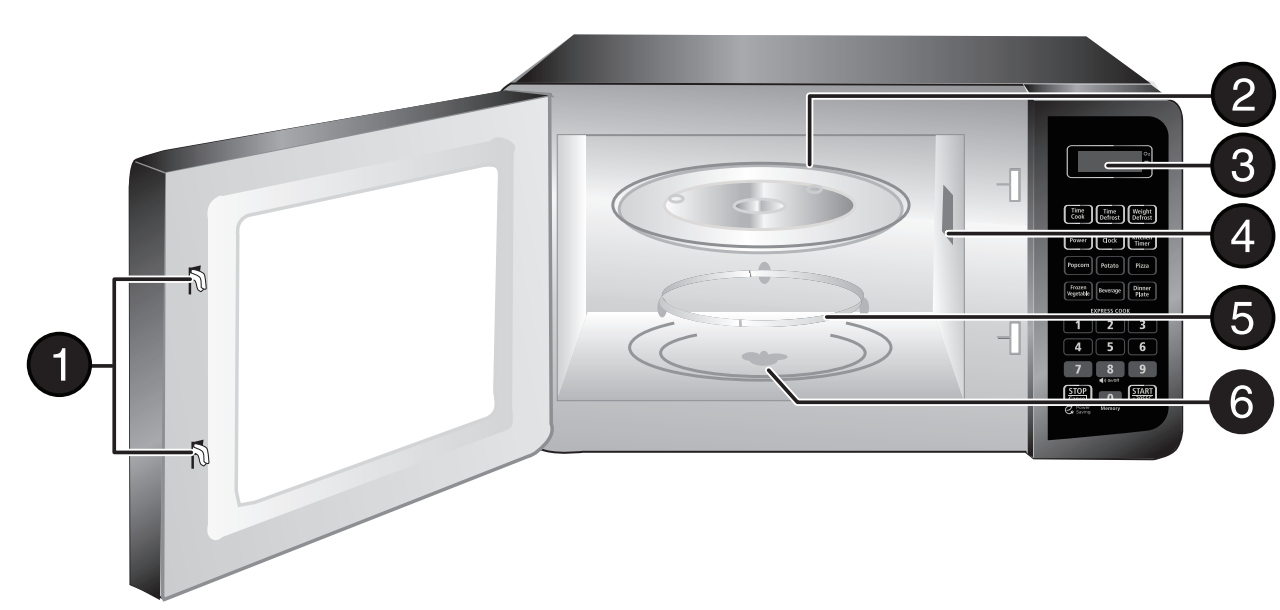
| # | ITEM | DESCRIPTION |
| 1 | Safety interlock system | Prevents the microwave from operating when the door is open. |
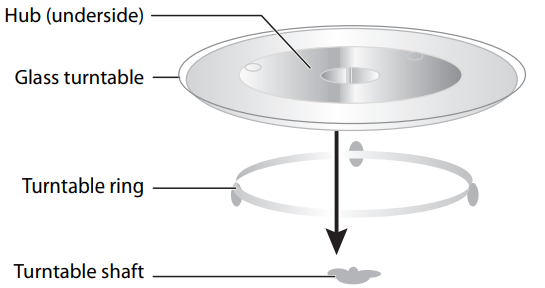
| 2 | Glass turntable | Allows food to cook evenly. |
| 3 | Control panel | Use to set cooking times and enter other information as needed. |
| 4 | Waveguide cover | Covers the waveguide. DO NOT REMOVE. |
| 5 | Turntable ring assembly | Allows the turntable to rotate to cook food evenly. |
| 6 | Turntable shaft | Rotates the turntable assembly. |
Control panel
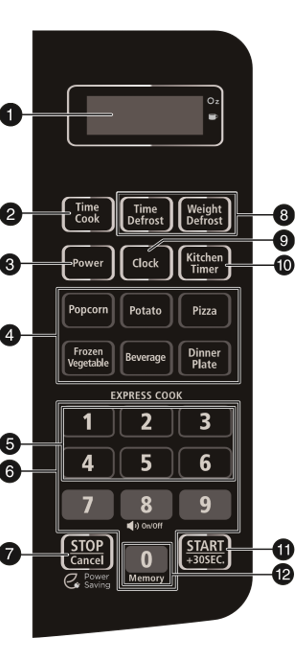
| # | ITEM | DESCRIPTION | |
| 1 | Display | In standby mode, it displays the time. In cooking mode, it displays cooking time, weight, and other information. | |
| 2 | Time cook | Press to set the amount of time you want to heat your food, then press the number buttons to enter the time you want (up to 99 minutes and 99 seconds). | |
| 3 | Power | Press to set the power level of your microwave, then press the number buttons to set the level you want (0-10). | |
| 4 | Auto menu | Press one of these buttons to automatically cook the item indicated. See “Cooking with the auto menu” on page 9. | |
| 5 | Express cook | In standby mode, press to quickly start cooking for 1 to 6 minutes. See “Cooking quickly” on page 9. | |
| 6 | Number pad | Press to enter cook time, defrost time, clock time, and other information. | |
| 7 | Stop/Cancel | Press to stop the cooking process. Press again to cancel the cooking operation. | |
| 8 | Defrost | Press Time Defrost, then enter the time you want for an item to defrost. See “Defrosting by time” on page 10. Press Weight Defrost, then enter the weight of the item you want to defrost. The cooking time is set automatically. See “Defrosting by weight” on page 10. | |
| 9 | Clock | Press to set or check the clock. See “Setting the clock” on page 8. | |
| 10 | Kitchen timer | Press this button, then enter the time you want to count down. See “Using the kitchen timer” on page 9. | |
| 11 | Start/Add 30 seconds | In standby mode, press this button to begin cooking. While cooking, press this button to add 30 seconds to the cooking time. | |
| 12 | Memory | Press repeatedly to choose a memorized procedure. |
Setting up your microwave oven
- Remove all packing material, protective film, and accessories. Do not remove the light brown Mica cover that is attached to the oven cavity to protect the magnetron.
- Check for any damage, such as dents or a broken door. Do not use the microwave if it is damaged.
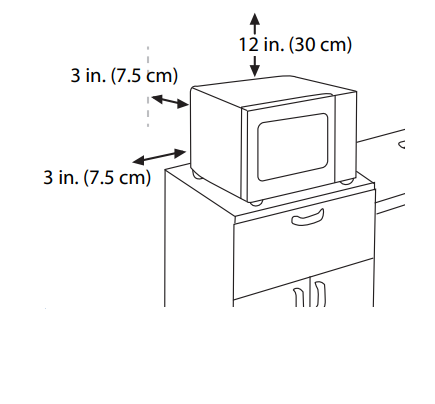
- Select a level surface that provides enough open space for the vents:

- Plug your microwave into a power outlet.
Installing the turntable
Setting the clock and the timer
- Press Clock. Your display shows “00:00”.
- Use the number pad to enter the current time (1:00–12:59), then press Clock to save the setting.
- The colon (:) flashes to count the seconds, and the clock is set.
- If the display shows “0:00”, the clock is not set.
Using the kitchen timer
- Press Kitchen Timer. The display shows “00:00” and the first digit flashes.
- Use the number pad to enter the time (up to 99 minutes and 99 seconds), then press START/+30SEC. When the time reaches 0, the buzzer rings.
Cooking with your microwave
Microwave cooking
- Press Time Cook, then use the number pad to enter the cooking time that you want.
- Press Power, then enter the power level that you want (0-10). The default power level is 100% (PL10).
Level 10 9 8 7 6 5 4 3 2 1 0 Power 100% 90% 80% 70% 60% 50% 40% 30% 20% 10% 0% Display PL10 PL9 PL8 PL7 PL6 PL5 PL4 PL3 PL2 PL1 PL0 - Press START/+30SEC to begin heating. The buzzer rings when the microwave is finished. OR
For multi-stage cooking, repeat steps 1-2 to program the second stage, then press START/+30SEC. The buzzer will ring between stages and automatically move on to the second stage.
Cooking quickly
- Press START/+30SEC to instantly cook something at 100% power for 30 seconds. OR
- Press 1-6 on the number pad to instantly cook something at 100% power for 1-6 minutes.
- To increase the time in 30-second increments, press START/+30SEC The maximum cooking time is 99 minutes and 99 seconds.
Cooking with the auto menu
- Press Popcorn repeatedly until the weight of your popcorn bag (1.75, 3.0, or 3.5 ounces) is shown on the display.
- Press START/+30SEC to start. The buzzer sounds once, then cooks your popcorn.
Potato
- Press Potato repeatedly until the number of potatoes you’re cooking (1-3) is shown on the display.
| AMOUNT | WEIGHT (APPROX.) |
| 1 potato | 8 oz. (227 g) |
| 2 potatoes | 16 oz. (453 g) |
| 3 potatoes | 24 oz. (680 g) |
- Press START/+30SEC to start. The buzzer sounds once, then cooks your potato.
Frozen vegetables
- Press Frozen Vegetable repeatedly until the weight of your vegetables (4.0, 8.0, or 16.0 ounces) is shown on the display.
- Press START/+30SEC to start. The buzzer sounds once, then cooks your vegetables.
Beverages
- Press the Beverage repeatedly until the number of cups (1-3) is shown on the display.
- Press START/+30SEC to start. The buzzer sounds once, then heats your drink
Saving a memory procedure
Memorized procedures let you save heating operations (cook time and power level) that you use often. You can save up to three procedures. 1 Press 0/Memory repeatedly to choose the memorized number (1-3) that you want to use.
- Press Time Cook, then use the number pad to end the cook time that you want.
- Press Power, then enter the power level that you want (1-10). The default power level is 100% (PL10).
Level 10 9 8 7 6 5 4 3 2 1 0 Power 100% 90% 80% 70% 60% 50% 40% 30% 20% 10% 0% Display PL10 PL9 PL8 PL7 PL6 PL5 PL4 PL3 PL2 PL1 PL0 - (Optional) If you want to add a second stage, repeat steps 2-3. You can only add two stages to a memorized procedure.
- Press START/+30SEC. The buzzer beeps, and the display shows the memorized procedure number.
- Press START/+30SEC again to run the procedure.
Cleaning and Maintenance
Cleaning the outside of your microwave
Exterior: The outside surface is precoated plastic. Clean the outside with mild soap and water, then rinse and dry with a soft cloth. Do not use any type of household or abrasive cleaner.
Door
Wipe the window on both sides with a damp cloth to remove any spills or spatters. Metal parts are easier to maintain if wiped frequently with a damp cloth. Avoid the use of spray and other harsh cleaners as they may stain, streak, or dull the door surface.
Control panel
If the control panel is dirty, open the microwave door before cleaning. Wipe the panel with a cloth dampened slightly with water only. Dry with a soft cloth. Do not scrub or use any sort of chemical cleaners. Close the door and press STOP/Cancel to clear any buttons you may have pressed.
Cleaning the inside of your microwave
Interior: Wipe with a soft cloth and warm water. Do not use abrasive or harsh cleaners or scouring pads. For baked-on food, use baking soda or a mild soap, then rinse thoroughly with hot water.
Waveguide cover
The waveguide cover is located on the side wall inside the microwave cavity. It is made from mi, c, and aso; it requires special care. Keep the waveguide cover clean to assure good microwave performance. Carefully wipe with a damp cloth any food spatters from the surface of the cover immediately after they occur. Built-up splashes may overheat and cause smoke or possibly catch fire. DO NOT REMOVE THE WAVEGUIDE COVER.
Removing odors
Occasionally, a cooking odor may remain in the microwave. To remove, combine one cup (.25 Lof ) of water, grated p, el and juice of one lemon, and several whole cloves in a two-cup (.5 L) glass measuring cup. Boil for several minutes using 100% power, then let it cool in the microwave. Wipe the interior with a soft cloth.
Turntable
Remove the turntable and wash it in mild, sudsy water. For stubborn stains, use a mild cleanser and non non-abrasive scouring sponge. You can also wash them in the top rack of a dishwasher. The turntable motor shaft is not sealed, so excess water or spills should be wiped up immediately.
Specifications
- Model: NS-MW09SS8
- Rated voltage: 120 V~60 Hz
- Rated input power (microwave): 1350 W
- Rated output power (microwave): 900 W
- Oven capacity: 0.9 Cu. Ft.
- Turntable diameter: 10.6 in. (27.0 cm)
- External dimensions (HxWxD): 11.5 x 19.1 x 14.8 in. (29.3 x 48.5 x 37.5 cm)
- Internal dimensions (HxWxD): 8.7 x 12.4 x 13.7 in. (22.1 x 31.4 x 34.7 cm)
- Certifications: UL approved
- Power cord length: 39.4 in. (1m)
- Net weight: 27.3 lbs. (12.4 kg)
Troubleshooting
| PROBLEM | POSSIBLE CAUSE | POSSIBLE SOLUTION |
| The microwave will not start | The electrical cord is not plugged in. | Plug in the electrical cord. |
| The door is open. | Close the door and try again. | |
| The wrong operation is set. | Check the instructions and try again. | |
| Arcing or sparking in the microwave | You are attempting to use incorrect materials in the microwave. | Use only microwave-safe materials. |
| You are attempting to use the microwave when it’s empty. | Do not operate the microwave when it’s empty. | |
| Spilled food remains in the microwave. | Clean the microwave with a wet towel. | |
| Unevenly cooked foods | You are attempting to use incorrect materials in the microwave. | Use only microwave-safe materials. |
| The food is not defrosted completely. | Defrost the food completely before attempting to cook it. | |
| The cooking time or power level is not adequate to cook the food. | Use the correct cooking time and power level. | |
| The food is not turned or stirred. | Turn or stir the food. | |
| Overcooked foods | The cooking time or power level is not adequate to cook the food. | Use the correct cooking time and power level. |
| Undercooked foods | You are attempting to use incorrect materials in the microwave. | Use only microwave-safe materials. |
| The food is not defrosted completely. | Defrost the food completely before attempting to cook it. | |
| The cooking time or power level is not adequate to cook the food. | Use the correct cooking time and power level. | |
| The microwave ventilation ports are blocked or restricted. | Make sure that the ventilation ports are not blocked or restricted. | |
Legal notices
FCC Statement
This device complies with Part 15 of the FCC Rules. Operation is subject to the following two conditions: (1) this device may not cause harmful interference, and (2) this device must accept any interference received, including interference that may cause undesired operation.
FCC Caution
Changes or modifications not expressly approved by the party responsible for compliance could void the user’s authority to operate this equipment.
EMC guidance
- Don’t use near active HF Insignia NS-GLSBFSCW1 Glass Scale surgical equipment or the RF shielded room of an ME system for magnetic resonance imaging, where the intensity of EM disturbances is high.
- Use of accessories, transducers, and cables other than those specified or provided by the manufacturer of this equipment could result in increased electromagnetic emissions or decreased electromagnetic immunity of this equipment and result in improper operation.
- Otherwise, degradation of the performance of this equipment could result.
One-Year Warranty
Definitions
The Distributor* of Insignia-branded products warrants to you, the original purchaser of this new Insignia-branded product (“Product”), that the Product shall be free of defects in the original manufacturer of the material or workmanship for one (1) year from the date of your purchase of the Product (“Warranty Period”).
How to obtain warranty service?
If you purchased the Product at a Best Buy retail store location or from a Best Buy online website, please take your original receipt and the Product to any Best Buy store. Make sure that you place the Product in its original packaging or packaging that provides the same amount of protection as the original packaging. To obtain warranty service, in the United States and Canada, call 1-877-467-4289. Call agents may diagnose and correct the issue over the phone.
Where is the warranty valid?
This warranty is valid only in the United States and Canada at Best Buy branded retail stores or websites to the original purchaser of the product in the country where the original purchase was made.
Customer Support
- Ph: 1-877-467-4289
- Website: www.insigniaproducts.com
INSIGNIA is a trademark of Best Buy and its affiliated companies. Distributed by Best Buy Purchasing, LLC 7601 Penn Ave South, Richfield, MN 55423 U.S.A.
©2021 Best Buy. All rights reserved.
FAQs
What type of microwave is the NS-MW09SS8?
Compact and featuring a digital control panel, the NS-MW09SS8 is a 0.9 cu. ft. countertop microwave oven that is perfect for use in offices, apartments, dorm rooms, and small kitchens.
What is the wattage of this microwave?
With its 900-watt operation, this machine provides effective heating for everyday duties like cooking, reheating, and defrosting.
How many power levels does this microwave offer?
With its 900-watt operation, this machine provides effective heating for everyday duties like cooking, reheating, and defrosting.
Can I mute the beeping sound?
Indeed! Press and hold the “0” button for approximately three seconds to turn off or turn on sound. You’ll hear a confirmation beep.
Why does moisture build up inside the microwave?
Condensation may result from steam from foods that contain a lot of moisture. This is typical. After use, just use a dry cloth to wipe the interior.
Is this microwave suitable for built-in installation?
No. Only the freestanding countertop type is available here. For adequate ventilation, leave at least 3 inches of space on all sides.
What does it mean when “LOC” appears on the display?
To unlock the control panel, hold down the “Stop/Cancel” button for three seconds.
Can I change the power level during cooking?
Indeed. To make adjustments even after you’ve selected the time, press Power Level, type the desired power (1–10), and then press Start.


