

Majority BARTON LED Display Digital Radio What’s In The Box
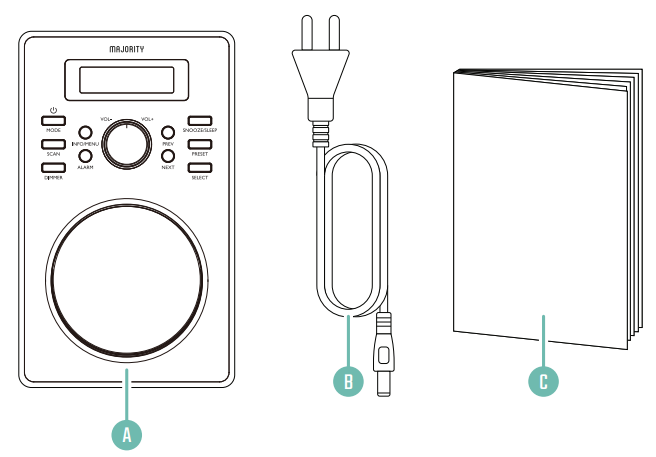
- Majority Barton Radio
- Power Supply
- User Guide
Front View
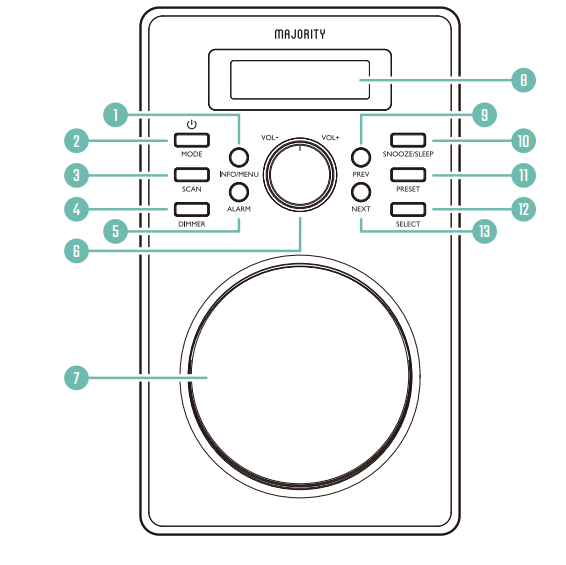
- Info/Menu
- Power/Mode
- Scan
- Dimmer
- Alarm
- Volume Up/Down
- Speaker
- Display Screen
- Previous
- Snooze/Sleep
- Preset
- Select
- Next
Rear View
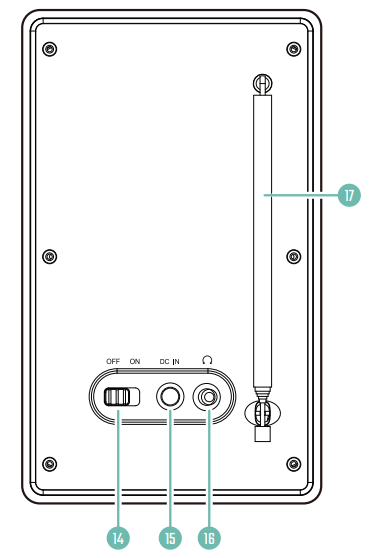
- On/Off switch
- DC power input
- Headphone jack
- Antenna
DAB
When the DAB radio is first switched on, it will automatically begin searching for and storing all stations with a good signal. In DAB/DAB+ mode, the radio will synchronize with the station’s time and date. If the radio does not search automatically, or if you wish to search for available stations again, press and release the “Scan” button (Ref. 3). Once the search is complete, the first available DAB station will play. To scroll through the stored stations, use the “Previous” (Ref. 9) and “Next” (Ref. 13) buttons. Press “Select” (Ref. 12) to listen to a station.
FM Scan Setting
The first time you switch to FM mode, the FM frequency “87.5 MHz” will be displayed on the screen. Choose between scanning for strong and weak signals (All) or only strong stations (Only). Press and hold the “Info/Menu” button (Ref. 1). Use the “Previous” or “Next” buttons (Ref. 9/Ref. 13) to navigate to “FM Scan Setting” and press the “Select” button (Ref. 12). Press the “Previous” (Ref. 9) or “Next” (Ref. 13) buttons to scroll between “All” and “Only.” Press the “Select” button (Ref. 12) to confirm your selection.
Manual Tuning
DAB/DAB+ Radio
When listening to a DAB/DAB+ radio station with a good signal, you can repeatedly press the “Info/Menu” button (Ref. 1) to display information about the different programs.
- Bit Rate: Displays the data rate at which the signal is transmitted.
- Bit Error Rate (BER): Provides details of the signal’s error rate.
- Channel and Frequency: Displays the transmission frequency and channel number of the station.
- PTY (Program Type): Displays the program type and description provided by the DAB station.
- Time and Date: Displays the date and time information provided by the broadcaster.
- Bit Rate: This is the data rate at which the signal is transmitted.
- Dynamic Label Segment (DLS): Displays the scrolling text information provided by the broadcaster.
How to Preselect a Station. To quickly access your favorite stations, you can preset them. Up to 10 different stations can be preset. To preset a station, first make sure it is currently broadcasting. While listening to a station, press and hold the “Preset” button (Ref. 11) for 2-3 seconds until the “Preset Store” settings open and “Preset Store <1: (Empty)” is displayed. Release the “Preset” button. Press the “Prev” (Ref. 9) or “Next” (Ref. 13) buttons to change the number you want to use to save the station. Press the “Select” button (Ref. 12) to save the station. Once saved, the display will show “Preset (x) stored.”
How to Play a Preset Radio Station
To play preset radio stations, press the “Preset” button (Ref. 11) to open the “Preset Recall” settings. Press and hold the button to open the “Preset Store” settings. Press the “Previous” (Ref. 9) or “Next” (Ref. 13) buttons to scroll through the preset stations from 1 to 10. Press the “Select” button (Ref. 12) to confirm your selection. The station will begin playing.
FM Radio
When listening to an FM radio station with a good signal, you can repeatedly press the “Info/Menu” button (Ref. 1) to display information about the different programs.
- Signal Strength: Displays a signal strength bar for the current station.
- Time and Date: Displays the time and date.
- Frequency: Displays the station’s transmission frequency.
- Audio Type: Displays the audio type of the station you are listening to. It will be stereo or mono.
- Radio Text: Displays the scrolling text information provided by the broadcaster.
- Program Type: Displays a description of the program type provided by the broadcaster.
Once the radio is in DAB/DAB+ mode, the time and date should adjust automatically. If this does not happen, or if you wish to change the time and date, follow these steps.
Manually Setting the Date and Time
To access the radio settings, press and hold the “Info/Menu” button (Ref. 1). Use the “Previous”/”Next” buttons (Ref. 9/Ref. 13) to navigate to “Time/Date” and press the “Select” button to confirm your selection (Ref. 12). The time will flash on the display.
- Press the “Alarm” button (Ref. 5) once for the first alarm (Alarm 1) or twice for the second alarm (Alarm Press the “Select” button (Ref. 12) to confirm the alarm you wish to set.
- Once alarm 1 or 2 is selected, the display will show the word “OFF”. To activate the alarm, use the “Next” button (Ref. 13). The word “ON” will now flash on the display. Press the “Select” button (Ref. 12) to confirm your selection.
- The alarm time digits will flash. To set the time you want the alarm to sound, press the “Previous” or”Next” buttons (Ref. 9/Ref. 13) to change the time and press “Select” (Ref. 12) to confirm. 4. Use the”Prev” or “Next” buttons (Ref.9/Ref.13) to edit the minutes and press the “Select” button (Ref.12) to confirm the change.
- Select the alarm frequency using the “Previous” or “Next” buttons to scroll through the alarm options: “Once/Daily/Weekends/Weekdays,” i.e., once, on weekends, or weekdays. Press the “Select” button to confirm your selection.
- Adjust the alarm volume by pressing the “Previous” or “Next” buttons (Ref. 9/Ref. 13). Press the”Select” button (Ref. 12) to confirm your selection.
- You can now choose the alarm sound. Press the “Previous” or “Next” buttons (Ref. 9/Ref. 13) to select the alarm sound: Alarm, DAB (DAB radio), or FM (FM radio), and press “Select” (Ref. 12) to confirm.
How to Cancel Alarm 1 or 2
To cancel the alarm, press the “Alarm” button (Ref. 5) once for the first alarm (Alarm 1) or twice for the second alarm (Alarm 2). Press the “Select” button (Ref. 12) to confirm the alarm you wish to cancel. To deactivate the alarm, press the “Next” button (Ref. 13) until “OFF” flashes on the display, and then press the “Select” button (Ref. 12) to confirm.
Snooze/Disable the Alarm When It Is Sounding
When the alarm sounds, press the “Snooze/Sleep” button (Ref. 10) to snooze it for 9 minutes. The radio will then enter standby mode. To completely disable the alarm when it sounds, press the “Power/Mode” button (Ref. 2).
Sleep Timer Setting
This allows you to program the radio to turn off at a specific time, up to 120 minutes after being turned on. Press the “Snooze/Sleep” button (Ref. 10). Set the sleep timer duration using the “Prev” and “Next” buttons (Ref. 9/Ref. 13): OFF/5 min/15 min/30 min/45 min/60 min/90 min or 120 min. When your selection is displayed, press the “Select” button (Ref. 12). The system will automatically start the timer. To turn off the sleep timer, follow the instructions above and select “OFF”. Once the timer has been set, a countdown of the minutes will begin on the display. For example, if it’s set to turn off in 5 minutes, it will flash “S5” in a countdown to “S0”, when the radio will enter sleep mode.
System Reset
To erase all preset settings and options, perform a factory reset. This is also recommended if you are experiencing any functionality issues with your radio. To perform a factory reset, press and hold the “Info/Menu” button (Ref. 1). Use the “Previous” or “Next” buttons (Ref. 9/Ref. 13) to select “Factory reset” and press the “Select” button (Ref. 12) to confirm your selection. The display will show “Factory reset?”. To confirm, use the “Next” button (Ref. 13) to select “Yes”. Press the “Select” button (Ref. 12) to begin the factory reset.
Software Version: Displaying the Software Version
To view the software version, press and hold the “Info/Menu” button (Ref. 1). Use the “Previous” or “Next” buttons (Ref. 9/Ref. 13) to navigate to “Software Version” and press the “Select” button (Ref. 12) to confirm your selection. The software version will be displayed.
Dimmer
Press the “Dimmer” button (Ref. 4) repeatedly to cycle through the low, medium, and high brightness settings. The “Scan/Dimmer” button can be used in both standby and operating modes.
Regulatory Information
FCC Compliance Statement: This device complies with part 15 of the FCC Rules. Operation is subject to the following two conditions:
- This device may not cause harmful interference, and
- This device must accept any interference received, including interference that may cause undesired operation
This equipment generates, uses, and can radiate radio frequency energy and, if not installed and used in accordance with the instructions, may cause harmful interference to radio communications. However, there is no guarantee that interference will not occur in a particular installation. Increase the separation between the equipment and receiver. Consult the dealer or an experienced radio/TV technician for help.
FCCRadiation Exposure Statement
This equipment complies with FCC radiation exposure limits set forth for an uncontrolled environment. This equipment should be installed and operated with a minimum distance of 20cm between the radiator & your body.
Warranty
All products come with a standard 12-month warranty. All items must be registered within 30 days of purchase for the warranty to be valid. Once on the web page, use the menu to find ‘Register Your Product’. You will also be given the chance to extend your warranty for an additional 24 months, free of charge.
Customer Support
- Website: www.majority.co.uk