


![]()
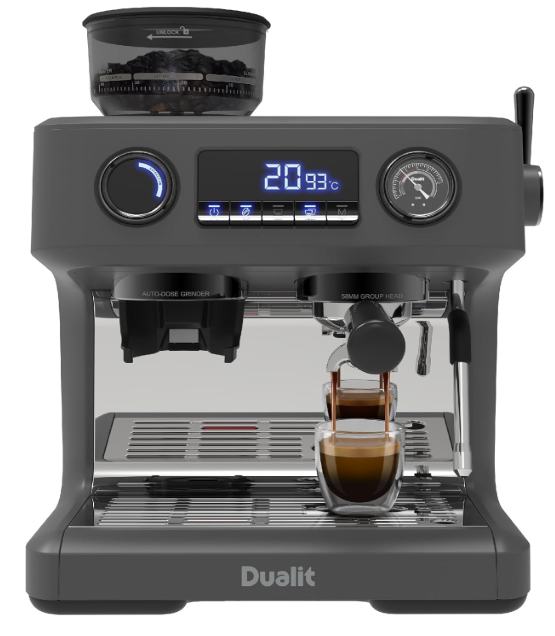
Dualit Espressivo Pro 2.8 L Coffee Machine
Safety Instructions
- Do not leave the appliance unattended during use; unplug after each use.
- Risk of fire if an unattended appliance is left operating or plugged in.
- Close supervision is necessary when any appliance is used by or near children.
- Children shall be supervised to ensure that they do not play with the appliance.
- Keep the appliance and its cord out of reach of children less than 8 years old.
- Risk of fire, electric shock, scalding or injury.
- Check that the voltage marked on the appliance corresponds to the supply voltage.
- Use this product with a rated voltage A.C. outlet only. Risk of electric shock and fire.
- Never use the plug without the fuse cover fitted.
- Ensure the replacement fuse is the same current value
- as the original. Replacement fuses are available and should be ASTA-approved to BS1362.
- Failure to do this may cause an overload, trip a circuit breaker or blow a fuse.
- Risk of electric shock and fire, or damage to the socket/outlet and plug.
- The socket/outlet should be protected by a Residual Current Device (RCD)
- Unplug the unit when not in use, before fitting or removing parts and before cleaning.
- To unplug it, hold the plug and pull it out of the socket. Never pull it out by the power cord.
- Do not use in the bathroom or outdoors. Do not operate on an uneven surface.
- The appliance must only be operated on a flat, horizontal surface.
- Do not store or use in an appliance garage or under cupboards.
- The use of accessory attachments is not recommended by Dualit.
Overview

Before First Use
- Read this instruction manual before you start using the appliance.
- It gives you important safety information and will ensure you get the most out of your Dualit product.
- Keep this manual and your proof of purchase in a safe place.
- Unpack the box with care, keeping all the packaging materials until you are satisfied that everything is present and in working order.
- Once satisfied, remove all packaging and tags from the appliance body and recycle the packaging appropriately. Do not remove tags from the cord. You may wish to keep the box to store your appliance.
Function Indicator


Limescale Build Up
Before Use – Know Your Water Hardness:
Confirm the hardness of your water with your local water company or use the quick reference map as a guide. If you are unable to establish the water hardness of your area or require further support, contact

 Water Softeners
You must use a Water Softening Bag in medium and hard water areas, but Dualit recommends that these be used in all areas. Scan the QR code to purchase. Follow the manufacturer’s instructions for use and replace according to the Water Hardness Table above.
Descaling

Always clean your machine before descaling; see page 28 for cleaning instructions. Dualit recommends using a specific limescale-removing solution; coffee machine cleaners will not descale your machine. Scan the QR code to purchase. Descale your appliance regularly according to the Water Hardness Table, in a well-ventilated area to prevent limescale buildup in the machine. See full descale instructions on page 33
Setting Up
Remove all packaging, tape and protective paper.
- This will only take 60 seconds. You will need the product model and serial numbers that are on the rating label on the base of the product.
- Check that all the accessories and attachments are complete and not damaged.
- Ensure that the machine is unplugged. Wash the Hopper Lid, Water
- Tank, Drip Tray, Portafilter and Cup Filters in warm, soapy water. Rinse and dry thoroughly.
- Wipe the Bean Hopper with a damp cloth.
- Remove the red seal from the Water.
- Valve by pulling the tab and check that there is no other packaging inside. Replace the Water Tank.

- If it is not correctly aligned, push the Tab in the direction shown until it is in the correct position.
- Ensure the Grind Inlet is correctly aligned before attempting to attach the Bean.
- Check that there are no foreign bodies in the Bean Hopper.


Use
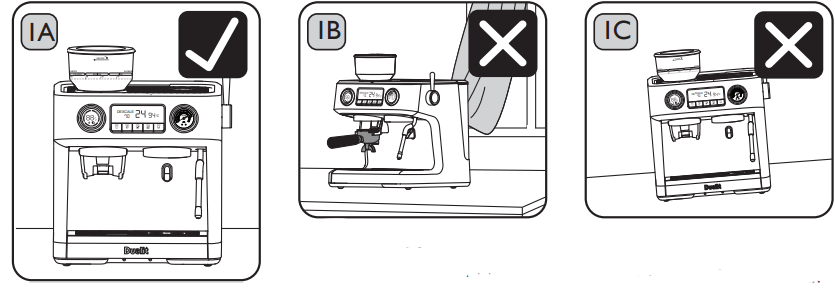
Position in a safe space away from:
- Heat sources. Risk of electric shock and fire.
- Water taps. Risk of electric shock. Do not position:
- In a cupboard or appliance garage. Risk of fire.
- Close to curtains or flammable material. Risk of fire.
- On a tray that collects liquid. Risk of electric shock. Do not position:
- On a polished wood, marble or porous surface. Risk of property damage.
- The surface must be flat to keep the machine level and stable. Risk of injury

- Ensure that the Steam/ Hot Water Lever is in the “OFF” position.
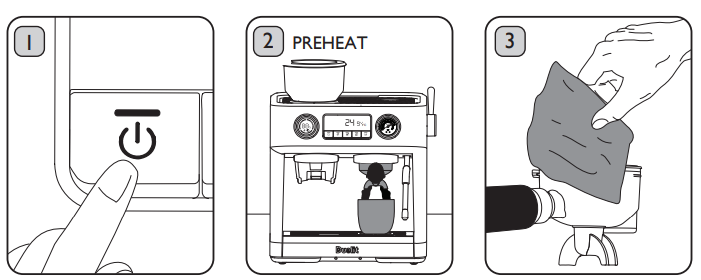
- Plug in the Power Cord and press the Power Button. The Grind Button will illuminate.
- The Power Button and Function Indicator will flash for up to 1 minute to indicate you’re in Preheat mode.

- Once Preheating is complete, the appliance will enter Standby mode (indicated by all buttons illuminating) and is ready to use. Position the Steam Wand in the Milk Jug.
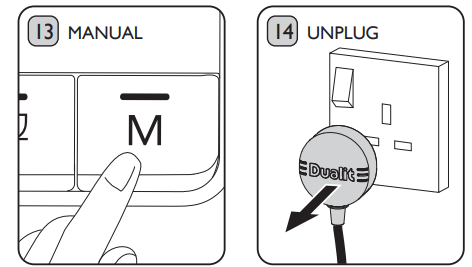
- Place a cup under the Portafilter and press the Double Cup Button to dispense water through the Portafilter and clean the internal pipework.

Dialling
There are lots of different factors that influence grind settings and dosing amounts: coffee origins, roast colours and whether you are using a Single or Double Cup Filter. Lighter roasted beans will often need a finer grind setting than darker roasts.
- Fill the Water Tank with fresh water; do not go above the “MAX” mark. You will see air bubbles at the connection when correctly located. Plug in the Power Cord and press the Power Button once.
- The appliance will beep once, and the Display will illuminate. Avoid letting the Water Tank run empty.

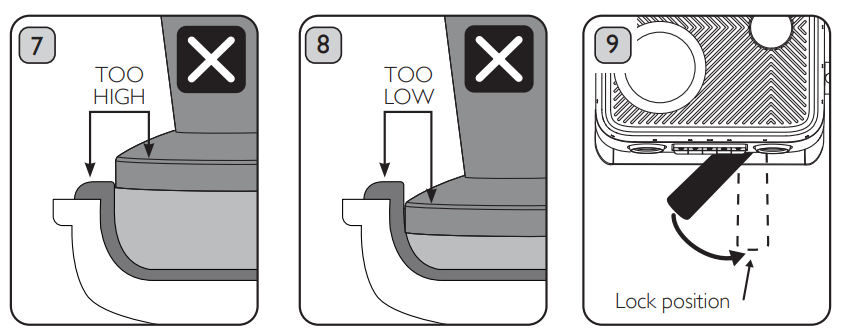
- Remove the Portafilter and level the coffee grounds in the Cup Filter by gently tapping on the work surface or using your finger. If the Tamper is sitting too high, there is too much coffee.
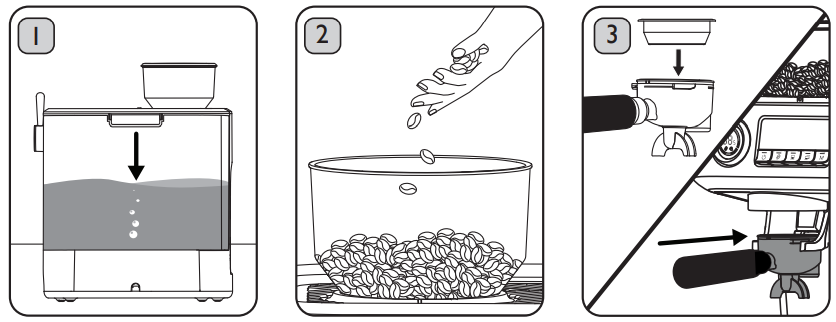

- If the Headroom Guide sits below the top of the Cup Filter, there is too little coffee.
- Increase the grind time by 1 second and grind again.
- Keep adding 1 second at a time until the Headroom Guide aligns with the top of the Cup Filter.
Extraction

- Flow starts within 1-3 seconds
- Fast flow like running water
- Extraction takes less than 20 seconds
- Thin, pale crema or no crema at all
- Very pale brown espresso
- Tastes weak and/or watery
- Coffee puck is wet and/or sloppy
- Flows start in 4-7 seconds
- Slow, steady flow of coffee
- Extraction takes between 20 and 40 seconds
- Crema is dense and a walnutty colour
- Dark brown espresso
- Tastes like a strong espresso
- The coffee can be knocked out in one piece
- Flows start after 8 seconds
- Slow drips or no flow at all
- Extraction takes more than 40 seconds
- Patchy crema or no crema at all
- Very dark brown espresso
- Tastes bitter and/or burnt
- The coffee puck is dry and hard to remove
Tamping
- Along with grind size and weight of coffee, tamping is used to control the extraction time.
- The tighter you compact the coffee cake, the longer the extraction.
- If the cake is not compressed, water will flow through the less dense areas or gaps in the grounds, resulting in a weak, flavourless espresso.

Tamper
Your Dualit Tamper is made of Stainless Steel and is used to compact the ground coffee in your Portafilter. Use approximately 2.5kg of pressure to tamp your ground coffee.

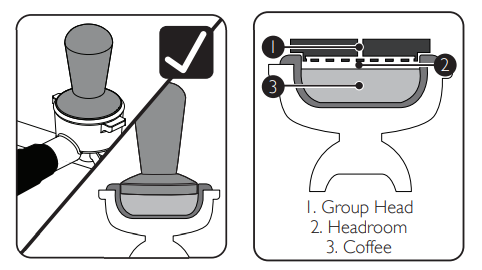
Headroom
The Tamper has a Headroom Guide to help ensure that the thickness of the ground coffee is consistent and the surface is level. This is essential to prevent the water from finding the easiest way through the ground coffee, resulting in a weak espresso. When tamping, the Headroom Guide should be level with the top of the Cup Filter.
Plate
This is the most important part of the Tamper. It comes into contact with the ground coffee and creates a smooth, flat surface when you apply downward pressure.
Making Coffee
Follow these steps when you have dialled in the Grinder, and you are happy with the espresso.
- Fill up the Water Tank if required. Plug in the Power Cord and press the Power Button once.
- The appliance will beep once, and the Display will illuminate

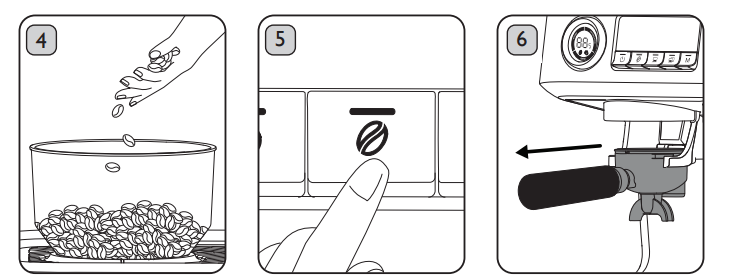
- Top up the Bean Hopper with fresh beans if required and secure the Lid.
- Remember to only grind what you need.

- Place the Portafilter so that the Rubber End Stop is resting on the edge of the work surface.
- Place the Tamper into the Cup Filter, gently pressing downwards.
- Stop when the Headroom Guide is level with the top of the Cup Filter.

- Remove the Tamper and clean any excess coffee grounds from the rim of the Cup Filter.
- The Display will count up the extraction time and stop automatically when the dose is reached.

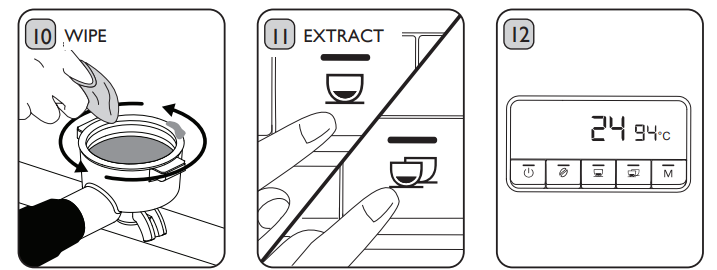
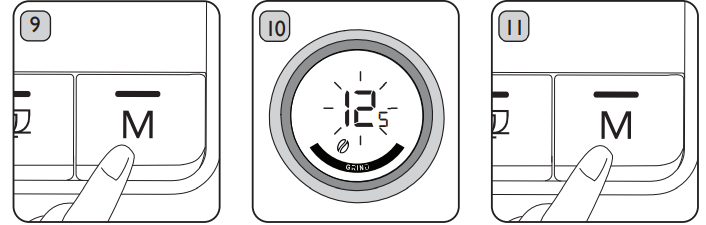
- To extract coffee manually, press the Manual Dosing Button once.
- Press again when you wish to stop the extraction.
- Switch off and unplug the appliance once you have finished using it. Risk of fire.
- If you are frothing milk, continue to page 25

Changing the Presets
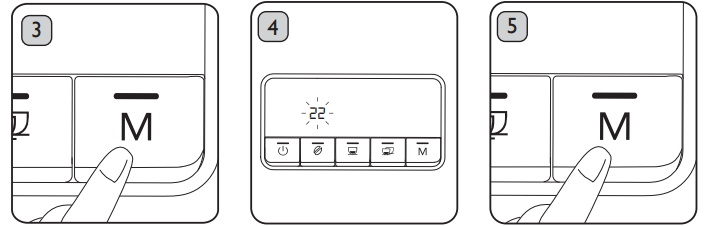
It is possible to adjust the pre-brew water volume, pre-brew time, extraction temperature and extraction water volume of both the Espresso and Double Espresso functions, as well as the grind time by following these steps.
The extraction temperature will flash on the Display Panel. Press the Espresso Button to decrease the temperature by 1°C per press. Press the Double Espresso Button to increase the temperature by 1°C per press. The temperature range is 88°C to 96°C.

- Press the Manual Dosing Button once to confirm the temperature.
- The appliance will beep once.

- The pre-brew time will flash on the Display Panel. Press the Espresso Button to decrease the time by 1 second per press. Press the Double Espresso Button to increase the time by 1 second per press.

- Press the Manual Dosing Button once to confirm the extraction water volume.
- The appliance will beep once. You have now completed the cycle, and the appliance is ready to use.

Frothing Milk
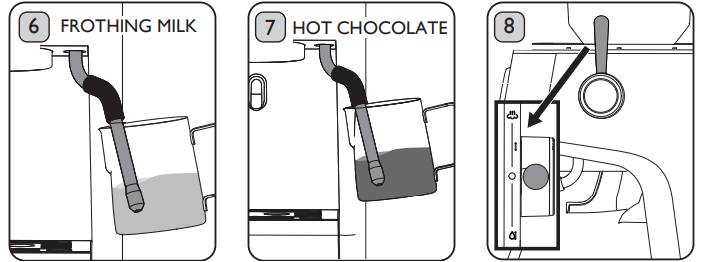
For best results, Dualit recommends chilling the Milk Jug before use and using fresh, semiskimmed milk straight from the fridge. Barista-grade plant-based, skimmed, and full-fat milk may also be used.
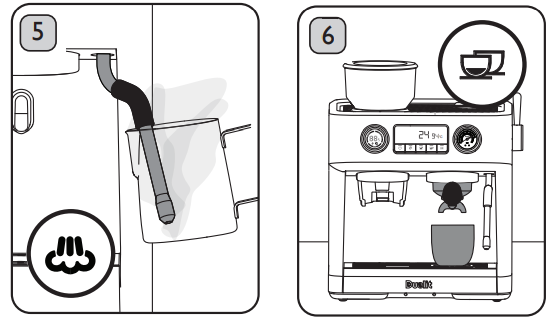
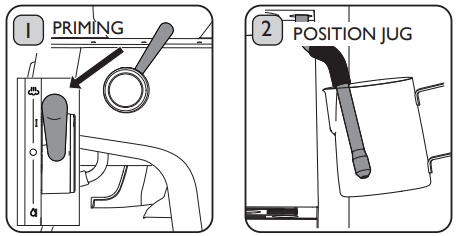
- If you are using the appliance from a cold start, e.g. the first use of the day/just switched on, prime the Steam Wand by turning the Steam/Hot Water Lever to the Steam position. Run the steam for 3 to 5 seconds before turning to the “O” position.
- To heat the milk only, leave the Steam Wand positioned well under the surface of the milk. Do not move the Milk Jug. Caution: Never allow the milk to boil. Risk of scalding

- To stop steaming/frothing, turn the Steam/Hot Water Lever to the “O” position.
- Ensure steaming has stopped before removing the Steam Wand from the Milk JugJugisk of scalding.

- Once you have finished using the appliance, turn off the Power Button and unplug or continue to the next step. Risk of fire.
Dispensing
The appliance has a separate Hot Water Tap dispensing instant hot water. Use for pre-warming cups, topping up hot drinks, making herbal teas or filling a teapot. The temperature of the water dispensed will be between 80°C and – 85°C.
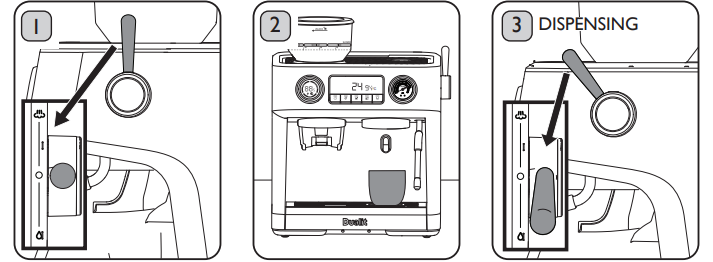
- Once the Power Light flashes and the machine beeps twice, turn the Steam/ Hot Water Lever to the “O” position to stop the water flow.
- Once you have finished using the appliance, turn off the Power Button and unplug or continue to the next step. Risk of fire
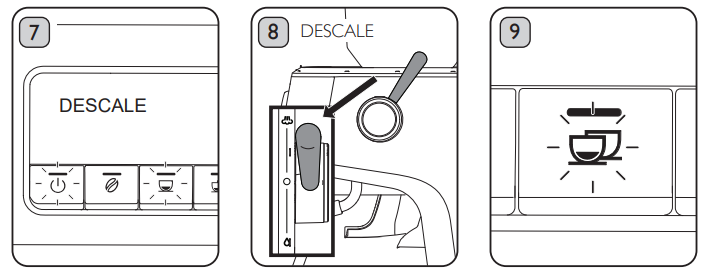
Cleaning
AFT EACH USE
Before cleaning, ensure that the appliance is switched off, unplugged and allowed to cool. Risk of electric shock, burns and scalding. All attachments and accessories should be hand-washed; not suitable for dishwashers.
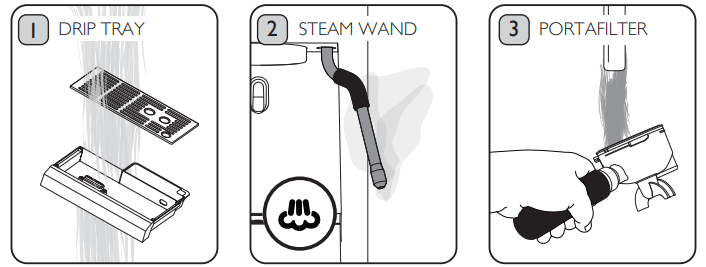
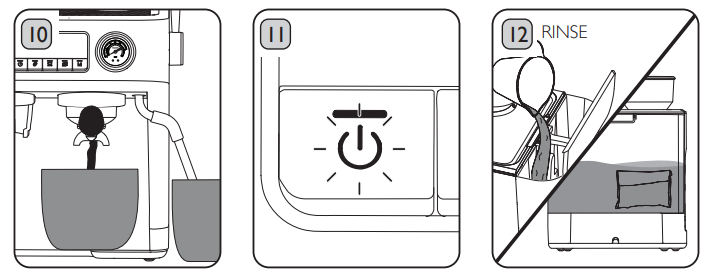
- Empty and clean the Drip Tray regularly. Spoon out any solid matter first to avoid blocking drains and discard or add to your compost.
- Whenever the Drip Tray Indicator is visible, empty it immediately. Rinse after each use.
- Wash the Portafilter and Cup Filters under running water to remove any dried coffee

Changing Beans
Before cleaning, ensure that the appliance is switched off, unplugged and allowed to cool. Risk of electric shock, burns, scalding and injury
- Refit the empty Bean Hopper and set it to a coarse grind. Plug in the machine and switch it on.
- Place a container under the Grind Outlet and press the Grind Button.
- Stop the Grinder when there is no more coffee to grind.
- This will grind only the remaining beans in the Burr.

- Use the Cleaning Brush to remove any coffee from the Upper Burr.

- Use the Cleaning Brush to sweep away any excess coffee into the Grind Outlet.
- Use a circular motion to remove all debris in the Ground Inlet and around the Clip.

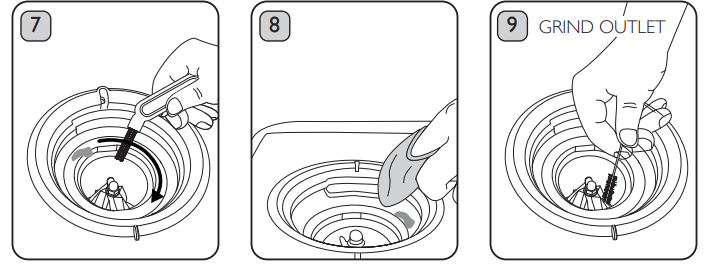
- If the Hopper does not fit, lift it off and check that the Upper Burr is in the correct position – adjust and re-fit Hopper.
- Use the thicker Cleaning Pin to remove dried milk from the Steam Tube.

- You will know when it is fitted correctly as it sits flush with the surrounding surfaces.
- Use the Cleaning Brush to remove any coffee build-up on the Cup Filters.


Deep Clean
Before cleaning, ensure that the appliance is switched off, unplugged and allowed to cool. Risk of electric shock, burns and scalding.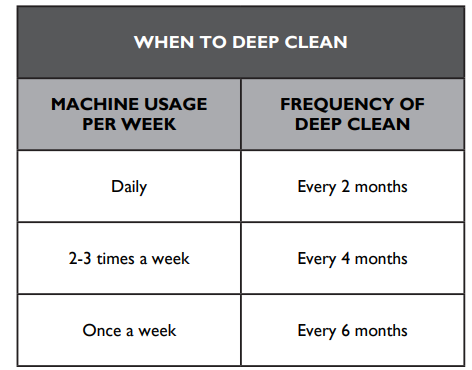
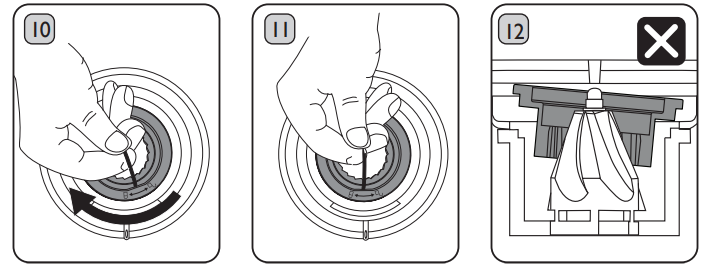
Remove the Drip Tray. Using a Philips screwdriver (PH2), remove the screw from the centre of the Filter Plate.
- Wipe the Group Head with a damp cloth to remove stubborn coffee build-up. Dry thoroughly
- Place the O-Ring into the Large Filter Plate, then place the Small Filter Plate as shown.
- Position the assembled Plates back into the Group Head, rethread the screw and tighten


Descaling
The Descale Indicator will flash when 40 litres of liquid have been dispensed (approximately 1100 espressos or 160 cups). The appliance must be descaled when 50 litres of liquid have been dispensed (approximately 1400 espressos or 200 cups). The Descale Indicator will illuminate solidly, and the appliance will not operate. Follow the steps to activate the Descale programme. The descaling process will take approximately 15 minutes.
- The Descale Indicator will be flashing to warn that descaling is due, or illuminated solidly to indicate the appliance is in lockdown and will not operate.
- Fill the Water Tank with a minimum of 1.5 litres of water and the recommended amount of descaler (see the instructions on your descaler)

- Press the Power Button to switch the appliance on. Press and hold the Double Cup and Manual Buttons at the same time until the appliance beeps once.

- The Group Head will dispense approximately 500ml and the Steam Wand 350ml. This will take approximately 2 minutes. When complete, the Double Cup Button will flash. Risk of chemical inhalation
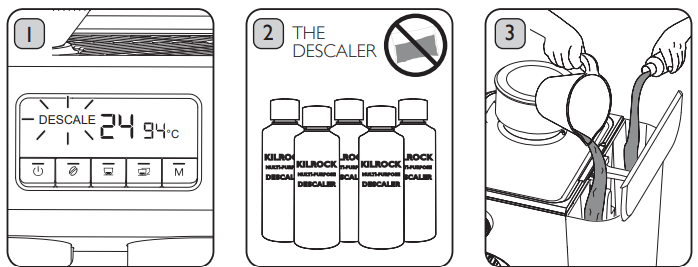
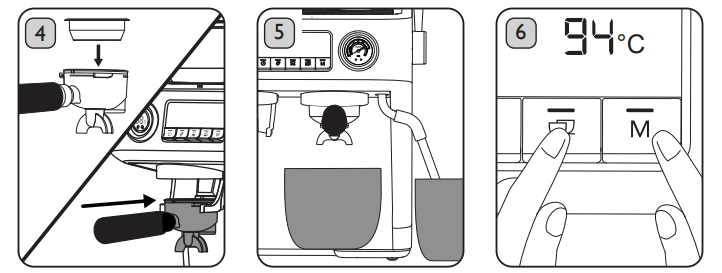
- Thoroughly rinse the Water Tank and fill with fresh water. Repeat steps 6 to 11 with water only to remove any trace of descaling solution. Replace the Water Softening Bag and refill the Water Tank with fresh water.
- The Power Button will illuminate, and the Single Cup Button will flash. You have activated the Descale programme.


Troubleshooting
| POSSIBLE CAUSE(S) | SOLUTION(S) | ||||
| MY COFFEE IS WEAK | |||||
| 1. You have not put enough coffee into the Cup Filter, or the coffee grind is too coarse. | 1. Follow the instructions on page 14 to dial in the Grinder. | ||||
| 2. You like your coffee extra strong. | |||||
| 2. Use a stronger blend or darker roasted beans. | |||||
| 3. The top of the tamped coffee is not level. | 3. Follow the instructions on page 18 to tamp the coffee correctly. | ||||
| MY COFFEE IS TOO STRONG | |||||
| 1. The volume being dispensed into my cup is too low. | 1. Follow the instructions on page 14 to dial in the Grinder. | ||||
| 2. You like your coffee weaker. | 2.1 Add extra water or milk to your coffee. | ||||
| 3. Coffee has been tamped too hard. | 3. Follow the instructions on page 18 to tamp the coffee correctly. | ||||
| MY COFFEE HAS NO CREMA | |||||
| 1. Essential oils have built up in the Cup Filters and Portafilter. | 1. Follow the instructions on pages 28-32 to clean the appliance. | ||||
| 2. Incorrect amount of coffee and/or unsuitable grind size is used. Coffee has not been tamped correctly. | 2. Follow the instructions on page 14 to dial in the Grinder. | ||||
| 3. Your beans are damp or not fresh. | 3. Use fresh coffee beans only. Once opened, store in an airtight container and use within a week. | ||||
| 4. Different coffee beans produce different amounts of crema. | 4. Try different flavours or roasts of whole coffee beans until you are satisfied with the results. | ||||
| THE APPLIANCE IS VIBRATING DURING USE | |||||
| 1. The appliance has a powerful pump that can cause vibrations. | 1. Unplug the appliance and remove the Water Tank. Ensure the machine is placed on a flat, even surface. | ||||
Guarantee
This appliance is of excellent quality and construction. However, if any defects in materials or workmanship do appear during the relevant guarantee period, we will, at our discretion, either repair or replace the defective parts, free of charge, subject to the terms and conditions of our Guarantee shown below
This Guarantee covers both parts and labour. Carriage is not included. Your Guarantee period is as follows:
- 1 year.. This Guarantee provides benefits which are additional to, and do not affect, your statutory rights. This Guarantee does not cover the cost of returning the product to the dealer from whom it was purchased or touss. This Guarantee applies only to products sold and located in mainland Great Britain. It does not cover liability in respect of or replacement of plugs, cables or fuses and also does not cover defects due to:
- Failure to use or maintain the product in accordance with Dualit’s instructions.
- Accidental damage to or abuse or misuse of the product.
- Product modification except by Dualit or an approved agent.
- Dismantling of or interference with the product.
- Theft or attempted theft of the product. Before returning any product under his Guarantee, please check that:
- You have followed the product instructions correctly.
- Your mains electricity supply is functional.
- The defect is not due to a blown fuse. If you wish to claim under this Guarantee, you should:
- Ensure that the product is clean and packed carefully (preferably in its original carton).
- Give exact details of the nature of the defect.
Customer Support
- Tel: +44 (0)1293 652 500
- Timings: (09:00 to 17:00 Monday to Friday).
- Website: www.dualit