


![]()
Bose DesignMax DM8SE Surface Loud Speaker
Safety instructions
- Keep the product away from fire and heat sources. Do not place naked flame sources, such as lighted candles, on or near the product.
- Do not make unauthorised alterations to this product.
- The DesignMax DM8SE wall-mounting bracket is only for use with the model DM8SE.
- Exposure to such substances can lead to degradation of the plastic material, resulting in cracking and creating a falling hazard.
- Clean speakers using only a dry cloth. Do not expose the loudspeaker to soap, detergent, mineral oil, alcohol, or other cleaning agents or chemicals.
- Avoid touching uninsulated wiring or wiring terminals.
- This product’s audio wiring terminals carry voltage that can result in discomfort upon contact.
- Do not block any ventilation openings. Install in accordance with the manufacturer’s instructions.
- Do not install near any heat sources such as radiators, heat registers, stoves, or other apparatus (including amplifiers) that produce heat.
- Only use attachments/accessories specified by the manufacturer.
Package Contents
 Installation Options and Accessories
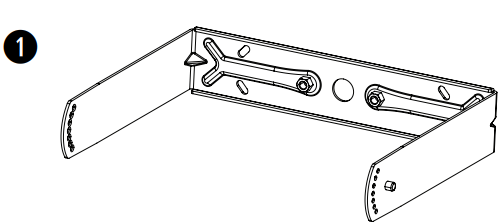
- U-bracket (included)

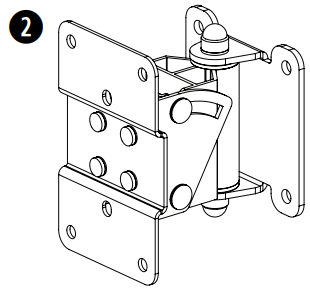
- Surface-Mount Pan and Tilt Bracket

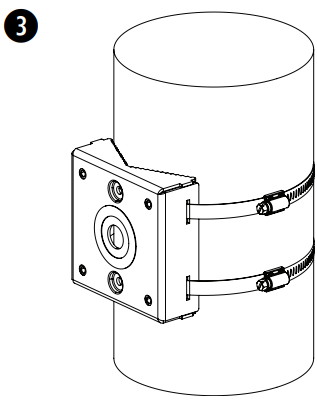
- Pole Mount Bracket
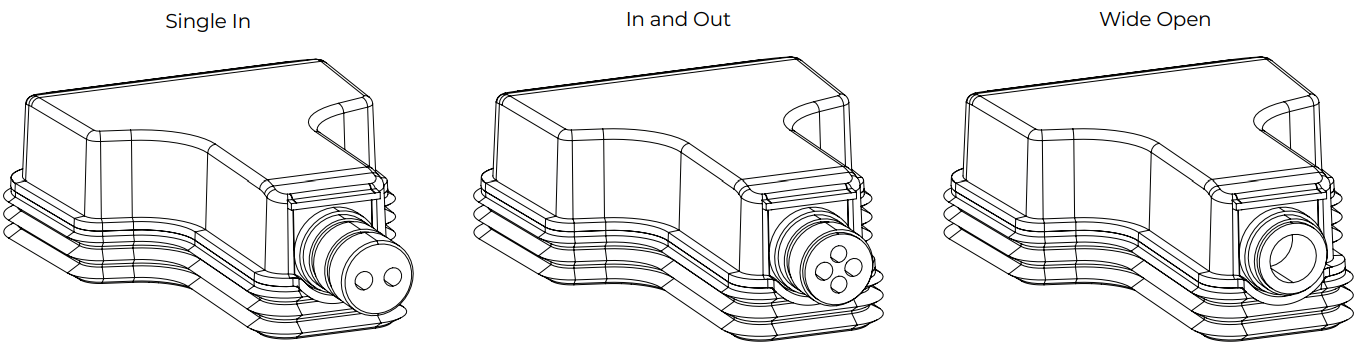
Weather-resistant Input Cover
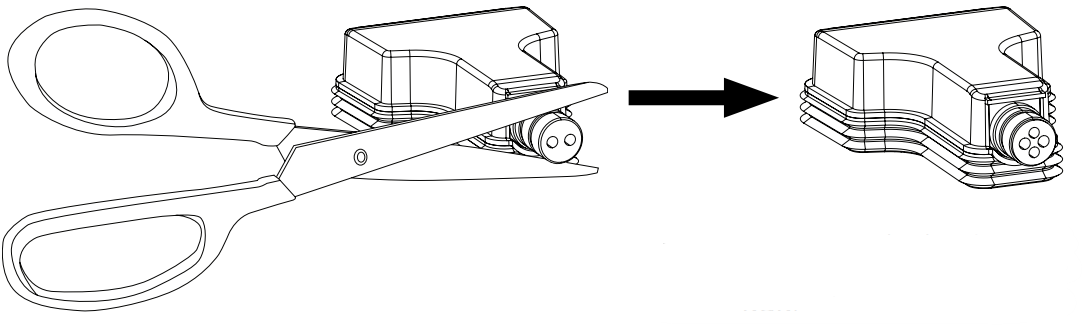
The weather-resistant input cover is designed for three different wiring scenarios (see above). To change the
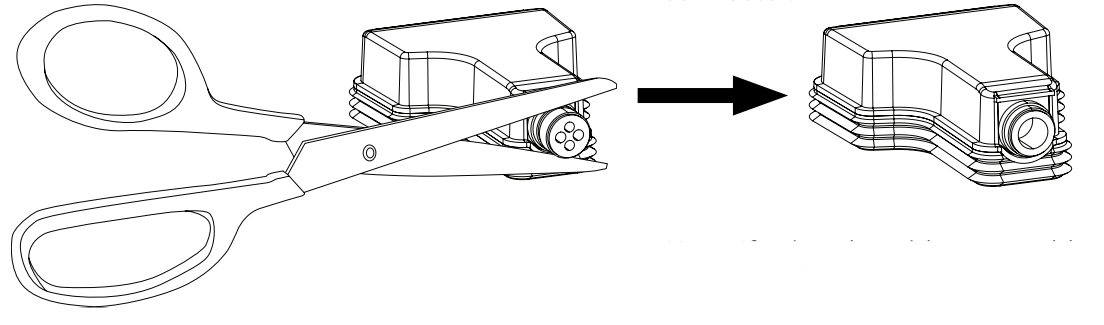
configuration of the input cover to support your wiring scenario, cut along the perforation on the rubber conduit.
If installing the loudspeaker with the rubber conduit facing upward, it is the installer’s responsibility to seal against water ingress into the Euroblock connector.
If using the wide open rubber conduit configuration, it is the installer’s responsibility to seal against water ingress into the Euroblock connector.
 Wire Gauge
The DesignMax DM8SE loudspeaker is designed to work with
- 18 AWG (0.8 mm2 ) to 14 AWG (2.1 mm2 ) size wire only.
Connection Diagrams
Expose six millimetres (1/4 inch) of bare wire to attach to the terminals.
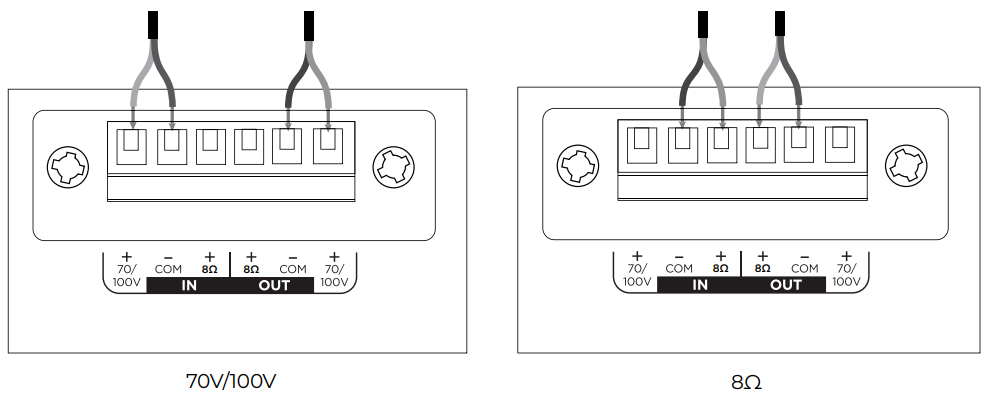
The loudspeaker is not rated for use with a rigid conduit. The loudspeaker is suitable for a flexible conduit or wiring connection only.
Loudspeaker Settings
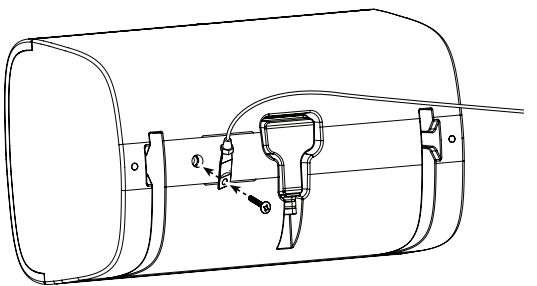
Using a Safety Cable
- Some regional construction codes require the use of a secondary method of securing loudspeakers to support structures to provide additional safety. Choose a mounting position, method, and hardware consistent with local building codes and regulations.
- A safety cable can be attached to the loudspeaker using the threaded insert on the back of the enclosure.
- The insert is sized for an M8 screw (not included) with a depth of 20 millimetres (0.79 inches).
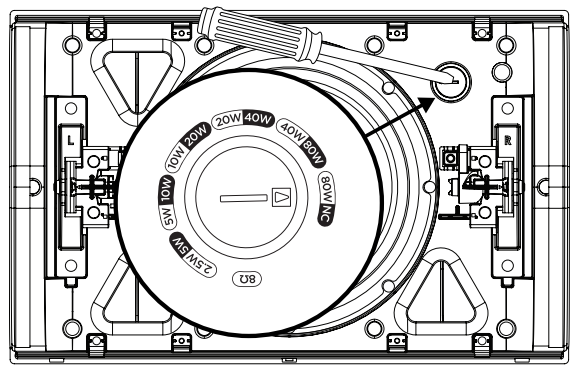
| 70V | ||||||
| 2.5W | 5W | 10W | 20W | 40W | 80W* | 8Ω |
| 5W | 10W | 20W 40W | 80W | NC** | ||
| 100V | ||||||
Transformer Tap Setting
Set the tap by turning it. Use a flat-head screwdriver.
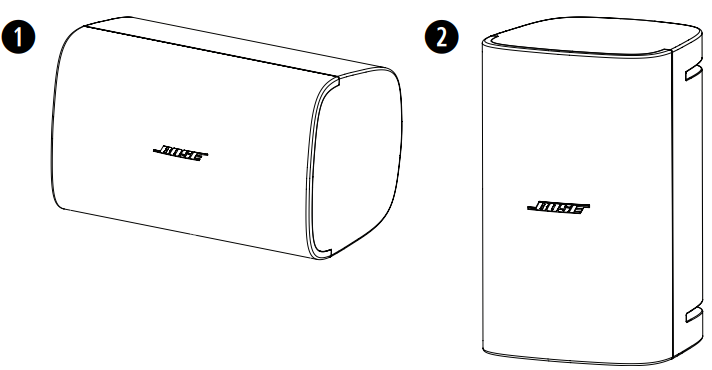
Loudspeaker Orientation
Choose the loudspeaker orientation best suited for your installation.
- Horizontal
- Vertical
Installation in proximity to cooking surfaces where the loudspeaker may be directly exposed to cooking oils, such as in commercial cooking environments, may decrease the performance or functionality of the loudspeaker.
Installing the Bracket
Choose fasteners that are consistent with all local building codes and requirements. Choose appropriate fasteners to support the weight of the loudspeaker (11.1 kg [24.5 lb]).
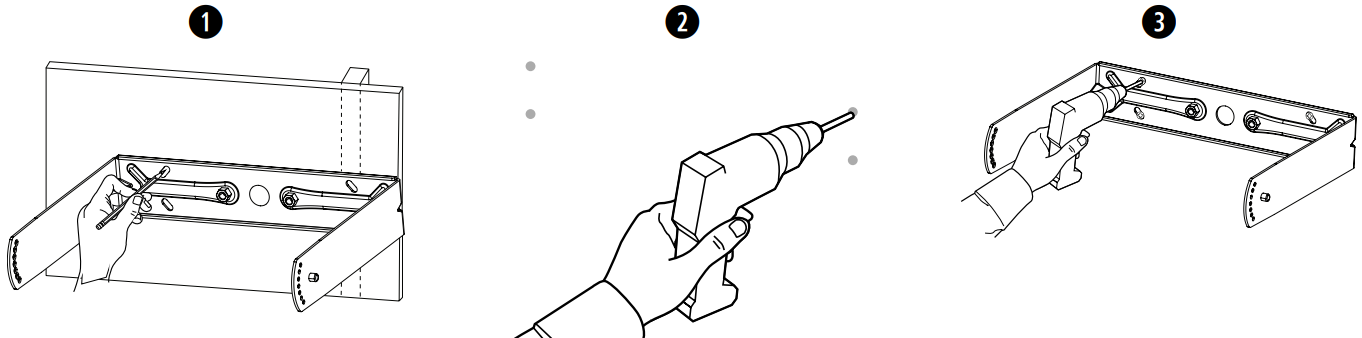
- Mark the drill holes.
- Drill four holes (sized for appropriate fasteners) into the wall.
- Secure the bracket to the wall with four screws (not included). Note: Use M6 or 1/4-inch sized screws.
Wiring the Connector
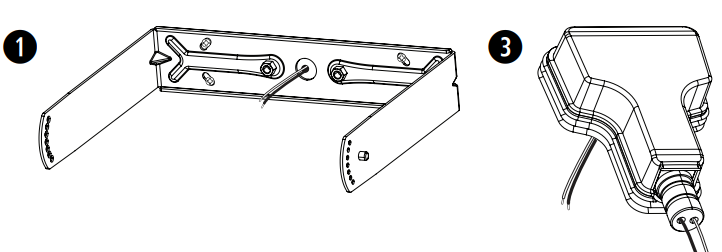
- Feed the wires through the centre hole of the bracket.
- Remove the connector from the loudspeaker.
- If using the weather-resistant input cover, insert the wires through the bottom of the input cover. See Preparing the Weather-resistant Input Cover on page 4.
- Wire the connector. For wiring information, see Wiring the Loudspeaker on page 5.
Important Mounting Information
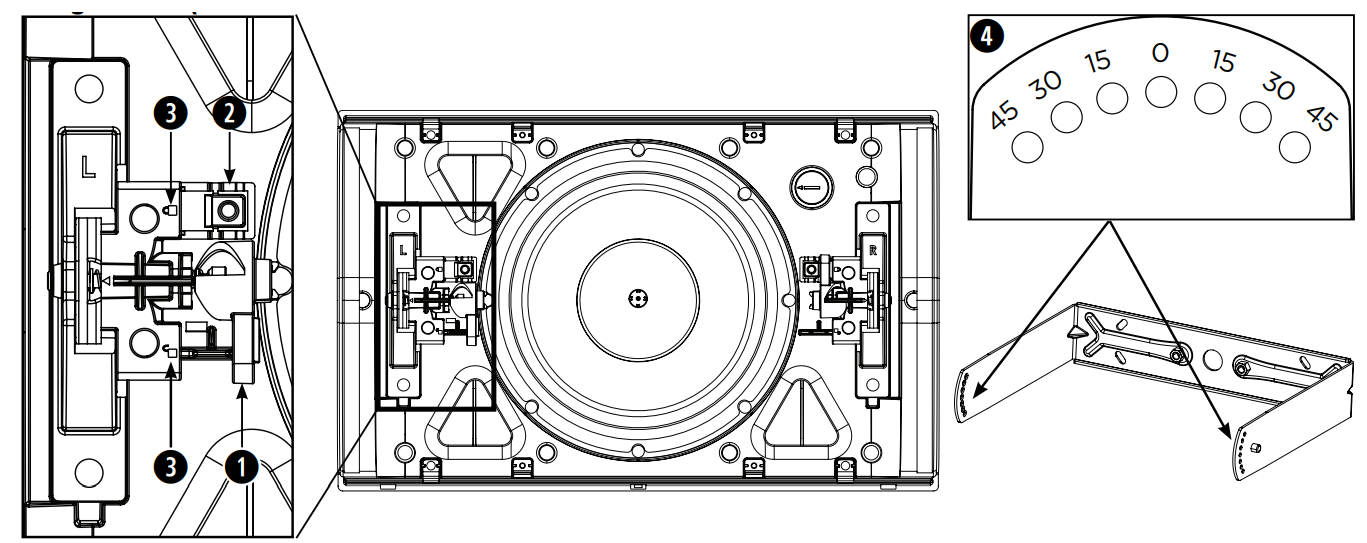
- Lock levers: Used to secure the loudspeaker to the mounting bracket. Push the levers toward the lock pins to lock; push the levers away from the lock pins to unlock.
- Lock pins: Press the pins down to unlock the levers.
- Lock indicators: Identify your locking direction.
- Angle labels (on bracket): Identify your desired angle position.
Installing the Loudspeaker
The loudspeaker is shipped with the lock levers taped down. Remove the tape before installation.

- Attach the loudspeaker to the bracket, adjust the loudspeaker to 45°, and lock the levers into place.
- Attach the wired connector to the loudspeaker.
- Unlock the levers and adjust the loudspeaker to your desired angle. Make sure to support the weight of the loudspeaker while you adjust the loudspeaker angle. The angle of the loudspeaker can be adjusted to 0°, 15°, 30°, or 45°.
- Lock the levers into place.
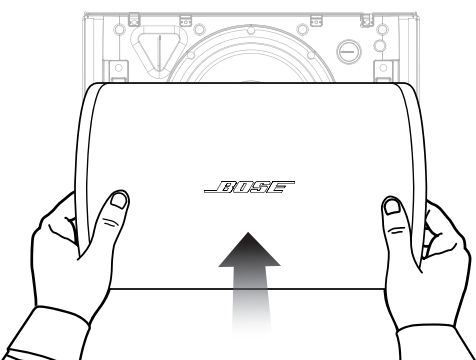
Adjusting the Logo
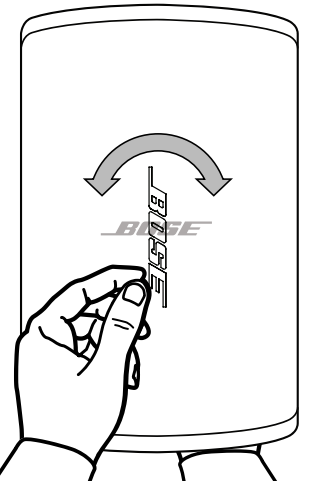
You can rotate the Bose logo to align with your loudspeaker orientation. With one hand, press the button on the back of the grille. Rotate the logo with the other hand. The logo can be rotated clockwise or counterclockwise.
Removing the Grille
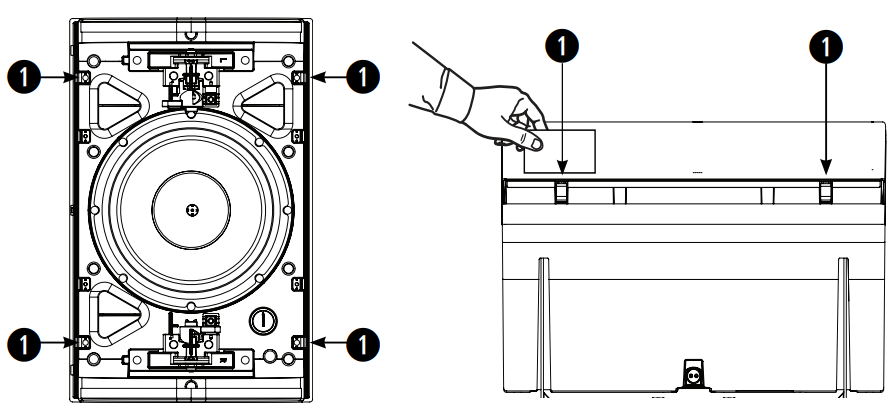
There are four small openings on each corner of the grille (1). Along the side of the loudspeaker, insert a small, flat tool into the grille openings to disengage the release tabs. Pull the grille
away from the loudspeaker.
Attaching the Grille
Place the grille over the front of the loudspeaker and push it firmly until it snaps into place.
Technical Specifications
| Physical | |
| Net Weight, Loudspeaker with grille and bracket | 11.1 kg (24.5 lbs) |
| Shipping Weight | 13 kg (28.5 lbs) |
| Environmental | Suitable for use outdoors in wet locations
IP55 per IEC 60529, 2019 |
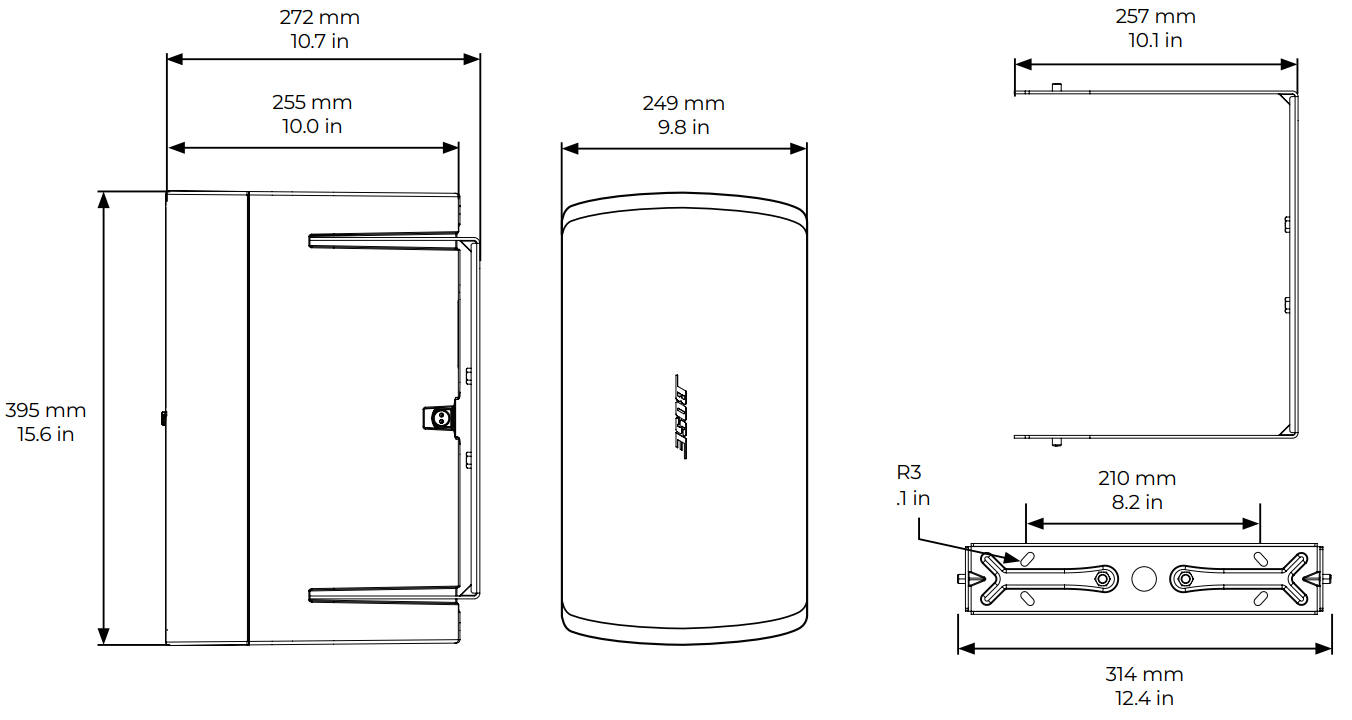
Product Dimensions
Regulatory Compliance
Environmentally rated to IP55
- This product conforms to all applicable EU directive requirements.
- Proper disposal and recycling help protect natural resources, human health, a nd the environment.
- For more information on the disposal and recycling of this product, contact your local municipality, disposal service, or the shop where you bought this product.
Warranty
- This product is covered by a limited warranty.
- For warranty details, visit BoseProfessional.com/warranty.
Customer Support
- Tel: 1-800-278-1083
- Website: https://support.bose.com/
MA 01748 USA Bose is a trademark of Bose Corporation. ArenaMatch is a trademark of Transom Post OpCo LLC. ©2024 Transom Post OpCo LLC.