


Bowers And Wilkins HTM6-S2 Channel Loudspeaker
Unpacking
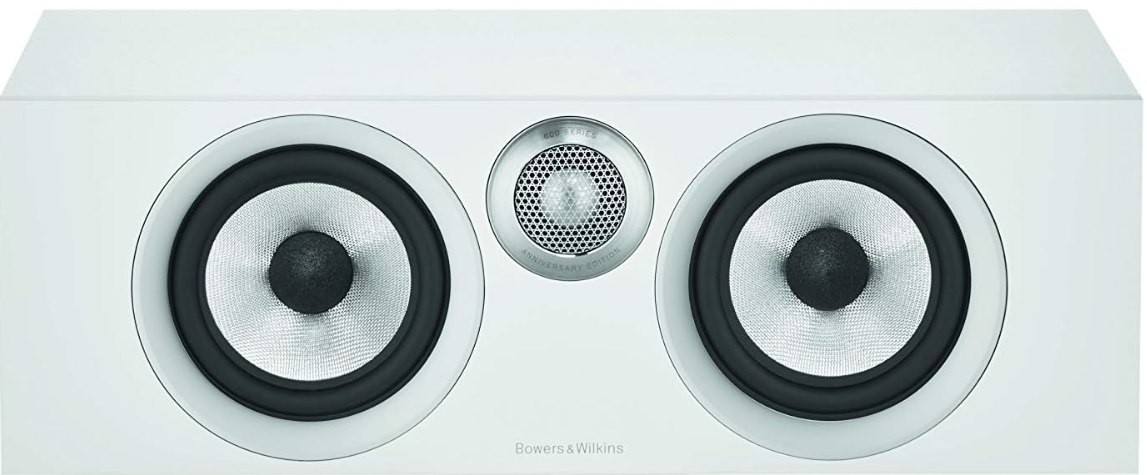
Carton Contents
- 1 Foam plug
- 4 Self-adhesive rubber supporting feet
Environmental Information
This product complies with international directives, including but not limited to:
- The Restriction of Hazardous Substances (RoHS) in electrical and electronic equipment,
- The Registration, Evaluation, Authorisation and restriction of Chemicals (REACH)
- The disposal of Waste Electrical and Electronic Equipment (WEEE).
Consult your local waste disposal authority for guidance on how to properly recycle or dispose of this product.
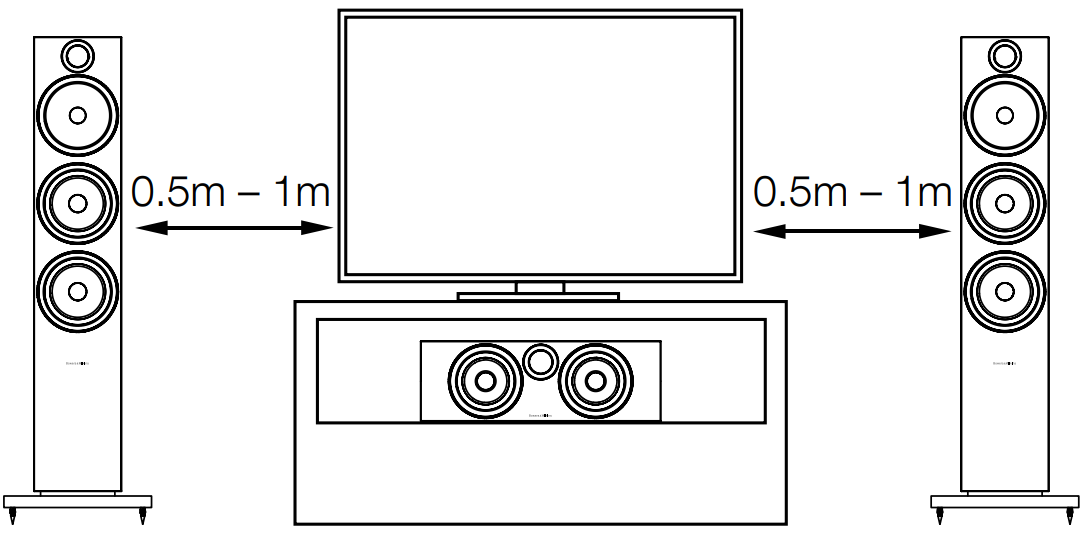
Speaker Installation
If using a projector with an acoustically transparent screen, place the speaker behind the centre of the screen. Otherwise, position it directly above or below the screen, whichever is closest to ear level. Align the front of the speaker approximately level with the screen.
The speaker is best used mounted on a rigid shelf or wall bracket, or on a rigid floor stand. If the speaker is to be placed either on a shelf or in a rack shared with other AV equipment, fix the 4 self-adhesive pads to the base of the speaker. They provide a degree of vibration isolation.
Stray Magnetic Fields
The speaker drive units create stray magnetic fields that extend beyond the boundaries of the cabinet. We recommend you keep magnetically sensitive articles (CRT television and computer screens, computer discs, audio and video tapes, swipe cards and the like) at least 0.5m from the speaker. LCD, OLED and plasma screens are not affected by magnetic fields.
Connections
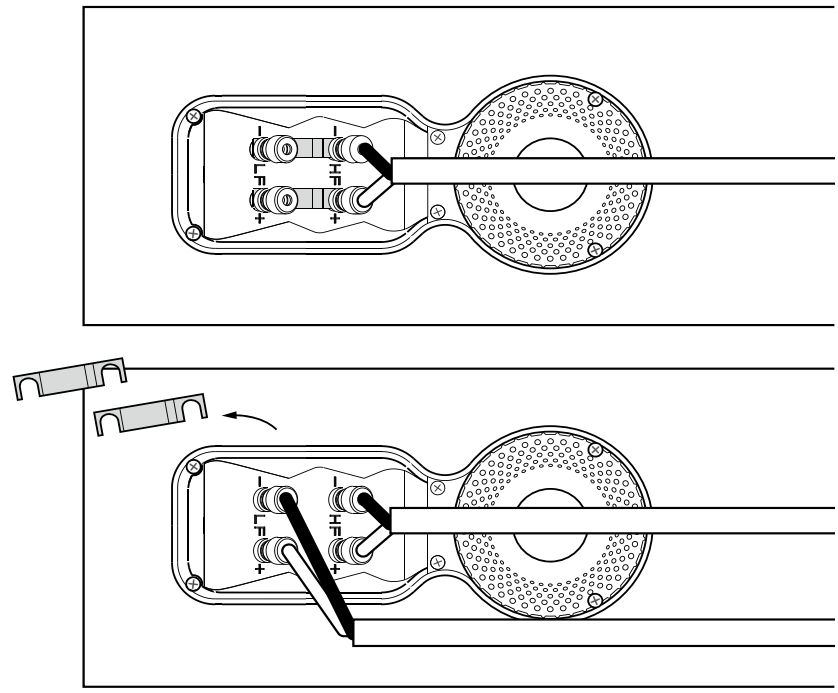
All connections should be made with the audio equipment switched off. There are 2 linked pairs of terminals on the back of the speaker. For a conventional connection (above left), the terminal links should remain in place (as delivered) and just one pair of terminals connected to the amplifier.
For bi-wire connections or bi-amplification (above right), the terminal links should be removed and each pair of terminals connected to the amplifier or amplifiers independently. Bi-wiring can improve the resolution of low-level detail.
Ensure that the positive terminals on the speaker (marked + and coloured red) are connected to the positive output terminal on the amplifier, and the negative terminals on the speaker (marked – and coloured black) are connected to the negative output terminal on the amplifier. An incorrect connection can result in poor imaging and loss of bass. Ask your dealer for advice when selecting speaker cable.
Fine Tuning
Before fine-tuning, make sure that all the connections in the installation are correct and secure.
Moving the speakers further from the walls will generally reduce the volume of the bass. Space behind the speakers will also help to create an aural impression of depth.
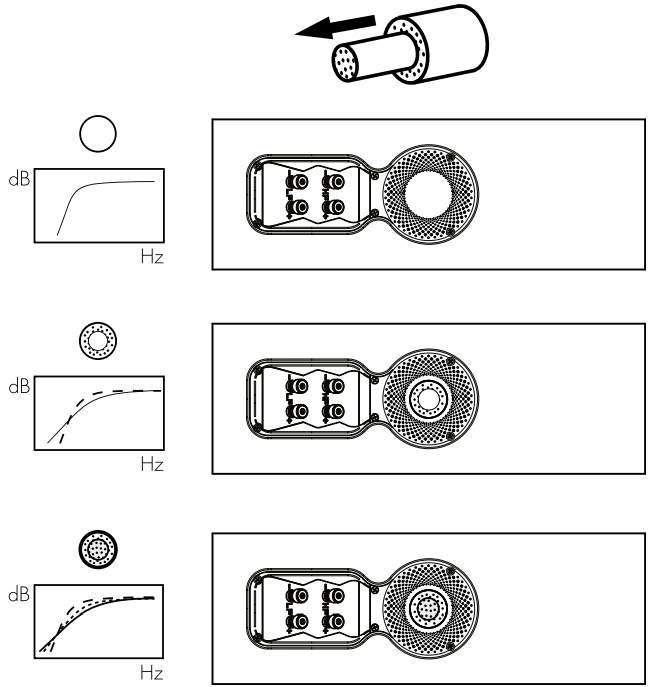
Conversely, moving the speakers closer to the walls will increase the volume of the bass. If you want to reduce the volume of bass without moving the speakers further from the wall, fit the foam plugs or, for less severe bass reduction, the foam rings in the port tubes (above).
If the bass seems uneven in frequency, this will most probably be a consequence of the acoustic properties of your listening room. Even small changes in the position of the speakers or listening position can have a significant effect on sonic performance, especially at low frequencies.
Try moving your listening position or locating your speakers along a different wall if possible.
If no alternatives exist, you can adjust your loudspeakers’ low-frequency performance using the supplied foam bungs.
The bungs are a two-piece part, allowing for a degree of fine-tuning using either the outer, larger-diameter piece in isolation or the two parts together. Using solely the outer, larger-diameter foam bung will deliver less bass attenuation than the complete bung assembly.
Running In
The performance of the speaker will change subtly during the initial listening period. If the speaker has been stored in a cold environment, the damping compounds and suspension materials of the drive units will take some time to recover their correct mechanical properties.
The drive unit suspensions will also loosen up during the first hours of use. The time taken for the speaker to achieve its intended performance will vary depending on previous storage conditions and how it is used. As a guide, allow up to a week for the temperature effects to stabilise and 15 hours of average use for the mechanical parts to attain their intended design characteristics.
Aftercare
The cabinet surfaces will usually only require dusting. If you wish to use an aerosol or other cleaner, apply the cleaner onto the cloth, not directly onto the product, and test a small area first, as some cleaning products may damage some of the surfaces.
Avoid abrasive products, or those containing acid, alkali or antibacterial agents. Marks on the paint surface may be removed with a dilute perfume-free soap solution. Remove any remaining streak marks by spraying with a proprietary glass cleaner and lightly wiping dry with a microfibre cloth. Do not use cleaning agents on the drive units and avoid touching them, as damage may result.
Customer Service
- Ph: 800 370 3740
- Website: https://www.bowerswilkins.com/
FAQs
Q: How should I position the HTM6-S2 for optimal sound?
Position the HTM6-S2 in the centre of your TV screen, either above or below it. To improve discourse clarity, make sure it is slightly tilted towards the listening area. If there isn’t enough space and ventilation around it, don’t put it inside a closed cabinet.
Q: What are the recommended power requirements?
Amplifiers that generate 25–150 watts into 8 ohms can be handled by the HTM6-S2. To prevent damage or distortion, be sure your amplifier is compatible with the speaker’s nominal impedance.
Q: Can I use the HTM6-S2 as a standalone speaker?
It works best when combined with other Bowers & Wilkins speakers to preserve complete surround sound and tonal consistency.
Q: How do I connect the HTM6-S2 to my amplifier or AV receiver?
Attach the speaker cables to the HTM6-S2’s rear terminals while keeping an eye on the proper polarity: black for negative (–) and red for positive (+). To guarantee the best possible signal transfer, tightly fasten the cords.
Q: What type of speaker cables should I use?
Make use of oxygen-free, premium copper wires that are large enough for the size of your space. 16-gauge wire is adequate for runs shorter than 10 meters (33 feet); longer runs may benefit from 14-gauge or thicker wire to reduce signal loss.
Q: How do I clean and maintain the HTM6-S2?
Use a gentle, dry cloth to dust the cabinet. Steer clear of solvents and chemical cleaners. Don’t take the grille off needlessly.
Q: What should I do if the sound seems unbalanced?
Room acoustics may also affect performance—experiment with slight adjustments in distance or angle.
6 Comments
Your article helped me a lot, is there any more related content? Thanks! https://accounts.binance.info/da-DK/register?ref=V3MG69RO
Can you be more specific about the content of your article? After reading it, I still have some doubts. Hope you can help me.
Your point of view caught my eye and was very interesting. Thanks. I have a question for you.
I don’t think the title of your article matches the content lol. Just kidding, mainly because I had some doubts after reading the article. https://accounts.binance.com/sk/register?ref=WKAGBF7Y
I don’t think the title of your article matches the content lol. Just kidding, mainly because I had some doubts after reading the article.
Can you be more specific about the content of your article? After reading it, I still have some doubts. Hope you can help me. https://www.binance.com/register?ref=IHJUI7TF