


Sonos Arc Black Voice Control Ultra Soundbar
Overview
The compact soundbar for music, TV, and more—
- Quick and easy setup, with only one cable to connect to your TV.
- Great sound for compact spaces- versatile design allows you to set it on a credenza, mount it on a wall, or place it inside a TV stand.
- Stream music, radio, podcasts, and more when the TV is off.
- Expandable. Add a Sub and two Sonos speakers, like Ones, for 5.1 surround sound.
- Control your Sonos system with the Sonos app (for Android and iOS).
- See Setup when you’re ready to add Ray to your Sonos system. For detailed instructions, check the Sonos Ray Black Wireless Compact Soundbar User Manual.
Important safety
- Read these instructions. Keep these instructions. Heed all warnings.
- Follow all instructions. Do not use this apparatus near water. Clean only with a dry soft cloth.
- Household cleaners or solvents can damage the finish on your Sonos products.
- Do not block any ventilation openings.
- Install in accordance with the manufacturer’s instructions to produce heat.
- Only use attachments/accessories specified by the manufacturer.
- Unplug this apparatus during lightning storms or when unused for long periods of time.
- This product does not have any user-serviceable parts.
- Do not open or disassemble, or attempt to repair it or replace any components.
- Refer all servicing to Sonos qualified service personnel.
- The Mains plug should be readily available to disconnect the equipment.
- Warning: To reduce the risk of fire or electric shock, do not expose this apparatus to rain or moisture.
- Do not expose the apparatus to dripping or splashing, and do not place objects filled with liquids, such as vases, on the apparatus.
Controls and Lights
Volume control
Touch for small adjustments or touch and hold to quickly change the volume:
- Volume up (right)
- Volume down (left)

Play/Pause
Touch to play or pause audio.

Next/Previous
(music only)
- Swipe right across the touch controls to skip to the next song.
- Swipe left to go to the previous song.


Status Light
Displays the product’s connection to WiFi, indicates when the volume is muted, and signals errors. Learn more

Connector Panel
- Join button\ Press to connect during setup.
- AC power (mains) input. Use only the supplied power cord (using a third-party power cord will void your warranty).
- Optical port: Use to connect the soundbar to your TV.
- Ethernet port: Use an Ethernet cable if you want to connect to a router, computer, or network-attached storage (NAS) device (Optional).


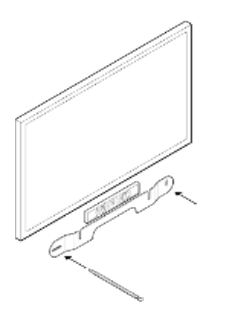
Select a location
You can wall-mount Ray above or below your TV, or place it in or on a TV stand. TV stand placement
- Place horizontally on a stable and level surface at least 2″ (50mm) from the TV.
- Don’t place vertically or on its side. Don’t block the TV’s IR sensor.
- Keep a 1″ (25 mm) space (minimum) above the Ray so you can reach the touch controls.
- For best sound quality, keep both ends of the Ray at least 1″ (25 mm) from a wall or other obstruction.
- Make sure the touch controls are facing up.
- Wall mount: You can secure the soundbar to a wall with a compatible wall mount.
- We recommend the custom-designed Sonos Ray Wall Mount (sold separately).
Connect the Cables
Before you start
- Disconnect existing home theatre or surround sound equipment from your TV.
- Connect any external devices, like a cable box or DVD player, directly to your TV.
- Turn your TV on.
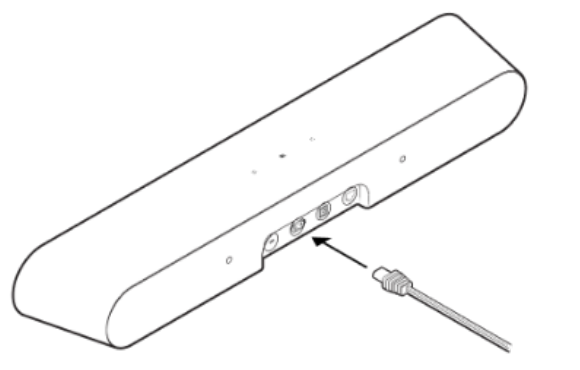
- Connect the power cord and plug in the soundbar.

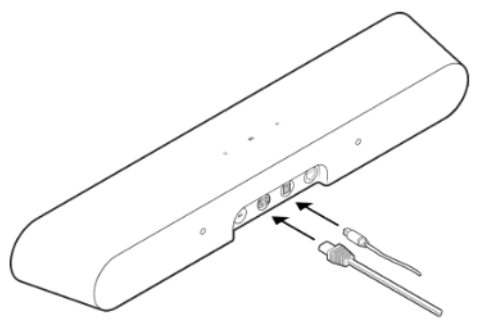
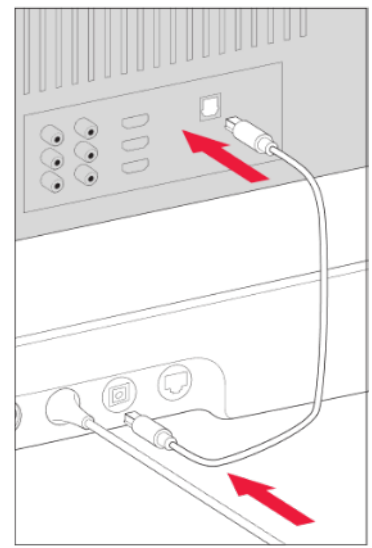
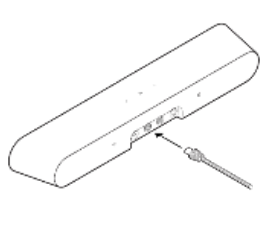
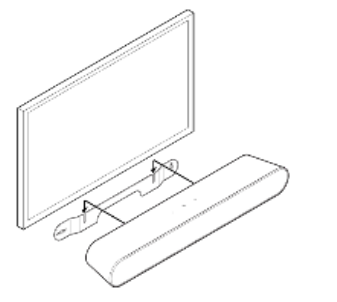
- Remove the protective cap, then connect the optical cable (included) to the optical port on the back of your soundbar.

- Remove the protective cap, then connect the optical cable to your IV’s optical digital OUT port.

Home theater
nos products for your TV provide full-theater sound and play music too. Create a home theater system by
adding a pair of rear surrounds and a Sub.
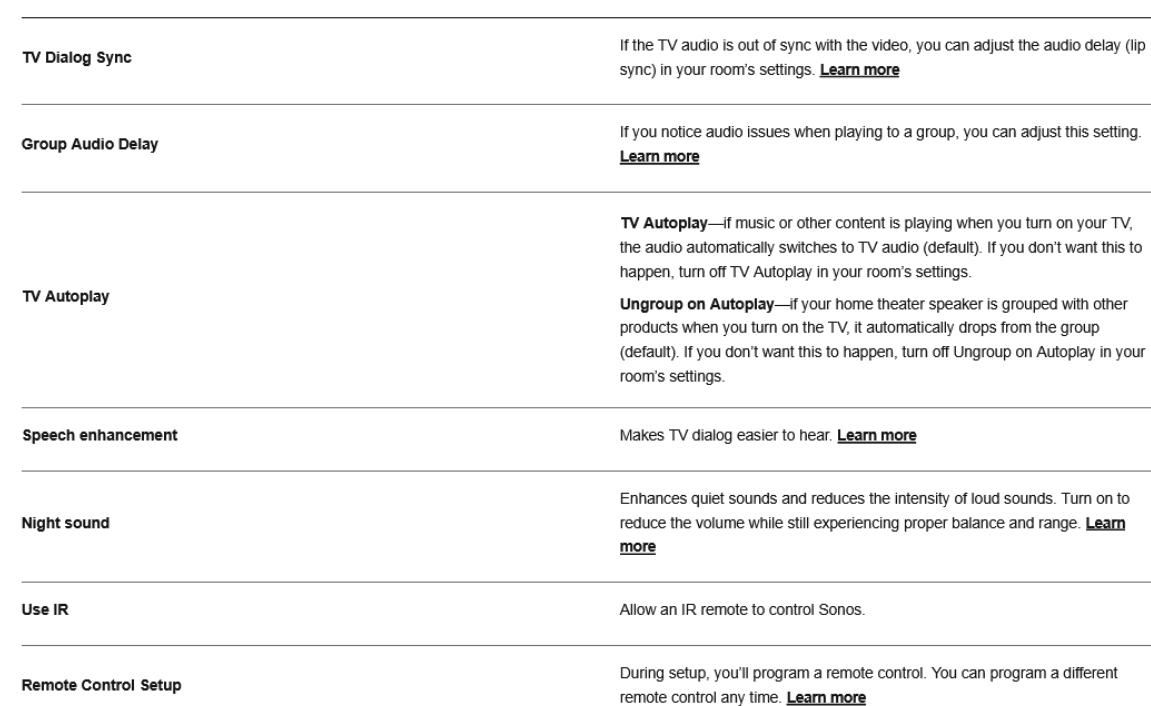
Home theater settings: Use the Sonos app to adjust sound settings or change the way your home theater speaker works with your TV.
Set up surround speakers.
It’s easy to turn two Sonos speakers (same model), or a Sonos Amp and your favorite non-Sonos speaker: Intoo separate right and left channels for your home theater
- Place each surround speaker about 10 it from your favorite listening position, angling them toward the seating area.
- Go to i > System. Select a room with a soundbar and choose Add Surrounds to get started ste If you group the rooms or create a stereo pair instead, you won’t have surround sound.
Surround Audio Settings Trueplay T™
Every room is different. Trueplay tuning measures how sound reflects off walls, furnishings, and other surfaces in a room, then fine-tunes your Sonos speaker to make sure it sounds great no matter where you’ve placed it. Trueplay works on IOS mobile devices running IOS 8 or later. During tuning, you’ll move around the room holding your mobile device.
- Select * > system, and pick the room you want to tune.
- Choose Trueplay Tuning to get started
Auto Trueplay
Portable Sonos products like Sonos Roam and Move can tune themselves automatically. Auto Trueplay uses
your speaker’s microphone to detect the environment and make periodic tuning adjustments so you get great sound wherever your speaker is and whatever you’re listening to. Go to 1 > System, and select your portable speaker to turn on auto Trueplay.
Product Settings
Line-In
(Sonos products with line-in capability) When a projector, turntable, stereo, or other audio device is connected to a Sonos product, you can adjust these line-in settings:
- Source name: Choose a name for the line-in device.
- Source level: Adjust the line-in source level if you find the default volume setting is too quiet or distorted.
- Audio Delay: Add a delay between the line-in source and Sonos to reduce the chance of audio issues occurring when you’re playing line-in audio on grouped speakers.
- Autoplay: Choose a room if you want line-in audio to start playing automatically when Sonos detects a signal on the line-in port.
Accessories
Find the perfect accessory for your Sonos system, tailored to perfectly fit your Sonos products.\ For a full selection of Sonos-compatible stands, wall mounts, chargers, and cables, see Accessories on our website.
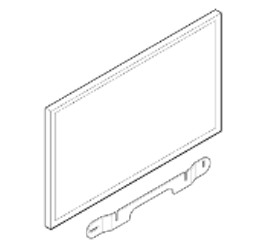
Wall Mount
Use the Ray wall mount kit (sold separately, available at sonos.com). It’s designed for mounting on a flat wall.
Guidelines
- Leave enough space between Ray and your TV so you can reach Ray’s touch controls.
- For best sound quality, keep both ends of the Ray at least 1′ (30cm) from a wall or other obstruction.
- Mount kit contents
- Wall mount bracket
- 2 short attachment screws
- 2 wall anchors
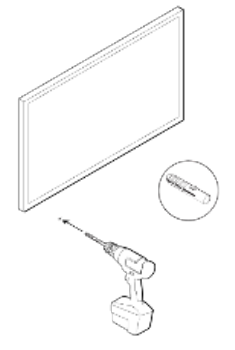
- 2 wall screws What you’ll need
- Pencil
- Phillips-head screwdriver
- Power drill (if needed for installation location)
- Measurement tool
- Level
- Stud finder (optional)
Set It Up
- If your TV is wall-mounted, align the top edge of the bracket with the bottom of your TV, leaving at least 2.5 inches (mm) between them.

- Mark the screw locations and remove the bracket.

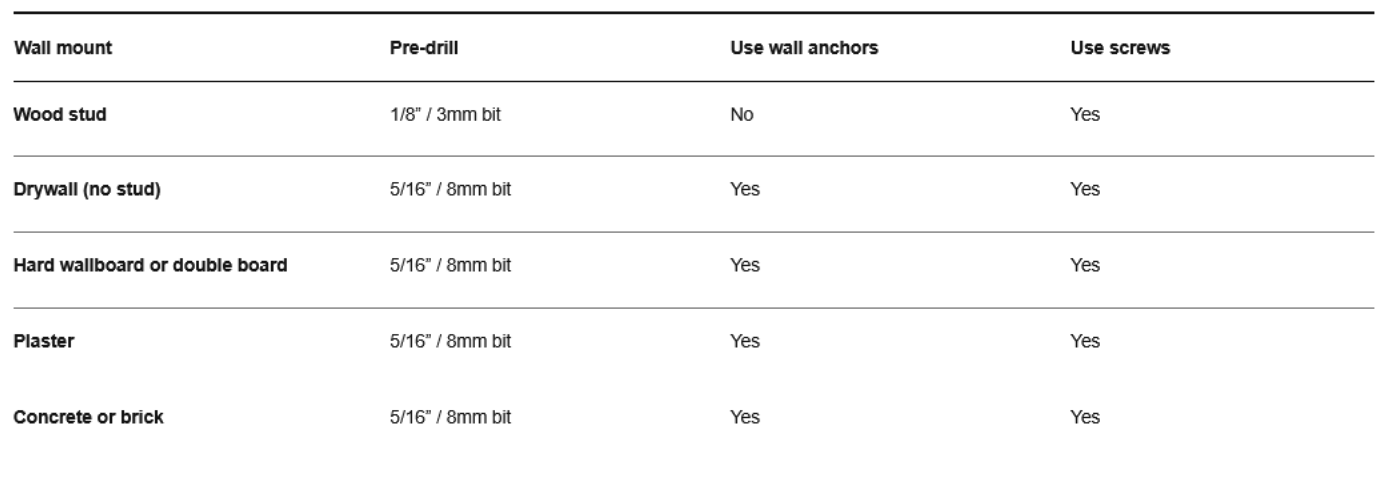
- If you’re using wall anchors, use a 5/16″ drill bit to drill pilot holes, starting with the hole on the left. Then insert the wall anchors.
- Don’t use wall anchors if you’re drilling into wood or plastic. See Wall mounting information.

- Position the wall mount bracket over the screw locations, using a level to confirm accuracy. Use a Phillips-head screwdriver or a power drill to scre the bracket to the wall, making sure the center notch is pointing up.

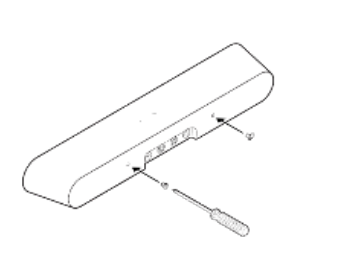
- Using a Phillips head screwdriver, fasten the 2 attachment screws to the back of the soundbar, making sure they are fully tightened.

- Remove the protective cap from the optical cable, then connect the power and optical cables to the back of the soundbar.

- Slide the soundbar down so the attachment screws fit into the slots on the wall bracket.\ Make sure the touch controls are facing up, and Sonos Ray is fully seated.


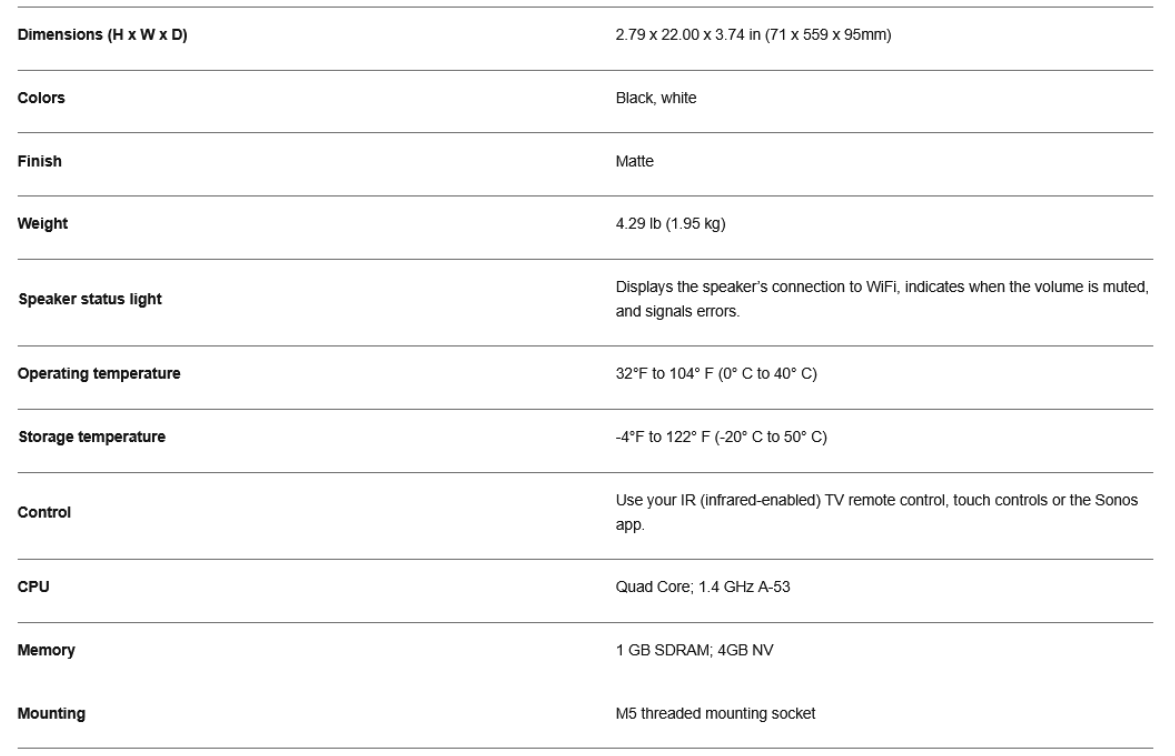
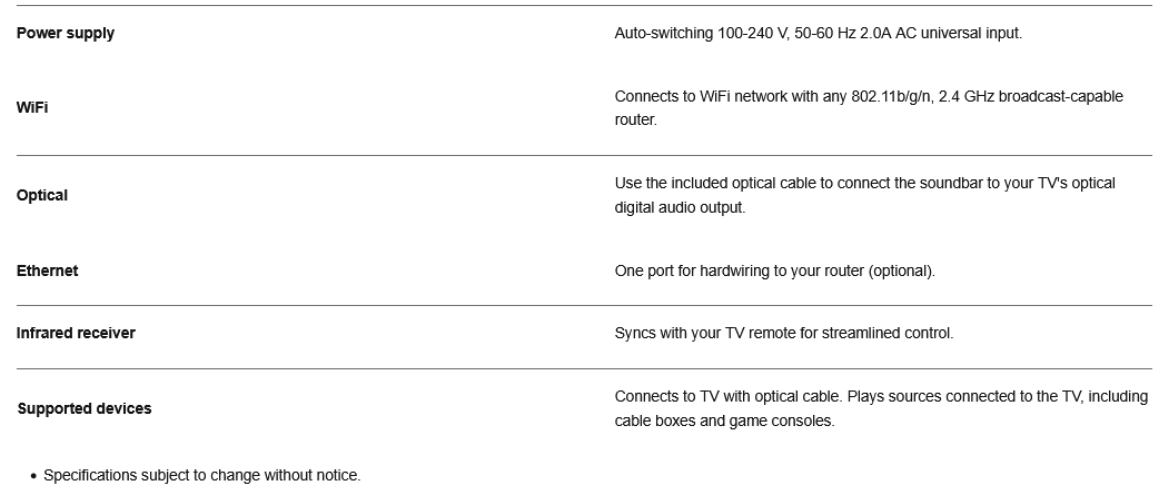
Specifications
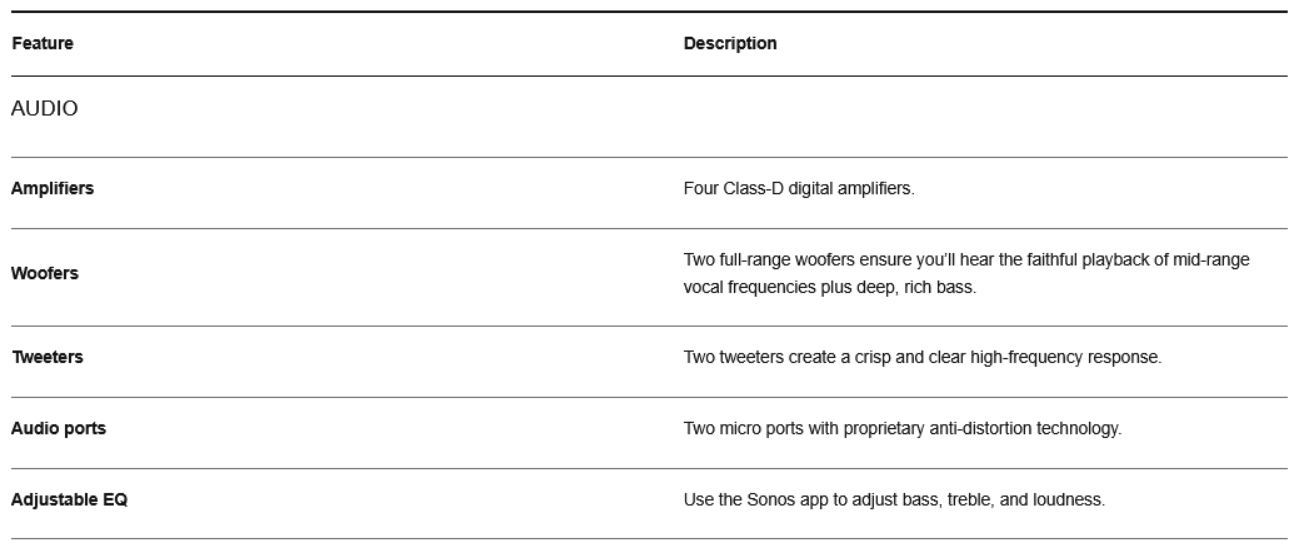
Software

General
Power & Connectivity
Customer Service
- Website: https://support.sonos.com/
- Ph: (800) 680-2345
FAQs
Q: What makes the Sonos Arc an “Ultra” soundbar?
The Arc’s forward-firing, side-firing, and upward-firing Dolby Atmos drivers provide immersive home theatre audio. Additionally, it incorporates smart tuning tools, voice control, and multi-room streaming into a sleek, simple design.
Q: Do I need an HDMI eARC connection for the Arc?
HDMI eARC is advised for optimal Dolby Atmos performance. Advanced formats might be restricted; however, the Arc will still function with regular HDMI ARC or optical (via adapter).
Q: Can I control the Arc with my voice?
Indeed. Voice assistants like Amazon Alexa and Sonos Voice Control are compatible with the Arc (availability may vary). Voice commands can be used for playing, volume, smart home functions, and more.
Q: Does the Arc require a separate subwoofer?
No. Although the Arc has a great built-in bass, if you want deeper low frequencies, you can add a Sonos Sub or Sub Mini.
Q: How do I mount the Arc on the wall?
Use the Sonos Arc Wall Mount for the best fit and stability. Ensure the mount leaves enough space below the soundbar for the upward-firing drivers to project sound properly.
Q: Can the Arc be placed inside a media cabinet?
It’s possible, but not ideal. Enclosed spaces may block upward-firing channels and reduce clarity. If cabinet placement is necessary, leave open space above the Arc.
Q: Why is dialogue still hard to hear?
In the Sonos app, turn on Speech Enhancement. Check the TV’s sound settings as well; clarity might be increased by decreasing TV sound processing or converting to PCM.
Q: Can I use the Arc with a gaming console?
Indeed. Attach gaming consoles (PS5, Xbox Series X, etc.) straight to the television. The TV then uses HDMI eARC to send compatible audio formats to the Arc.
4 Comments
Thanks for sharing. I read many of your blog posts, cool, your blog is very good.
Thanks for sharing. I read many of your blog posts, cool, your blog is very good.
I don’t think the title of your article matches the content lol. Just kidding, mainly because I had some doubts after reading the article.
I don’t think the title of your article matches the content lol. Just kidding, mainly because I had some doubts after reading the article.