


DJI Mini 5 Pro Drone Fly More Combo Plus Drone
Using this Manual
Read Before Use
DJI™ provides you with tutorial videos and the following documents:
- Safety Guidelines
- Quick Start Guide
- User Manual
DJI Mini 5 Pro User Manual
- User Manual: It is recommended to watch all the tutorial videos and read the Safety Guidelines before using it for the first time. Make sure to review the Quick Start Guide before using it for the first time, and refer to this User Manual for more information.
- The remote controller with a screen has the DJI Fly app already installed. You are required to download DJI Fly to your mobile device when using the remote controller without a screen.
- The interface and functions of DJI Fly may vary as the software version is updated. Actual user experience is based on the software version used.
- For increased safety, flight is restricted to a height of 98.4 ft (30 m) and a range of 164 ft (50 m) when not connected or logged into the app during flight.
- App login is valid for 90 days. Connect to the internet and log in again when expired.
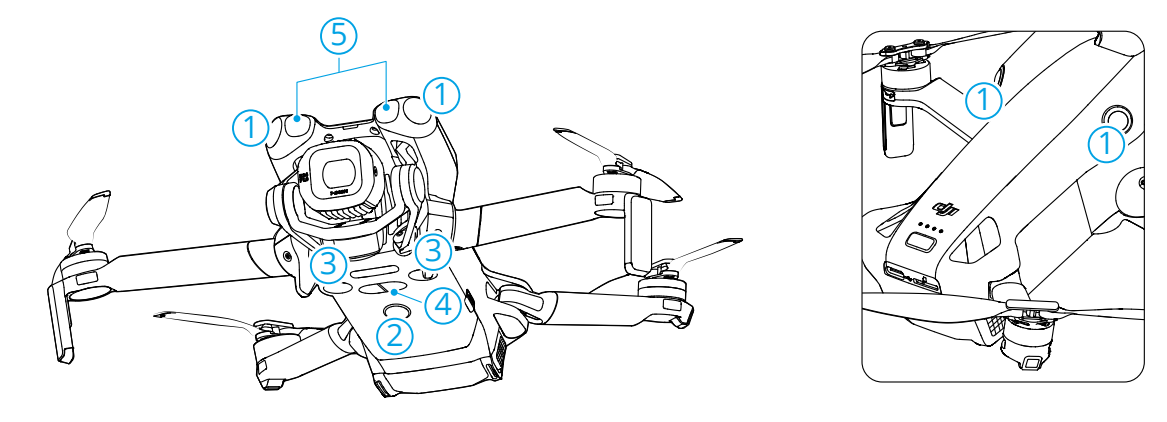
Overview
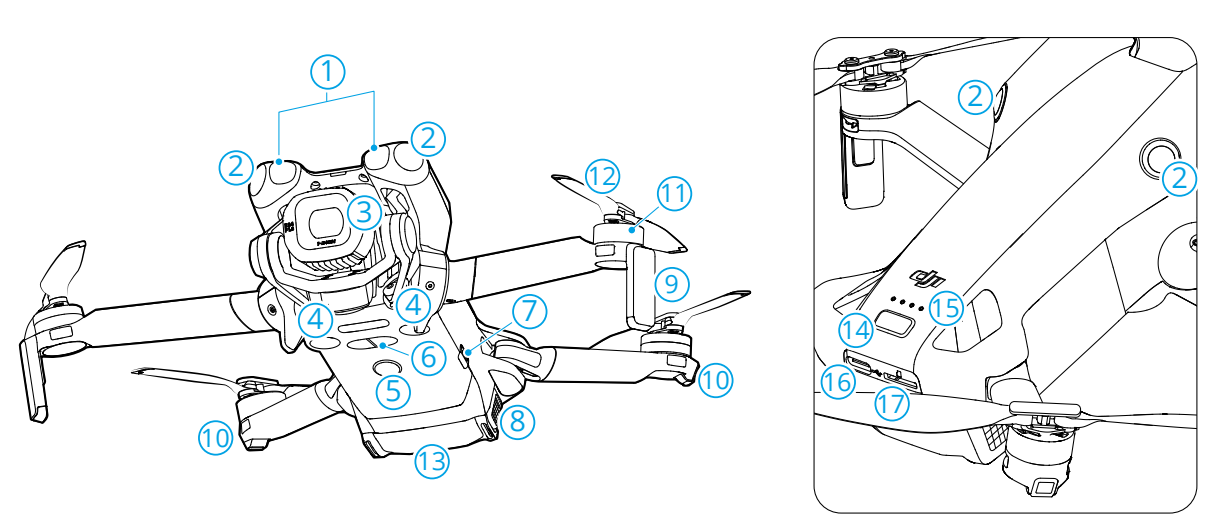
- Forward-Facing LiDAR [1]
- Omnidirectional Vision System [2]
- Gimbal and Camera
- Downward Vision System
- Auxiliary Light
- Three-Dimensional Infrared Sensing System [1]
- Side Button
- Battery Buckles
- Landing Gears (Built-in antennas)
- Aircraft Status Indicators
- Motors
- Propellers
- Intelligent Flight Battery
- Power Button
- Battery Level LEDs
- USB-C Port
Description
Remote Controller 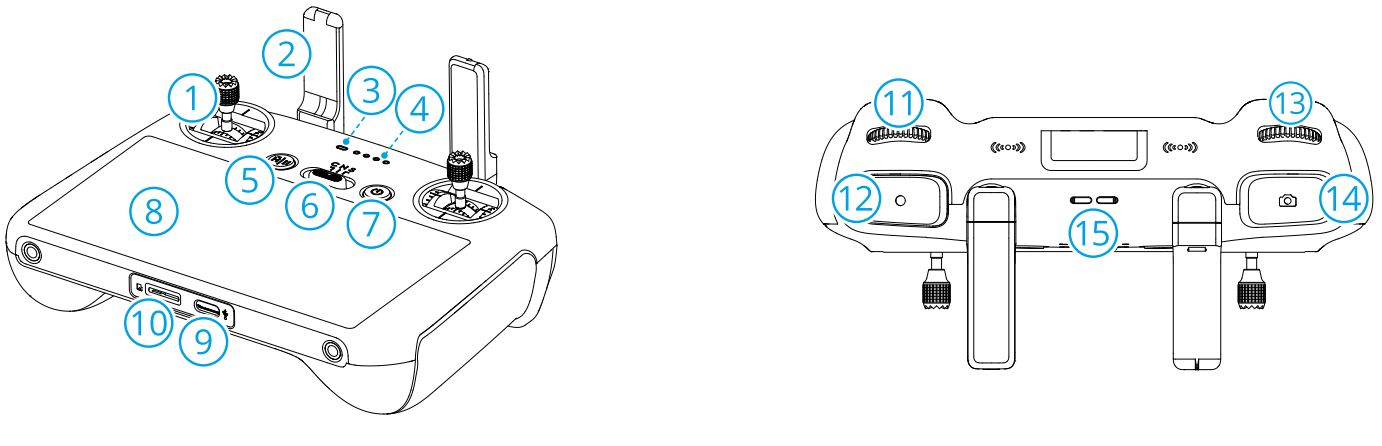
- Control Sticks
- Antennas
- Status LED
- Battery Level LEDs
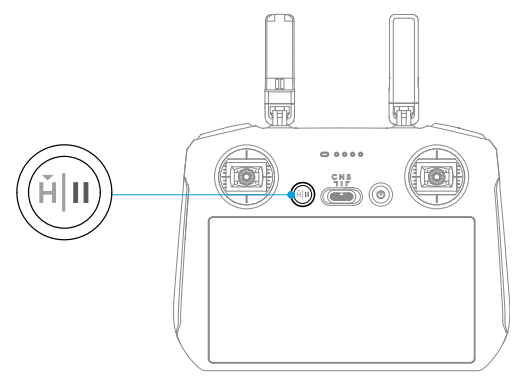
- Flight Pause/Return to Home (RTH)Button
- Flight Mode Switch
- Power Button
- Touchscreen
- USB-C Port
- microSD Card Slot
- Gimbal Dial
- Record Button
- Camera Control Dial [1]
- Focus/Shutter Button
- Speaker
- Control Stick Storage Slots
- Customizable C2 Button [1]
- Customizable C1 Button [1]
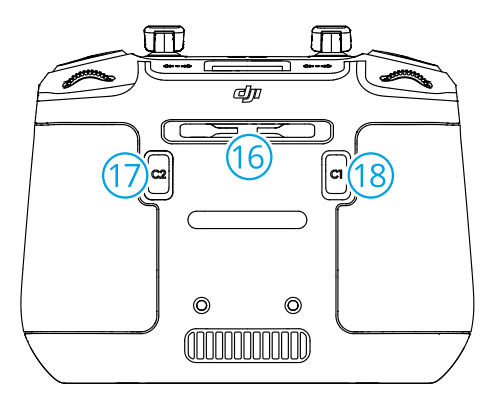
- To view and set the button function, go to camera view in DJI Fly, and tap > Control > Button Customization.
DJI RC-N3 Remote Controller
- Power Button
- Flight Mode Switch
- Flight Pause/Return to Home (RTH) Button
- Battery Level LEDs
- Control Sticks
- Customizable Button [1]
- Photo/Video Button
- Remote Controller Cable
- Mobile Device Holder
- Antennas
- USB-C Port
- Control Stick Storage Slots
- Gimbal Dial
- Shutter/Record Button
- Mobile Device Slot
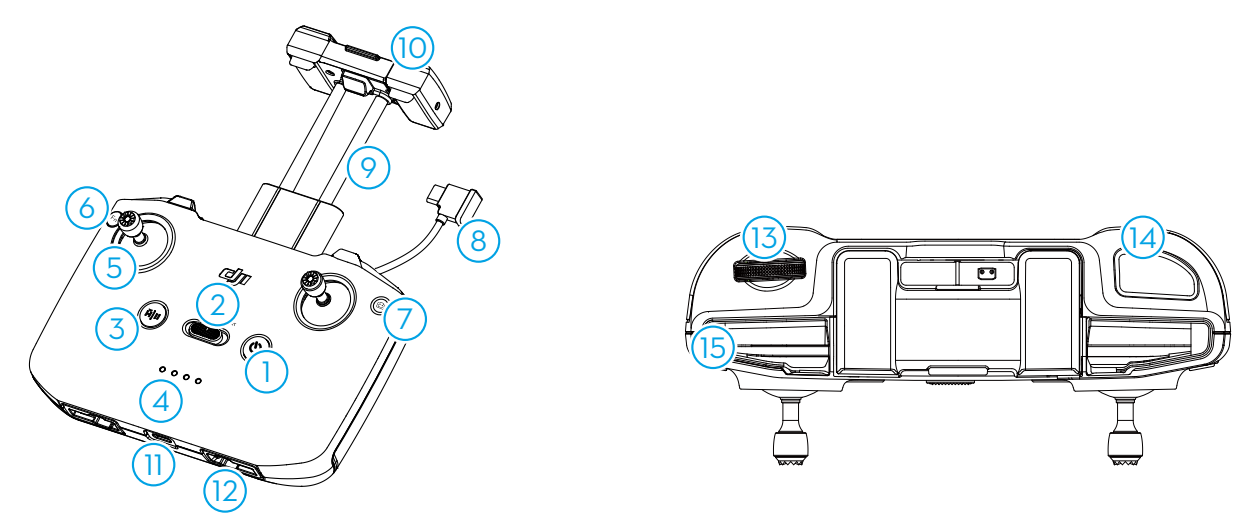
- To view and set the button function, go to camera view in DJI Fly, and tap > Control > Butto..n
Customization.
Product Profile
Preparing the Aircraft
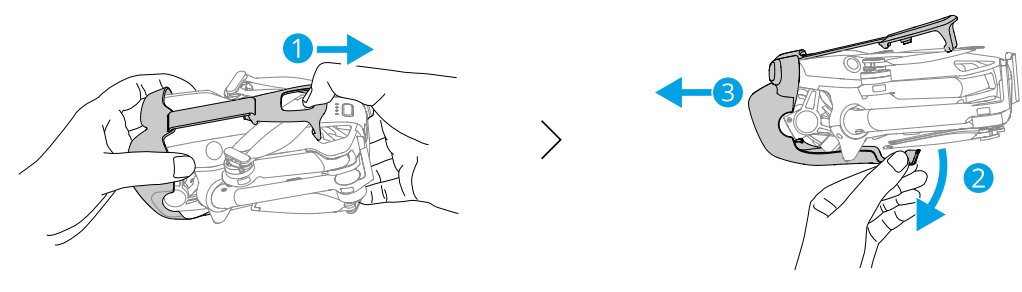
- Remove the storage cover.

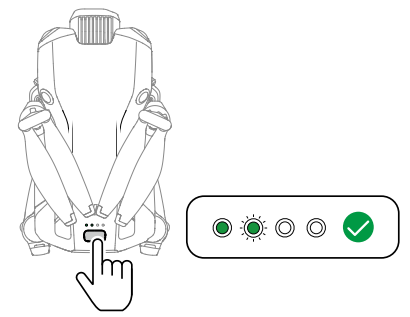
- Press the power button once to activate the battery.

- Unfold the aircraft arms as shown.

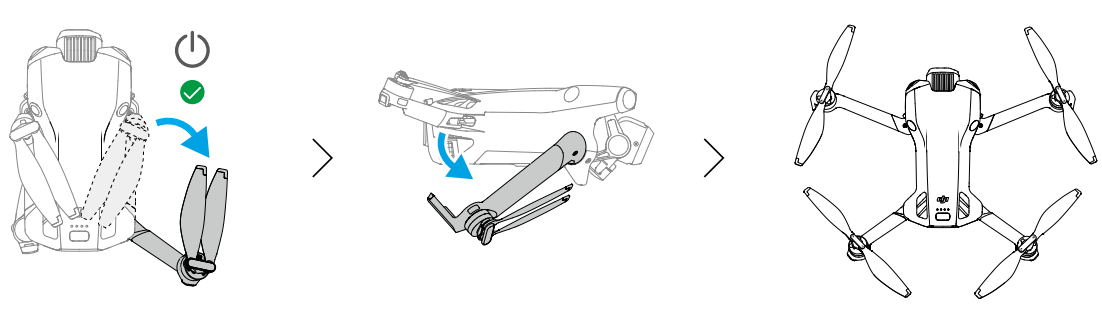
- Automatic Power-On: Unfolding the right rear arm will power on the aircraft by default.
- Automatic Power-Off: Folding the right rear arm will initiate an automatic countdown for power-off.
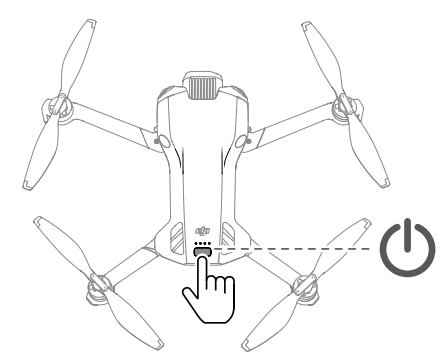
- Manual Power-On/Power-Off: Press, then press and hold the power button to power on or off the aircraft.

- If the aircraft does not take off after activating the battery, the battery will enter sleep mode again after the aircraft powers off for a period of time.
- When the USB-C port of the aircraft is in use, unfolding the arm will not power on the aircraft.
- If a collision occurs during flight, the automatic power-off feature will not function.
- The feature is available after the aircraft is restarted.
- It is recommended to use official chargers to charge the Intelligent Flight Battery.
- Make sure the storage cover is removed before powering on the aircraft.
- Otherwise, it may affect the aircraft’s self-diagnostics.
- Attach the storage cover when the aircraft is not in use
Remote Control
DJI RC 2
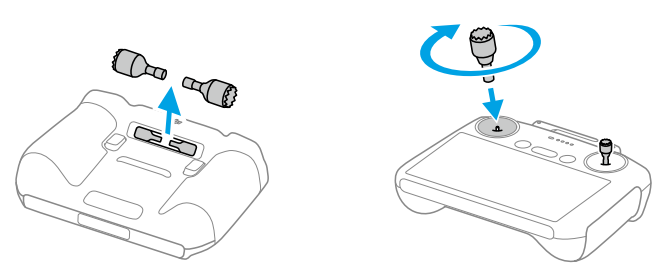
- Remove the control sticks from the storage slots and mount them on the remote controller.

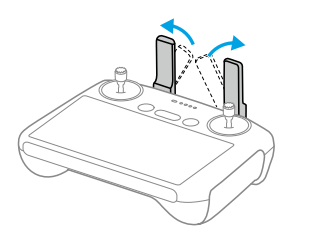
- Unfold the antennas.

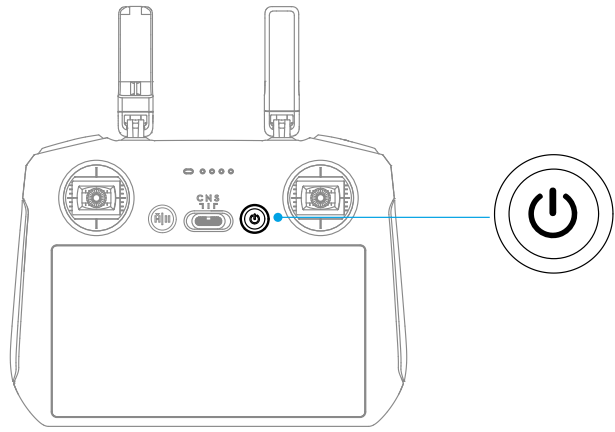
- The remote controller needs to be activated before first use, and an internet connection is required for activation. Press, then press and hold the power button to power on the remote controller. Follow the on-screen prompts to activate the remote controller.
DJI RC-N3
- Remove the control sticks from the storage slots and mount them on the remote controller.
- Pull out the mobile device holder. Choose the appropriate remote controller cable based on the port type of your mobile device (the cable with a USB-C connector is connected by default).
- Place your mobile device in the holder, then connect the end of the cable without the remote controller logo to your mobile device. Make sure your mobile device is securely in place.
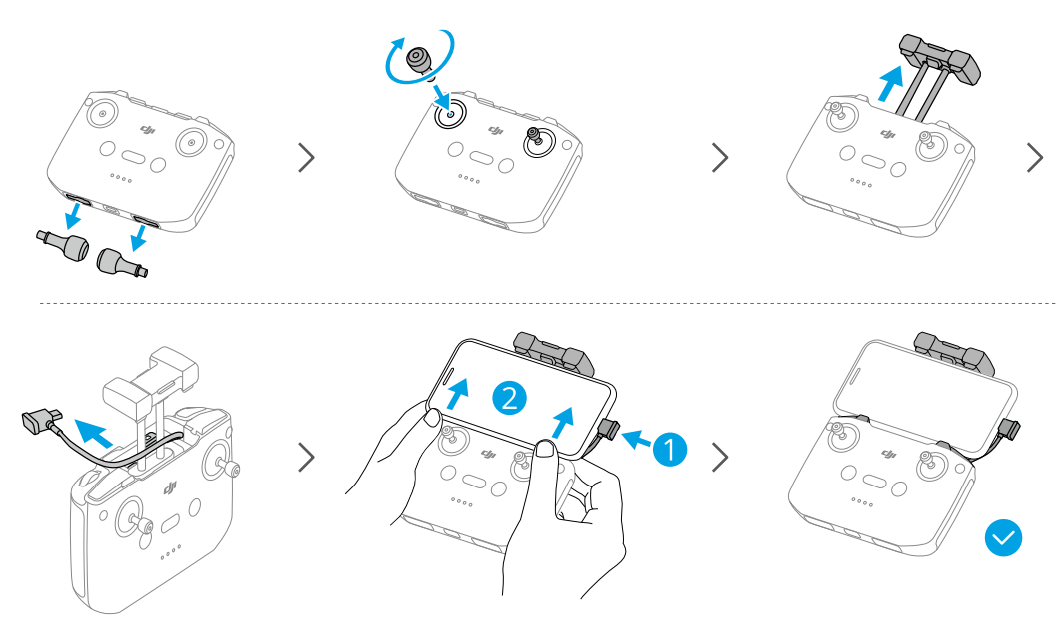
- If a USB connection prompt appears when an Android mobile device is used, select the option to charge only. Other options may cause the connection to fail. Adjust the mobile device holder to make sure your mobile device is firmly secure.
Activation
The aircraft requires activation before first use. Press, then press and hold the power button to power on the aircraft and remote controller, respectively, and then follow the onscreen prompts to activate the aircraft using DJI Fly. An internet connection is required for activation.
Firmware Update
A prompt will appear in DJI Fly when a firmware update is available. Update the firmware whenever prompted. Otherwise, some features may not be available.
Safety
After completing pre-flight preparations, it is recommended to train your flying skills and practice flying safely. Pick a suitable area to fly in according to the following flight requirements and restrictions. Strictly abide by local laws and regulations when flying. Read the Safety Guidelines before flight to ensure safe use of the product.
Flight Restrictions
GEO (Geospatial Environment Online) System
The DJI Geospatial Environment Online (GEO) System is a global information system that provides real-time information on flight safety and restriction updates and prevents UAVs from flying in restricted airspace. Under exceptional circumstances, restricted areas can be unlocked to allow flights. Before that, you must submit an unlocking request based on the current restriction level in the intended flight area.
The GEO system may not fully align with local laws and regulations. You are responsible for your own flight safety and must consult with the local authorities on the relevant legal and regulatory requirements before requesting to unlock a restricted area.
Flight Limits
For safety reasons, flight limits are enabled by default to help you operate the aircraft safely. You can set flight limits on height and distance. Altitude limits, distance limits, and GEO zones function concurrently to manage flight safety when the Global Navigation Satellite System (GNSS) is available. Only altitude can be limited when GNSS is unavailable.
Altitude and Distance Limits
Max altitude restricts the flight altitude of the aircraft, while max distance restricts the flight radius around the Home Point of the aircraft. These limits can be changed in the DJI Fly app for improved flight safety.
- Max Altitude
- Home Point (Horizontal Position)
- Max Distance
- Height of the aircraft when taking off


Strong GNSS Signal 
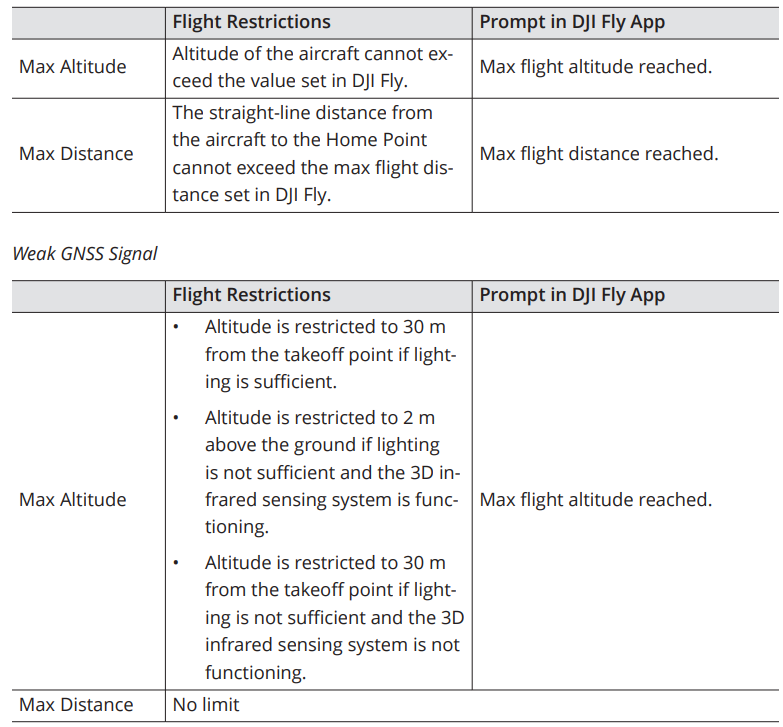
- Each time the aircraft is powered on, the altitude limit will be automatically removed as long as the GNSS signal becomes strong (GNSS signal strength ≥ 2), and the limit will not take effect even if the GNSS signal becomes weak afterwards.
- If the aircraft flies out of the set flight range due to inertia, you can still control the aircraft, but cannot fly it any further away.
GEO Zones
The DJI GEO system designates safe flight locations, provides risk levels and safety notices for individual flights, and offers information on restricted airspace. All restricted flight areas are referred to as GEO Zones, which are further divided into Restricted Zones, Authorization Zones, Warning Zones, Enhanced Warning Zones, and Altitude.
Unlocking Zones
Self-Unlocking is intended for unlocking Authorization Zones. Once the unlocking request is approved, you can synchronize the unlocking license through the DJI Fly app. To unlock the zone, alternatively, you can launch or fly the aircraft directly into the approved Authorization Zone and follow the prompts in DJI Fly to unlock the zone.
- To ensure flight safety, the aircraft will not be able to fly out of the unlocked zone after entering it.
- If the Home Point is outside the unlocked zone, the aircraft will not be able to return home.
Flight Environment Requirements
- DO NOT fly in severe weather conditions such as strong winds, snow, rain, and fog. Only fly in open areas. Tall buildings and large metal structures may affect the accuracy of the onboard compass and GNSS system.
- Fly the aircraft within visual line of sight (VLOS). Any flight beyond visual line of sight (BVLOS) can be conducted only when the aircraft performance, the knowledge and skills of the pilot, and the operational safety management are compliant with local regulations for BVLOS. Avoid obstacles, crowds, trees, and bodies of water.
- When the GNSS signal is weak, fly the aircraft in environments with good lighting and visibility. The vision system may not work properly in poor light conditions. Minimize interference by avoiding areas with high levels of electromagnetism, such as locations near power lines, base stations, electrical substations, and broadcasting towers.
- The braking distance of the aircraft is affected by the flight altitude. The higher the altitude, the greater the braking distance. When flying at high altitudes, you should reserve adequate braking distance to ensure flight safety.
- GNSS cannot be used on the aircraft in polar regions. Use the vision system instead. DO NOT take off from moving objects such as cars, ships, and airplanes. DO NOT take off from solid-colored surfaces or surfaces with strong reflections, such as a car roof.
Operating the Aircraft Responsibly
To avoid serious injury and property damage, observe the following rules:
- After landing, power off the aircraft first, then switch off the remote controller.
- DO NOT use an aircraft that has been accidentally damaged, crashed, or is not in good condition.
- Make sure to train sufficiently and have contingency plans for emergencies or if an incident occurs.
- Make sure to have a flight plan. DO NOT fly the aircraft recklessly.
- Respect the privacy of others when using the camera.
- Make sure to comply with localprivacy laws, regulations, and moral standards.
- DO NOT use this product for any reason other than general personal use.
- DO NOT use it for illegal or inappropriate purposes such as military or unauthorized investigations.
- DO NOT trespass onto the private property of others.
- Make sure you are NOT under the influence of anesthesia, alcohol, or drugs, or other conditions that could impair the ability to operate the aircraft safely.
Pre-Flight Checklist
- Remove any protective parts from the aircraft.
- Make sure the Intelligent Flight Battery and the propellers are mounted securely.
- Make sure the remote controller, mobile device, and Intelligent Flight Battery are fully charged.
- Make sure the aircraft arms and propellers are unfolded.
- Make sure the gimbal and camera are functioning normally.
- Make sure that nothing is obstructing the motors and that they are functioning normally.
- Make sure that DJI Fly is successfully connected to the aircraft.
- Make sure all camera lenses and sensors are clean.
- Only use genuine DJI parts or DJI-authorized parts.
- Unauthorized parts may cause system malfunctions and compromise flight safety.
Basic Flight
Auto Takeoff/Landing
- Launch DJI Fly and enter the camera view.
- Complete all steps in the pre-flight checklist.
- Ta. If conditions are safe for takeoff, press and hold the button to confirm.
- The aircraft will take off and hover above the ground.
- If conditions are safe to land, tap, then tap and hold to confirm.
- Auto landing can be canceled by tapping.
- If the Downward Vision System is working normally, Landing Protection will be enabled.
- Motors will stop automatically after landing.
Starting/Stopping the Motors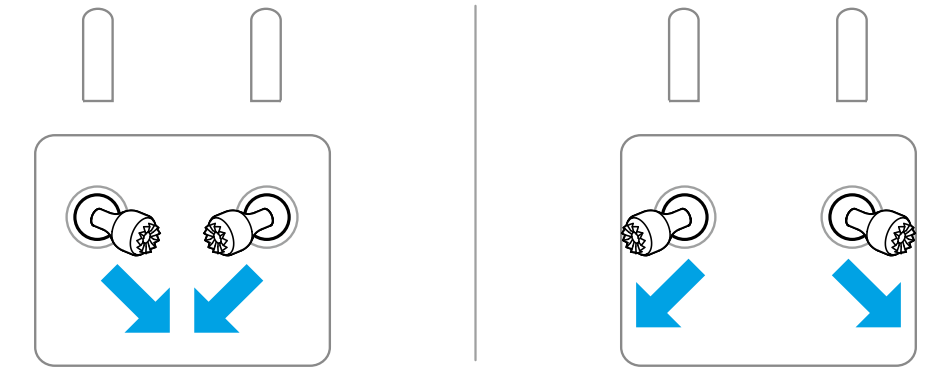
Perform one of the Combination Stick Commands (CSC) as shown below to start the motors. Once the motors have started spinning, release both sticks simultaneously.
The motors can be stopped in two ways:
Method 1: When the aircraft has landed, push the throttle stick down and hold until the motors stop.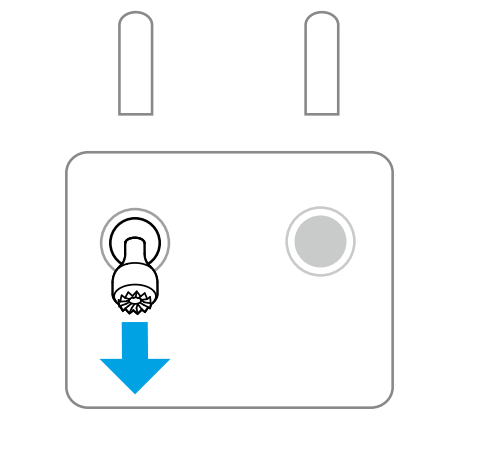
Method 2: When the aircraft has landed, perform one of the CSCs as shown below until the motors stop.
Stopping the Motors Mid-Flight
Stopping the motors mid-flight will cause the aircraft to crash. The default setting for Emergency Propeller Stop in the DJI Fly app is Emergency Only, which means that the motors can only be stopped mid-flight when the aircraft detects that it is in an emergency such as the aircraft is involved in a collision, a motor has stalled, the aircraft is rolling in the air, or the aircraft is out of control and is ascending or descending very quickly.
Controlling the Aircraft
The control sticks of the remote controller can be used to control the aircraft’s movements. The control sticks can be operated in Mode 1, Mode 2, or Mode 3, as shown below. The default control mode of the remote controller is Mode 2. In this manual, Mode 2 is used as an example to illustrate how to use the control sticks. The more the stick is pushed away from the center, the faster the aircraft moves.
DJI Mini 5 Pro User Manual
Mode 1
Mode 2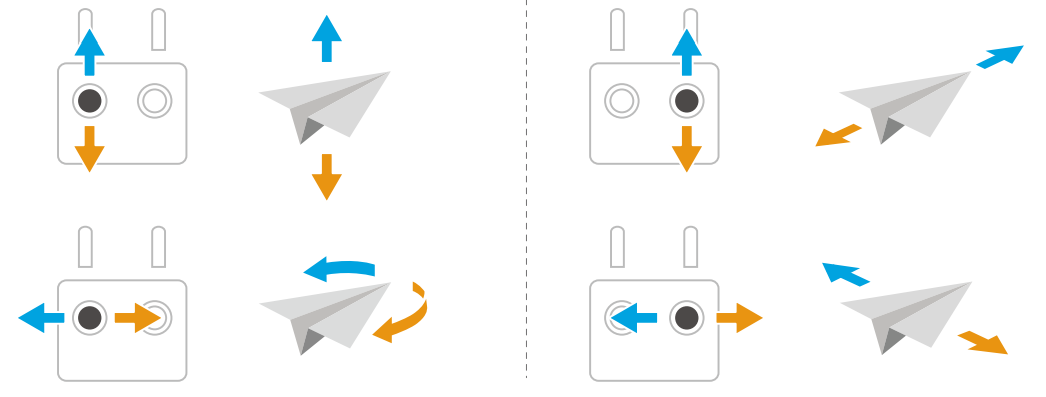
Mode 3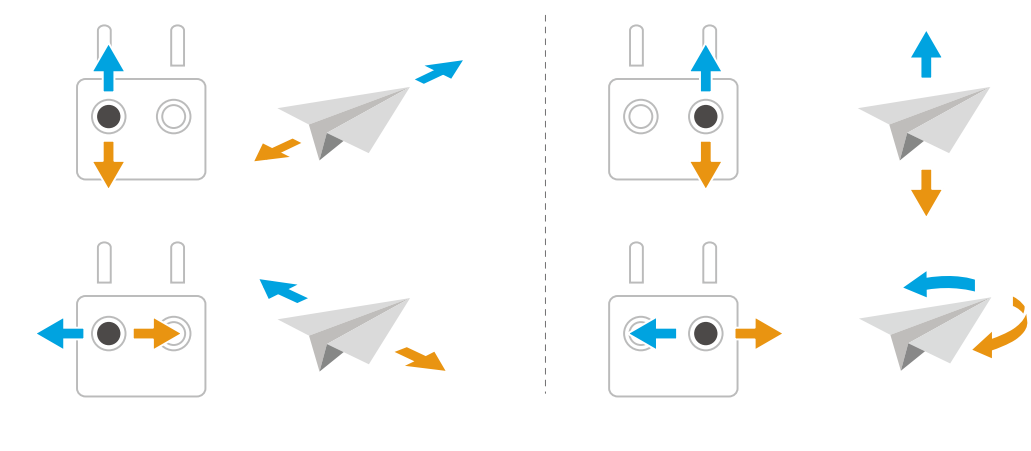
Takeoff/Landing Procedures
- The pre-flight checklist is designed to help you fly safely.
- Go through the full pre-flight checklist before each flight.
- Place the aircraft in an open, flat area with the rear of the aircraft facing towards you.
- Power on the remote controller and the aircraft.
- Launch DJI Fly and enter the camera view.
- Wait for the aircraft self-diagnostics to complete.
- If DJI Fly does not show any irregular warning, you can start the motors.
- Push the throttle stick up slowly to take off.
- To land, hover over a level surface and push the throttle stick down to descend.
- After landing, push the throttle down and hold until the motors stop.
- Power off the aircraft before the remote controller.
Video Suggestions and Tips
- Select the desired gimbal operation mode in DJI Fly.
- It is recommended to take photos or record videos when flying in Normal or Cine mode.
- DO NOT fly in bad weather, such as on rainy or windy days.
- Choose the camera settings that best suit your needs.
- Perform flight tests to establish flight routes and preview scenes.
- Use the control sticks gently to ensure smooth and stable movement of the aircraft.
Intelligent Flight Modes
Spotlight
Enables the gimbal camera to face toward the subject all the time while you manually control the flight. When the vision system is working normally, the aircraft will bypass or brake if an obstacle is detected, according to the obstacle avoidance action set to Bypass or Brake in DJI Fly.
Supported Subjects
- Stationary subjects
- Moving subjects (only vehicles, boats, and people)
Point of Interest (POI)
Allows the aircraft to fly around the subject. The aircraft will bypass obstacles regardless of the flight modes or obstacle avoidance action settings in DJI Fly when the vision systems are working normally. Supported Subjects:
- Stationary subjects
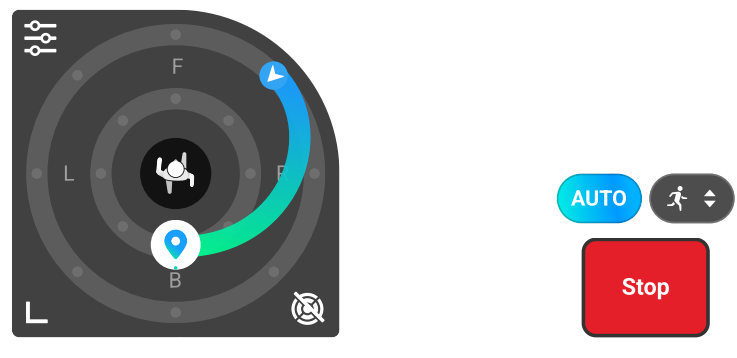
- Moving subjects (only vehicles, boats, and people) ActiveTrack
- The aircraft follows the subject in Manual and Automatic Movement modes.
Manual: Tap or slide the trace wheel to change tracking direction, and the aircraft will automatically fly from its current position along the generated trajectory to the selected tracking direction and keep tracking. Users can also manually adjust the tracking direction, height, and distance using the control sticks. Tap the FocusTrack Settings icon to set tracking parameters in the app.
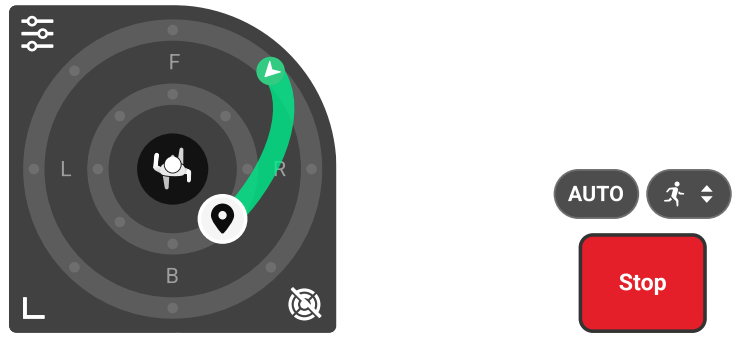
- Automatic Movement: Tap the AUTO icon to enable or disable Automatic Movement. The aircraft continuously adjusts its flight path to follow the subject based on the flight environment.

- In Automatic Movement mode, the aircraft will follow the subject using the default tracking parameters of the app. Custom FocusTrack settings will not take effect.
- Pay attention to the flight environment and ensure flight safety.
- Moving the control stick or operating the trace wheel, the aircraft will exit Automatic Movement mode.
- DO NOT manually set the shooting scene to Standard or Cycling when skiing.
- Otherwise, the tracking effect and flight safety cannot be guaranteed.

Using Focus Track
Before enabling FocusTrack, make sure the flying environment is open and unobstructed with sufficient light. Tap the FocusTrack icon on the left of the camera view, or select the subject on the screen to enable FocusTrack. After enabling, tap the FocusTrack icon again to exit. During use, press the Flight Pause button on the remote controller to cancel the subject selection.
Master Shots
The aircraft will select a preset flight route based on the subject type and distance, and automatically take a variety of classic aerial photography shots.
Using Master Shots
- Tap the Shooting Mode icon on the right side of the camera view and select MasterShots.
- The aircraft will fly back to its original position once the recording is finished.
- Tap or press the Flight Pause button on the remote controller once.
- The aircraft will exit MasterShots immediately and hover.
Quick Shots
QuickShots include multiple shooting modes. The aircraft automatically records according to the selected shooting mode and generates a short video.
Using QuickShots
- Tap the Shooting Mode icon on the right side of the camera view and select QuickShots. After selecting one sub-mode, tap the plus icon or drag-select the subject on the screen.
- Then tap to begin shooting. The aircraft will record footage while performing a preset flight movement according to the option selected, and generate a video afterwards.
- The aircraft will fly back to its original position once the recording is finished. Tap or press the Flight Pause button on the remote controller once. The aircraft will exit QuickShots immediately and hover.
Hyperlapse
Hyperlapse takes a certain number of photos according to the time interval, and then compiles these photos into a video of a few seconds. It is especially suitable for recording scenes with moving elements, such as traffic flow, clouds drifting, and sunrises and sunsets.
Using Hyperlapse
- Tap the Shooting Modes icon from the camera and select Hyperlapse. Select the Hyperlapse mode.
- After setting the related parameters, tap the shutter/ record button to begin the process.
- Tap or press the Stop button on the remote controller, tand he aircraft will exit Hyperlapse and hover.
Waypoint Flight
With Waypoint Flight, you can set waypoints for different shooting locations in advance and then generate a flight route based on the set waypoints. The aircraft will then fly automatically along the preset route and complete the preset camera actions. The flight routes can be saved and repeated at different times to capture the changes over seasons and the day-to-night effect.
Using Waypoint Flight
- Tap on the left of the camera view to enable Waypoint Flight.
- Follow the on-screen instructions to complete the settings and perform the flight route.
- Tap again to exit waypoint flight, and the flight route will be saved to the Library automatically.y
Cruise Control
Cruise Control enables the flight speed and gimbal rotation speed to be locked, making control easier and camera movements smoother. More camera movements, such as spiraling up and gimbal rotation, can be achieved by increasing control stick input and dial input.
Using Cruise Control
- Set one customizable button of the remote controller to Cruise Control. When pushing the control sticks, press the cruise control button, and the aircraft will automatically fly at the current speed.
- DJI RC 2: When adjusting the gimbal angle using the remote controller dial, press the cruise control button, and the gimbal will maintain its current rotation speed and direction.
- It is recommended to set the camera control dial to gimbal roll. DJI RC-N3: Automatic gimbal rotation is not supported via the cruise control button. The gimbal rotation will stop when the gimbal reaches its movement limit.
- During gimbal rotation, if you adjust the gimbal angle, the gimbal will perform the corresponding adjustment and then continue rotating. Press the s Flight Pause button on the remote controller once, or tap to exit cruise control.
Aircraft
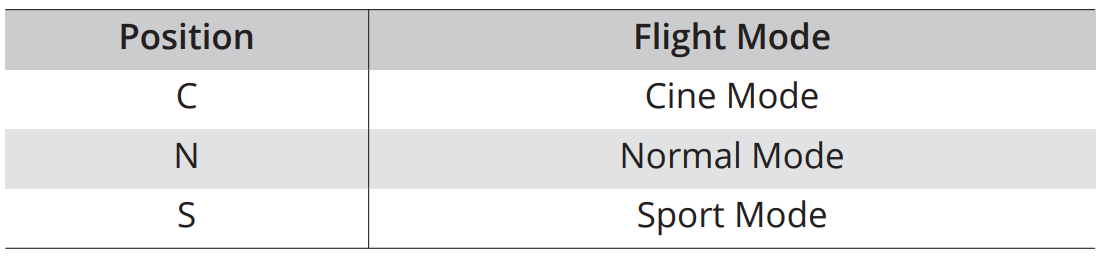
Flight Mode
The aircraft supports the following flight modes, which can be switched via the Flight Mode switch on the remote controller. Normal Mode: Normal mode is suitable for most flight scenarios. The aircraft can hover precisely, fly stably, and use Intelligent Flight Modes.
Sport Mode: The maximum horizontal flight speed of the aircraft will be higher when compared with Normal mode. Note that obstacle avoidance is disabled in Sport mode. Cine Mode: Cine mode is based on Normal mode with a limited flight speed, making the aircraft more stable during recording.
The aircraft automatically changes to Attitude (ATTI) mode when the vision system is unavailable or disabled, and the GNSS signal is weak or the compass experiences interference. In ATTI mode, the aircraft may be more easily affected by its surroundings.
- The flight modes are only effective for manual flight and cruise control.
- You must stay alert to the surrounding environment and control the aircraft to avoid obstacles.
- The maximum speed and braking distance of the aircraft significantly increase in Sport mode.
- A minimum braking distance of 30 m is required in windless conditions.
- Make sure to maintain adequate maneuvering space during flight.
- You may experience shaking in videos recorded in Sport mode.
Aircraft Status Indicators
The aircraft has two aircraft status indicators.
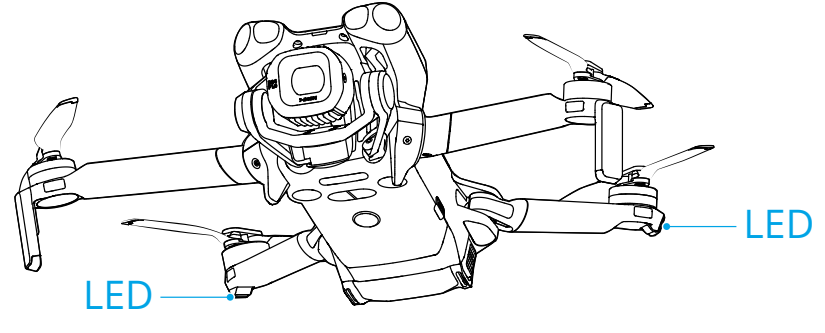
When the aircraft is powered on, but the motors are not running, the aircraft status indicators will display the current status of the aircraft.
Aircraft Status Indicators Descriptions
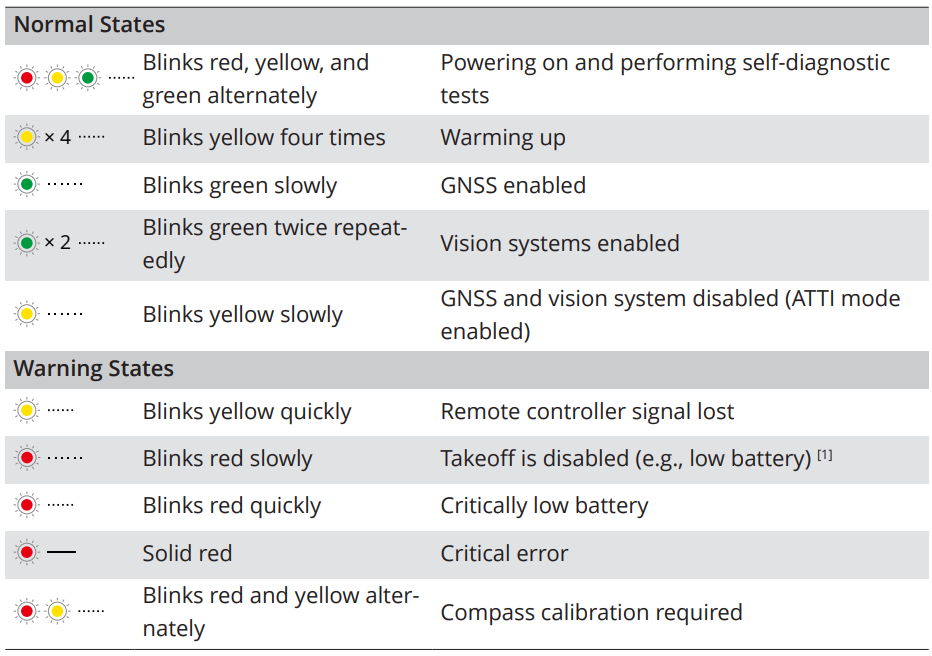
If the aircraft cannot take off while the status indicators are blinking red slowly, view the warning prompt in DJI Fly. Lighting requirements vary depending on the region. Observe local laws and regulations.
Return to Home
Carefully read the contents of this section to ensure you are familiar with the behaviorof the aircraft in Return-to-Home (RTH). The Return to Home (RTH) function will automatically fly the aircraft back to the lastrecorded Home Point. RTH can be triggered in three ways: the user actively triggers RTH, the aircraft has a low battery, or the remote controller signal has been lost (Failsafe RTH istriggered). If the aircraft has recorded the Home Point successfully and the positioning system is functioning normally, when the RTH function is triggered, the aircraft will automatically fly back and land at the Home Point.
Home Point: The Home Point will be recorded at takeoff as long as the aircraft has a strong GNSS signal or the lighting is sufficient. After the Home Pointis recorded, DJI Fly will issue a voice prompt. If it is necessary to update the Home Point during a flight (such as if you have changed your position), the Home Point can be manually updated in > Safety page in DJI Fly. When the aircraft is used with the DJI RC 2 remote controller, Dynamic Home Point is available.
Advanced RTH
When Advanced RTH is triggered, the aircraft will automatically plan the best RTH path, which will be displayed in DJI Fly and will be adjusted according to the environment. During RTH, the aircraft will adjust the flight speed automatically according to environmental factors such as the wind speed, wind direction, and obstacles. If the control signal between the remote controller and the aircraft is good, exit RTH by tapping in DJI Fly or by pressing the RTH button on the remote controller. After exiting RTH, you will regain control of the aircraft.
Trigger Method
The user actively triggers RTH.
During flight, you can trigger RTH by pressing and holding the RTH button on the remote controller, or tapping from the left side of the camera view and then pressing and holding the RTH icon. If the remote controller signal is lost during RTH, the aircraft will continue the RTH procedure regardless of the preset Signal Lost Action.
RTH Procedure
After Advanced RTH is triggered, the aircraft brakes and hovers in place. When the environment or lighting conditions are suitable for the vision system:
- The aircraft will adjust its orientation to the Home Point, plan the best path according to the RTH settings, and then return to the Home Point if GNSS was available at takeoff.
- If GNSS was unavailable and only the vision system was working during takeoff, the aircraft would adjust its orientation to the Home Point, plan the best path according to the RTH settings, and then return to the position wita h strong GNSS signal based on the RTH settings.
- Make sure that the obstacle avoidance is enabled.
- DO NOT fly in narrow spaces, and the environmental wind speed should be less than 3 m/s.
- You need to confirm whether the flight path is correct and pay attention to flight safety.
- After confirmation, the aircraft will continue to return to the home point at a low speed.
- If an obstacle appears on the return path, the aircraft will brake and may exit RTH.
- The aircraft lands immediately if the RTH distance is less than 5 m.
RTH Settings
RTH settings are available for Advanced RTH. Go to the camera view in DJI Fly, tap > Safety, and scroll to Return to Home (RTH).
Optimal
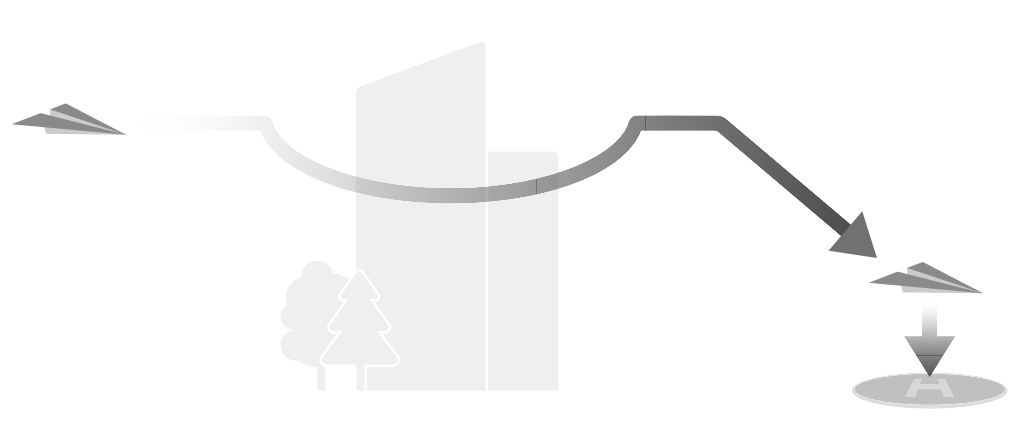
- If the lighting is sufficient and the environment is suitable for the vision system, the aircraft will automatically plan the optimal RTH path and adjust the altitude according to environmental factors, such as obstacles and transmission signals, regardless of the RTH Altitude setting.
- The optimal RTH path means the aircraft will travel the shortest distance possible to reduce the amount of battery power used and to increase flight time.
- If the lighting is insufficient or the environment is not suitable for the vision system, the aircraft will perform Preset RTH based on the RTH Altitude setting.
Preset
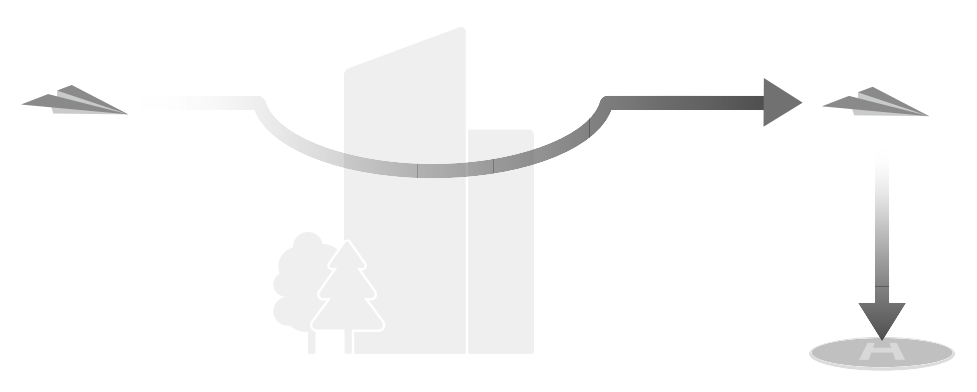
- If the forward-facing LiDAR detects an obstacle ahead, the aircraft will ascend to avoid the obstacle.
- It will stop climbing once the path ahead is clear and then continue to RTH.
- The aircraft will brake and hover, and the user will need to take control.
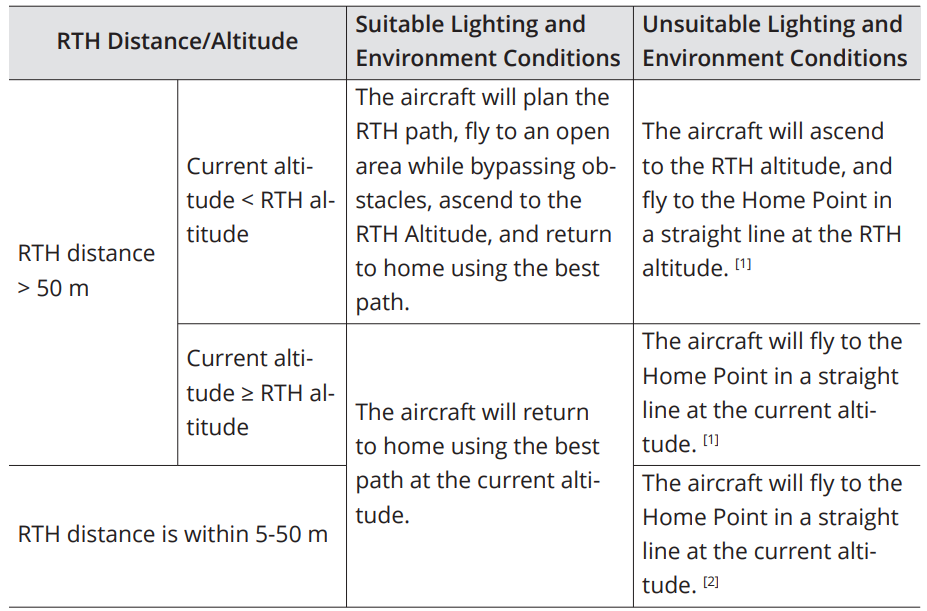
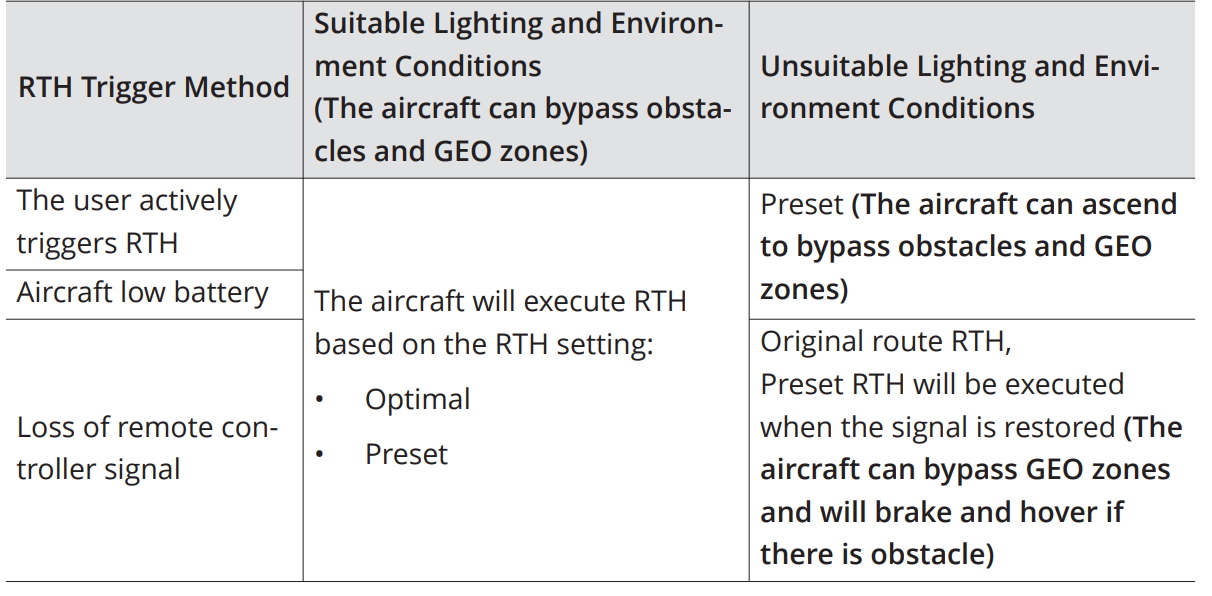
The RTH plans for different environments, RTH trigger methods, and RTH settings are as follows:
Landing Protection
During RTH, landing protection activates once the aircraft begins to land. The specific performance of the aircraft is as follows:
- If the ground is determined suitable for landing, the aircraft will land directly.
- After reaching the area above the Home Point, the aircraft will land precisely on the takeoff point.
- Performing a precision landing is subject to the following conditions:
- The Home Point must be recorded upon takeoff and must not be changed during flight.
- During takeoff, the aircraft must vertically ascend at least 7 m before moving horizontally.
- The Home Point terrain features must remain largely unchanged.
- The lighting conditions must not be too bright or too dark.
- During landing, movement of any other control stick apart from the throttle stick will be regarded as giving up precision landing, and the aircraft will descend vertically.
Dynamic Home Point
When Dynamic Home Point is enabled, the RTH icon will turn blue. After RTH is triggered, the aircraft will return near the Home Point, exit RTH, and hover. Users can control the aircraft.
- In camera view, tap > Update Home Point > Dynamic Home Point > Update.
- In camera view, tap > Safety > Update Home Point > Dynamic Home Point > Update.
- After enabling Dynamic Home Point for the first time, if the GNSS signal of the remote controller is weak, the dynamic Home Point may not be available.
- Use the Dynamic Home Point function in an open environment with a strong GNSS signal. Otherwise, the Home Point will have a large deviation from the actual remote controller location.
- Once the dynamic Home Point is available, if the GNSS signal of the remote controller is weak, the Home Point will remain at the last successfully updated location. When RTH is triggered, check if the Home Point location is the latest remote controller location.
Sensing System
- Omnidirectional Vision System
- Auxiliary Light
- Downward Vision System
- 3D Infrared Sensing System
- Forward-Facing LiDAR
When using the auxiliary light, make sure to comply with local regulations and DO NOT obstruct the LED lights on the arms.
- When Vision Positioning and Obstacle Avoidance is disabled, the aircraft relies only on GNSS to hover, omnidirectional obstacle avoidance is unavailable, and the aircraft will not automatically decelerate during descent close to the ground.
- Disabling Vision Positioning and Obstacle Avoidance takes effect only when flying manually, and will not take effect when using RTH, auto landing, or using Intelligent Flight Modes.
- Vision Positioning and Obstacle Avoidance can be temporarily disabled in clouds and fog or when an obstacle is detected when landing. Keep Vision Positioning and Obstacle Avoidance enabled in regular flight scenarios. Vision Positioning and Obstacle Avoidanceares enabled by default after restarting the aircraft.
Advanced Pilot Assistance Systems
The Advanced Pilot Assistance Systems (APAS) feature is available in Normal mode and Cine mode. When APAS is enabled, the aircraft will continue to respond to your commands and plan its path according to both control stick inputs and the flight environment. APAS makes it easier to avoid obstacles, obtain smoother footage, and give a better flying experience.
When APAS is enabled, the aircraft can be stopped by pressing the Flight Pause button on the remote controller. The aircraft brakes and hovers for three seconds and awaits further pilot commands.
- When aircraft orientation changes rapidlywhile flying near obstacles.
- When flying through narrow obstacles such as canopies or bushes at high speed.
- When flying near obstacles that are too small to detect.
Landing Protection
If obstacle avoidance action is set to Bypass or Brake, Landing Protection will be activated when you push the throttle stick down to land the aircraft. Landing Protection is enabled once the aircraft begins to land.
- If the ground is determined to be suitable for landing, the aircraft will land directly.
- If the ground is determined to be unsuitable for landing, the aircraft will hover when it descends to a certain height above ground. Push down on the throttle stick for at least five seconds, and the aircraft will land without obstacle avoidance.
Vision Assist
The vision assist view, powered by the vision systems, changes the image on the view from the corresponding vision sensors according to the flight speed direction to help users navigate and observe obstacles during flight.
- When using vision assist, the quality of the video transmission may be lower.
- It is normal for components of the aircraft to appear in the vision assist view.
- It is normal that image seams or brightness differences may occur in the vision assist view.
- Vision assist should be used for reference only. Glass walls and small objects such as tree branches, electric wires, and kite strings cannot be displayed accurately.
- Vision assist is not available when the aircraft has not taken off or when the video transmission signal is weak.

- When the direction is not locked in a specific direction, the vision assist view automatically switches to the current flight direction.
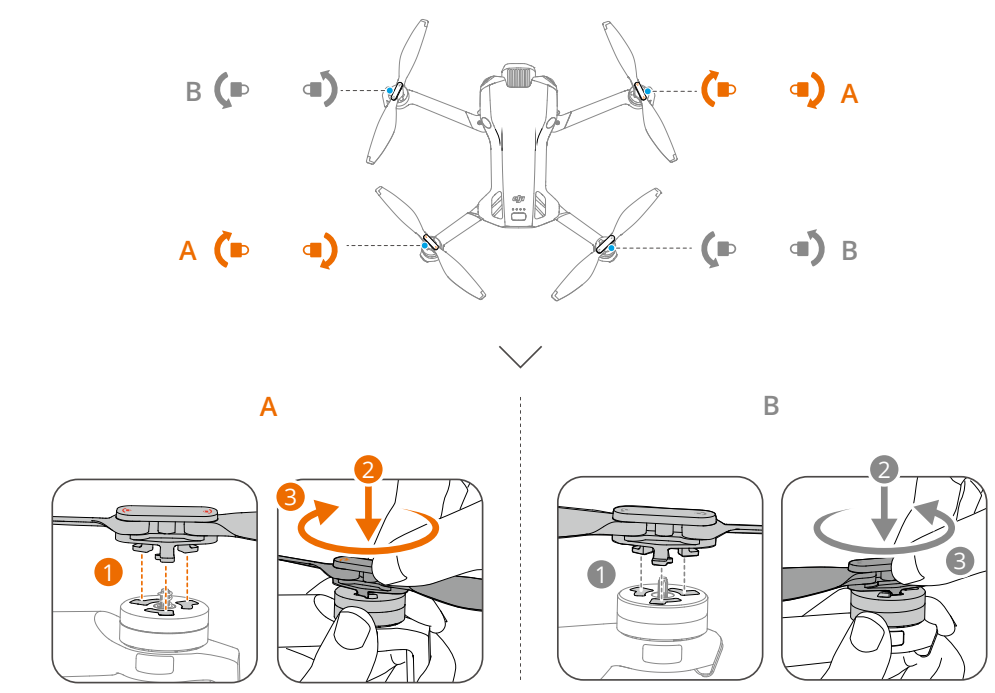
Propellers
Attaching/Detaching the Propellers
Install the propellers correctly according to the color marks on the propellers and motors.

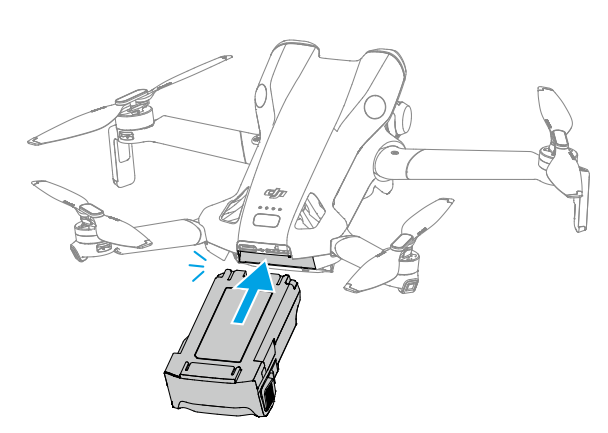
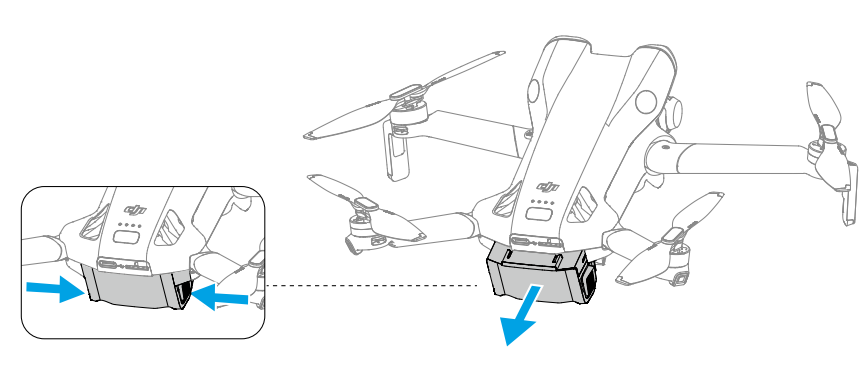
Installing/Removing the Battery

Battery Usage
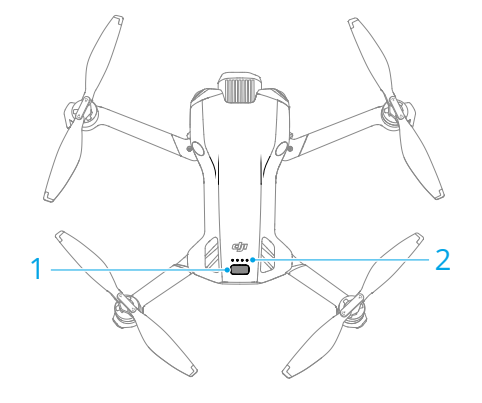
Checking the Battery Level
Press the power button once to check the current battery level.
- Power Button
- Battery Level LEDs
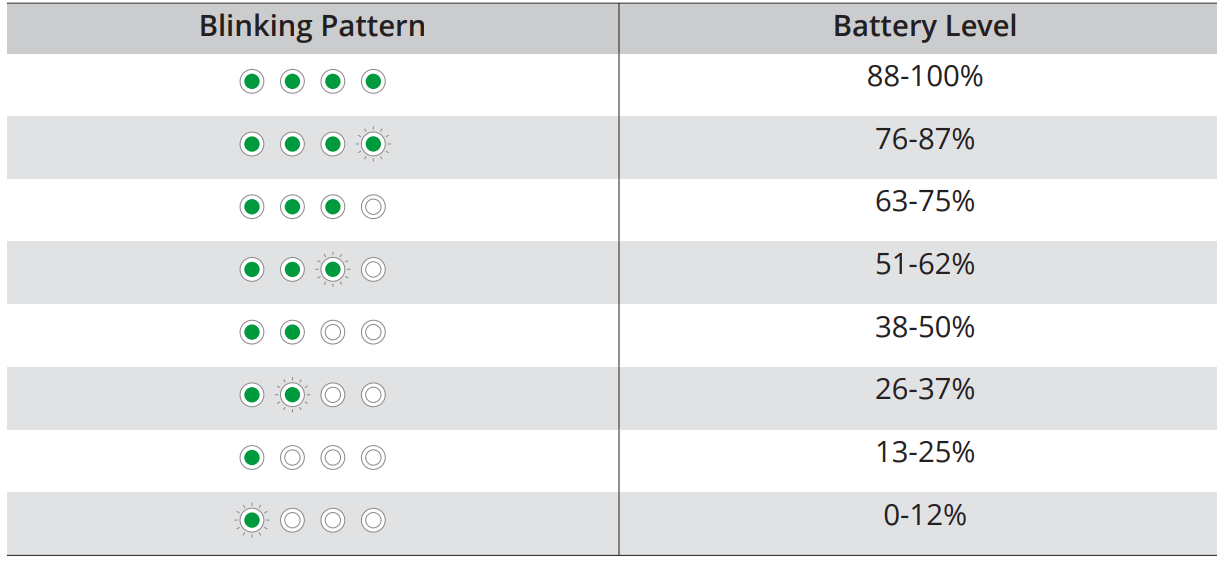
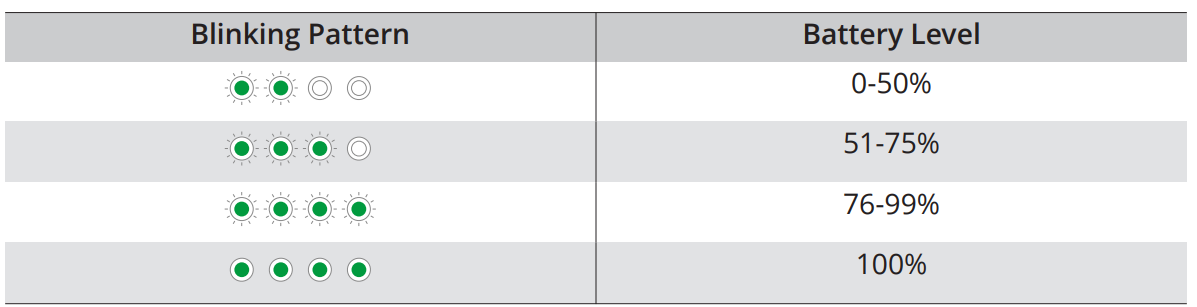
The battery level LEDs display the power level of the battery during charging and discharging. The statuses of the LEDs are defined below:
- The LED is on
- The LED is flashing
- The LED is of
Powering On/Off
Press, then press and hold the power button to power the aircraft on or off. The battery level LEDs display the battery level when the aircraft is powered on. The battery level LEDs turn off when the aircraft is powered off.
If the two LEDs shown in the picture below blink simultaneously, it indicates the battery is malfunctioning. Remove the battery from the aircraft, insert the battery again, and make sure that it is securely mounted.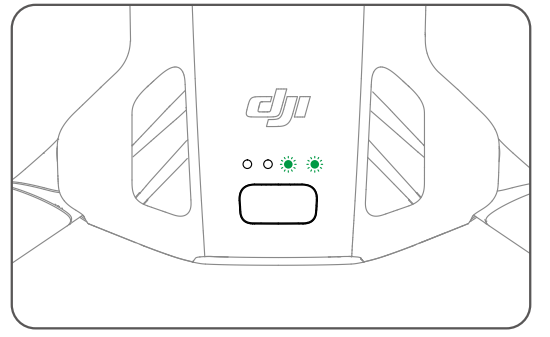
Charging the Battery
Fully charge the battery before each use. It is recommended to use the charging devices provided by DJI or other chargers that support the USB PD fast charging protocol.
Using a Charger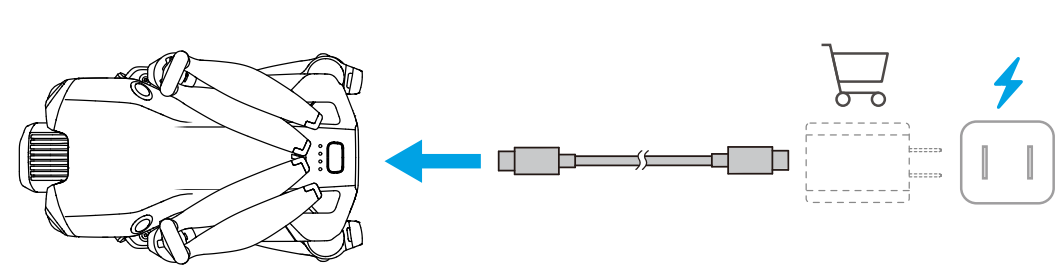
- The battery cannot be charged if the aircraft is powered on.
- The table below shows the battery level during charging.
- The blinking frequency of the battery level LEDs differs depending on the USB charger used.
- If the charging speed is fast, the battery level LEDs will blink quickly.
- Four LEDs blinking simultaneously indicate the battery is damaged.
Charging Hub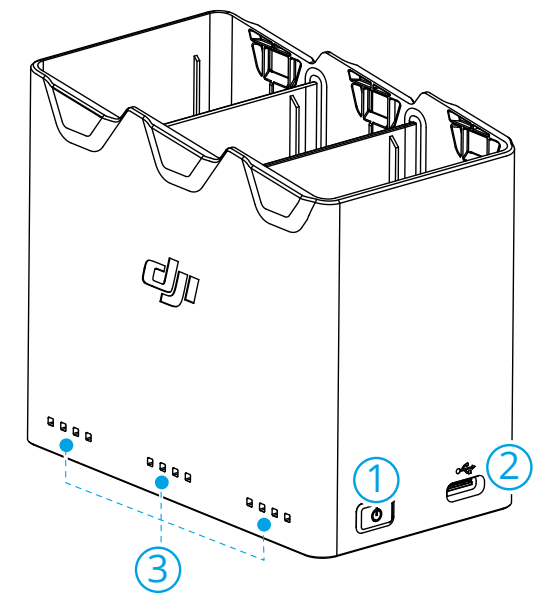
- Function Button
- USB-C Connector
- Status LEDs
How to Charge
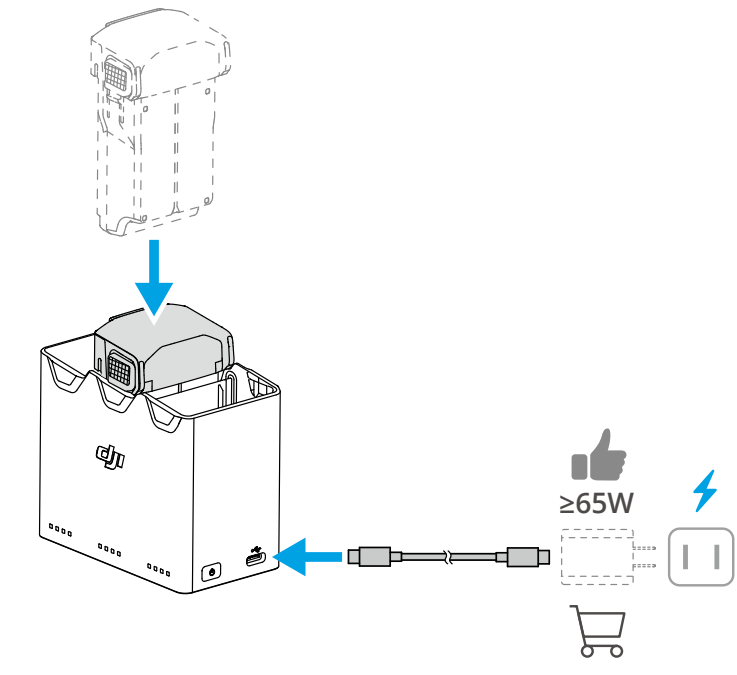
When using chargers of different power outputs, the charging sequence will vary.
- Parallel charging conditions are as follows:
- Battery Model: BWXNN5-2788-7.0
- Adapter:
- Power ≥ 45 W
- Output current ≥ 3 A at 15V
- Supports PD protocol
- Charging cable: Rated current ≥ 3 A
Charging Hub as a Power Bank
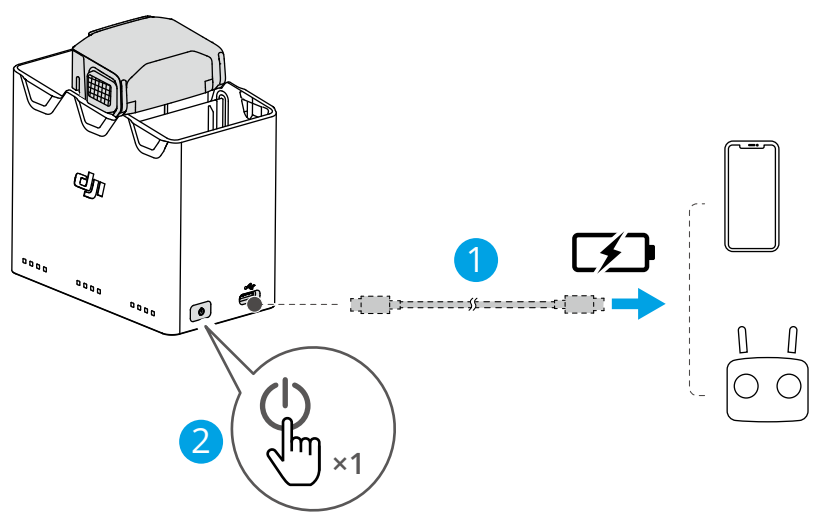
- Insert one or more batteries into the charging hub.
- Connect an external device via the USB-C port, such as a mobile phone or remote controller.
- To stop charging the external device, disconnect the external device from the charging hub.
- If the remaining charge of a battery is lower than 5%, the battery cannot charge the external device.
- To switch to charging Intelligent Flight Batteries, reconnect the USB-C cable.
Accumulating Power
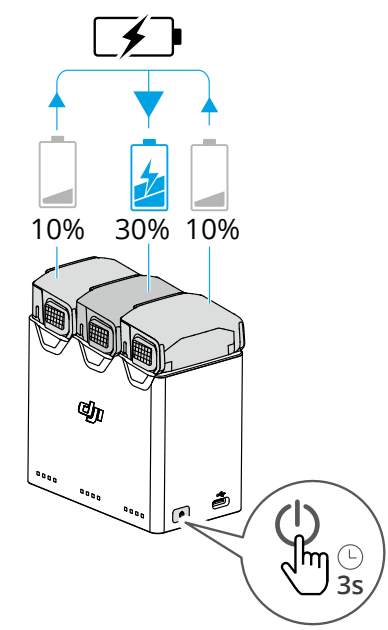
- Insert the Intelligent Flight Batteries into the charging hub, press and hold the function button to transfer the power from the batteries with a lower power level to the battery with the highest power level. The status LEDs for the batteries witha lower power level will display the current power level, while the status LEDs for the battery with a high power level will blink in sequence.
- To stop accumulating power, press and hold the function button again. After stopping power accumulation, press the function button to check the power level of the batteries.
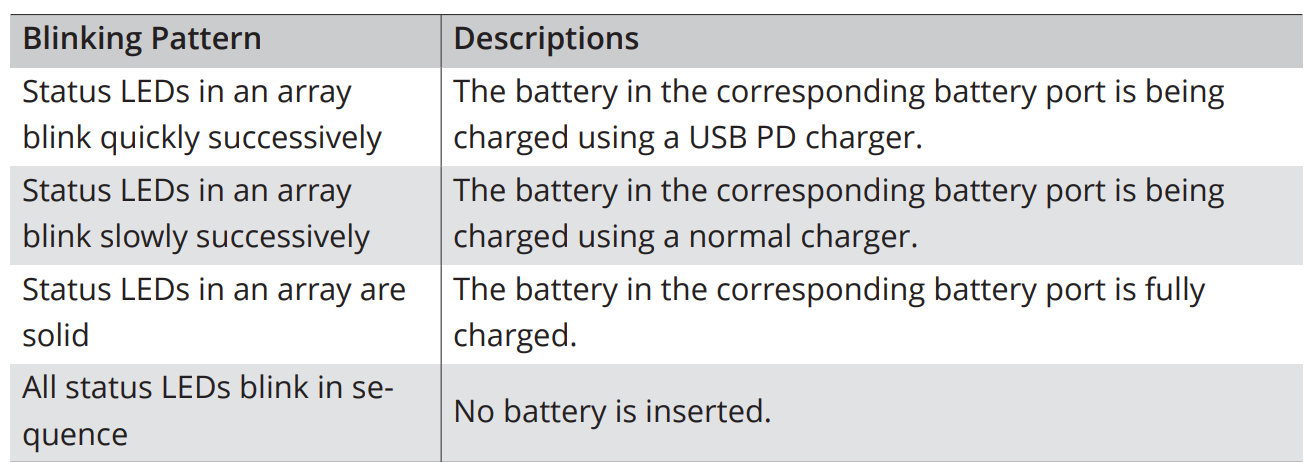
Status LED Descriptions
Each battery port of the charging hub has its corresponding status LED array, which can indicate charging status, battery level, and abnormal status. The LED status for battery level and battery abnormality is the same as that on the aircraft.
Charging Status
Battery Protection Mechanisms
The battery level LEDs can display battery protection notifications triggered by abnormal charging conditions.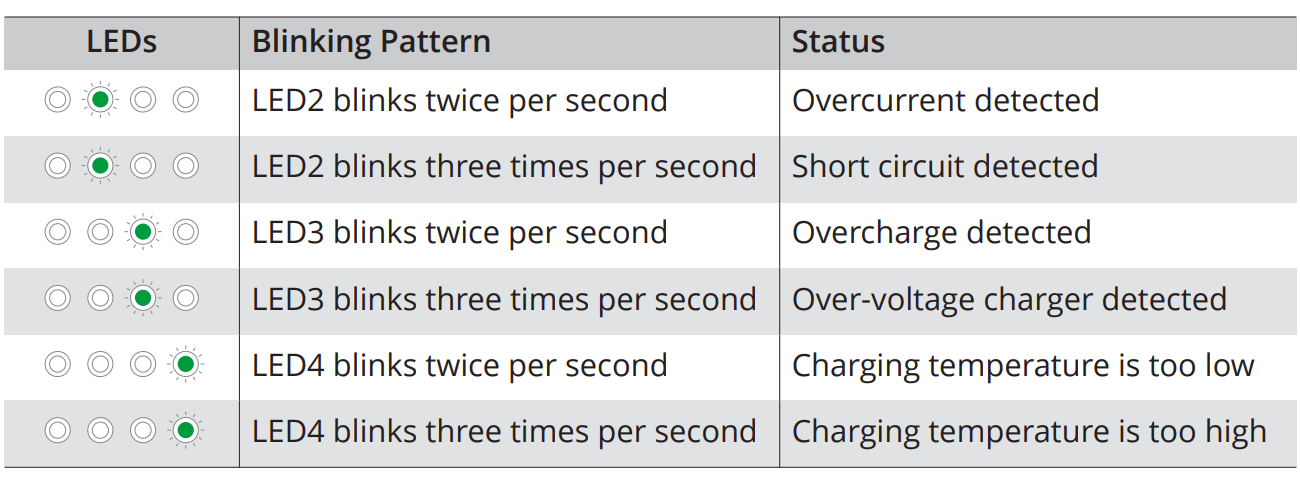
If any of the battery protection mechanisms are activated, unplug the charger and plug it in again to resume charging. If the charging temperature is abnormal, wait for it to return to normal. The battery will automatically resume charging without the need to unplug nd plug in the charger again.
Gimbal and Camera
Gimbal Angle
Use the gimbal dial on the remote controller to control the tilt of the gimbal. Alternatively, do so through the camera view in DJI Fly. Press and hold the screen until the gimbal adjustment bar appears. Drag the bar to control the gimbal’s angle. The gimbal supports roll rotation, allowing angle adjustment during shooting. Click the link or scan the QR code to watch the tutorial video.
Gimbal Operation Modes
Two gimbal operation modes are available. Switch between the different operation modes in > Control. Follow Mode: The roll angle of the gimbal remains stable relative to the horizontal plane or maintains the preset roll angle. This mode is suitable for capturing stable images. FPV Mode: When the aircraft is flying forward, the gimbal rolls in sync with the rolling aircraft to provide a first-person flying experience.
Storing and Exporting Photos and Videos
The aircraft supports the use of a microSD card to store your photos and videos. Refer to the Specifications for more information about recommended microSD cards. Photos and videos can also be saved in the internal storage of the aircraft when no microSD card is available. Use QuickTransfer to export the footage to a mobile device.
- Connect the aircraft to a computer using a data cable, export the footage intohe internal storage of the aircraft or to the microSD card mounted on the aircraft.
- The aircraft does not need to be powered on during the exporting process.
- Ensure that the SD card slot and the microSD card are clean and free of foreign objects during use.
- DO NOT remove the microSD card from the aircraft when taking photos or videos.
- Otherwise, the microSD card may be damaged.
- Check camera settings before use to ensure they are configured correctly.
- Before capturing important photos or videos, take a few images to test whether the camera is operating correctly. Make sure to power off the aircraft correctly.
- Otherwise, the camera parameters will not be saved, and any recorded images or videos may be affected. DJI is not responsible for any loss caused by an image or video recorded in a way that is not machine-readable
Quick Transfer
Follow the steps below to quickly download photos and videos from the aircraft to your mobile device.
- Power on the aircraft and wait until the self-diagnostic tests of the aircraft are complete.
- Turn on the Bluetooth and Wi-Fi on the mobile device, and make sure the positioning function is enabled as well.
- Enter QuickTransfer mode using one of the methods below.
- Launch DJI Fly on the mobile device and tap the QuickTransfer card on the home screen.
- Launch DJI Fly on the mobile device, go to Album, and tap in the upper right corner.
- Launch DJI Fly on the mobile device, and press the aircraft side button.
- Once successfully connected, the files on the aircraft can be accessed and downloaded at high speed. Note that when connecting the mobile device to the aircraft for the first time, press and hold the power button of the aircraft to confirm.
- If the mobile device is connecting to the aircraft for the first time to use the QuickTransfer function, pressing the aircraft side button will not take effect.
- If the aircraft is powered off, pressing the aircraft’s side button will not take effect.
- If DJI Fly is running in the background:
- For iOS mobile devices: Press the home button, and the mobile device will push a notification. Tap the notification to enter QuickTransfer mode. Ensure the notification permission for DJI Fly is enabled on the mobile device.
- For other mobile devices: Pressing the aircraft side button will not take effect.
Allow Quick Transfer in Sleep
If the Allow QuickTransfer in Sleep feature is enabled in DJI Fly (enabled by default), QuickTransfer can be used while the aircraft is powered off. After the aircraft and remote controller are connected, in the DJI Fly camera view, tap > Camera to enable or disable Allow QuickTransfer in Sleep. After enabling Allow QuickTransfer in Sleep, the aircraft will enter sleep mode after powering off, allowing you to use the QuickTransfer function.
- The battery is replaced.
- A USB-C cable is connected to the aircraft.
- When using QuickTransfer, it is not necessary to enter the Wi-Fi password on the settings page of the mobile device in order to connect. Launch DJI Fl,y, and a prompt will appear to connect the aircraft.
- Use QuickTransfer in an unobstructed environment with no interference and stay away from sources of interference such as wireless routers, Bluetooth speakers, or headphones.
Remote Controller
Powering On/Off
Press the power button once to check the current battery level. Press, then press and hold to power the remote controller on or off.
Charging the Battery
Connect the charger to the USB-C port on the remote controller.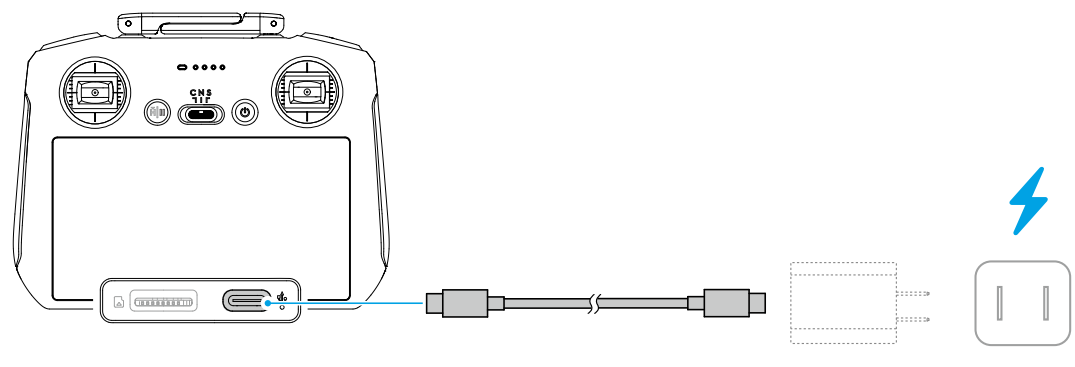
- Fully charge the remote controller before each flight.
- The remote controller sounds an alert when the battery level is low.
- Fully charge the battery at least once every three months to maintain the battery’s health.
Controlling the Gimbal and Camera
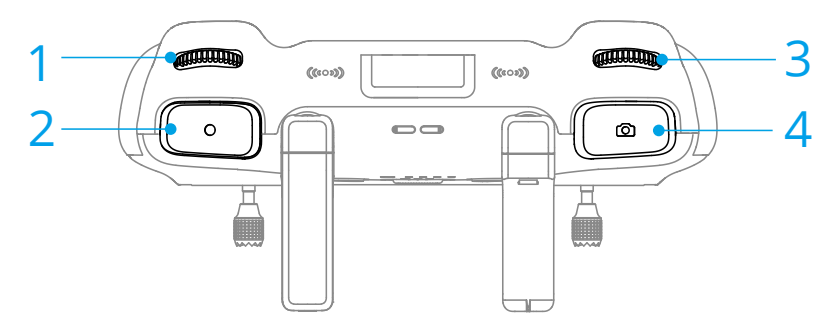
- Gimbal Dial: Control the tilt of the gimbal.
- Record Button: Press once to start or stop recording.
- Camera Control Dial: Use to adjust the zoom by default. The dial function can be set to adjust the focal length, EV, shutter speed, and ISO.
- Focus/Shutter Button: Press halfway down to auto-focus and press all the way down to take a photo.
The gimbal supports roll rotation. Press and hold the C1 button and then use the camera control dial to control the gimbal roll by default. You can also set other buttons to control the gimbal roll.
Flight Mode Switch
Toggle the switch to select the desired flight mode.
Flight Pause/RTH Button
Press once to make the aircraft brake and hover in place. Press and hold the button until the remote controller beeps and starts RTH. The aircraft will return to the last recorded Home Point. Press the button again to cancel RTH and regain control of the aircraft.
Remote Controller LEDs 
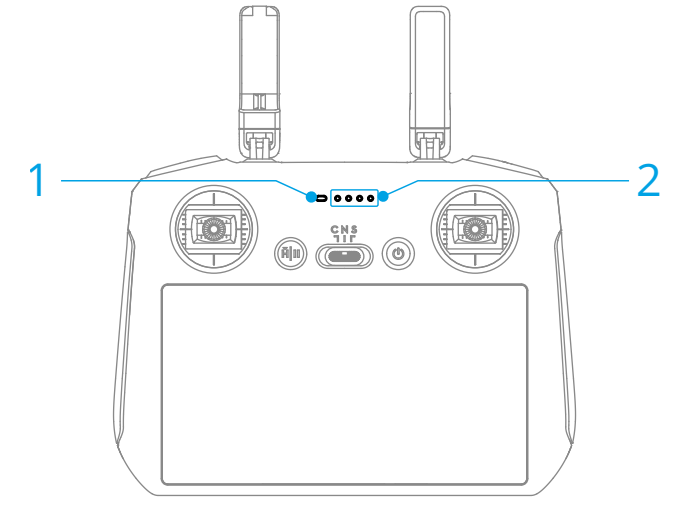
- Status LED
- Battery Level LEDs
Status LED 
Battery Level LEDs 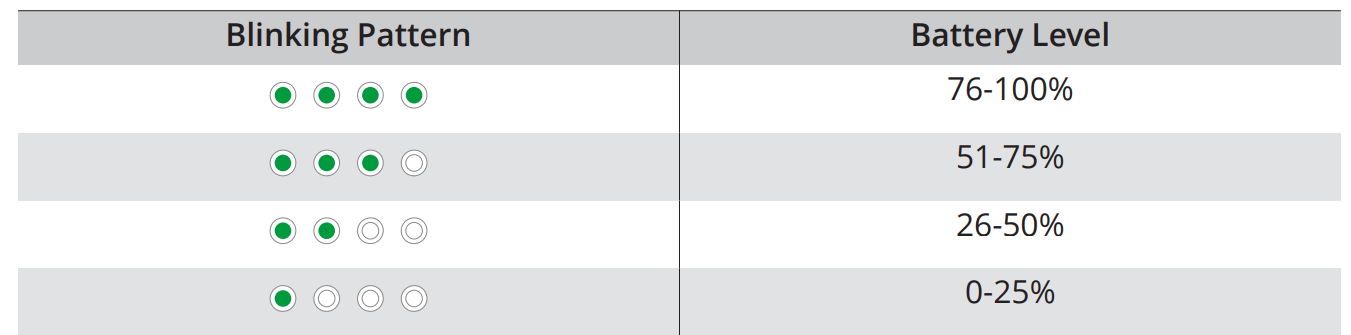
Remote Controller Alert
The remote controller beeps to indicate an error or warning. Pay attention when prompts appear on the touchscreen or in DJI Fly.
Slide down from the top of the screen and select Mute to disable all alerts, or slide the volume bar to 0 to disable some alerts.
The remote controller sounds an alert during RTH, which cannot be cancelled. The remote controller sounds an alert when the battery level of the remote controller is low. It will automatically power off after the alert stops. Move the control sticks or press any button to cancel the alert.
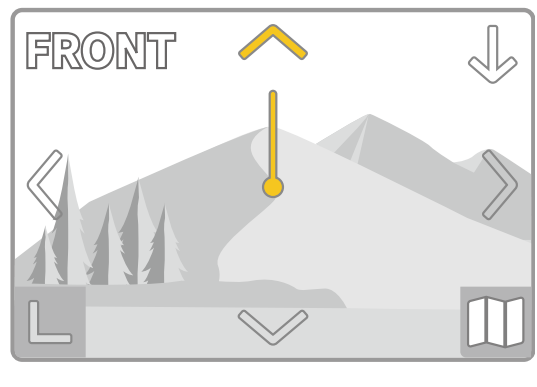
Optimal Transmission Zone
The signal between the aircraft and the remote controller is most reliable when the antennas are positioned in relation to the aircraft, as illustrated below. If the signal is weak, adjust the remote controller orientation, or fly the aircraft closer to the remote controller.
- DO NOT use other wireless devices operating at the same frequency as the remote controller. Otherwise, the remote controller will experience interference.
- A prompt will be displayed in DJI Fly if the transmission signal is weak during flight. Adjust the remote controller orientation according to the attitude indicator display to make sure that the aircraft is in the optimal transmission range.
Linking the Remote Controller
The remote controller is already linked to the aircraft when purchased together as a combo. Otherwise, follow the steps below to link the remote controller and the aircraft after activation.
- Power on the aircraft and the remote controller.
- Launch DJI Fly. In camera view, tap > Control > Connect to Aircraft.
- During linking, the status LED of the remote controller blinks blue and the remote controller beeps.
- Press and hold the power button of the aircraft for more than four seconds.
- The aircraft beeps, and its battery level LEDs blink in sequence to indicate it is ready to link.
- The remote controller will beep twice, and its status LED will turn solid green to indicate linking is successful. Operating the Touchscreen
Screen Gestures
Back: Slide from the left or right to the center of the screen to return to the previous screen.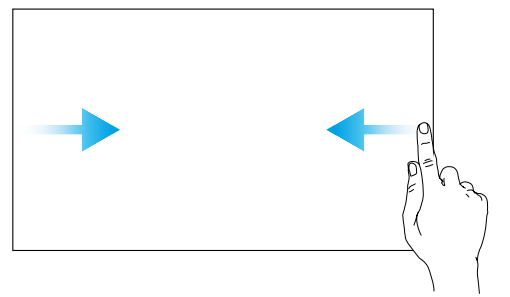
Return to DJI Fly: Slide up from the bottom of the screen to return to DJI Fly.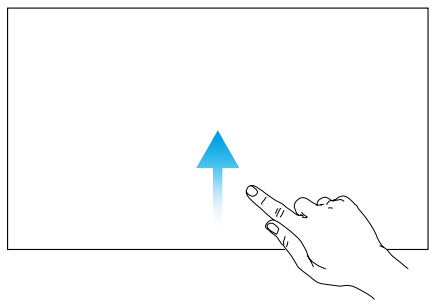
Open the status bar: Slide down from the top of the screen to open the status bar when in DJI Fly. The status bar displays the time, Wi-Fi signal, battery level of the remote controller, etc.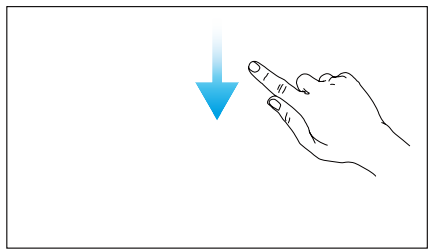
Open Quick Settings: Slide down twice from the top of the screen to open Quick Settings when in DJI Fly.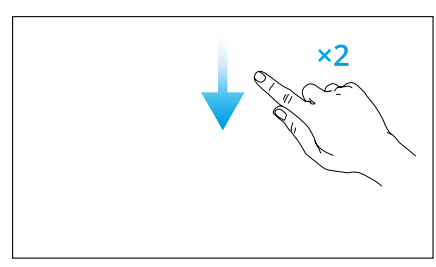
Specifications
Visit the following website for specifications. https://www.dji.com/mini-5-pro/specs
Compatibility
- Visit the following website to get the information on compatible products. https://www.dji.com/mini-5-pro/faq
Firmware Update
- Use DJI Fly or DJI Assistant 2 (Consumer Drones Series) to update the aircraft and the remote controller firmware.
DJI Fly
When the aircraft is connected to the remote controller, run DJI Fly, and you will be notified if a new firmware update is available. Follow the on-screen instructions for the update. Note that you cannot update the firmware if the remote controller is not linked to the aircraft. An internet connection is required.
Using DJI Assistant 2 (Consumer Drones Series)
Use DJI Assistant 2 (Consumer Drones Series) to update the aircraft and the remote controller separately.
- Power on the device. Connect the device to a computer with a USB-C cable.
- Launch DJI Assistant 2 (Consumer Drones Series) and log in with your DJI account.
- Select the device and click Firmware Update on the left side of the screen.
- Select the firmware version. Wait for the firmware to download.
- The firmware update will start automatically. Wait for the firmware update to complete.
- The battery firmware is included in the aircraft firmware. Be sure to update all batteries.
- Make sure to follow all the steps to update thefirmware; the update may fail.
- Make sure the computer is connected to the internet during the update.
- DO NOT unplug the USB-C cable during an update.
- The firmware update will take approximately 10 minutes.
Flight Recorder
Flight data, including flight telemetry, aircraft status information, and other parameters are automatically saved to the internal data recorder of the aircraft. The data can be accessed using DJI Assistant 2 (Consumer Drones Series).
Post-Flight Checklist
- Make sure to perform a visual inspection so that the aircraft, remote controller, gimbal camera, Intelligent Flight Batteries, and propellers are in good condition.
- Contact DJI support if any damage is noticed.
- Make sure that the camera lens and vision system sensors are clean.
- Make sure to store the aircraft correctly before transporting it
Maintenance Instructions
To avoid serious injury to children and animals, observe the following rules:
- mall parts, such as cables and straps, are dangerous if swallowed.
- Keep all parts out of reach of children and animals.
- DO NOT allow the camera to come into contact with or become immersed in water or other liquids.
- Check every aircraft part after any crash or serious impact.
- If there are any problems or questions, contact a DJI authorized dealer.
- Regularly check the Battery Level Indicators to see the current battery level and overall battery life.
- The battery is rated for 200 cycles. It is not recommended to continue using it afterward.
- Make sure to transport the aircraft with the arms folded when powered off.
- Make sure to transport the remote controller with antennas folded when powered off.
- The battery will enter sleep mode during long-term storage.
- Charge the battery to exit from sleep mode.
- Store the aircraft, remote controller, battery, and charger in a dry environment.
- Make sure that the aircraft and the propellers are clean by removing any dirt or dust with a soft cloth.
- Do not clean the aircraft with a wet cloth or use a cleanser that contains alcohol.
- Liquids can penetrate the aircraft housing, which can cause a short circuit and destroy the electronics.
Troubleshooting Procedures
- How to solve the gimbal drift issue during flight? Calibrate the IMU and the compass in DJI Fly.
- If the problem persists, contact DJI Support.
- No function: Check if the Intelligent Flight battery and the remote controller are activated by charging.
- Power-on and start-up problems: ms Check if the battery has power.
- If yes, contact DJI Support if it cannot be started normally.
- Firmware updateissue ues Follow the instructions in the user manual to update the firmware.
- If the firmware update fails, restart all the devices and try again.
- rocedures to reset to factory default Use the DJI Fly app to reset to factory default settings.
- How to detect careless handling or storage in unsafe conditions: Contact DJI Support.
Disposal
Observe the local regulations related to electronic devices when disposing of the aircraft and the remote controller.
Battery Disposal
Dispose of the batteries in specific recycling containers only after a complete discharge. DO NOT dispose of the batteries in regular trash containers. Strictly follow the local regulations regarding the disposal and recycling of batteries. Dispose of a battery immediately if it cannot be powered on after over-discharging. If the power button is disabled and the battery cannot be fully discharged, contact a professional battery disposal/recycling agency for further assistance.
C0 and C1 Certification
DJI Mini 5 Pro is compliant with C0 and C1 certification requirements. There are some requirements and restrictions when usingthe DJI Mini 5 Pro in EU member states, EFTA member states (EFTA,i.e., Norway, Iceland, Liechtenstein, Switzerland), and Georgia.a
Product weight may vary due to differences in batch materials and other factors. The actual weight is approximately 249.9 ± 4 g and should be based on the delivered product. Before flying, check and confirm local laws and regulations to determine whether registration or an exam is required.
MTOM Statement
For C0
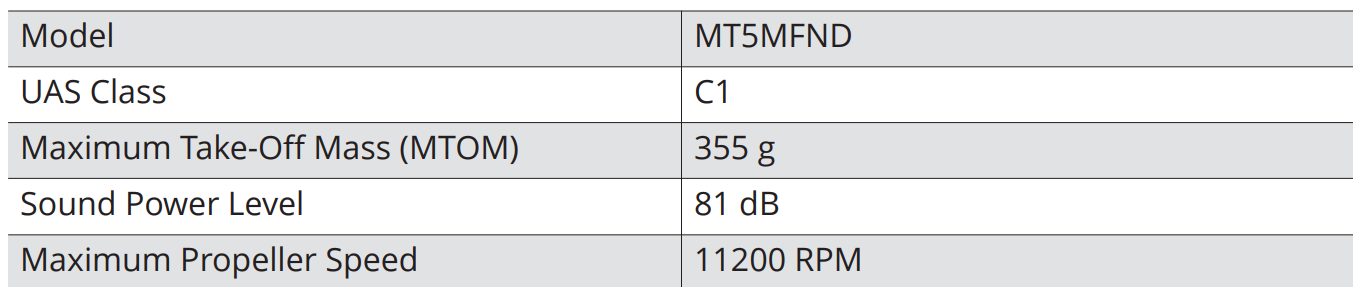
The MTOM of the DJI Mini 5 Pro (Model MT5MFND) is 249.9 g to comply with C0 requirements.
For C1
The MTOM of the DJI Mini 5 Pro (Model MT5MFND) is 355 g to comply with C1 requirements. You must follow the instructions below to comply with the MTOM requirements.
- DO NOT add any payload to the aircraft except the items listed in the List of Items, including the qualified accessories section.
- DO NOT use any non-qualified replacement parts, such as intelligent flight batteries or propellers, etc.
- DO NOT retrofit the aircraft.
List of Items, including qualified accessories
For C0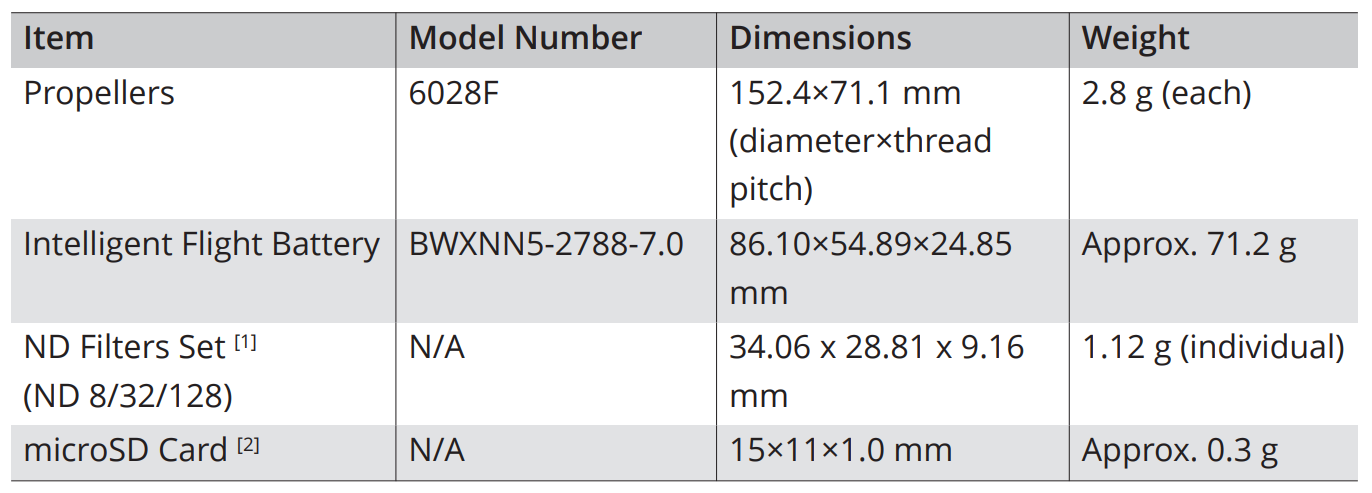 For C1
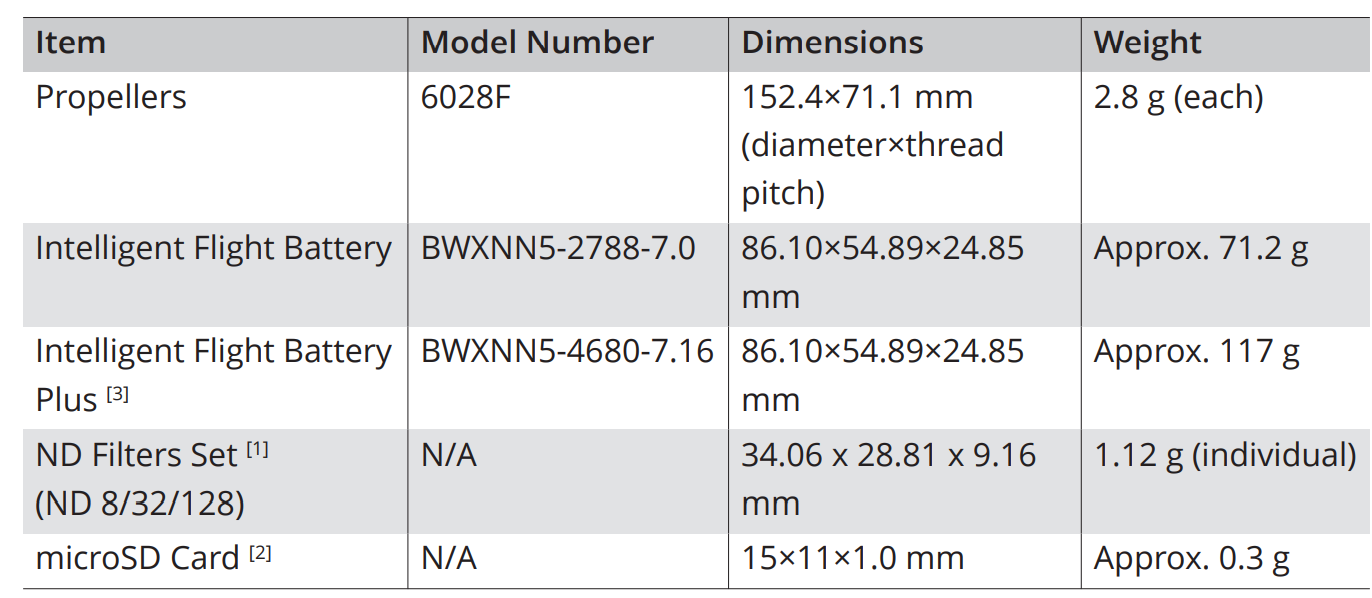
- For how to install and use the ND Filters Set, refer to the ND Filter Set Product Information.
- Not included in the original packaging.
- Only sold in some countries and regions.
List of Spare and Replacement Parts
For C0
- Propellers
- DJI Mini 5 Pro Intelligent Flight Battery
For C1
- Propellers
- DJI Mini 5 Pro Intelligent Flight Battery
- DJI Mini 5 Pro Intelligent Flight Battery Plus
Direct Remote ID
- Transport Method: Wi-Fi Beacon.
- Method of uploading the UAS Operator Registration Number to the aircraft: Enter DJI Fly, tap > Safety > UAS Remote Identification, and then upload the UAS operator registration number
GEO Awareness
GEO Awareness contains the features listed below. UGZ (Unmanned Geographical Zone) Data update: You can update the FlySafe data by using the data update feature automatically or storing the data in the aircraft manually.
- Method 1: Go to Settings in DJI Fly and tap About > FlySafe Data > Check for Updates
to update the FlySafe data automatically. - Method 2: Check the website of your national aviation authority regularly and obtain the latest UGZ data to import to your aircraft. Go to Settings in DJI Fly, tap About > FlySafe Data > Import from Files, and then follow the on-screen instructions to store and import the UGZ data manually.
A prompt will appear in the DJI Fly app when the import completes successfully. If the import fails due to improper data format, follow the on-screen prompt and retry.
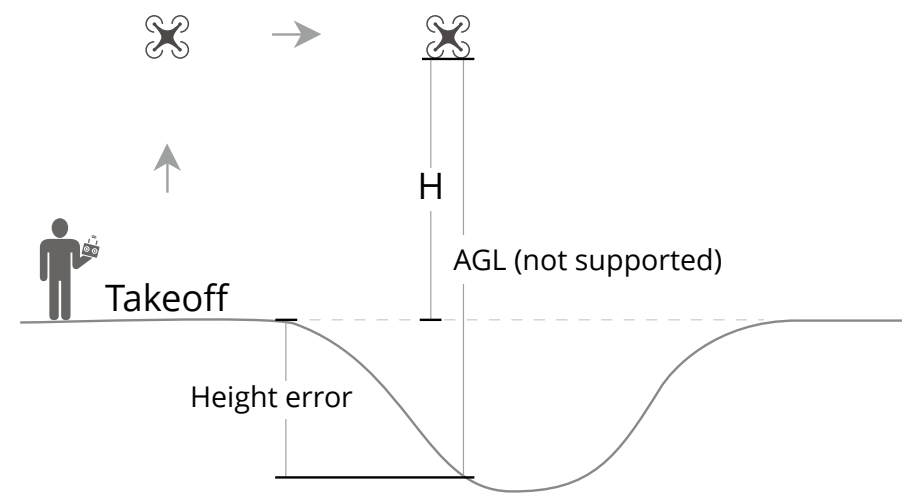
AGL (Above Ground Level) Statement
The vertical part of Geo-Awareness may use the AMSL altitude or the AGL height. The choice between these two references is specified individually for each UGZ. Neither the AMSL
altitude nor the AGL height is supported by the DJI Mini 5 Pro. The height H appears in the DJI Fly app camera view, which is the height from the aircraft’s takeoff point to the aircraft. The remote pilot remains responsible for not breaching the vertical limits of the UGZ.
GEO Zones
Restricted Zones
Appear red in the DJI app. You will be prompted with a warning, andthe flight will be prevented. UA cannot fly or take off in these zones.
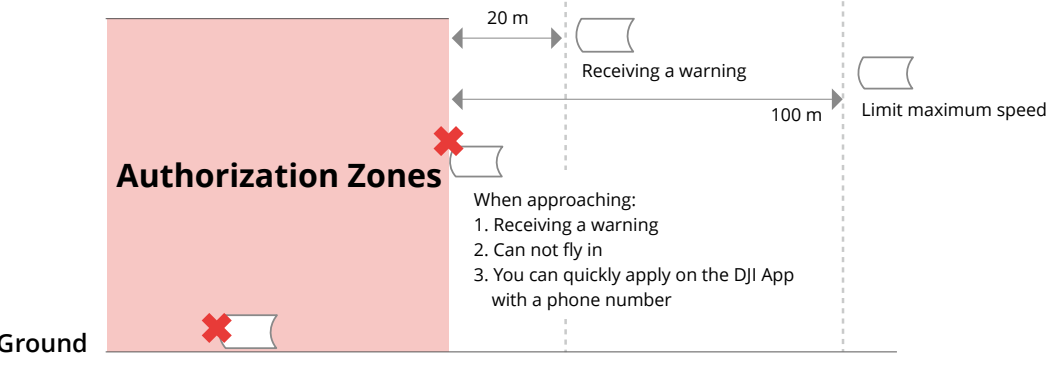
Authorization Zones
Appear blue in the DJI app. UA cannot fly or take off in these zones unless authorized.
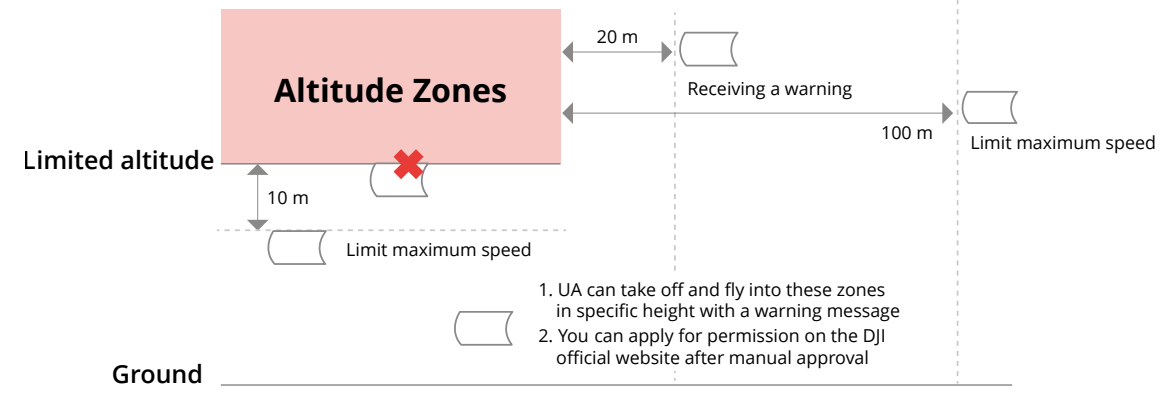
Altitude Zones
Altitude zones are zones with a limited altitude and appear in gray on the map. When approaching, you will receive a warning in the DJI app.
Enhanced Zones
A warning message will appear when the drone reaches the edge of the zone.
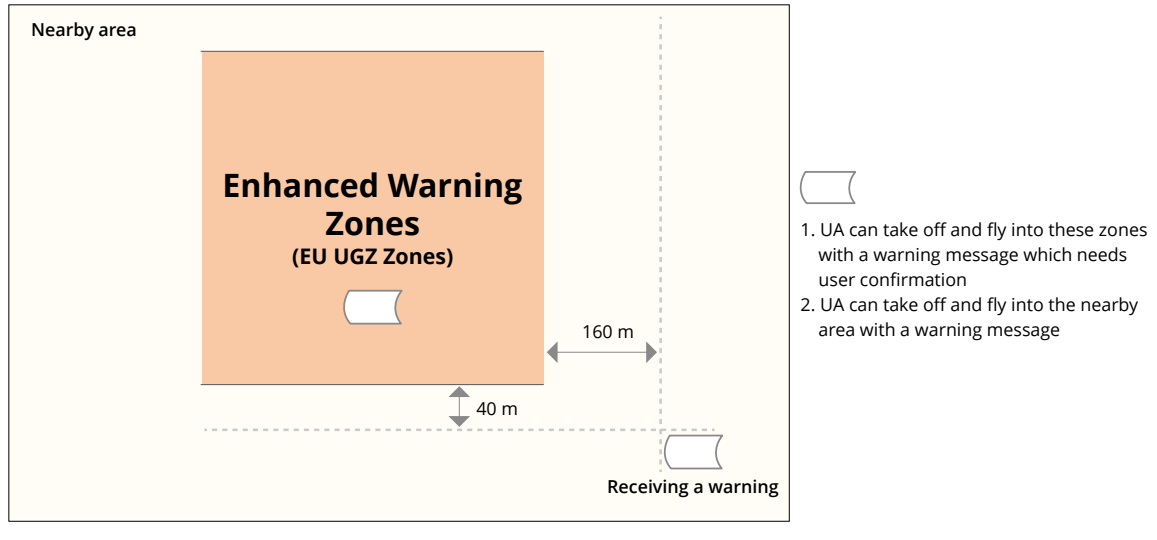
A warning message will prompt you when the drone reaches the edge of the zone.
- When the aircraft andthe DJI Fly app cannot obtain a GPS signal, the GEO awareness function will be inoperative.
EASA Notice
This manual is provided by SZ DJI Technology, Inc., and the content is subject to change.
FAR Remote ID Compliance Information
The aircraft automatically broadcasts Remote ID messages from takeoff to shutdown. location source to DJI mobile devices without an integrated GNSS system, [1] and must run the DJI flight control app, such as DJIFlyF, ly in the foreground and always allow the DJI flight control app to obtain its accurate location information. The connected external device must minimally be one of the following:
- FCC Certified personal wireless device that uses GPS with SBAS (WAAS) for location services;
- FCC-certified personal wireless device with integrated GNSS.
- The aircraft automatically initiates a pre-flight self-test (PFST) of the Remote ID system before take off, and cannot take off if it does not pass the PFST.
- The aircraft monitors the Remote ID system functionality from pre-flight to shut down.
- The aircraft using the Intelligent Flight Battery does not activatethe Remote ID system.
- You can visit the official website of the FAA to learn more about aircraft registration and Remote ID requirements.
Footnotes
- DJI mobile devices without an integrated GNSS system, such as the DJI RC-N3.
- The pass criterion for PFST is that the hardware and software of the Remote ID required-data source and radio transmitter in the Remote ID system are functioning properly.
Customer Service
- Ph: +1 818 235 0789.
- Website: https://fly-safe.dji.com/nfz/nfz-query.
- Address: Lobby of T2, DJI Sky City, No. 53 Xianyuan Road, Xili Community, Xili Street, Nanshan District, Shenzhen, China, 518055.
DJI is a trademark of DJI. Copyright © 2025 DJI All Rights Reserved.
FAQs
Q: What is the Fly More Combo Plus DJI Mini 5 Pro?
A high-end package built for prolonged flying sessions is the DJI Mini 5 Pro Fly More Combo Plus. It comes with additional intelligent flying batteries, a multi-battery charging hub, extra propellers, and other attachments for extended use and convenience.
Q: For whom is the DJI Mini 5 Pro most appropriate?
This drone is perfect for professionals, enthusiasts, travellers, and content creators who desire cutting-edge photographic capabilities in a small, lightweight package. Both novice and seasoned pilots seeking portability without compromising performance will find it suitable.
Q: Does drone registration apply to the Mini 5 Pro?
Drones that fall within the Mini category might not need to be registered for recreational usage in many areas. Users should carefully verify and abide by local aviation restrictions before flying, though, as laws differ by nation.
Q: What distinguishes the “Fly More Combo Plus” from the regular model?
Compared to the normal package, the Fly More Combo Plus allows pilots to fly longer and minimise downtime between flights by providing more batteries, extended charging choices, and spare parts.
Q: On a single charge, how long can the DJI Mini 5 Pro fly?
Conditions like wind, speed, and the use of intelligent features all affect flight time. The Mini 5 Pro is built to provide prolonged flight time for continuous aerial capture under ideal circumstances.