


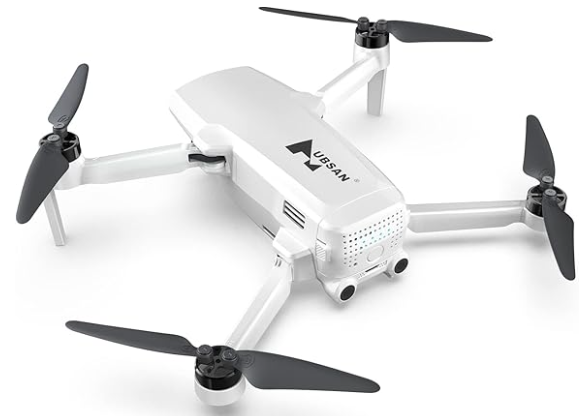
Hubsan ZINO Mini SE 40 Mins Flight Time Drone
Introductions
All users must read the product operating instructions and the liability disclaimer before using and operating any HUBSAN products. By using a HUBSAN product(s), users accept the terms and conditions of HUBSAN’s liability and operational guidelines. This product is not suitable for minors under 14 years of age. When operating a HUBSAN product(s), users also accept all liability and responsibility for their own behavior, actions, as well as any consequences resulting thereof while using a HUBSAN product(s).
Users agree to comply with these terms and conditions, along with any relevant policies/guidelines set forthby HUBSAN. Some details of this document may change with the upgrade of the product software version. Please read the upgrade details carefully before upgrading the software version.
Safety Instructions
- Do not disassemble or reassemble the battery.
- Do not short-circuit the battery.
- Do not use or charge near sources of heat.
- Do not put the battery in contact with water or any kind of liquid.
- Do not charge batteries in sunlight or near fire.
- Do not puncture or subject the battery to the force of any kind.
- Do not discard unused batteries in regular trash.
- Do not solder on or near the battery.
- Do not reverse charge or over-discharge the battery.
- Do not reverse charge or reverse the battery polarities.
- Do not mix other types of batteries with lithium batteries.
- Do not exceed the specified charging time.
- Do not place the battery in a microwave or in areas of high pressure.
- Do not expose the battery to the sun or excessive heat.
- Do not use or charge in temperatures below 0 ℃ and above 45 ℃.
- Keep away from the reach of children.
- Use a dedicated battery charger only and follow all charging guidelines.
- Adults must supervise minors if allowed to charge the batteries, even when using dedicated HUBSAN chargers.
Flight Environment
- Select an open area to fly. Avoid high-rise buildings and tall obstacles (such as trees and poles).
- GPS functions such as GPS mode and Return to Home may not function properly.
- Do not fly in bad weather conditions (such as in wind, rain, or fog).
- Fly the aircraft in ambient temperatures of 0-40 ℃.
- When flying, please stay away from obstacles, people and crowds, high voltage lines, trees, water, etc.
- To avoid remote control signal interference, do not fly in strong electromagnetic environments.
- Do not operate the aircraft near high-pressure lines, airports, or areas with severe magnetic interference.
Operation
Be extremely cautious and responsible when using the aircraft. Small electronic components can be damaged due to crashes or exposure to moisture/liquid. To avoid any injuries, do not use the aircraft with damaged components.
Battery
Fully charge the aircraft battery before flight. Use only the HUBSAN dedicated supplied charger for charging. Keep the battery out of the reach of children and away from any kind of moisture.
Flight
Please be mindful of personal safety and the safety of others when operating and flying your drone.
- Do not fly in bad weather conditions.
- Do not attempt to catch the aircraft while it is in flight.
- This product is intended for experienced pilots over the age of 14.
- After every flight, completely disarm the aircraft motors and power off the drone. Then, power off the remote control.
Symbol Explanation
- Prohibited Operation
- Important Notice
- Instruction
- Explanation / Reference\
Aircraft
Spare Part
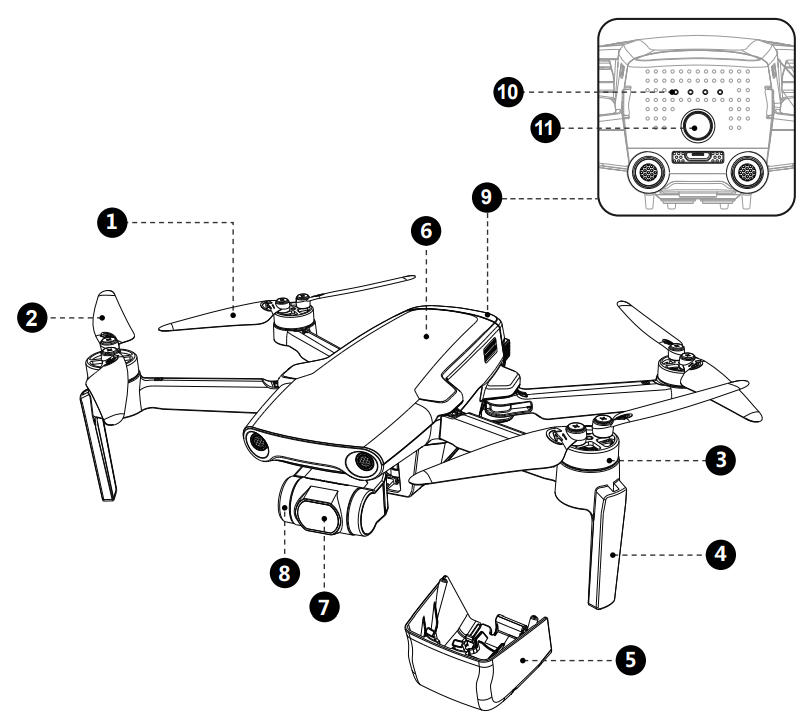
- Propeller A
- Motor
- Tripod (With Antenna)*
- Gimbal Protection Guard
- 8 3-axis gimbal
- Intelligent Battery
- Battery level indicator
- Battery power switch
- Body shell
- Propeller B
- 4K HD Camera

- Low-altitude infrared altitude hold system
- Aircraft flashlight
- Downward Vision System
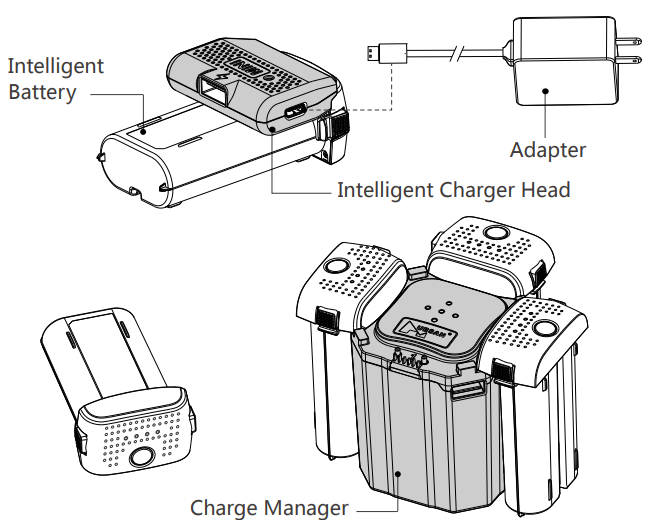
Aircraft Battery
Aircraft Lithium Battery Capacity: 3000mAh, 7.2V lithium 2S intelligent battery. Consumers can charge it with an ordinary cell phone charger or use the official standard 9V/2A charger.
- Plug the Micro USB or DC head into the charge manager; the middle of the charge manager lights up to mean it starts working.
- With the battery off, insert the battery into the 4 ports of the Charge Manager. The Charge Manager flashes the indicator for the port that is charging, and the battery indicator flashes as well.
- When the battery is fully charged, the battery indicator goes out, and the interface indicator corresponding to the charging manager becomes steady on, which means fully charged.
- Based on the number above each interface in Charging Manager, to chargethe battery in order. When there is no Micro USB port plugged in, plug the battery into the Charge Manager and turn the battery on.
- When the middle of the Charge Manager lights up and the corresponding port starts flashing, the Charge Manager enters power bankmode and can charge other devices with the USB-A port, which accepts 5V/1A current.
Aircraft Battery Installation
Take a fully charged battery. Insert the battery into the battery compartment, while pressing the left and right edges behind the battery (As shown in the illustration), push in until the battery buckles are fully locked. You should hear the buckle locking sound. The battery top should be flush with the aircraft’s back, which confirms the battery is in place. 1

Battery Functions
- Battery activation: The smart battery needs to be connected to the APP and activated according to the prompts for the first time.
- Power display: The battery has a power indicator, which can display the current battery power levels.
- Upgrade mode: The smart battery can be used for firmware upgrade.
- Auto-Discharging Function: To prevent swelling, the full battery automatically discharges to 7.4V to protect the battery when it is idle for 2 days.
- Balanced Charging: During charging, the voltages of the battery cells are automatically balanced.
- Overcurrent Protection: The battery stops charging if an excess current is detected.
- Overcharge Protection: The battery stops charging automatically once fully charged.
- Over-discharge Protection: Discharging stops automatically to prevent excess discharge.
- Short Circuit Protection: The power supply is automatically cut off if a short circuit is detected.
- Battery Cell Damage Protection: HUBSAN App displays a warning message when a damaged battery cell is detected.
- Communication: Information about the battery’s voltage, capacity, and current is transmitted to the aircraft.
- Automatic: when the battery is in the open state, if no electric equipment is connected, the battery will automatically shut down and enter a dormant state in 3 minutes.
Storage of a Smart Battery
Due to the physical characteristics of electronic components, even in the dormant state, the smart battery still has weak current loss, which can be regarded as a normal state.
- Before saving the battery for a long time, please fully charge the battery (or at least 70%) and then save it. Take out the battery every six months and recharge it to ensure that the battery power will not be exhausted under hibernation mode.
- The battery should be stored in a dry place away from acid and alkali, away from fire sources, and without violent vibration, pressure, and inflammables and explosives.
- The battery will be in an automatic discharge process and generate heat, so do not wrap the battery with materials with low thermal conductivity, such as foam and fiber, when storing, which can easily cause the battery burn out the battery cell or even fire.
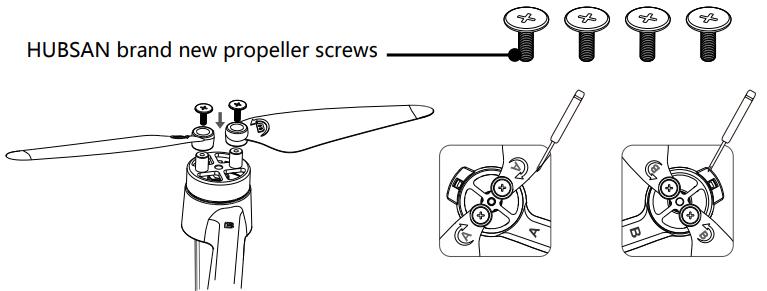
Propellers
Before installing the propeller, please carefully check the letters on the aircraft motors and the letters on the propeller. You must match those letters when installing propellers. If the blade is damaged or needs to be replaced, unscrew the screw counter-clockwise to remove the propeller. Be sure to replace the propeller together with the original new propeller screws to prevent accidental screw and propeller loss. (HUBSAN Standard accessories come with original screws)
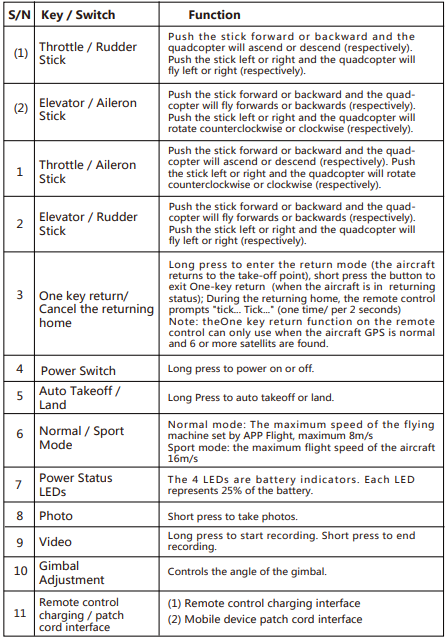
Remote Controller
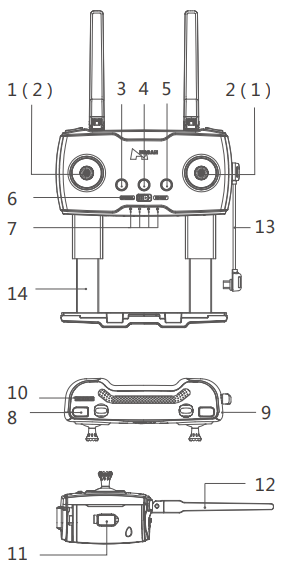
- Throttle/Rudder stick controller levers
- Forward & Backward/left & right flight controller levers
- Power (Long press)
- Auto Takeoff / Land
- NORMAL / SPORT Mode
- Power Status LEDs
- Photo
- Video
- Gimbal Adjustment Wheel
- Charging / Adapter Port
- WIFI Antenna
- Adapter Cable
- Smart device holder
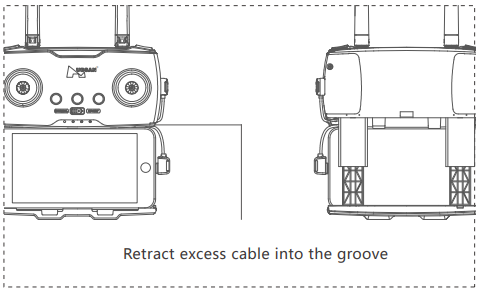
Installation
When installing the mobile device, place the device in its dedicated frame and avoid pressing the device’sbuttons with the frame.
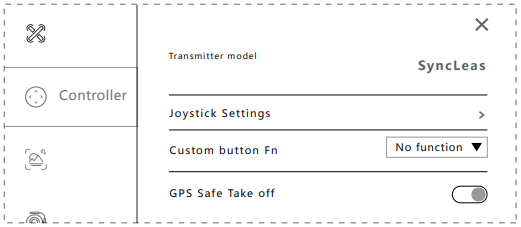
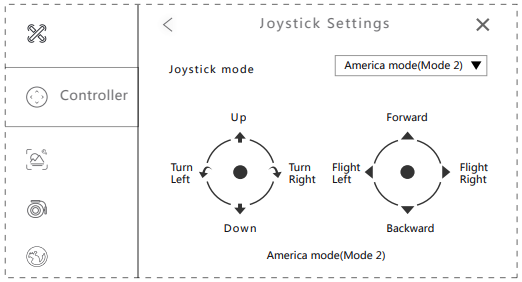
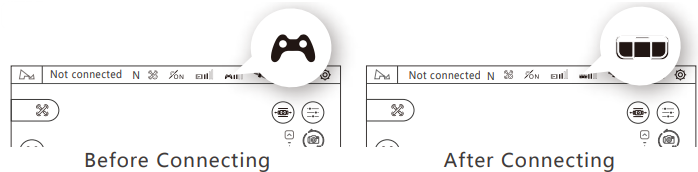
- Open the APP and choose the relevant aircraft model to enter the flight control interface, and click the gear icon in the upper right corner to enter the settings.

- Enter the “controller” option in the settings interface and click “Joystick settings”.

- Choose the joystick mode.

Remote Controller Features
Transmitter Cable Connection
Transmitter Battery Charging
The transmitter uses a micro USB cable to charge, as shown in the figure:
The transmitter charging time is about 2.5 hours. The power indicator of the remote control flashes when charging, and it will turn solid on after the battery full charged.
Remote Control Antenna Angle
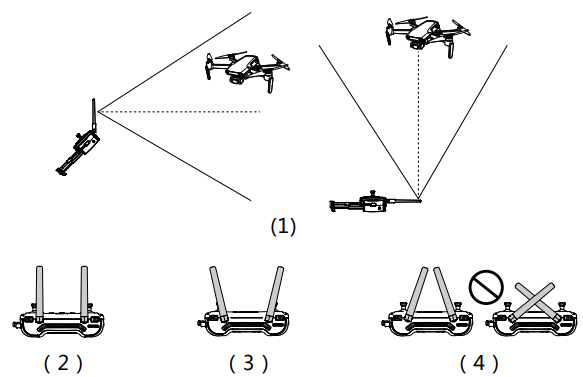
- Adjust the angle of the remote control antenna and let it face the flight direction of the aircraft as much as possible.
- In a long-distance state, the distance between the two antennas is properly tightened to maintain the antenna’s directivity.
- Closer Sate, the two antennas are properly separated to maintain a wide receiving range.
- Do Not Form an occlusion or cross between the antennas.
Transmitter Calibration
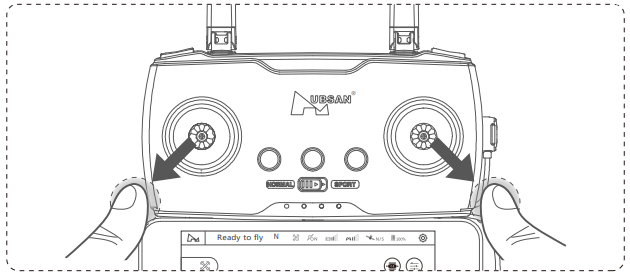
Start Calibration: Push and hold both sticks to the upper left corner as shown in the picture below, and power on the transmitter. The transmitter will enter calibration state and start beeping; release the power button and the sticks. Calibrate Sticks: Rotate both sticks in circles to their maximum travel at least three times, and release the sticks. Exit and save calibration: long-press any button except the power button until the remote controller stops beeping and the LED lights on.
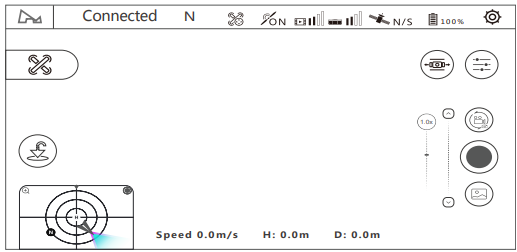
 APP Flight Control Interface
Pairing The Aircraft
- Press the battery switch to power on the aircraft.
- Press the remote control switch to connect to the mobile phone, and wait for the remote control to connect to the aircraft successfully. Open the mobile phone X-HUBSAN 2.0 APP, and it will automatically jump out of the activation interface.
- The new user can register an account as the activation account, and the old user who has logged in to the APP before can directly enter the password to activate it.
- Run the X-HUBSAN 2.0 APP, and select the aircraft model.
- Press the aircraft power button, then press and hold for a few seconds to turn it on.
- Press the transmitter power button, then press and hold for a few seconds to turn it on.
- Connect the transmitter to your mobile device with the RC cable.

- Start binding (This step is only required when first binding or replacing the transmitter; you need to do it manually.)
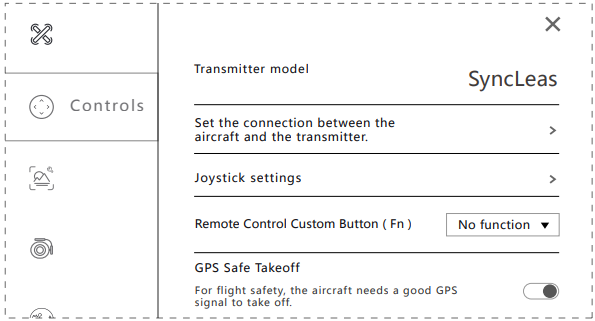
- Go to APP – Settings – Controls, transmitter connection method: SyncLeas.

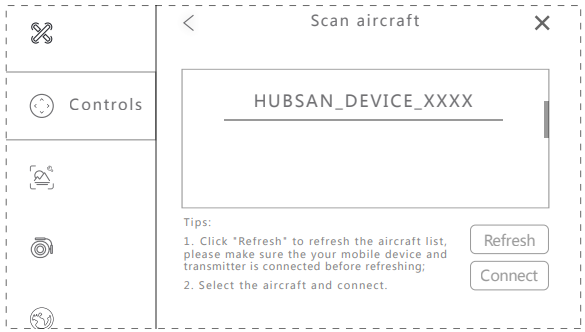
- Select “Set the connection between the aircraft and the transmitter” and scan the aircraft.
- Select the aircraft and connect.

- You have to complete the binding process on the APP, only when using the drone or if replacing the transmitter.
Compass Calibration
When using the drone for the very first time, the compass calibration message will pop up before takeoff. Follow the instructions on your screen, rotate the drone horizontally, then point the drone’s nose to the ground and rotate it clockwise. The compass calibration message will disappear once it is completed. You must complete the compass calibration before flying the aircraft for the first time. The compass is susceptible to interference from other electronic devices, resulting in abnormal flight data. Regular calibration helps to keep the compass and its readings accurate. Select “Compass Calibration” under the APP setting interface.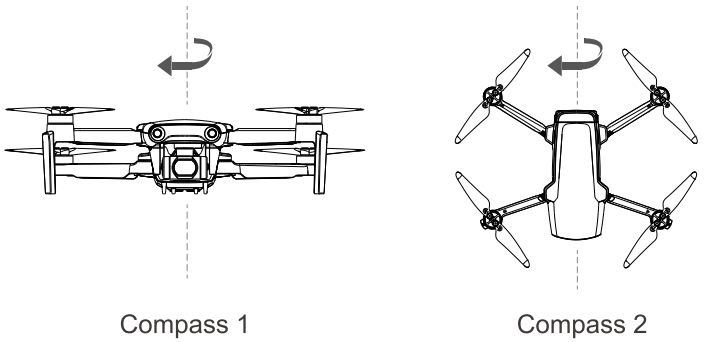
Motor starting condition
- The aircraft, remote control, and mobile phone have been connected successfully.
- The aircraft compass has been calibrated (APP doesn’t prompt to calibrate the compass).
- The aircraft must be placed on a horizontally leveled ground.
- The aircraft has not locked sufficient GPS satellites for positioning. please don’t force take-off ;
- The power of the drone should be ≥15% ;

Starting the Motors
Push both sticks down and outwards as shown in the picture to start the motors. Once the motors start spinning, release both sticks.
Stopping the Motors
When the motors are running, push both sticks down and outwards again to stop the motors. Release both sticks once the motors stop.
Allow forced to stop the motors.
The motor can be forced to stop by pushing both sticks down and outwards for 2 seconds during the flight. This function should be used with caution. It will lead to the aircraft falling and may endanger personal safety. This function is only allowed to be used in case of failure (such as tumbling and other abnormal conditions) by default. If it takes effect at any time, the user needs to manually set it in the X-Hubsan 2.0 app.
Aircraft Functions
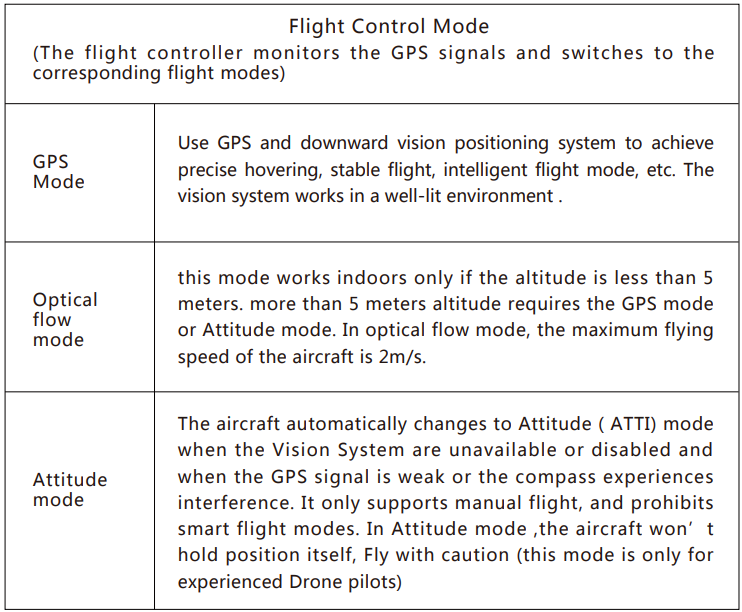
Flight Control Mode
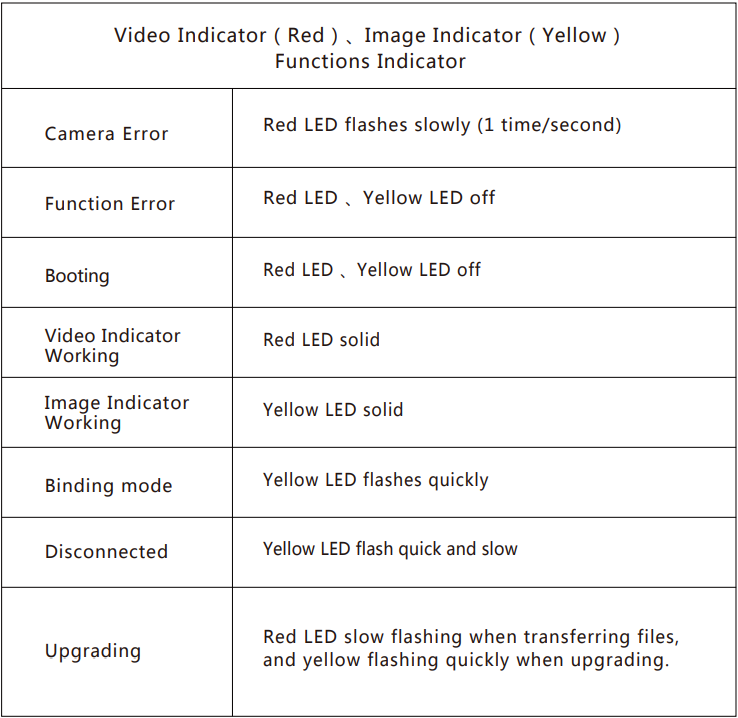
Aircraft Indicator
Return-to-home (RTH)
There are three types of RTH: One-key RTH, Low Battery RTH, and Failsafe RTH. When taking off, and the GPS has locked more than 6 satellites, the aircraft will mark take off point as the home point. If there is no GPS signal and the drone is forced to take off, whenever GPS locks more than 6 satellites, it will record that point as home position.
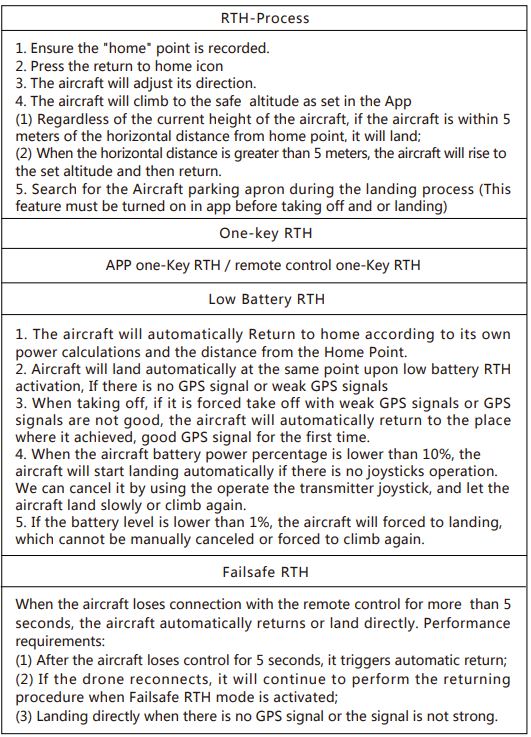
Landing Apron Search
When the aircraft is landing or returnsto a height of about 10 meters from the ground, it will automatically enter the search for the drone apron function.
- The gimbal camera points downward to optically search for the Aircraft parking apron[H].
- Once the drone locks the apron visually, it will descend smoothly on apron.
- If the aircraft can’t find the parking apron or the battery is critically low, the aircraft will land directly.
- The search for the Aircraft parking apron function cannot be performed if video is being recorded.
- If you do not need to use this feature, please turn it off in the app.
Optical Flow Vision Positioning System
The aircraft is equipped with a downward optical flow vision positioning system, which is composed of a downward vision camera and a TOF (time of flight) sensor, so that the drone can hover stably at low altitudes without GPS or when there are weak GPS signals.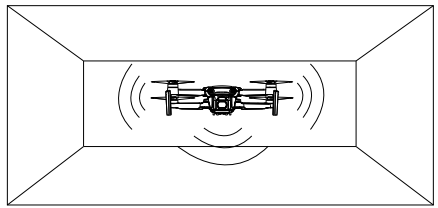
- The Vision Systems work best with adequate lighting and clearly marked or textured obstacles. It is not designed to completely replace the pilot’ss controls and judgment.
- The best working range of the downward vision system is 0.5-5 meters.
- When it exceeds this range, the positioning performance may decrease.
- Keep the Vision sensors clean at all times.
- Do not obstruct and interfere with the Vision Sensing System.
- The optical flow vision system can only be used indoors and cannot be used outdoors.
- The drone will switch to GPS hold position mode automatically outdoors.
Struggling Mode
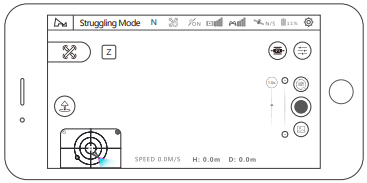 When the aircraft battery power drops to 11% during the flight, the ” ” icon will pop up in the upper left corner of the flight control interface on X-Hubsan 2.0 APP. Clicking it will open the struggling mode.
The behavior of draining the lithium battery in the struggling mode will cause irreversible damage to the battery. This behavior will be automatically recorded by the system. The original intention of this function is that when the drone flies too far away, the drone cannot return smoothly due to strong winds or other emergencies, and when the flight environment at that time does not have the conditions for orced landing, try best to allow you to let the drone fly to a safe place before the battery power runs out, and make a final effort to save the drone.
Creative Video
- Select the direction of rotation (clockwise/counterclockwise);
- Set the rotation angle, the range of rotation angle (90 ° -360 °, accuracy 1°);
- Set the rotation speed (1-30 ° / sec, accuracy 1);
- Click GO, the aircraft rotates in place, hovering at its position, shooting a video during the rotation;
- You can click the exit button at any time to exit the mode and save the video.

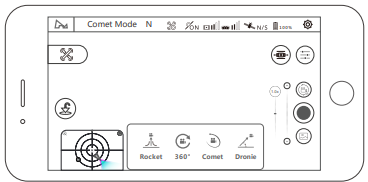
Comet Mode
After selecting the center point on the APP, the aircraft will automatically fly along the eclipse track and record video. Please only use it in an open area. APP operation:
- Select the target. The aircraft camera is always aimed at the selected target when shooting
- Select the flying direction (clockwise/counterclockwise)
- Click GO, the aircraft starts recording the video and performs an eclipse flight move.

Orbiting
Tap on “Mode Selection” then “Orbit Mode” to set the current location or the position of the mobile device as the center. During Orbit mode, you can adjust the speed and direction by moving the control stick left and right, and adjust the orbit radius by moving the control stick forward and backward.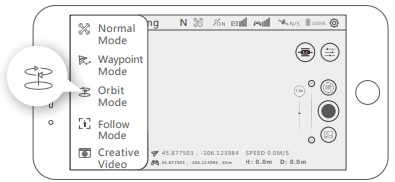
Waypoint
The aircraft will fly along the set flight path drawn on-screen or saved. You can adjust the speed of the aircraft during flight.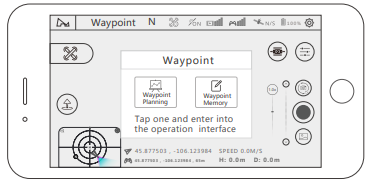
Waypoint Planning
You can preset the waypoint parameters, such as the number of waypoints, the altitude of each waypoint, and other parameters. The aircraft will follow the preset parameters after you activate waypoint mode. You can control the flying speed during flight, or you can pause or resume the Waypoint mode.
Waypoint Memory
After entering the mode, fly the aircraft and tap on “Memorize Waypoints” on the APP, and the aircraft will mark the location. After memorizing all the waypoints, upload and execute, the aircraft will fly according to the recorded waypoints. If the aircraft is not in the starting position, the aircraft will fly to the starting waypoint position before starting this function.
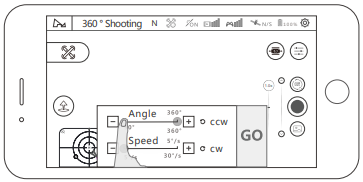
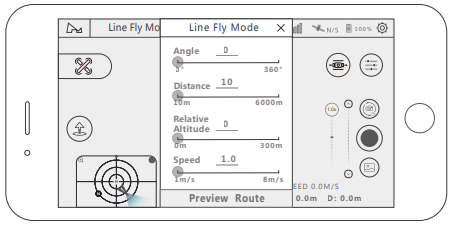
Line Fly Mode
Tap on “Mode Selection” then “Line Fly Mode”.Set the angle, distance, and speed of the aircraft.
Performance requirements
- Set the angle (0 ~ 360 °, accuracy 1 °); Set the distance (10-6000 meters, accuracy 1 meter); Set the speed (1-8 m / s, accuracy 0.1);
- Once setup is complete, the aircraft will execute Line Fly mode. During the flight, pilots can take photos or videos manually, or pause/resume/stop the flight at any time.
- During the flight, you can control the altitude only.
- You can pause/resume/stop the flight at any time.
- When the aircraft is low on battery or loses radio connection, the aircraft will always return home.

Follow Mode
Enter into follow mode. Choose Image tracking and or GPS follow.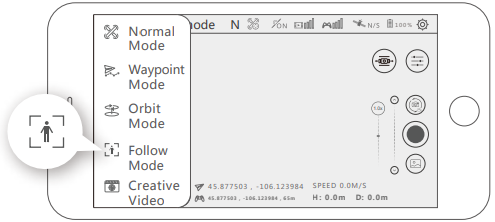
- Image Tracking: Select the target on the APP by dragging your finger and drawing a rectangle around the desired target.
- GPS Follow: the aircraft will follow the device when turning on the GPS follow.
Hyperlapse
When you choose Hyperlapse mode, you can choose free orCircle.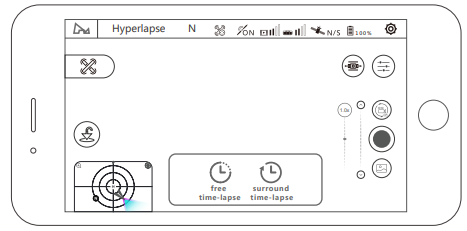
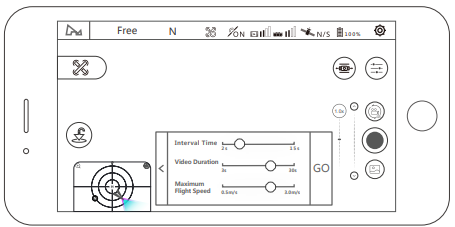
Free
The aircraft will take a certain number of photos and compose a time-lapse video automatically according to the parameters set. During the process of shooting, the user can control the flight of the aircraft freely.
- choose free;
- set the shutter interval, the video length, and the maximum flight speed;
- after done, please click‘ GO’ and start shooting.
Panorama mode
Set the photo mode in the camera settings to panoramic photo; you can choose spherical, 180°, vertical shooting, and wide-angle shooting. In this mode, the aircraft will perform the shooting task automatically. You can quit this mode at any time during shooting. Note: Aircraft will not stitch and compose the final panoramas or spheres; you will need to use aftermarketsoftware to perform the stitching.
Gimbal Pitch Adjustment
APP Adjustment
- Method 1: long-press the blank of the video preview interface, and the mobile device will vibrate once.
- Method 2: You can fine-tune the angle of the gimbal pitch by clicking the up-down button(2) on the gimbal pitch axis slider in the app

- Transmitter Adjustment: You can adjust the angle of the gimbal pitch by fiddling with the control thumb-wheel of the gimbal pitch.

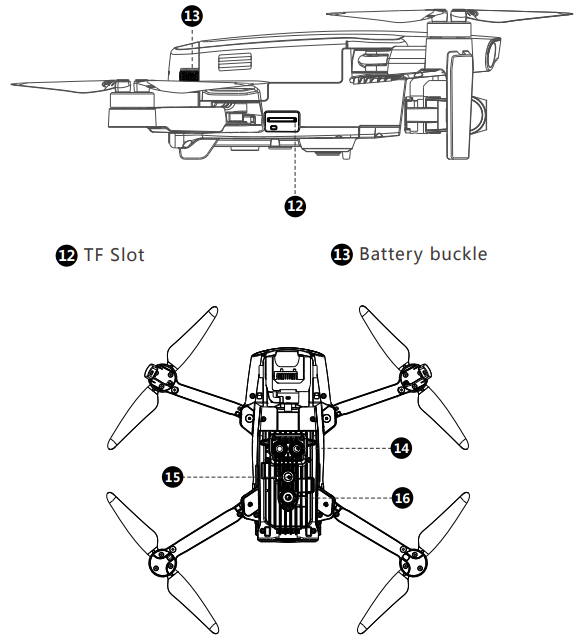
TF Card
- support TF card, U3 above 16G/32G/64G/128G;
FCC Information
This equipment generates, uses, and can radiate radio frequency energy and, if not installed and used in accordance with the instructions, may cause harmful interference to radio communications. However, there is no guarantee that interference will not occur in a particular installation.
- Reorient or relocate the receiving antenna.
- Increase the separation between the equipment and receiver.
- Consult the local dealer or an experienced radio / TV technician for help.
- Changes or modifications not expressly approved by the party responsible for compliance could void the user’s authority to operate the equipment. This device complies with Part 15 of the FCC Rules.
- Operation is subject to the following two conditions: (1) this device may not cause harmful interference, and (2) this device must accept any interference received, including interference that may cause undesired operation.
This equipment complies with FCC radiation exposure limits set forth for an uncontrolled environment. Please read the operating instructions carefully before use!
- Never leave units unattended when charging.
- Unplug the charging cable immediately after charging
- Propellers may cause injury
- This product is not a toy
- Not suitable for children under 14 years of age
Disclaimer
HUBSAN accepts no liability for damages, injuries, or any legal responsibilities directly or indirectly from the use of HUBSAN products under the following conditions:
- Subjective misjudgment and/or intentional misoperation of products.
- Any mental damage, trauma, impairment, illness, compensation caused/solicited by accidents involving HUBSAN products.
- Product operation in no-fly zones (i.e., natural reserves).
- Malfunctions or problems caused by modification, refit, replacement, or use with non-HUBSAN accessories/parts, failure to follow the guidance of the manual in assembly or operation.
- Damages, injury, or any legal responsibilities caused by mechanical failures due to natural wear and tear (aircraft flight time clocking in 100 hours or above), corrosion, aging hardware, etc.
- Aircraft use in or exposure to bad weather, such as rain, wind, snow, lightning, tornadoes, and hurricanes. The acquisition, through the use of HUBSAN products (specifically but not limited to aircraft), of any data, audio, or video that results in infringement of law and/or rights.
- Misuse and/or alteration of batteries, product/aircraft circuits, hardware protections (including protection circuits), RC model and battery chargers.
- Users who engage in reckless, unsafe flying (with or without sufficient training).
- Non-compliance with precautions, instructions, information, and operation guidelines/methods given through official Hubsan website announcements, product quick start guides, user manuals, etc.
- Other losses, damages, or injuries that are not within the bounHubsan’sHubsan’s’s responsibility.
FAQ’S
- Update the latest firmware
- Abnormal aircraft hovering
- Change ththe ight site. Please do not fly near tall buildings and signal towers.
- Do the compass calibration and horizontal calibration
- The wind is too strong to affect the flight
- Aircraft GPS accuracy is not precise, or cannot pass the GPS accuracy test
- in the open area of the outdoors with GPS over 6 satellites
- Walk around near the aircraft
- Replace the mobile device
- The battery cannot charge. Plug the charger and battery
- Short flight time or exposure to original temperature conditions can easily reduce battery life.
- The tilt Angle of the gimbal is too large, or the gimbal shows abnormal behavior
- Restart the aircraft and recalibrate the gimbal
- Check the APP to see whether the gimbal status is normal
- Gimbal initializatiofailed.. Before starting the aircraft, remove the gimbal’s protective cover and ensure nothing blocks its movement.
- The picture is not clear.
- Check whether the lens protective filhass peeled off
- Please shoot inan environment with good lighting
- Shooting parameters setting in the camera Settings of the APP
- Place some desiccant in the protective cover of the gimbal when storing
- The pictureor video is lost
- Perform completing recording operation after recording the video, it may lead to video damage or loss.
Download App
Before flying, download and install the X-HUBSAN 2.0 APP. You could download the APP for free by scanning the code at right or searching in APP Store (IOS) Or Goggle Play.
Customer Service
- Website: www.hubsan.com
- Ph: (909)444-0555