
![]()
ADLER AD 7059 Car Vacuum Cleaner

Safety Instructions
- Connect the device to a 220-240 V ~ 50/60 Hz grounded socket only.
- Be especially careful when using the device when children are around.
- Always remove the plug from the socket after use by holding the socket with your hand.
- Do not immerse the cord, plug, or the entire appliance in water or any other liquid.
- Periodically check the condition of the power cord.
- Do not repair the device yourself, as this may result in electric shock.
- Any repairs may only be made by authorised service points.
- Improperly performed repair may result in danger to the user.
- Do not use the device near flammable materials.
- Keep the power cord away from hot surfaces.
- Do not leave the device switched on or the mains adapter unattended.
- Do not allow the motor part of the device to get wet.
- Do not use the device outside the home; use it indoors only.
- Do not use the vacuum cleaner to pick up flammable substances (such as fuel, solvents).
- Do not vacuum objects with sharp edges (e.g., glass shards).
- Do not direct the suction tube of the vacuum cleaner towards other people or animals.
- Be especially careful when vacuuming the stairs; take care of your own safety.
- Do not block any ventilation openings.
- Do not run the vacuum cleaner without the filter in place.
- Do not pull the vacuum cleaner by the hose.
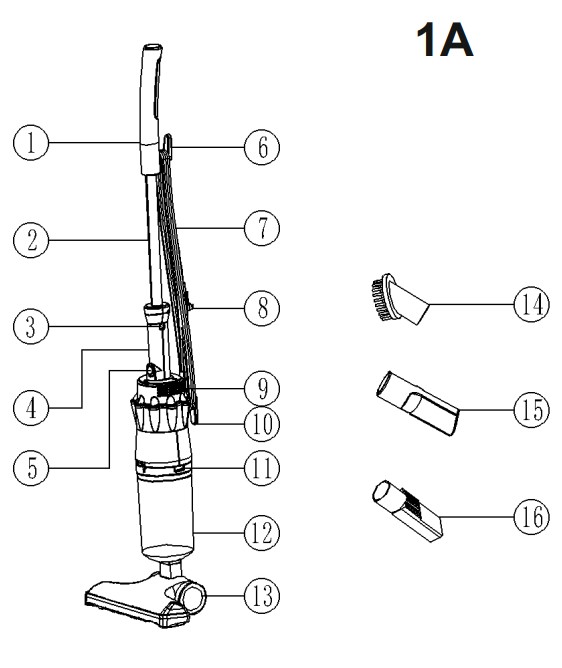
Description
- Handle
- Tube
- Handle the release button
- Body
- On / Off button
- Cable hanger up
- Cable
- Plug
- Air outlet
- Cable hanger down
- Container release button
- Dust container
- Floor brush
- Round brush
- Nozzle
- Connector

Before First Use
- Remove all packing material from the device.
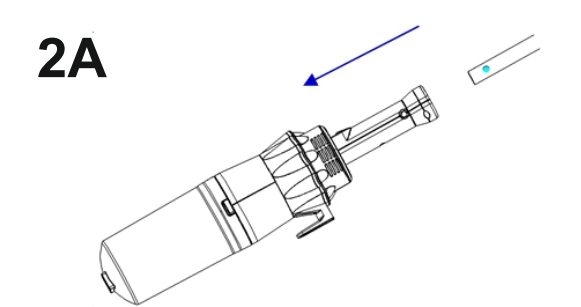
- Assemble the device as shown in picture 2A by pushing the tube into the handle.
- The little button on the handle should appear in the hole in the handle.
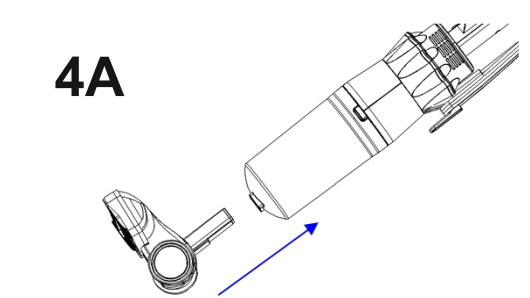
- Insert the floor brush (13) into the hole in the dust container (12) as shown in picture 4A.
- Unroll the power cable (7).
- Plug the power cable into the wall socket.
- Turn on the device by pressing the On / Off button (5).
Changing the Attachments
- Remove the floor brush (13).
- Insert the connector (16) into the dust container (12). As shown in picture 5A.

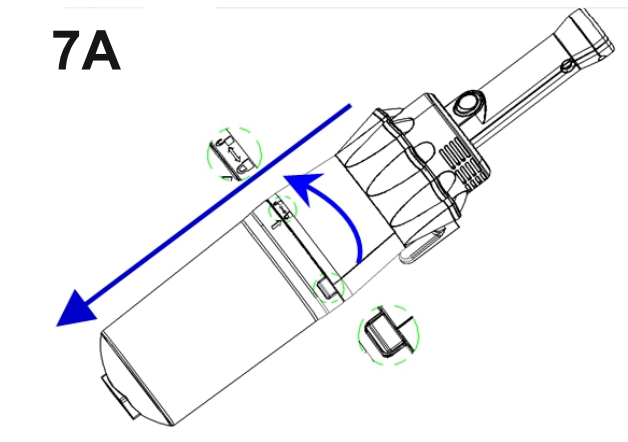
Opening the Dust Container
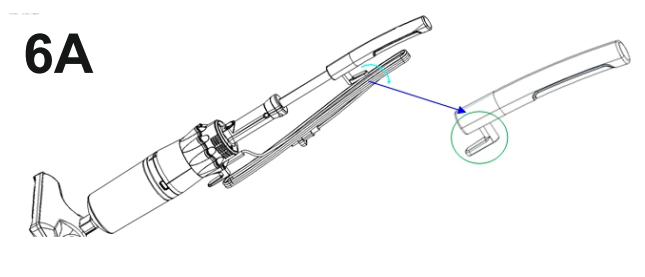
- Twist the dust container clockwise by holding the dust container with one hand and the other hand firmly placed on the body of the device or handle.
- On the side of the device are drawn 2 symbols of a lock. One is open, and one is closed. Move the container until the marker is aligned with the open lock 6A
- Pull the dust container downwards and empty it into a waste bin.
- Put the container back and twist counterclockwise so the marker and closed lock symbol align. 7A
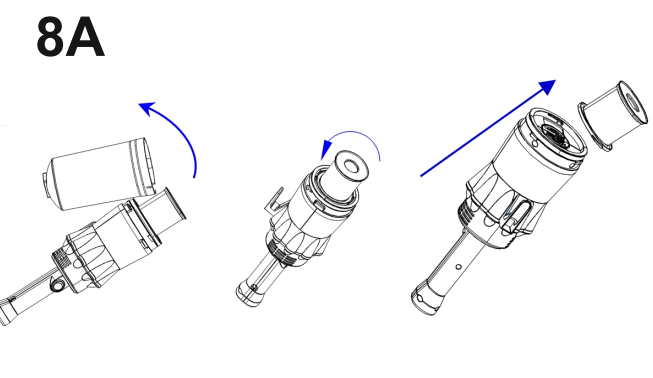
Cleaning the HEPA filter
- Open the dust container as explained in the instructions above.
- Twist the HEPA filter counterclockwise a quarter turn to release it from the mounting. As shown in picture 8A.
- Clean the HEPA filter with air pressure or by gently tapping it against a waste bin.
- Aou can ao dean under running water. After ADLER AD 7049 Handheld Vacuum Cleaner washing it with water, let it air dry in a warm place with a lot of air circulation.
- Assemble the filter back into its mounting.
TECHNICAL DATA
- Power source: 220-240 V – 50 Hz
- Power: 600 W Max: 800W
Environmental Instructions
- Dispose of cardboard packaging and polyethene (PE) bags in the appropriate containers for separate collection of municipal waste according to their description.
- If there are batteries in the device, remove them and separately return them to the collection and storage facility. Return the used device to a suitable collection and storage facility, as the hazardous substances in it may pose a threat to health and the environment.
- Waste electrical equipment is waste that contains substances harmful to humans, animals, and the environment.
- These substances can lead to contamination of the soil, water, or air, and through this, they can get into the human body and lead to numerous health ailments, such as vision, hearing, and speech disorders; they can also lead to kidney, liver, and heart damage, and cause skin diseases.
- Harmful substances can also have adverse effects on the respiratory and reproductive systems and lead to cancerous changes. Consumption of plants growing on the contaminated soils, and products made from them, may risk the above-mentioned health effects.
- Do not dispose of the device in the municipal waste container!!! Service: If you wish to purchase spare parts or report any complaints, please contact the seller who issued the receipt directly.
Customer Service
- Website: service@adlerglobal.com.
- Ph: 0800 9753 003
- Timings: Mo – Fr, 8:30 am – 5:00 pm
FAQs
Q: What power source does the ADLER AD 7059 use?
Convenient for cleaning while on the road, the AD 7059 vehicle vacuum cleaner is powered by the 12V car cigarette lighter connection.
Q: What is the power rating of the vacuum cleaner?
With its 120W operation, the Hoover has enough suction to clean the interior of a conventional car.
Q: Is the AD 7059 suitable for wet and dry cleaning?
No, only dry vacuuming is intended for the AD 7059. Avoid using it to clean damp surfaces or liquids.
Q: How do I turn the vacuum on and off?
Switch the ON/OFF button on the vacuum’s handle or body after plugging it into the vehicle’s 12V outlet.
Q: How often should I empty the dust container?
To preserve suction efficiency, empty the container after every use or when it reaches the maximum fill line.
Q: Can the vacuum handle pet hair?
The Hoover can indeed collect pet hair; however, in order to avoid blockage, it is advised to clean the filter and brush nozzle afterwards.
Q: How long is the power cord?
Depending on the model, the vacuum’s 3- to 5-meter cord is enough to reach the majority of the interior of a typical automobile.
Q: Can I use it in larger vehicles like vans or SUVs?
Yes, it functions in larger cars, although you might have to move the plug to properly reach every location.