
Bose AM894537 AMU Suspension Rail 
Introduction
The AMU Suspension Rail bracket is compatible with all ArenaMatch Utility loudspeakers. To ensure safe product installation, it is the installer’s responsibility to refer to all relevant documentation for this product and all other installation components before installing the product.
Safety Instructions
Contains small parts which may be a choking hazard. Not suitable for children under age 3.
- Please read this document and all safety warnings before attempting installation.
- Unsafe mounting or overhead suspension of any heavy load can result in serious injury or death, and property damage.
- It is the installer’s responsibility to evaluate the reliability of any mounting method used for their application.
- Only professional installers with the knowledge of proper hardware and safe mounting techniques should attempt to install any loudspeaker overhead.
- Consult the local authority having jurisdiction before installing this product.
- Use only the hardware and accessories included or specified by Bose Professional.
- Do not mount on surfaces that are not sturdy or that have hazards concealed behind them, such as electrical wiring or plumbing.
- Do not make unauthorised alterations to this product.
- Do not expose loudspeaker or mounting components to any chemical substances that are not specified by Bose Professional, including but not limited to lubricants, cleaning agents, contact sprays, or other hydrocarbon-based solvents.
- Exposure to such substances can lead to degradation of the plastic material, resulting in cracking and creating a falling hazard.
- Do not place or install the bracket or product near any heat sources, such as fireplaces, radiators, heat registers, or other apparatus (including amplifiers) that produce heat.
Installation
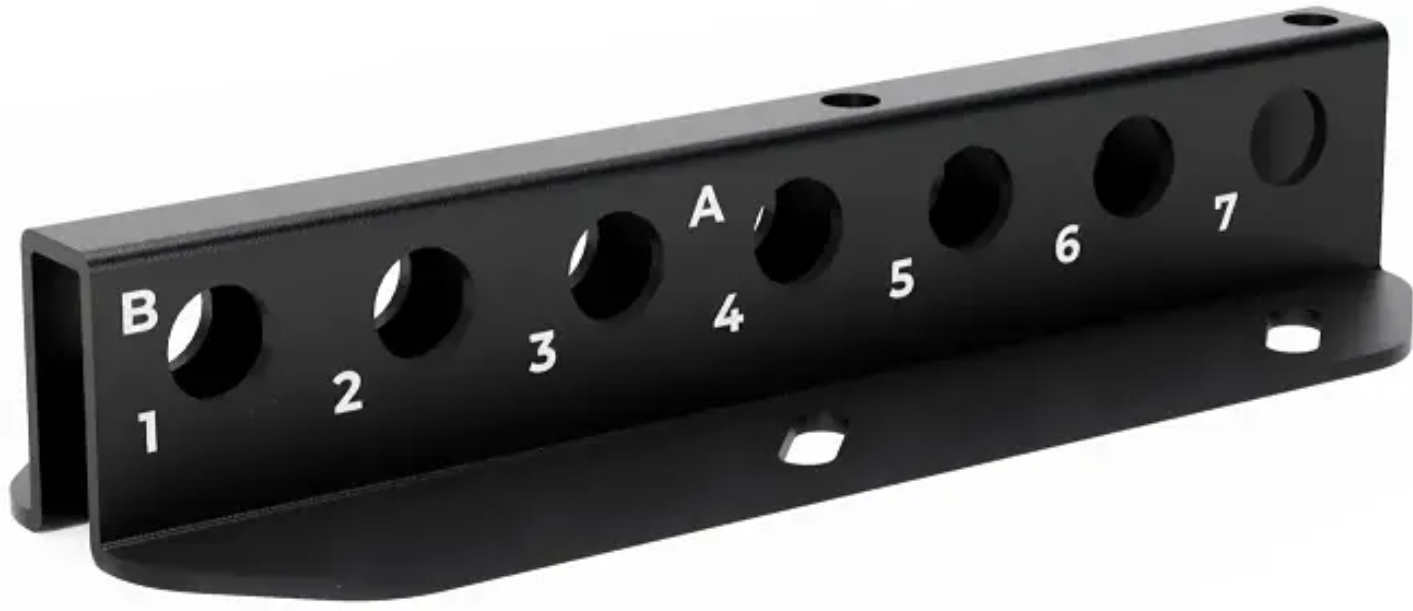
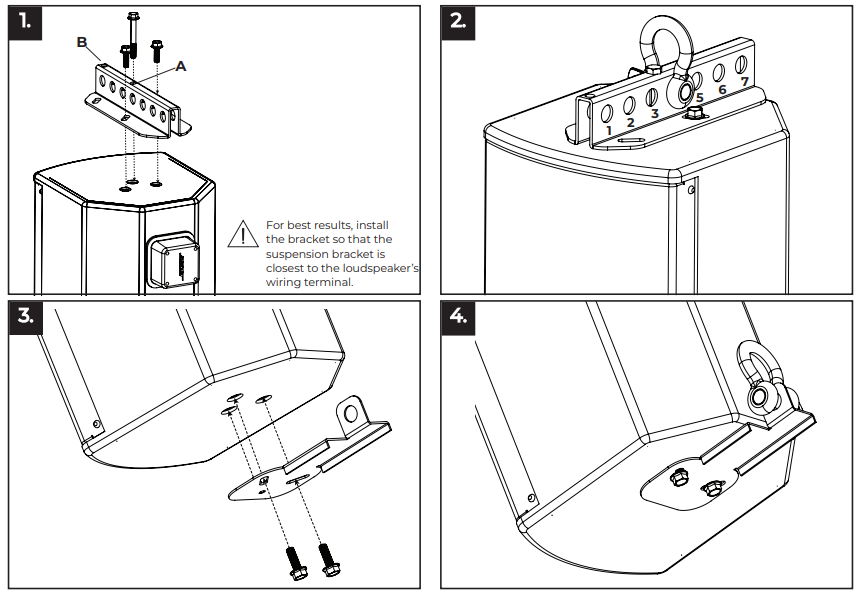
- Attach the suspension bracket to the loudspeaker by placing the 65 mm M8 bolt and washer through mounting location A or B (see “Mounting Position Angles” chart) and into the designated threaded insert in the loudspeaker.
- Secure the bracket by inserting two 25 mm M8 bolts into the remaining threaded inserts.
- Tighten all bolts with a 13-millimetre socket tool using a torque not to exceed 13.6 to 20.3 newton·meters (10 to 15 pound·feet).
- Attach a ½ inch shackle to the bracket in the appropriate numbered location according to your desired mounting position.
- To install the optional pullback bracket, attach the bracket to the opposite side of the loudspeaker using two 25 mm bolts, making sure to insert the bracket peg into the remaining threaded insert. Tighten bolts.
- Attach a ½ inch shackle to the tab on the pullback bracket.
Importers Information
- EU Importer: Transom Post Netherlands B.V., Keizersgracht 391A, 1016 EJ, Amsterdam.
- UK Importer: Transom Post Netherlands UK, Squires House 205a High Street, West Wickham, BR4 0PH.
- Japan Importer: Transom Post International Japan KK Co., Ltd. PMO Tamachi IV Shiba5-29-19, Minato-ku, Tokyo.
- Australia Importer: Transom Post Australia Pty. Ltd., Level 14, 60 Margaret Street, Sydney, NSW 2000.
- China Importer: Transom Post (Shanghai) Audio Co. Ltd, Room 2209, Building 1, 175 Longyao Road, Xuhui District, Shanghai.
- Mexico Importer: POST INTL MEXICO, S. DE R.L. DE C.V. Insurgentes Sur No. 1079, 1st floor, Colonia Noche Buena, Benito Juárez, C.P. 03270, Mexico City.
- UAE Importer: 102 A, Sama Tower, Sheikh Zayed Road, Dubai, UAE. Bose Professional, 117 South St, Hopkinton.
Warranty
- This product is covered by a limited warranty.
- For warranty details, visit BoseProfessional.com/warranty
Customer Support
- Tel: 1-800-278-1083
- Website: https://support.bose.com/
MA 01748 USA Bose is a trademark of Bose Corporation. ArenaMatch is a trademark of Transom Post OpCo LLC. ©2024 Transom Post OpCo LLC.
FAQs
Q: What is the recommended weight limit for the suspension rail?
To prevent safety risks, always make sure the total installed equipment weight does not beyond the rated capacity specified in the handbook.
Q: How should the rail be installed?
Install the rail horizontally between two sturdy support points (such as structural beams or wall studs).
Q: Can multiple AMU units be mounted on a single rail?
It is possible to attach more than one unit as long as the total weight does not surpass the rail’s maximum rated capability. Make sure that the distance between units permits adequate cable management and airflow.
Q: What tools are required for installation?
Make sure the supporting structure can withstand the weight and always take safety precautions.
Q: How do I ensure the rail is level and secure?
Before fastening the rail, line it using a spirit level. To ensure stability after installation, gently press down. Check the mounting points again and tighten the fasteners if there is any movement.
Q: Can the suspension rail be installed on drywall or other non-structural surfaces?
Mounting the rail only on plasterboard or other flimsy surfaces is not advised. To guarantee secure support, use structural studs, beams, or suitable reinforced anchors.
Q: Is it possible to adjust the height of mounted AMU units after installation?
Indeed, depending on the position of the mounting bracket, the design permits some vertical flexibility.
2 Comments
Your article helped me a lot, is there any more related content? Thanks!
Your article helped me a lot, is there any more related content? Thanks!