
![]()
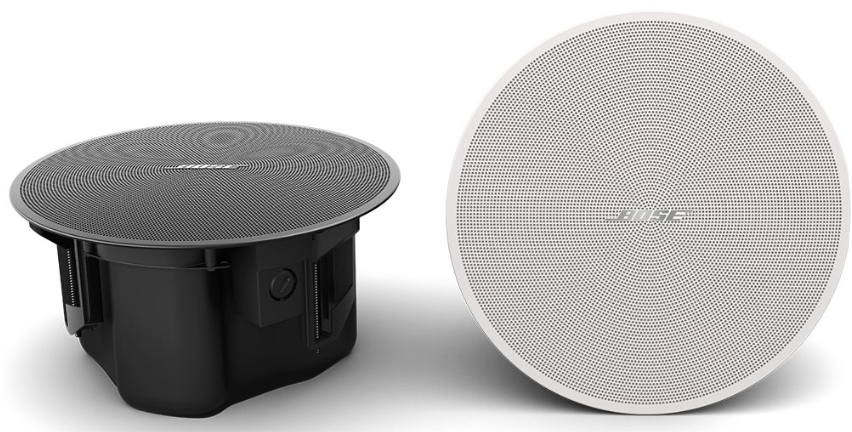
Bose DesignMax DM3C In-Ceiling Loudspeaker
Safety Instructions
- Do not block any ventilation openings. Install in accordance with the manufacturer’s instructions.
- Do not install near any heat sources such as radiators, heat registers, stoves, or other apparatus (including amplifiers) that produce heat.
- Only use attachments/accessories specified by the manufacturer.
- Keep the product away from fire and heat sources.
- Do not place naked flame sources, such as lighted candles, on or near the product.
- Do not make unauthorized alterations to this product.
- The FreeSpace FS4SE wall-mounting bracket is only for use with the model FS4SE.
- Clean speakers using only a dry cloth. Do not expose the loudspeaker to soap, detergent, mineral oil, alcohol, or other cleaning agents or chemicals.
- Do not mount on surfaces that are not sturdy or that have hazards concealed behind them, such as electrical wiring or plumbing.
- Unsafe mounting or overhead suspension of any heavy load can result in serious injury or death, and property damage.
Product Ratings
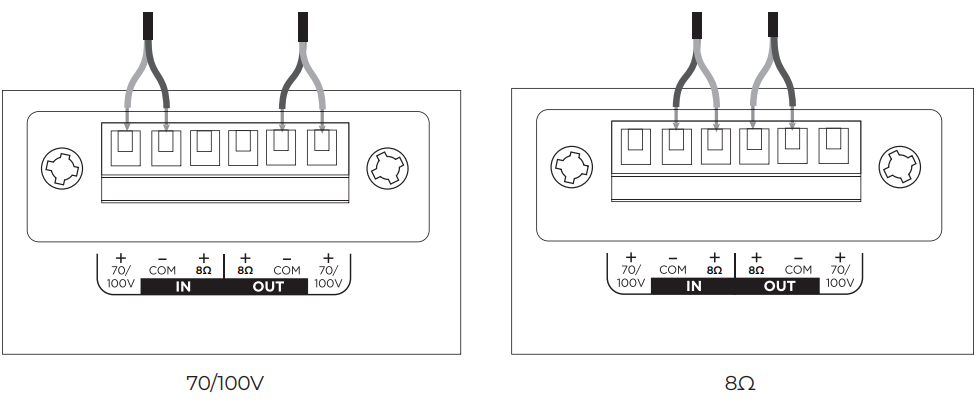
- Input Voltage: 70V/100V
- Impedance: 8 Ω, 40 W
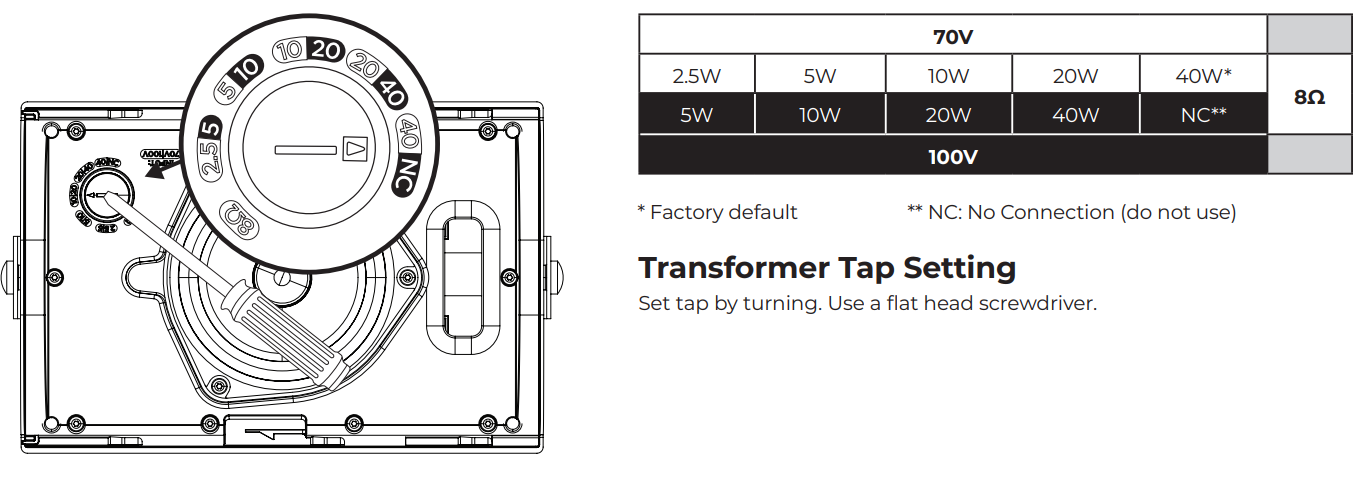
- Current or Power: (70V): 2.5W, 5W, 10W, 20W, 40W; (100V): 5W, 10W, 20W, 40W
Package Contents

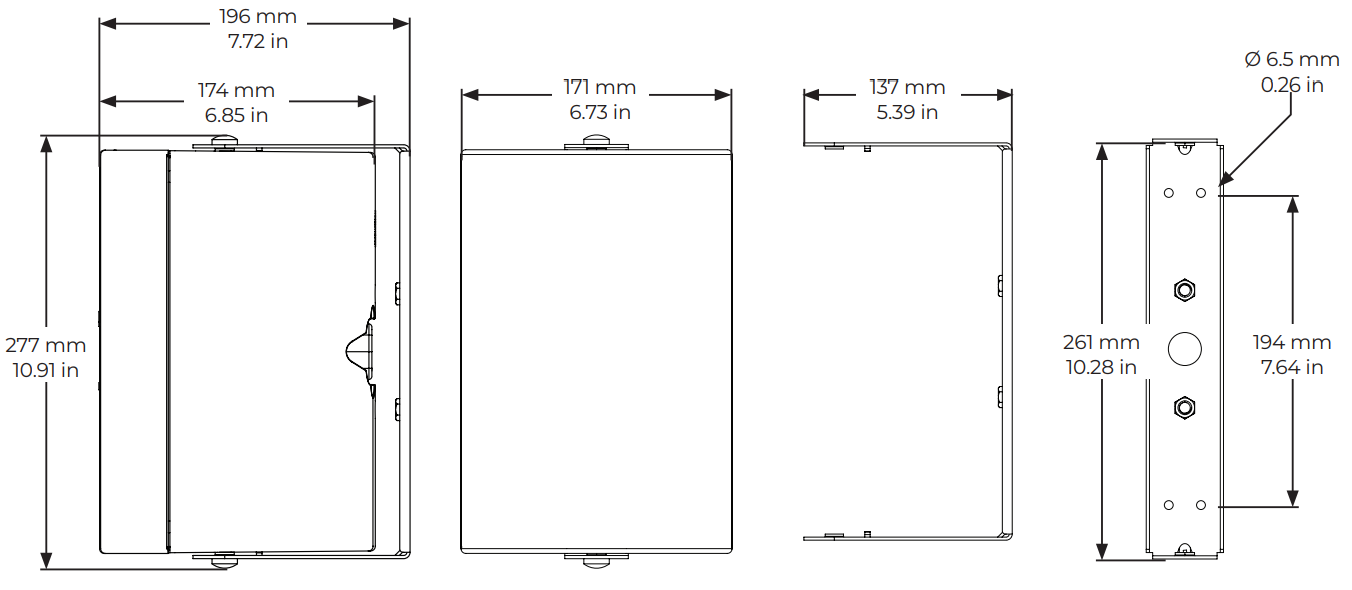
Dimensions
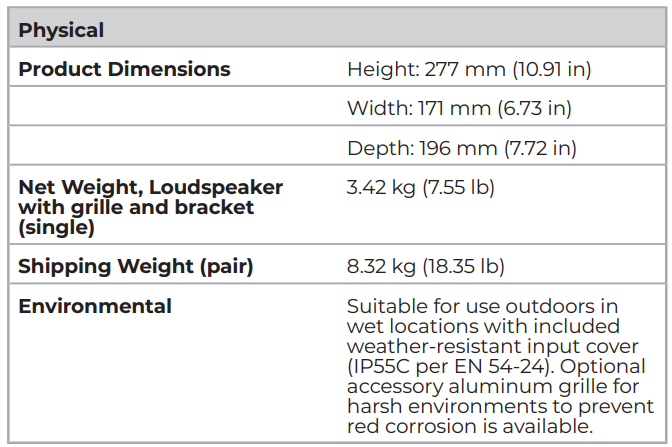
Technical Specifications
Accessories
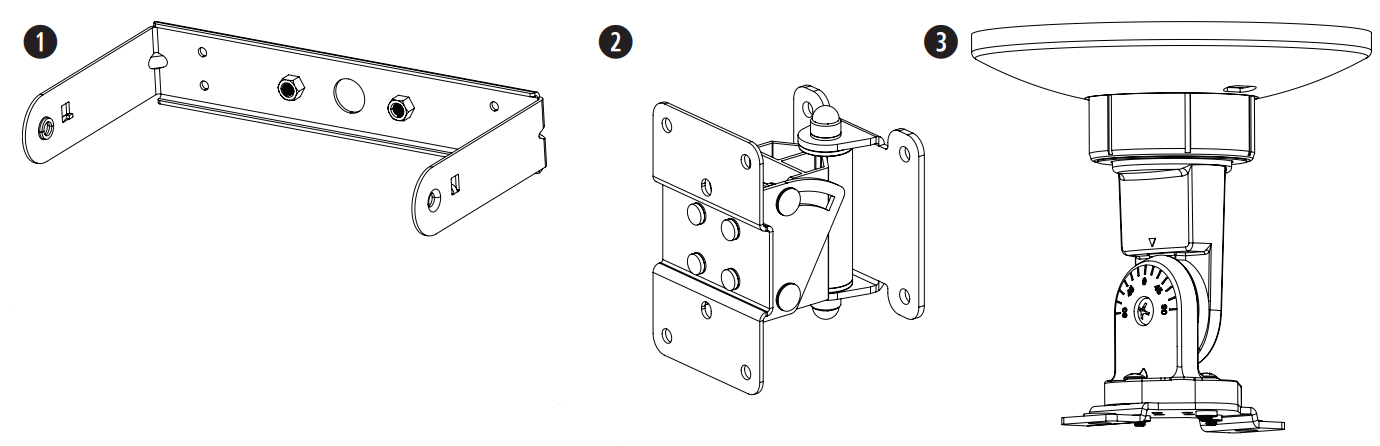
- Mounting bracket (included)
- Surface-Mount Pan and Tilt Bracket (optional)
- CMBS2 ceiling-mount bracket (optional; for indoors only)
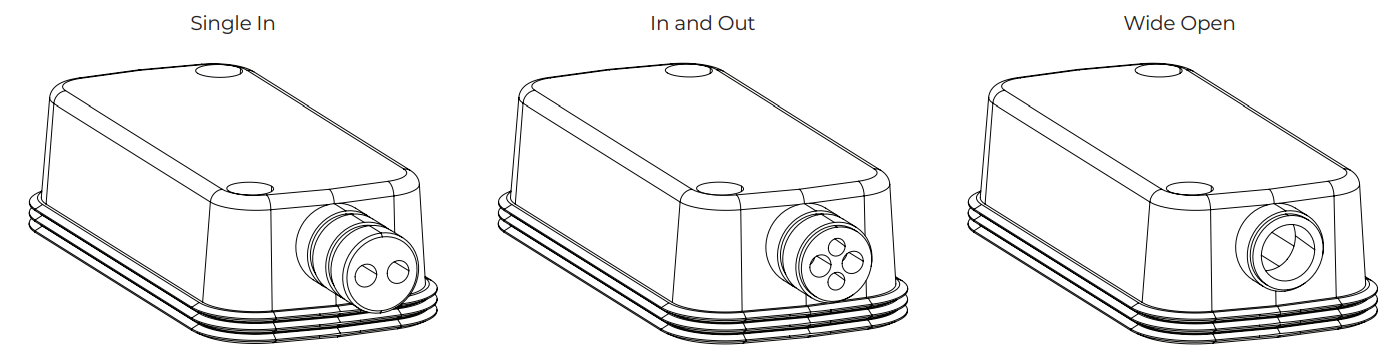
Weather-resistant Input Cover
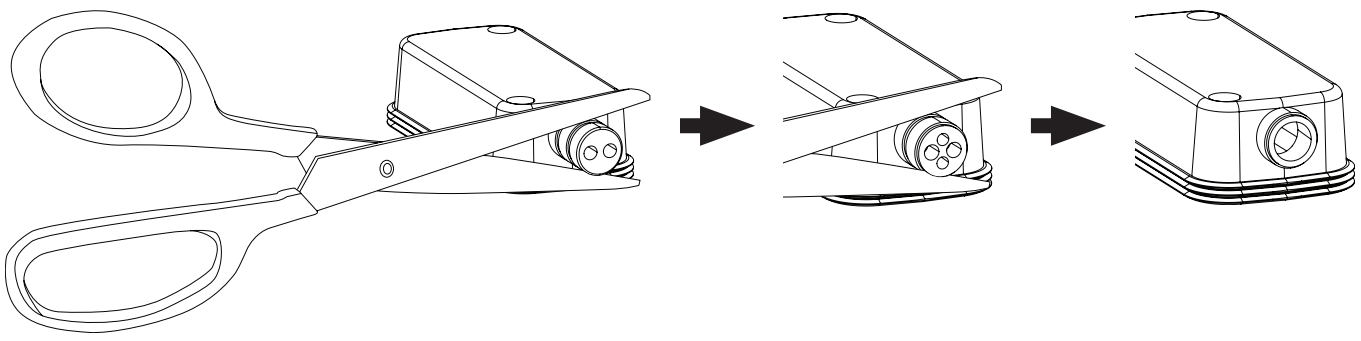
The weather-resistant input cover is designed for three different wiring scenarios (see above). To change the configuration of the input cover to support your wiring scenario, cut along the perforation on the rubber conduit.
- Indoor-only applications do not require the use of the input cover.
- If installing the loudspeaker with the rubber conduit facing upward, it is the installer’s responsibility to seal against water ingress into the Euroblock connector.
- If using the wide open rubber conduit configuration, it is the installer’s responsibility to seal against water ingress into the Euroblock connector.
Wiring the Loudspeaker
Wire Gauge
The FreeSpace FS4SE loudspeaker is designed to work with 18 AWG (0.8 mm2 ) to 14 AWG (2.1 mm2 ) size wire only.
Connection Diagrams
Expose six millimeters (1/4 inch) of bare wire to attach to the terminals.
- The loudspeaker is not rated for use with a rigid conduit. The loudspeaker is suitable for a flexible conduit or wiring connection only.
- Wiring method must be in accordance with: In Canada, CSA C22.1, Canadian Electrical Code, Part I, Safety Standard for Electrical Installations, Section 32; In the United States, The National Electrical Code, NFPA 70.
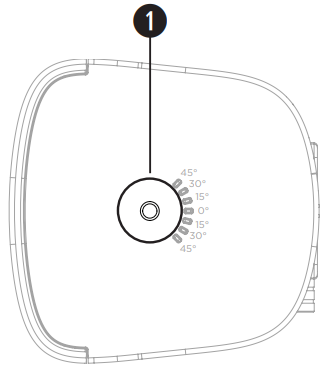
Loudspeaker Settings
Using a Safety Cable
- Some regional construction codes require the use of a secondary method of securing loudspeakers to support structures to provide additional safety.
- Choose a mounting position, method, and hardware consistent with local building codes and regulations.
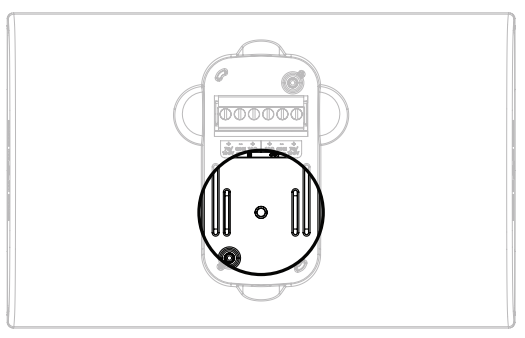
- A safety cable can be attached to the loudspeaker using the threaded inserts on the sides of the enclosure.
- See the diagram to the right for safety attachment points.
- The side inserts (1) are sized for M8 screws with a depth of 10 millimeters (0.39 inches).
Loudspeaker Orientation
Choose the loudspeaker orientation best suited for your installation.
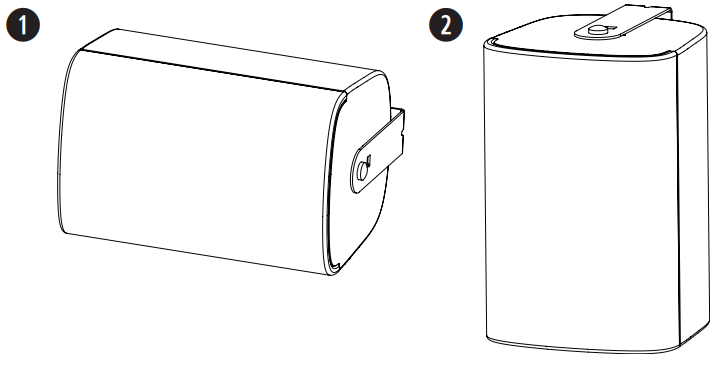
- Horizontal
- Vertical
Installing the Bracket
- When choosing an installation location, at least two of the mounting bracket’s attachment points must be secured to a support structure. Attachment points not secured to a support structure must be secured using appropriate hardware for the installation.
- Choose fasteners that are consistent with all local building codes and requirements.
Choose appropriate fasteners to support the weight of the loudspeaker (3.42 kg [7.55 lb]).
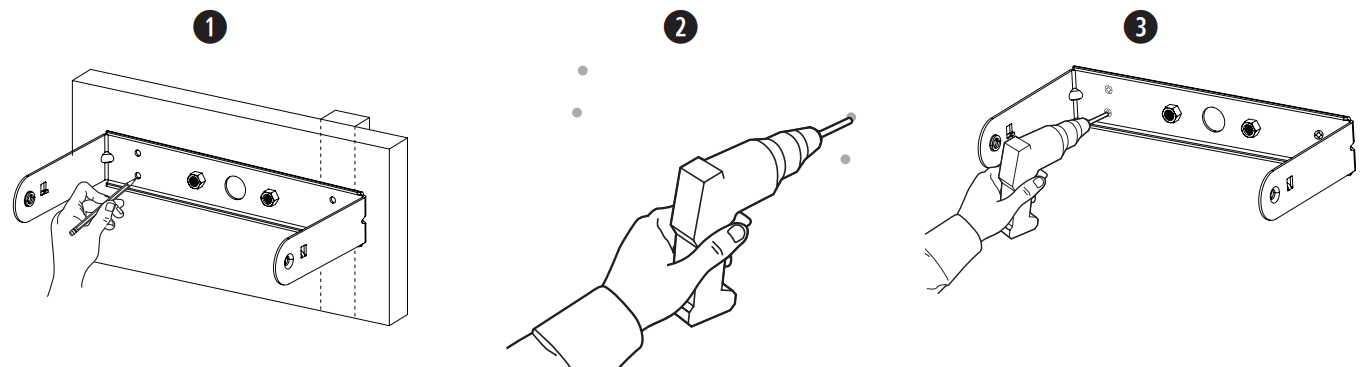
- Mark the drill holes.
- Drill four holes (sized for appropriate fasteners) into the wall.
- Secure the bracket to the wall with two screws (not included). Note: Use M6 or 1/4″-20 sized screws.
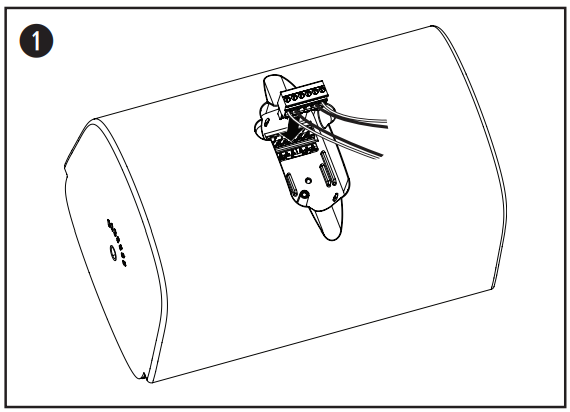
Wiring the Connector
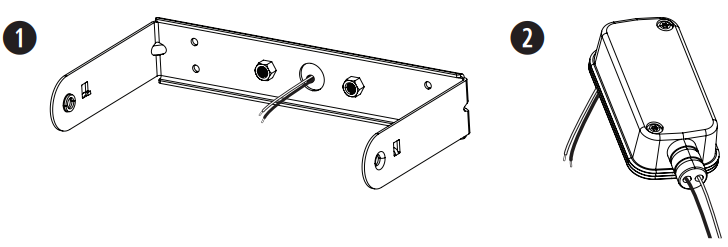
- Feed the wires through the center hole of the bracket.
- Insert the wires through the bottom of the input cover. See Preparing the Input Cover on page 4.
- Wire the connector. For wiring information, see Wiring the Loudspeaker on page 5.
Ceramic Terminal Attachment Point
 Installing the Loudspeaker
 Installing the Loudspeaker
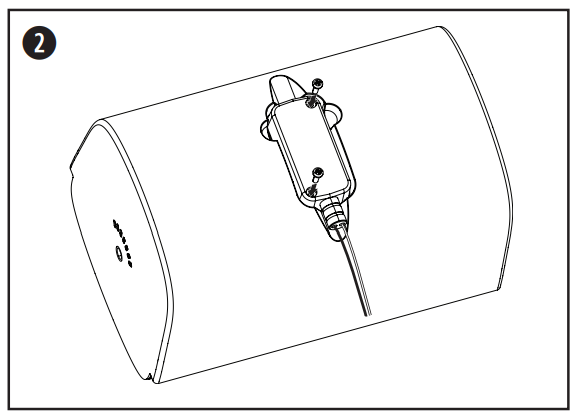
- Attach the wired connector to the loudspeaker.
- Place the input cover over the connector and press it firmly against the loudspeaker to create a tight seal. Use the two included input cover screws to secure the input cover.
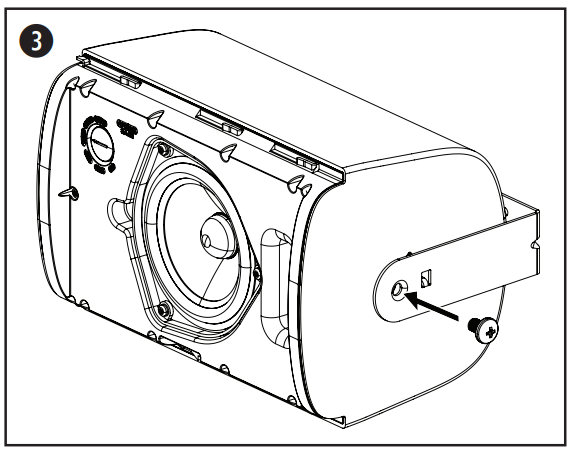
- Hold the loudspeaker in between the bracket arms and insert one of the included bracket screws into each side of the loudspeaker using the threaded inserts.
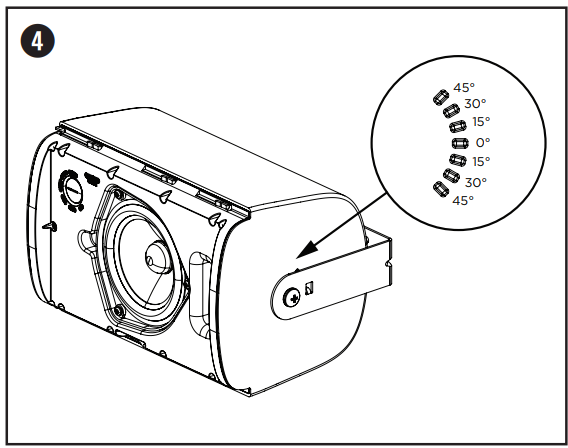
- Align the pins on the mounting bracket with the angle slots appropriate for your installation and snap the bracket into the loudspeaker.
- The angle of the loudspeaker can be adjusted to 0°, ±15°, ±30°, or ±45°.
- In outdoor applications, do not install the loudspeaker with an upward pitch.
- Tighten the screws on both sides of the loudspeaker to secure the loudspeaker to the mounting bracket. Do not over-torque the screw.
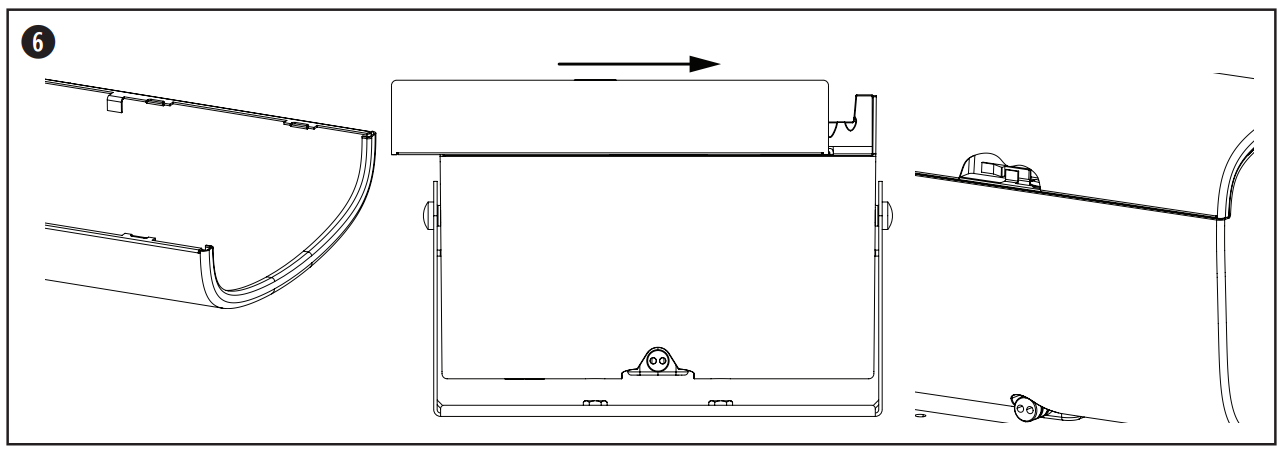
- Locate the extended grille tab on the inside of the grille. Attach the grille by sliding it into place. Be sure the extended grille tab attaches to the grille lock on the loudspeaker enclosure.
Removing the Grille
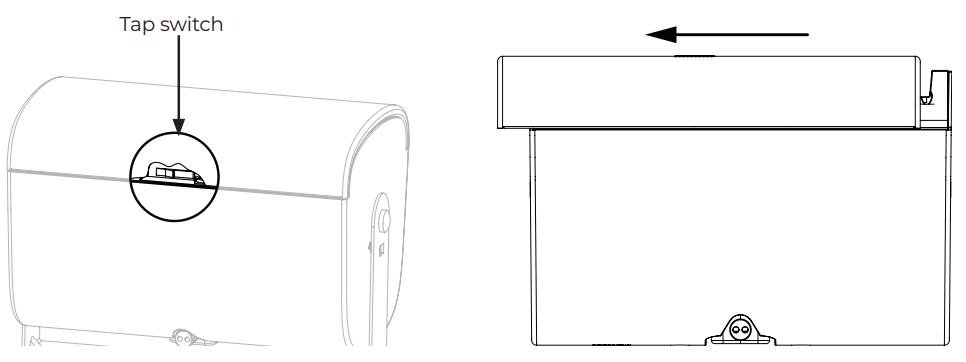
The grille is secured to the loudspeaker by the grille lock. Disengage the grille lock by inserting a small tool through the grille perforation (no larger than 1.5 millimeters in diameter). While depressing the grille lock, slide the grille away from the loudspeaker to detach it.
- The grille lock is located on the loudspeaker opposite the tap switch. See the diagram below for the grille lock location.
Adjusting the Logo
The FreeSpace FS4SE comes with a pre-installed Bose logo for horizontal installations. The loudspeaker also comes with a separate logo for vertical installations. To remove the logo, peel it away from the loudspeaker grille. To apply the vertical logo, find the center of the grille and align the notches on the back of the logo with the grille perforation. Press to affix it to the loudspeaker grille.
Systems for Buildings
Environmental: Type A (indoor applications)
- Suitable for installation using Class 1, Class 2, or Class 3 wiring methods in accordance with NFPA 70, National Electric Code, 2002, Article 640.
- Suitable for use with fire alarm circuit wiring methods in accordance with NFPA 70, National Electric Code, 2002, Article 760.
- NFPA 70, National Electric Code, 2002, Article 300-22 (c). NFPA 90-A, 2002, Installation of Air Conditioning and Ventilation Systems, Paragraph 4.3.10.2.6.5.
- EMC Directive 89/336/EEC and Article 10 (1) of the directive, EN50081-1 and EN50082-1 as signified by the CE mark.
- The FreeSpace FS2P loudspeaker has been designed to the requirements defined in the following European regulatory specification for combination systems.
- British Standard Code of Practice BS 5839, Part 8, when used with the ceramic terminal block and thermal fuse. Tested to IEC60268-5.
Foot Notes
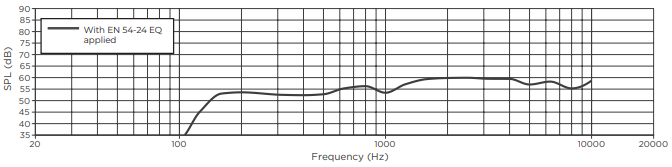
The specifications data were measured in an anechoic chamber, free-field. The reference plane is on the grille surface and perpendicular to the reference axis. The reference axis is perpendicular to the center of the grille surface. The horizontal plane contains the reference axis and is perpendicular to the reference plane.
On-axis Frequency Response
Regulatory Compliance
- This product conforms to all applicable EU directive requirements.
- Proper disposal and recycling help protect natural resources, human health, a nd the environment.
- For more information on the disposal and recycling of this product, contact your local municipality, disposal service, or the shop where you bought this product.
Warranty
- This product is covered by a limited warranty.
- For warranty details, visit BoseProfessional.com/warranty
Customer Support
- Tel: 1-800-278-1083
- Website: https://support.bose.com/
MA 01748 USA Bose is a trademark of Bose Corporation. ArenaMatch is a trademark of Transom Post OpCo LLC. ©2024 Transom Post OpCo LLC.
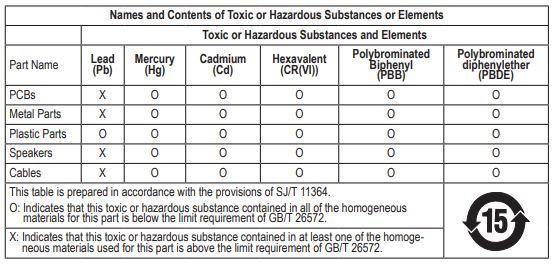
China Restriction of Hazardous Substances Table
Taiwan Restriction of Hazardous Substances Table
 Taiwan Restriction of Hazardous Substances Table
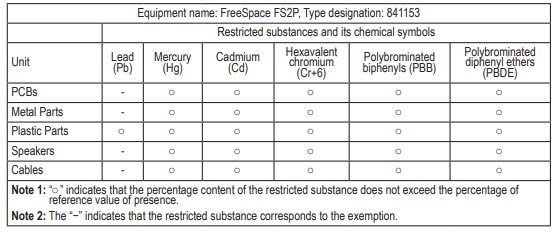
FAQs
Q: What is the DesignMax DM3C designed for?
Designed for both business and residential settings, the DM3C is a professional-grade in-ceiling loudspeaker that produces clear, steady sound for full-range audio applications, paging, and background music. For other Bose solutions, including surface-mounted options, check out the Bose DesignMax DM8SE Surface Loudspeaker Manual.
Q: Can I use the DM3C in both commercial and residential spaces?
Indeed. The DM3C offers consistent coverage and natural sound in a variety of settings, making it appropriate for homes, workplaces, retail establishments, hotels, conference rooms, and restaurants.
Q: Can I adjust the sound direction?
To maximise coverage and clarity, the DM3C features a rotating baffle that directs the sound output towards the listening area.
Q: Can the grille be painted to match the ceiling?
Indeed. Make use of water-based, light paint. Don’t paint the internal parts or the driver.
Q: How do I replace a damaged grille?
Bose offers replacement grilles. Carefully remove the old grille and use the mounting clips to secure the new grille.
Q: What warranty coverage does the DM3C have?
A limited manufacturer’s warranty covering material and workmanship flaws is included with the DM3C. Regional variations in warranty terms can be seen on the Bose website.