
Bose SOUNDDOCK SERIES II Digital Music System


Safety Instructions
Please take the time to carefully follow the instructions in this owner’s guide. It will help you set up and operate your system properly and enjoy all of its advanced features. Please save this owner’s guide for future reference.
- Read these instructions for all components before using this product.
- Keep these instructions for future reference.
- Heed all warnings – on the product and in the owner’s guide. Follow all instructions.
- Do not use this apparatus near water or moisture
- Clean only with a dry cloth – and as directed by Bose Corporation.
- Unplug this product from the wall outlet before cleaning.
- Do not block any ventilation openings. Install in accordance with the manufacturer’s instructions.
- To ensure reliable operation of the product and to protect it from overheating, put the product in a position and location that will not interfere with its proper ventilation.
- For example, do not place the product on a bed, sofa, or similar surface that may block the ventilation openings.
- Do not put it in a built-in system, such as a bookcase or a cabinet that may keep air from flowing through its ventilation openings.
- Do not install near any heat sources, such as radiators, heat registers, stoves, or other apparatus (including amplifiers) that produce heat.
- Only use attachments/accessories specified by the manufacturer.
- Use only with the cart, stand, tripod, brace, or table specified by the manufacturer or sold with the apparatus.
- Unplug this apparatus during lightning storms or when unused for long periods of time – to prevent damage to this product.
- To prevent risk of fire or electric shock, avoid overloading wall outlets, extension cords, or integral convenience receptacles.
- Do not let objects or liquids enter the product, as they may touch dangerous voltage points or short out parts that could result in a fire or electric shock.
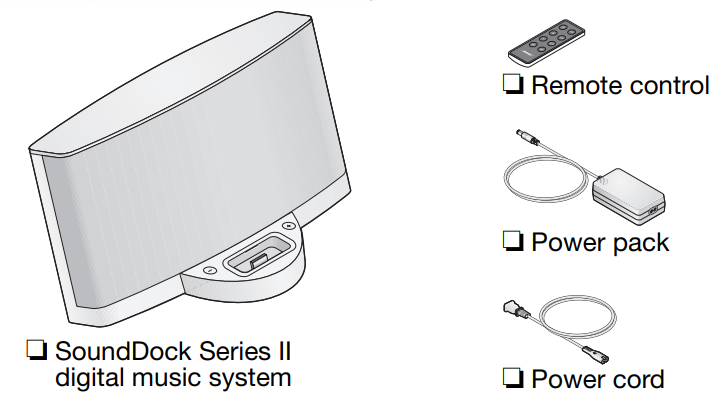
Unpacking and Setting Up
Check the carton for all of the parts shown. Save the carton for possible future use. It provides the best means to repack the system for transporting it outside your residence.
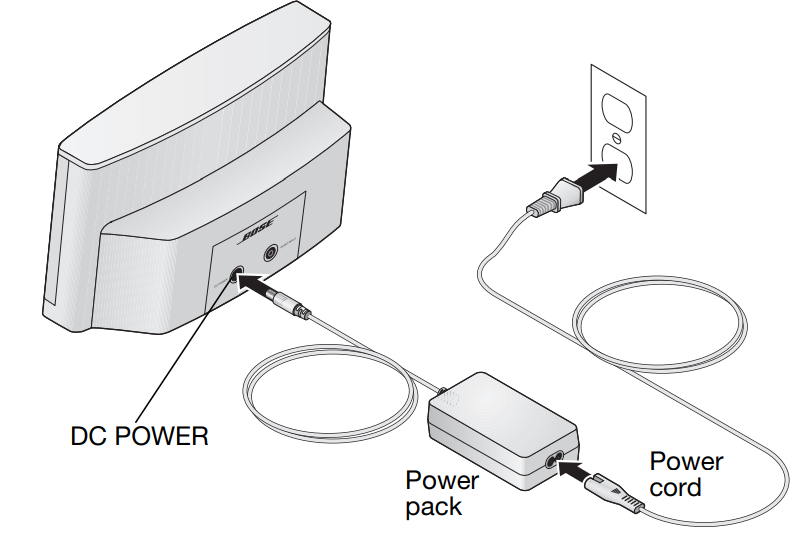
- Place the system on a firm and level surface.
- Plug the power pack into the DC POWER connector on the rear of the system.
- Plug the small end of the power cord into the connector on the power pack.
- Plug the other end of this cord into a wall outlet. You will hear a short tone indicating a power connection has been made.
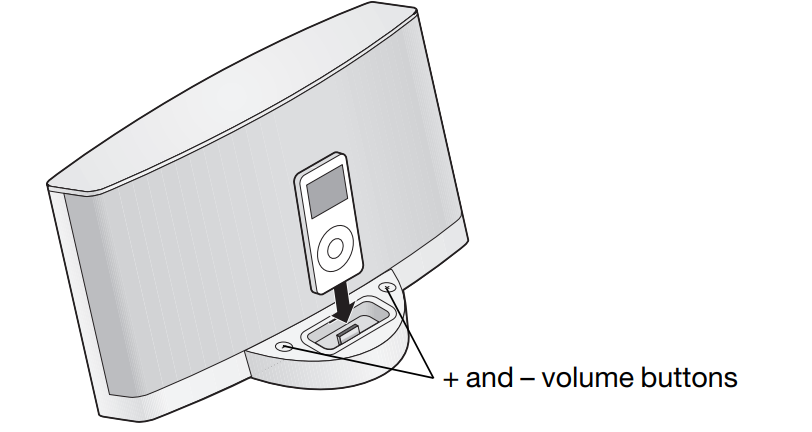
Using your iPod/iPhone
You can use the system right away, with the universal dock adapter already installed. Or you can replace the installed adapter with the insert supplied with your iPod/iPhone. With either the adapter or your insert in place:
- Set your iPod/iPhone to play, then firmly insert it into the dock. The system begins to play immediately.
- Adjust the volume using buttons on the system dock or the remote control volume buttons.
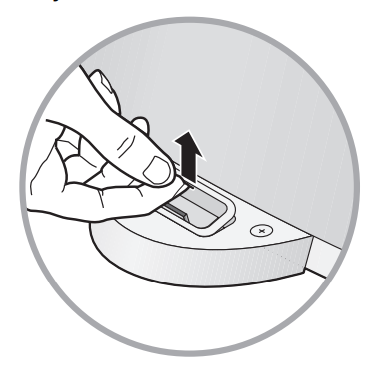
To replace the universal adapter
- Insert a fingernail into the adapter slot and pull up to remove the adapter from the well of the dock. Or use an object that fits into the slot to gently pry out the adapter.
- Place your insert into the well and press on the edges until they are flush with the dock.
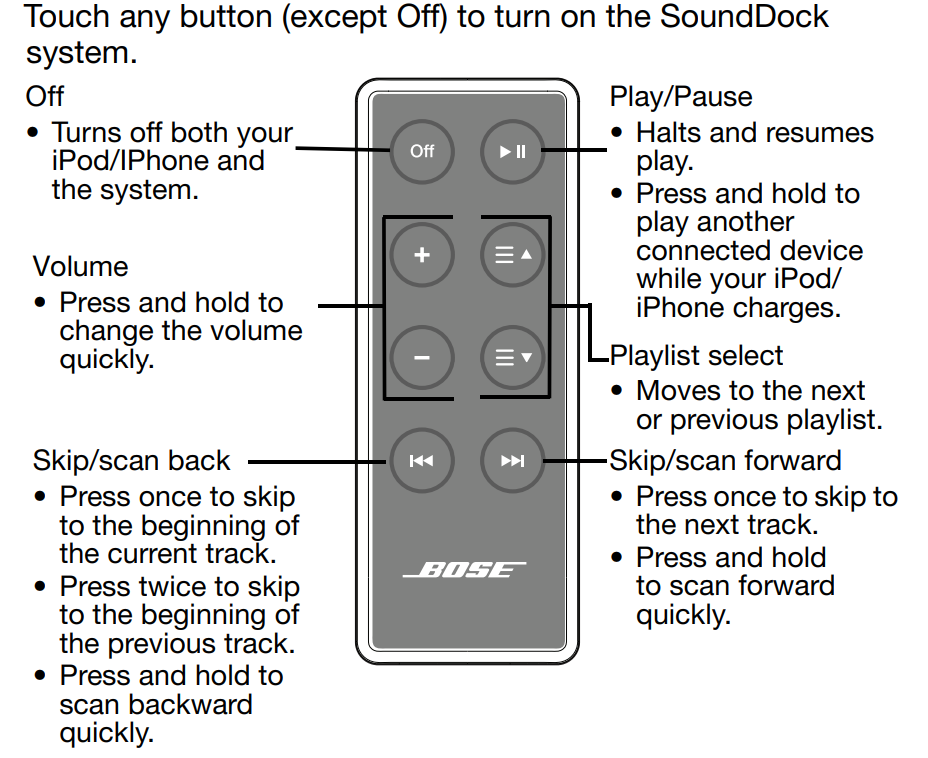
Using the Remote
Other Audio Device
 Other Audio Device
 You can play another audio by connecting it to the system. This requires a cable with a 3.5mm mini plug at one end.
- Set the audio device to slightly below full volume, then plug it into the AUDIO INPUT connector.
- If your iPod/iPhone is in the system dock and charging, press and hold the Play/Pause button for three seconds to hear the other device.
- Adjust the volume using buttons on the system dock or the remote control volume buttons. Other buttons on the remote do not control this other device. To return to listening to your iPod/iPhone, press the Play/Pause button once.

Maintaining the System
Changing the remote control battery is the only regular maintenance that is required. You may also clean the system.
Replacing the remote battery
When the remote stops operating or its range seems reduced, it is time to change the remote battery.
- Using a coin, turn the battery cover slightly counterclockwise.
- Remove the cover and insert the new battery (CR2032 or DL2032) flat side up, with the + symbol in view.
- Reseat the cover and turn it clockwise to lock into place.

Cleaning the System
Wipe the system using a soft, dry cloth. You can also lightly vacuum the grille.
- Do not use solvents, chemicals, or sprays.
- Do not allow liquids to spill or objects to drop into any openings.
Technical Information
Power rating
- 100-240V 50-60Hz, 1.5A, 81-100VA
System size and weight
- 6.65″H x 11.91″W x 6.48″D (16.89 cm x 30.26 cm x 16.47 cm) 4.56 lb (2.1 kg)
Compatibility
- The SoundDock digital music system is compatible with all iPhones and most iPod models.
- Not compatible with the 3rd generation with a dock connector.
Troubleshooting
| Problem | What to do |
| Your iPod/iPhone does not dock properly | Remove your iPod/iPhone from the dock and check for obstructions on the connectors in the dock and on your iPod/iPhone. Then reseat it in the dock. Remove your iPod/iPhone from the dock, wait five seconds, then firmly reseat it. You may need to do this a few times. |
| No sound | Increase the volume setting for the system. Increase the volume on the iPod/iPhone or your second audio device, if it is playing. Press the Play/Stop button on the remote control. Press and hold this button to hear a second device while the iPod/iPhone is charging. |
| Your iPod/iPhone does not navigate playlists using the remote. | Make sure there are no empty playlists on your iPod/iPhone. |
| Problem | What to do |
| Your iPod/iPhone does not respond to the SoundDock® remote control buttons shown: | Remove your iPod/iPhone from the dock, wait five seconds, then firmly reseat the iPod/iPhone. Try the remote from a different location. If it works there, check for interference from bright room lights or sunlight. Wipe off the small lens on the front end of the remote with a clean, dry cloth. |
| Your SoundDock does not respond to any controls | Unplug the power cord for one minute, then plug it back in. Contact your local Bose® dealer about the problem. |
| Your iPod/iPhone does not charge | Remove your iPod/iPhone from the dock and check for any connection obstructions. Reseat the iPod/iPhone firmly. Make sure your iPod is a compatible model (one that does not have four buttons above the click wheel). |
FCC Statements
If applicable, this equipment has been tested and found to comply with the limits for a Class B digital device, pursuant to Part 15 of the FCC rules. These limits are designed to provide reasonable protection against harmful interference in a residential installation. This equipment generates, uses, and can radiate radio frequency energy and, if not installed and used in accordance with the instructions, may cause harmful interference to radio communications. However, this is no guarantee that interference will not occur in a particular installation.
- Reorient or relocate the antenna in the device receiving the interference.
- Increase the separation between the equipment and receiver.
- Consult the dealer or an experienced radio/TV technician for help.
- This product complies with the Canadian RSS-310 Class B specification.
Thank you for your Purchase
Congratulations on your choice of the SoundDock® Series II digital music system from Bose. Designed specifically to work with your iPod or iPhone, this system provides high-quality audio performance that invites your music to come out and play. Whether the music is from your iPod/iPhone or from another connected device, you’ll find that it attracts a wide audience of people who love the sound.
Warranty
Your Bose® SoundDock Series II digital music system is covered by a limited transferable warranty. Details of the limited warranty are provided on the product registration card that is included in the carton. Please refer to the card for instructions on how to register. Failure to do so will not affect your limited warranty rights. What you must do to obtain Limited Warranty Service:
- Return product, with proof of purchase from an authorized Bose dealer, using the following procedures:
- Label and ship the product, freight prepaid, to the address provided by the Bose organization in your country, and place any necessary return authorization number prominently on the outside of the carton. Cartons not bearing a return authorization number, where required, will be refused.
- This product is covered by a limited warranty.
- For warranty details, visit BoseProfessional.com/warranty
Customer Support
- Tel: 1-800-278-1083
- Website: https://support.bose.com/
MA 01748 USA Bose is a trademark of Bose Corporation. ArenaMatch is a trademark of Transom Post OpCo LLC. ©2024 Transom Post OpCo LLC.
FAQs
Q: What devices are compatible with the SoundDock Series II?
The SoundDock Series II is intended for use with Apple products that have a 30-pin connector, such as some iPod and iPhone versions. Through the optional auxiliary (3.5 mm) input, it can also be used with other devices.
Q: How loud can the SoundDock Series II get?
Optimised for medium-sized rooms, offices, or private listening, the system produces room-filling sound with clean highs and powerful bass. Its performance is remarkable for its size, despite the fact that it is not intended for huge settings.
Q: Can I connect external speakers?
External speaker connections are not supported by the SoundDock Series II. Its built-in full-range speaker system produces high-quality, portable audio without the need for extra amplification.
Q: Can I control playback from the SoundDock itself?
Indeed, the SoundDock Series II has track navigation and play/pause controls. Certain features, such as playlist selection, still need to be controlled by the device.
Q: Is the SoundDock portable?
Despite its small size, the system is intended to be a stationary device. Although it is portable, it needs a power source to function.
Q: Does it support software updates?
Although the SoundDock Series II itself doesn’t need software upgrades, it works with other devices that might. For optimal compatibility, make sure the firmware on your device is up to date.
1 Comment
Can you be more specific about the content of your article? After reading it, I still have some doubts. Hope you can help me.