
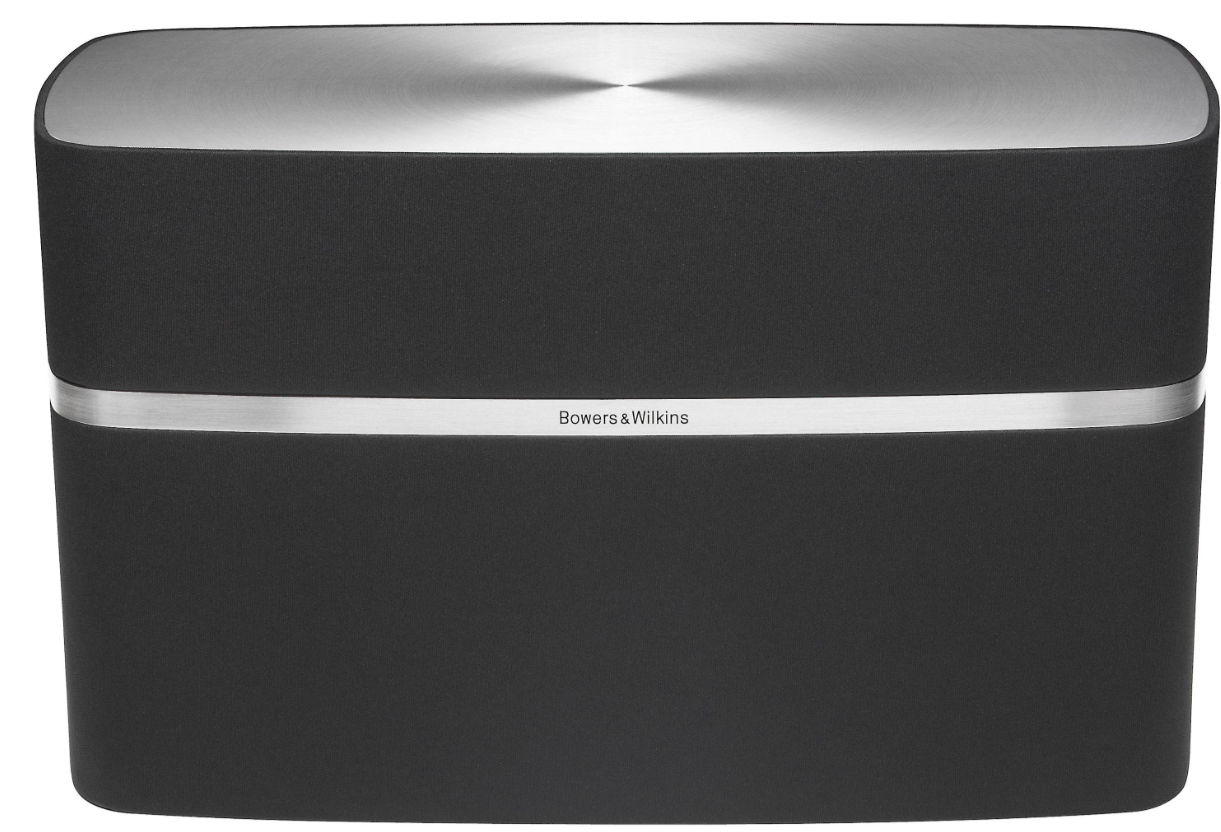
Bowers And Wilkins A7 Speaker With AirPlay
Welcome to Bowers & Wilkins and A7
Thank you for choosing Bowers & Wilkins. When John Bowers first established our company, he did so in the belief that imaginative design, innovative engineering, and advanced technology were keys that could unlock the enjoyment of audio in the home. His belief is one that we continue to share, and it inspires every product we design.
Can be Used
- Play audio directly from iTunes® via either a cable or wireless network connection.
- Play audio stored on or streamed to your computer via USB.
- Connect and listen to an external audio source such as a TV or a portable music player.
- This manual will tell you everything you need to know to get the most from your A7.
- It begins by describing the contents of the A7 carton.
A7 Carton Contents
- A7
- Power cable
- Remote control
- Document pack containing a Quick Start Guide,
Connecting to your A7
You can connect to your A7 by
- Using AirPlay® to stream wirelessly from iTunes.
- Using AirPlay® to stream wirelessly from an iPod touch®, iPhone®,e® or iPad®.
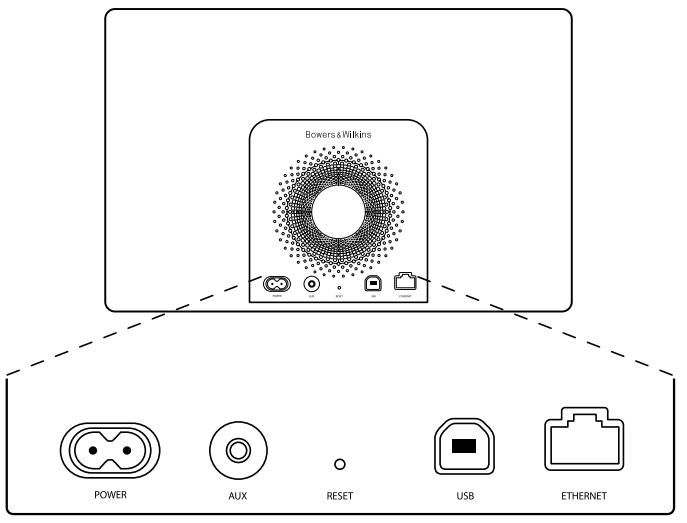
- Using the rear panel-mounted connection sockets. Diagram 1 illustrates A7’s rear panel connection sockets.
AirPlay Connection
A7 is able to play audio from iTunes either wirelessly or via a wired (Ethernet) connection using AirPlay streaming technology. When connected to the same network as a computer running iTunes, A7 can appear as an output option in the pop-up AirPlay menu. See Section 5 for information on configuring A7 to join your home network and on configuring iTunes to play through A7.
As well as streaming audio from iTunes, AirPlay also makes it possible to stream audio directly to the A7 from an iPod, iPhone, or iPad. Any iPod, iPhone, or iPad application that incorporates a volume control will have an additional icon that enables selection of available remote speakers for playback. An AirPlay device within wireless range will be included in the selection list.
USB Input
If you wish to listen to audio, either stored or streamed, on your Mac/PC using an A7 USB input, connect it using a USB cable from a spare Mac/PC USB socket.
Auxiliary Input
If you wish to listen to an external analogue or digital audio source, connect it to the A7 Aux input socket using either an analogue cable terminated with a mini-jack plug or a digital cable terminated with a mini-TosLink optical plug. A7 will automatically identify the type of cable used and configure the Aux input socket appropriately.
Mains Input
Connect A7 to a mains outlet socket using the supplied mains cable. When first connected to mains power, 7 will automatically power up with its indicator pulsing red.
Using A7
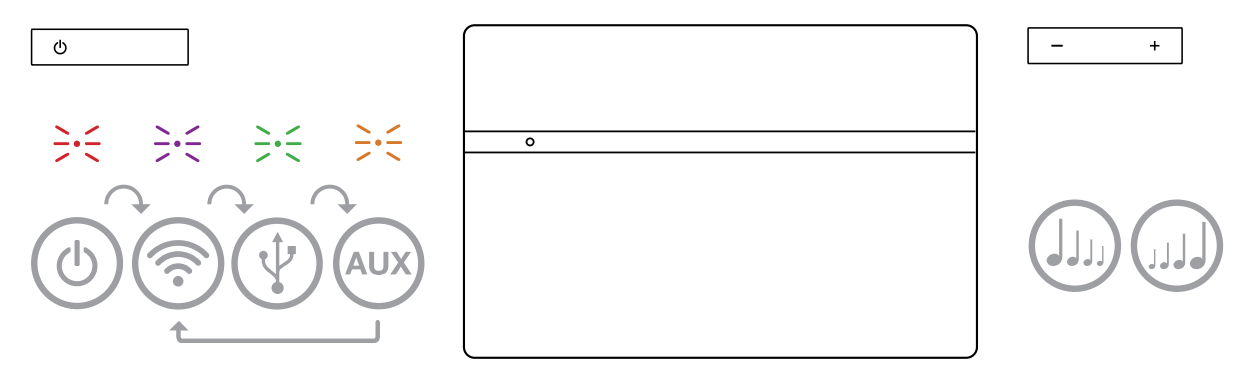
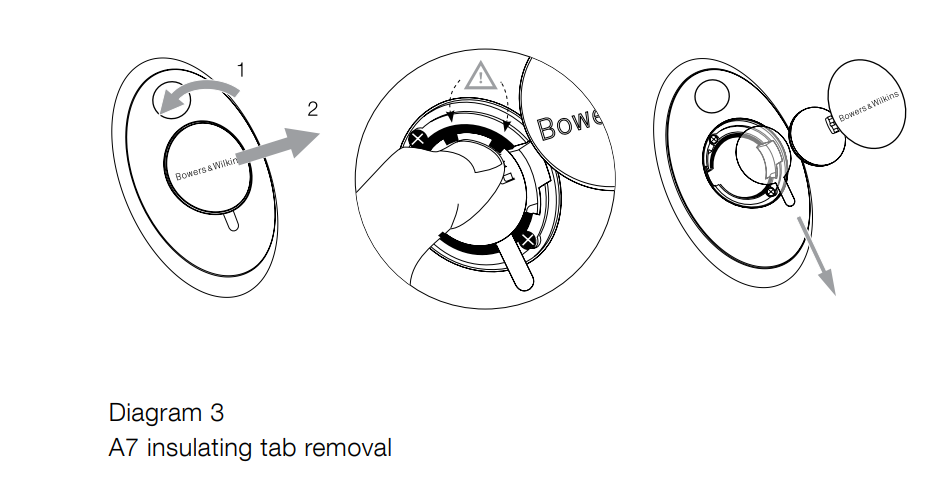
A7 can be operated either from the controls on its body, illustrated in Diagram 2, or from the remote control. If the remote control is to be used, the battery insulating tab must first be removed. This is illustrated in Diagram 3. Diagram 4 illustrates the remote control key functions.
Switching On and Off
The A7 indicator illuminates dim red in Sleep mode and will turn off in Standby mode. A7 can only be switched on from Standby mode by pressing the A7 Standby button. A7 can be switched on from Sleep mode by the following action.s
- Pressing the A7 Standby button.
- Pressing the emote control Standby key.
- Streaming music to A7 by AirPlay
- Play music through the AUX input.
To switch A7 into Sleep mode, either press the remote control Standby key or press and hold the A7 Standby button for 2 seconds. The A7 indicator will illuminate dim red. To switch the A7 into Standby mode, press and hold the A7 Standby button for 4 seconds. The A7 indicator will turn off.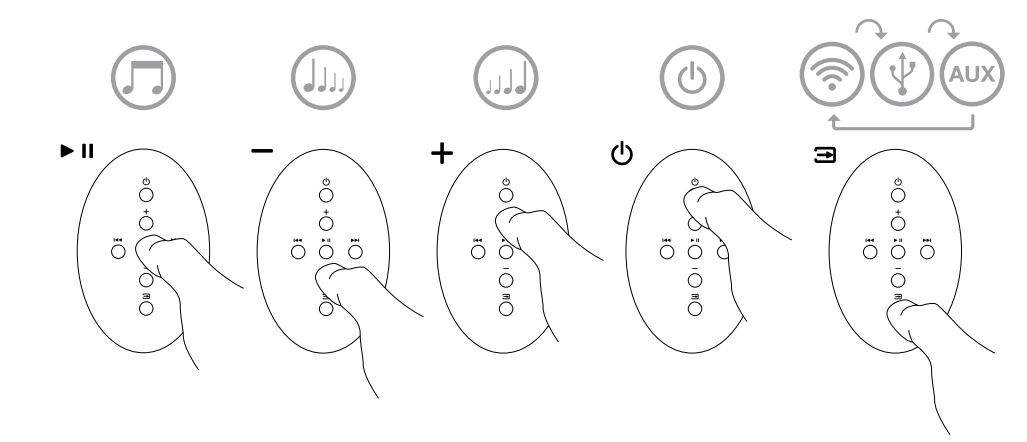
A7 Functions
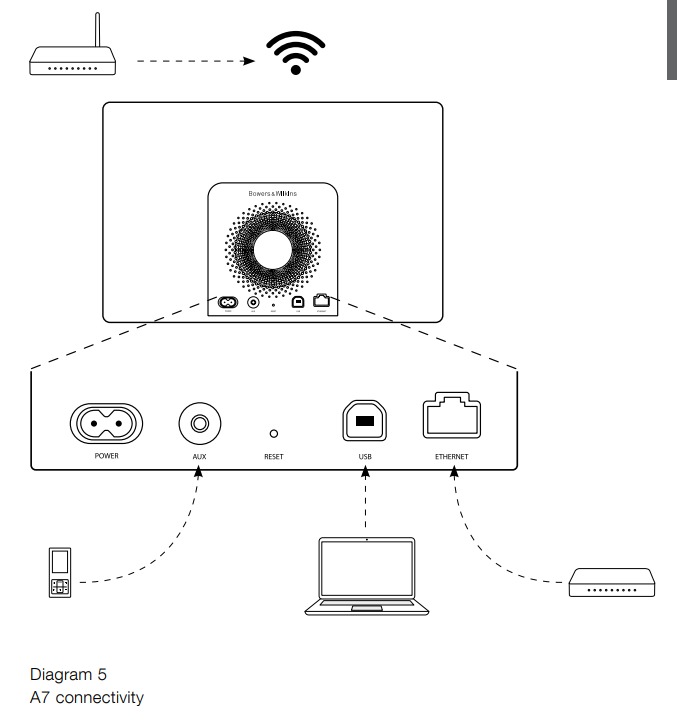
Diagram 5 illustrates A7’s connectivity. With A7 switched on from Standby or Sleep:
- You can connect to a wired or wireless network and listen to your iTunes audio via AirPlay.
- You can listen to other digital or analogue audio sources via the AUX input.
- You can listen to audio stored or streamed on your computer via USB.
- You can use the remote control Volume keys or A7’s Volume buttons to control volume.
- You can use the remote control’s Input key or A7’s Standby button sequentially to select connected inputs.
Adjusting the Sound of A7
If A7 is connected to iTunes via AirAirPlayyou can use one of the iTunes EQ options to tailor the sound. Any ability to adjust the sound from the USB and AUX inputs will depend on the capabilities of the source hardware or software.
A7 Automatic Input Switching
In some circumstances, A7 will automatically switch to its AirPlay input or switch on from Sleep mode:
- If iTunes-streamed audio is present on the AirPlay input when the USB or (auxiliary) input is selected, but no audio is playing, the AirPlay input will automatically be selected.
- If iTunes-streamed audio is present on the AirPlay input when the A7 is in Sleep mode, it will automatically switch on and play the streamed audio.
- When A7 has been In Sleep mode for more than one minute and an audio signal is detected through the AUX input, it will automatically switch on and play the AUX input audio.
A7 Indicator
The A7 indicator illuminates in a range of colours to indicate different operational conditions. Table 1 describes the colours and their meanings.
Joining Wireless Networks
Configuring iTunes.. In order to play your iTunes music on your A7 using AirPlay, your A7 must join the same network as the computer on which iTunes is installed and running. A7 network addressing is set to DHC, P, which means that once it has joined the wireless network, it will not require any further configuration. You will need to know your home wireless network name and password (also known as wireless key) before you st.art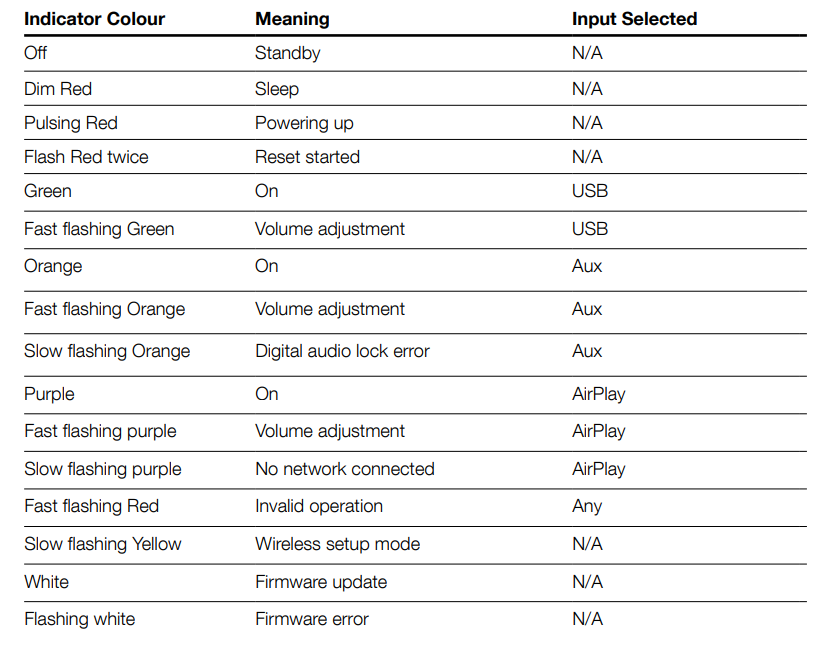
Set up your A7 with your iOS device (iPod touch, iPad, or iPhone)
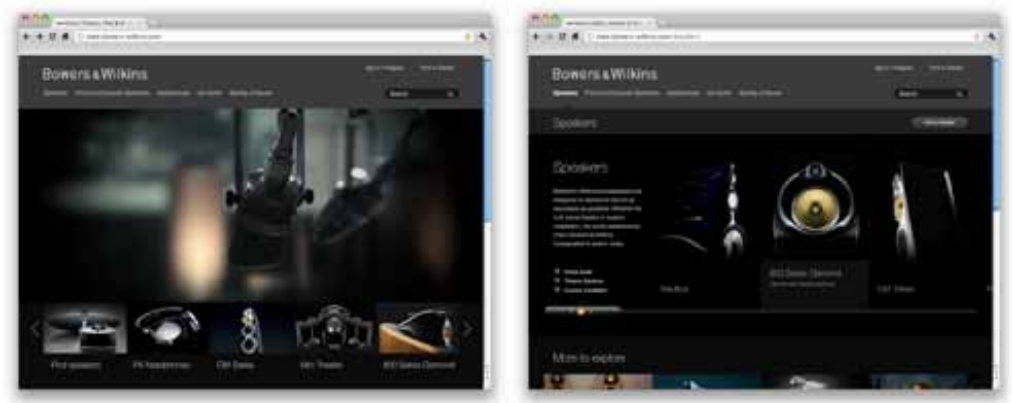
- Get the ‘Bowers & Wilkins Control’ App from the App Store or by visiting www.bowers-wilkins. com/control
- Follow the onscreen instructions.
Set Up with a Mac or PC
- Get the ‘Bowers & Wilkins Control’ App from the App Store or by visiting www.bowers-wilkins. com/control
- Follow the onscreen instructions.
Setting Up Using a Wired Connection
To set up A7 to join your wireless network, you should first connect it physically to the Mac/PC using an Ethernet cable. You will need to ensure that your Mac/PC wireless capabilities are disabled. Once connected, you can browse to the A7 setup page. Follow the steps described below.
- Unplug every cable from the A7.
- Using an Ethernet cable, connect the A7 rear panel Ethernet socket to an Ethernet socket on the computer.
- Connect the power cable. A7 will switch on with the indicator pulsing red.
- Once the A7 indicator begins to flash yellow. Press and hold the ‘+’ volume button on A7 for 4 seconds.
- This will open the A7 setup page.
- The setup page provides the option to change the A7 name.
- Enter a new name (A7 Kitchen, for example) in the Name box.
- Select your home network Name from the drop-down list and enter the Password in the appropriate box. Take care to type the password correctly.
- When you are finished, click on the Apply button, then close the A7 setup page.
- Disconnect the Ethernet cable.
Configuring iTunes
With A7 connected to your home network (wired or wireless), you can configure iTunes to use it as an output device. Select A7 as an output option in the pop-up AirPlay menu. iTunes will now play through the A7.
Multiple A7 units can be connected to the wireless network and used to provide audio in separate rooms. Each will be available in the iTunes devices menu, identified by either the names specified in the setup page or by default, the last three digits of their serial numbers.
Using USB Input
The USB input enables you to connect your A7 to a Mac/PC in order to play its stored or streamed audio.
Playing Audio via USB
When A7 is connected to a Mac/PC via USB and its USB input is selected, the computer will identify A7 as an output-only audio device. Specifying A7 in the Mac/PC audio control panel will allow it to play audio data either stored locally on the computer or streamed via a network or the internet.
Firmware Update
Updated A7 firmware may from time to time be made available for download from A7’s support section of the Bowers & Wilkins website.
Factory Reset
A7 has a pin-hole reset button located on its rear connection panel. The reset button is illustrated in Diagram 6. To return the A7 network settings (AirPlay input) to the factory defaults, ensure the power cable is connected, and power the A7 on. Press and hold the reset button for 2 seconds. The indicator will flash red twice.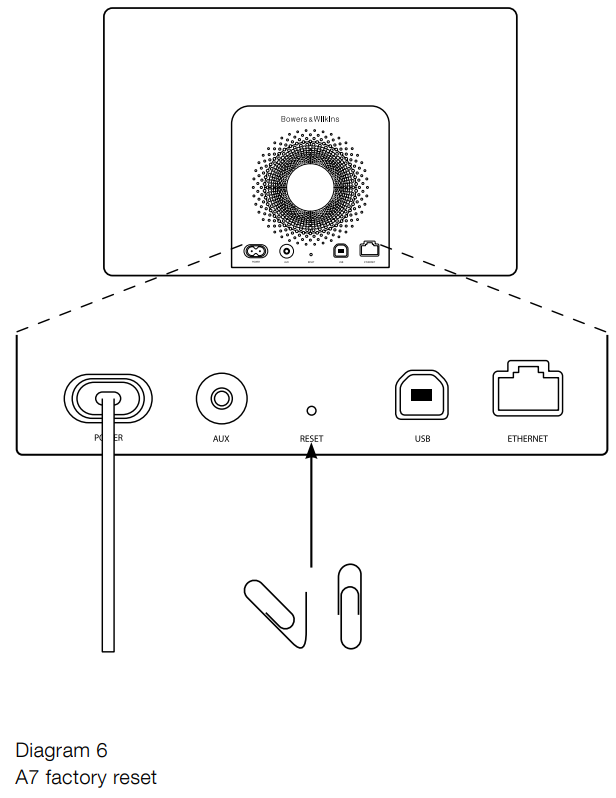
Cleaning
Use a clothes brush or a damp cloth to clean the grille cloth. Wipe other surfaces with a clean, lint-free cloth. If you wish to use a cleaning agent, apply it onto the cleaning cloth, not directly onto A7. Test a small area first, as some cleaning products may damage some of the surfaces. Avoid abrasive products, or contain acid, alkali, or anti-bacterial agents.
Technical Specifications
| Model | A7 |
| Description | Wireless Music System |
| Technical features | Apple® AirPlay® technology, Digital Signal Processing (DSP), High Quality Class-D amplifier, Switch-mode power supply, USB streaming from PC / Mac®, Flowport™, Remote control |
| Drive units | 2x 25mm (1.0 in) Nautilus™ tube aluminium tweet, 2x 75mm (3.0 in) Midrange, 1x 150mm (6.0 in) Subwoofer |
| Frequency response | 40Hz – 36kHz ±3dB on reference axis |
| Frequency range | -6dB at 36Hz and 42kHz |
| Amplifier power output | 2x 25W (tweeter) 2x 25W (midrange) 1x 50W (subwoofer) |
| Input voltage | 100V – 240V ~ 50/60Hz |
| Rated power consumption | 100W |
| Standby power consumption | <0.5W |
| Operating temperature | This product is only designed to work at an ambient temperature of up to 45°C. |
| Inputs | Network (RJ45 Ethernet or Wi-Fi), Auxiliary – analogue / optical digital (3.5mm mini jack), Streaming & firmware upgrades (USB 2.0) |
| Height | 220mm |
| Width | 360mm |
| Depth | 160mm |
| Net weight | 5.7kg |
| Enclosure | Glass filed ABS |
| Grilles | Black cloth |
| Apple compatibility | AirPlay works with iPhone, iPod touch, and iPad with iOS 4.3.3 or |
Customer Service
- Ph: 800 370 3740
- Website: https://www.bowerswilkins.com/
FAQs
Q: What is the Bowers & Wilkins A7 designed for?
Rich, detailed sound reproduction is the goal of the high-fidelity wireless speaker A7. It is perfect for streaming music from other networked sources and directly from Apple devices via AirPlay.
Q: How do I set up AirPlay on the A7?
On your iPhone, iPad, or Mac, choose the A7 from the AirPlay menu to begin audio streaming right away.
Q: What are the recommended placement guidelines for optimal sound?
For optimal bass response, position the A7 at ear level and at least 10 to 20 centimetres away from walls. Steer clear of enclosed shelves and corners since they may produce jumbled low frequencies.
Q: How do I update the firmware on the A7?
The Bowers & Wilkins app or your network-connected AirPlay device can handle firmware updates. To prevent disruptions during the upgrade, keep the speaker powered on and linked to Wi-Fi.
Q: Can I connect multiple A7 speakers?
Yes, you can use AirPlay 2 to group several A7 speakers for synchronised playback across your house while preserving accurate time and stereo imaging.
Q: How do I adjust bass and treble settings?
The Bowers & Wilkins app provides access to the built-in EQ presets on the A7. Change the parameters to suit your listening preferences and the acoustics of your room.
Q: How do I reset the A7 to factory settings?
Hold down the reset button on the back panel until the status LED turns amber, then let go. This will remove linked devices and network settings, enabling a new configuration.
4 Comments
Pingback: Bowers & Wilkins 700 Series 3 Home Speaker | User Manual
Can you be more specific about the content of your article? After reading it, I still have some doubts. Hope you can help me. https://accounts.binance.com/pt-BR/register-person?ref=GJY4VW8W
Thank you for your sharing. I am worried that I lack creative ideas. It is your article that makes me full of hope. Thank you. But, I have a question, can you help me? https://www.binance.com/fr/register?ref=T7KCZASX
Your point of view caught my eye and was very interesting. Thanks. I have a question for you. https://accounts.binance.info/fr-AF/register?ref=JHQQKNKN