
Bowers & Wilkins CCM362 Black in-Ceiling Speaker

Unpacking
They are particularly suitable for use in humid environments as swimming pools. This manual describes the installation of CCM3 Series speakers within conventional stud and sheetrock (joist and plasterboard) ceilings. It begins by listing the contents of the CCM3 series carton:
- Two CCM3 Series speakers
- Two CCM3 speaker grilles
- One aperture template
- Two paint masks
- Quick Start Guide
- Warranty information
CCM3 Series Basics
CCM3 Series ceiling mount speakers comprise a baffle carrying the speaker drivers, crossover circuitand connectors, and a magnetically secured grille. The baffle is secured in the ceiling aperture by dogclamps that swing outwards and tighten
CCM3 Series speakers require ceiling aperture and height clearance dimensions described in the following table:
Minimum Height
- Model Aperture Diameter Clearance
- CCM362 204mm (8.0 in) 79mm (3.2 in)
- CCM382 253mm (9.9 in) 85mm (3.4 in)
Before installing the CCM3 Series speaker, you should ensure that the ceiling locations chosen are free of obstructions such as pipe work, ducting or wiring that will interfere with the installation. In existing drywall construction, use a stud-finding tool to help you map the ceiling construction and a pipe detector to scan the proposed installation locations.
Positioning CCM3 Series Speakers
The appropriate position for CCM3 Series speakers within the listening environment will depend on their specific application:
Stereo Audio Applications
Try to avoid corner locations for the speakers and ensure that the acoustic environment around each speaker is similar.
Multi-channel Audio Applications
The centre speaker should be on the centre line of the screen, and the front speakers should be each laterally within approximately 0.5m (20 in) of the sides of the screen. Surround channel CCM3 Series speakers should be located just behind and to either side of the listening position. Try to avoid corner locations for any of the speakers and ensure that the acoustic environment around each front and surround speaker is similar.
Diagram 2 illustrates the general speaker location guidelines.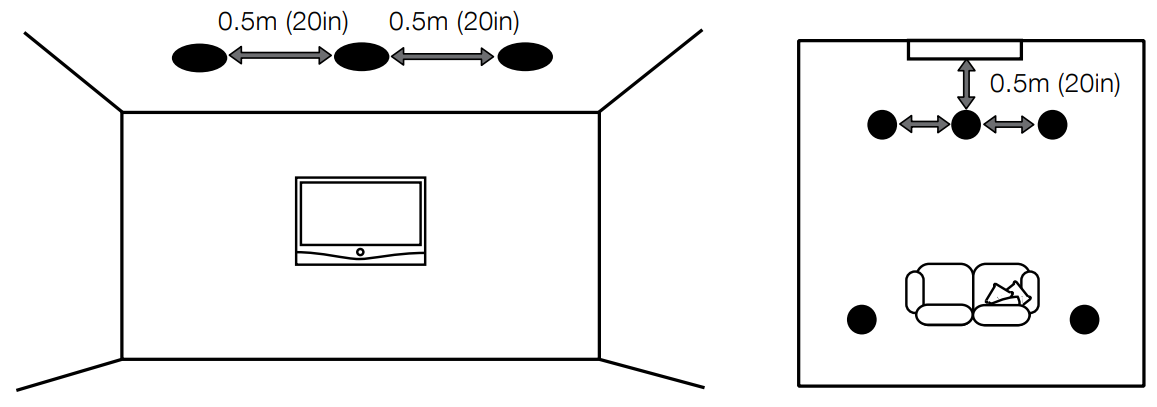
Stereo Audio Applications 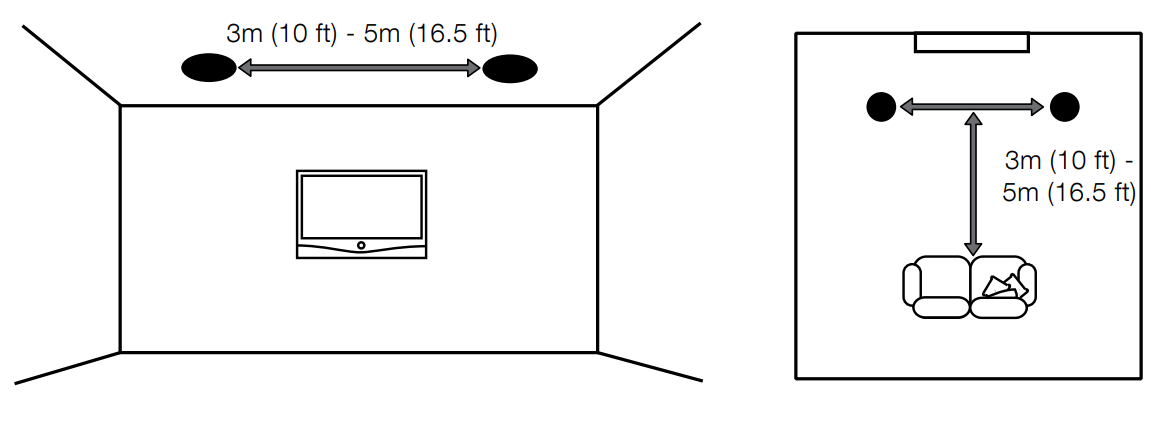
Multi-channel Audio Applications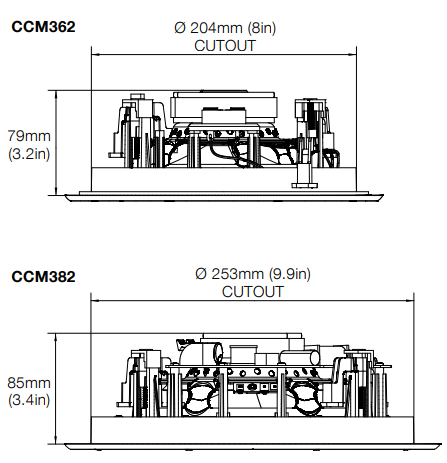
Installing CCM3 Series Speakers
To install a CCM3 Series speaker, proceed as described in the following paragraphs:
Using the supplied aperture template, mark a cut line on the ceiling. Check that the cut line defines the correct aperture diameter. Cut along the line with an appropriate tool to create a round aperture in the ceiling
The speaker cable is already present in the ceiling
Space pulls the cable down through the aperture. You likely need to gain access through the floor above to route the cables through the ceiling space. Leave enough spare cable through the aperture to ease connection to the speaker, but not so much that it is likely to buzz or rattle when pushed back up into the ceiling space. Approximately 1.0m (3 ft) is appropriate.
Now connect the speaker cable to the spring
terminals on the side of the baffle. Diagram 3 illustrates the cable connection.
With the speaker connected to the cable
Take great care not to damage the speaker drive units with the screwdriver. Engage the screwdriver with each dog-clamp screw in turn and tighten them. Diagram 4 illustrates inserting and securing the speaker.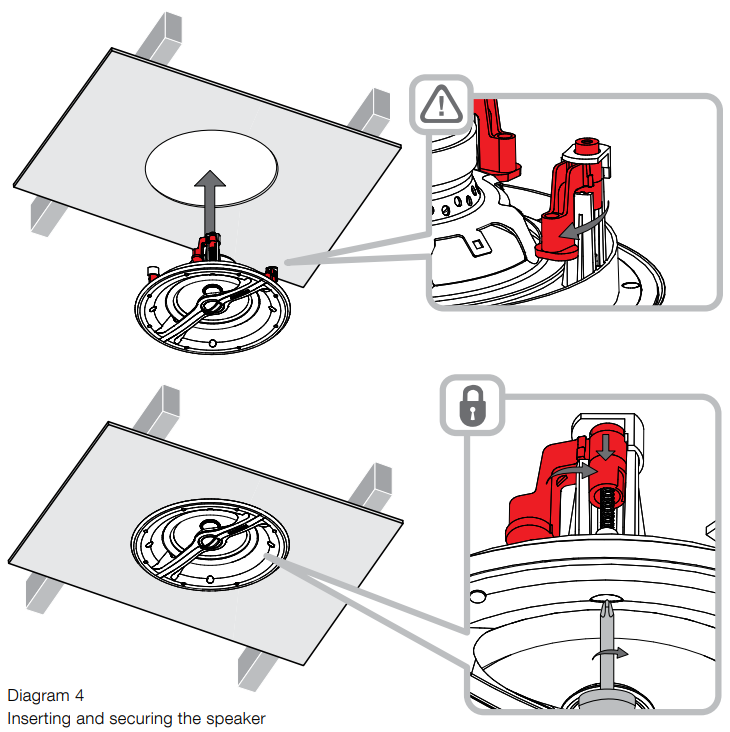
The grille can now be fitted.
The grille is placed magnetically, so it simply needs to be aligned with the groove in the frame flange, where it will click into place. Diagram 5 illustrates fitting the grille.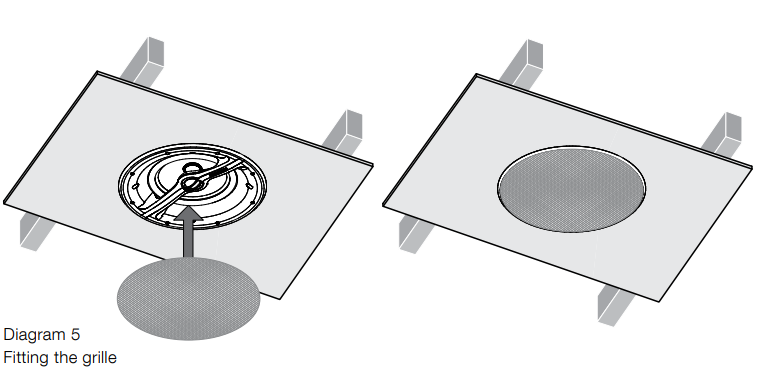
Using a Pre-mount Kit
Custom install pre-mount kits enable the locations of in-ceiling and in-wall speakers to be defined before the sheetrock (plasterboard) is fitted to the studs (joists).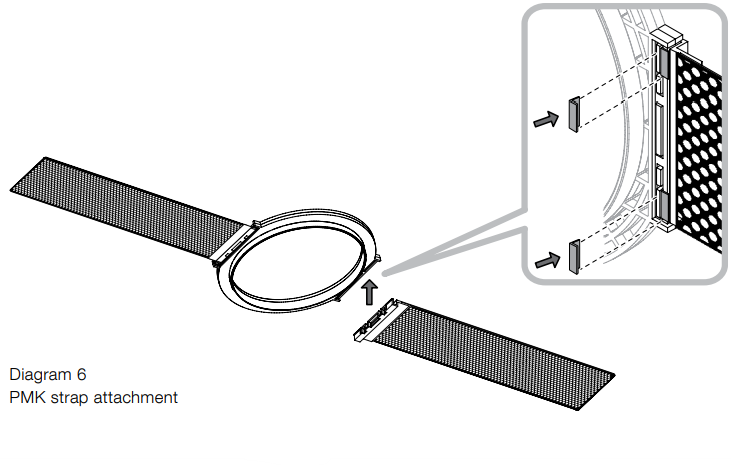
A pre-mount kit (PMK) comprises a plastic moulding that defines the aperture size of the specific speaker model, two perforated metal straps and four plastic clips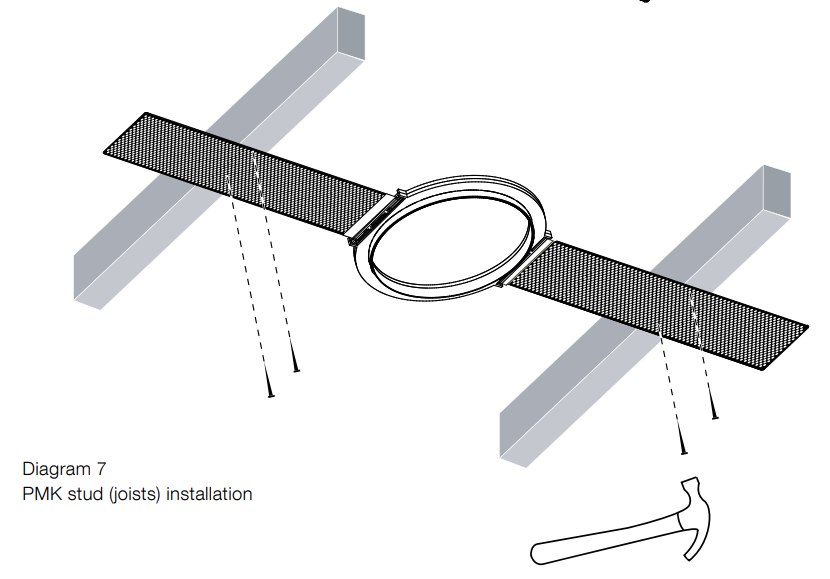
To use a PMK, first attach one strap to each side of the moulding using the plastic clips. 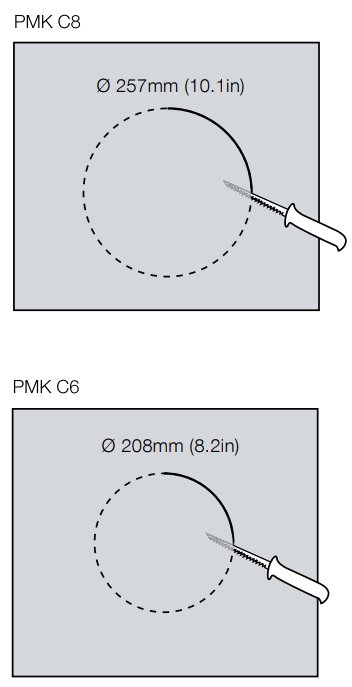
When the sheetrock (plasterboard) is subsequently fitted (marked on the outside to denote the position of the pre-mount kit), the PMK plastic moulding serves as an internal cut guide that significantly eases cutting the speaker aperture. Diagrams 6 to 9 illustrate the PMK installation.
Using a Back-box Kit
As well as enabling compliance with fire regulations, back-boxes also optimize speaker performance by providing a defined acoustic loading volume. A minimum clearance depth of 140mm from the outer stud (joist) plane to any rear obstruction required to fit a back-box.
Back-boxes incorporate holed side flanges that are intended to be nailed to adjoining studs (joists). All the nail holes should be used to help minimize the risk of the flange vibrating against the stud (joist) when the speaker is in use.
A cable clamp adjacent to the gland provides cable strain relief.
When the sheetrock (plasterboard) is fitted over the back box, a generous bead of fire-retardant sealing mastic should be applied to the back box flanges to seal the assembly and minimize the possibility of vibration when the speaker is in use. Diagrams 10 to 12 illustrate back-box installation.
Customer Service
- Ph: 800 370 3740
- Website: https://www.bowerswilkins.com/
FAQs
Q: What is the CCM362 speaker?
A high-performance in-ceiling speaker for home theatre and multi-room audio systems is the CCM362. It has a covert ceiling-mounted design that produces powerful bass, detailed highs, and crisp speech.
Q: Can the grille be painted?
Indeed. Steer clear of heavy coatings that could obstruct the speaker mesh and degrade sound quality.
Q: Can these speakers be used for home theatre setups?
Indeed. For in-ceiling home theatre applications, the CCM362 is perfect, particularly for surround or height channels in Dolby Atmos or DTS:X systems.
Q: Are these speakers compatible with smart home systems?
Yes, provided that the receiver or amplifier is a component of a smart home audio system (such as networked audio or multi-room Wi-Fi).
Q: Where can I get replacement grilles or parts?
The official website or authorized dealers of Bowers & Wilkins offer replacement grilles and accessories.
Q: What is the recommended ceiling thickness for installation?
Standard ceiling thicknesses between 9 and 25 mm (0.35 and 1 inch) are appropriate for the CCM362. It could take more preparation to mount the QuickDogsTM clamps correctly on thicker ceilings.
Q: Can I angle or tilt the speakers?
Other Bowers & Wilkins models with adjustable tweeters may be suitable for tilted installations.