
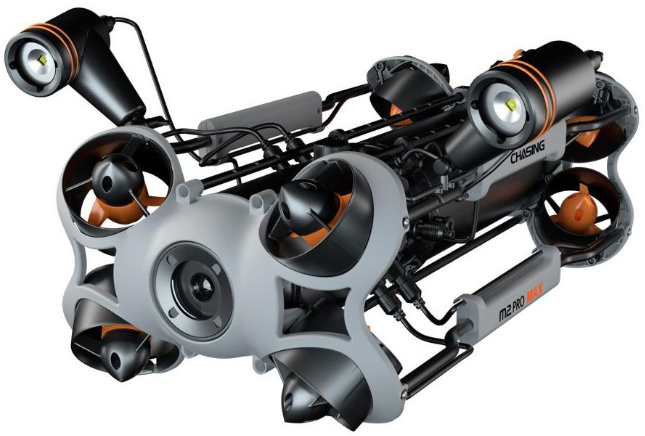
CHASING M2 Pro Max ROV Underwater Drone
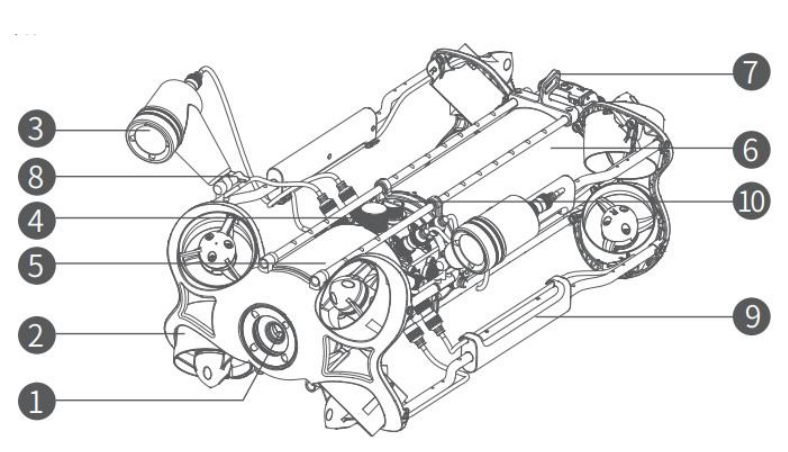
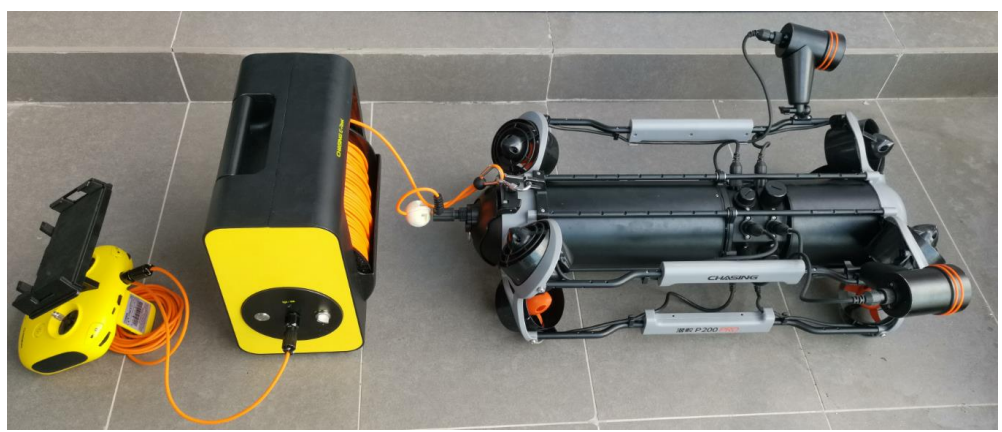
Parts List
- Camera
- Thruster/Propeller
- 2*4000LM LED Lights
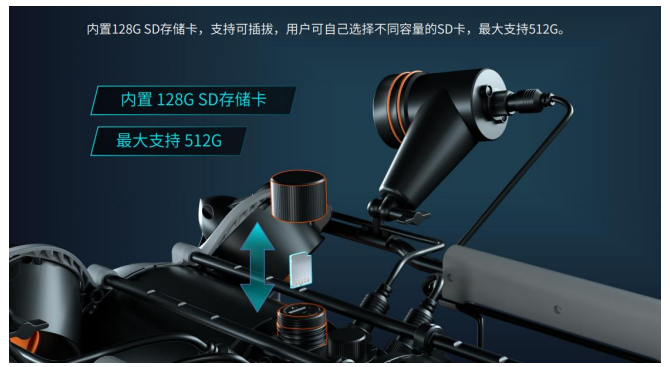
- Micro SD Slot
- Main Cabin
- Battery Cabin
- Buckle Bracket
- LED Light Adjustment Knob
- Hand Grip(Up & Down)
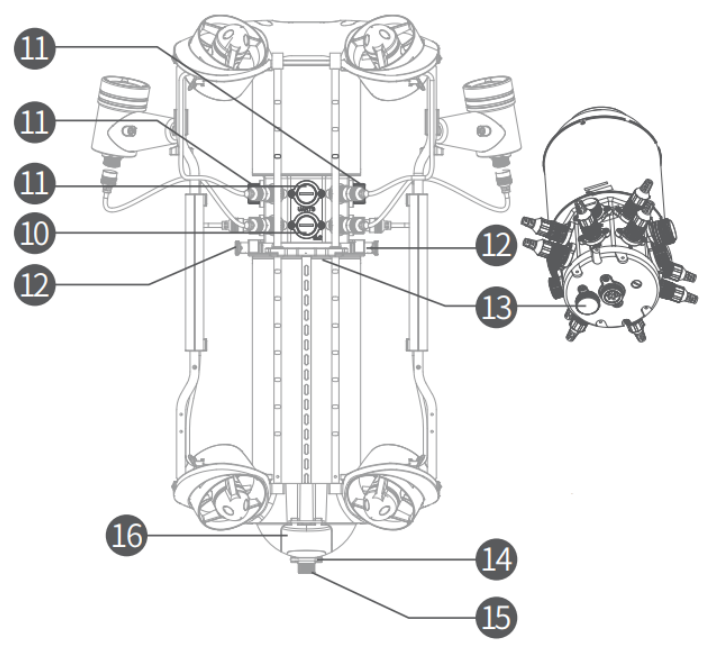
- Peripheral Interface
- Peripheral Interface
- Battery Twist Lock Knob
- Depth&Temperature Sensor
- Battery Pull Ring
- Tether Socket/Charging Socket
- Battery Fastener
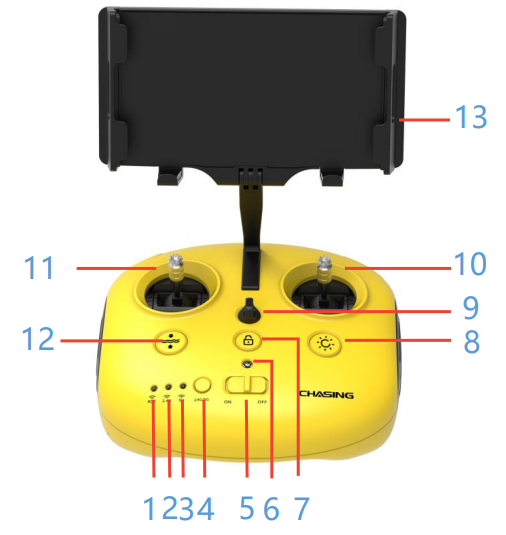
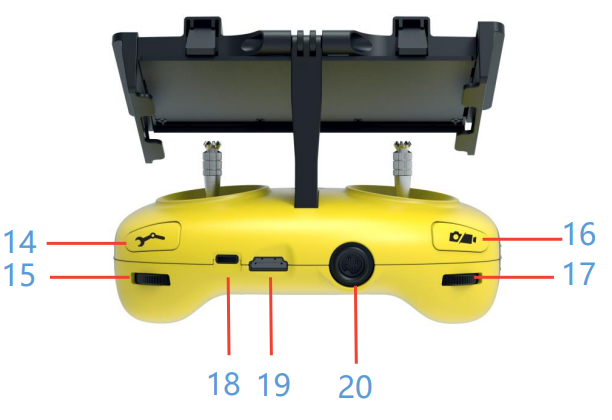
Remote Controller
- 3. Signal Indicator: ROV/2.4G/5G
- ROV: Indicates the communication status between the controller and the drone.
- 4G: Wi-Fi indicator, always on when working
- 5G: Wi-Fi indicator, always on when working
- Wi-Fi switch button: Short press to switch 5Ghz/2.4Ghz WiFi Power switch: Turns the controller on/off.
- Power Indicator: Green (High power), Blue (Medium power), Red (Low power)
- Unlock: Unlock/Lock, the current state of the Thruster will show on the App
- Led Control: On/Off led light (0%, 1-99%, 100%)
- Safety Buckle: Can be used with a safety rope to prevent dropping
- Right Control Stick: Used to control the navigation of the ROV
- Left Control Stick: Used to control the navigation of the ROV
- One-key reset: Short press to reposition the ROV return to a horizontal state/ Long press to switch control mode.
- Phone/Tablet Clamp: Used to attach a phone/tablet to the mounting bracket, supports mobile devices up to 10.5 inches.
- Robotic Arm Control: long press to enable/disable the grabber claw function; short press to switch the floodlight brightness level
- Right Wheel: Adjust the roll angle or control the opening and closing of the grabber claw
- Photo/Video: Short press to take photos, long press to start/end recording video
- Left Wheel: Adjust the pitch angle
- Type-C Port: Wired connection with mobile phone/tablet device
- HDMI Socket: 1080P HD image real-time output
- Tether Connection Socket/Charging socket

E -Reel
- Power switch
- 3 Meters Tether/ Charging socket
- Speed knob: stop/slow/fast
- Power indicator: Green 100% -60% ; Blue 59% -20% ;Red 19% -0% The indicator flashes when the motor is running
- Handle interface
- Handle: Used for manual winding
- Straightener
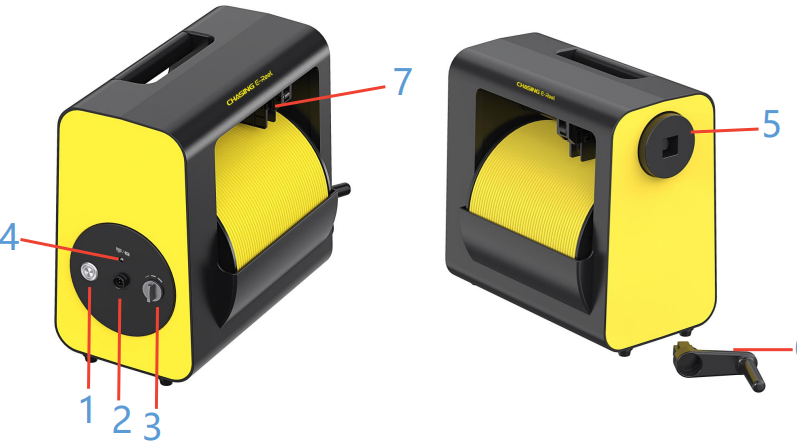
- Support IP65 waterproof and dustproof level.
- Support up to 200 meters of tether cable.
- Built-in 4800mAh high-capacity battery. The frequency of power discharge is up to 30 times in a full power state. It can be manually retracted via the rocker if there is no power.
How to Use
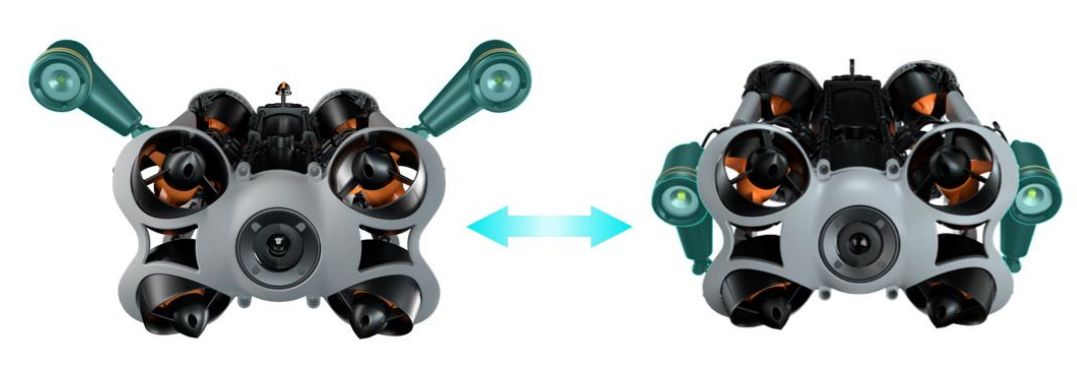
Unfold the Floodlights
- Turn the knob counterclockwise to unfold the floodlights.
- Turn the knob clockwise to tighten the floodlights for use.
- Application: The floodlights can be disassembled and installed on both sides under the ROV, which can adapt to various complex applications underwater.

Installation & Connection

- Connect the E-reel to the controller with the 3-meter tether cable and tighten the nut
- Hook up the tether cable buckle to the position
- Connect the tether connector to the ROV position and tighten the nut
Power on
Turn on the remote controller’s power button. A few seconds later, the remote controller’s indicator lights up, and the 5G or 2.4G light will always be on. Also, the ROV makes two self-test sounds.

Connect the controller with the APP
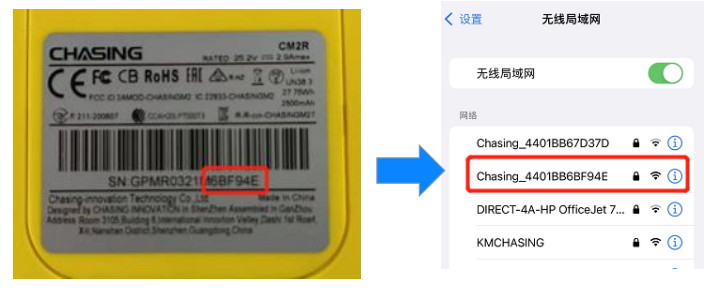
WIFI Connection
- Please find the SN on the bottom of the remote control.r;
- Go to the Wi-Fi settings on your phone/table.;
- Wait for 5-10 seconds, and the Chasing_xxxx.
- Click to connect and input the Wi-Fi Password: 12345678
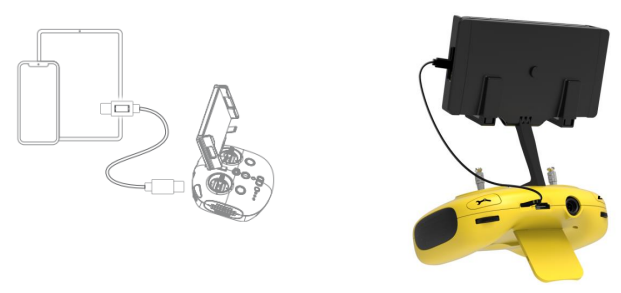
USB Direct Cable Connection
Connect the controller to the mobile phone/tablet with the included adapter cable (You may select the corresponding adapter cable according to the mobile device’s interface.) PS: connect the end with the printed phone pattern to the phone/tablet.
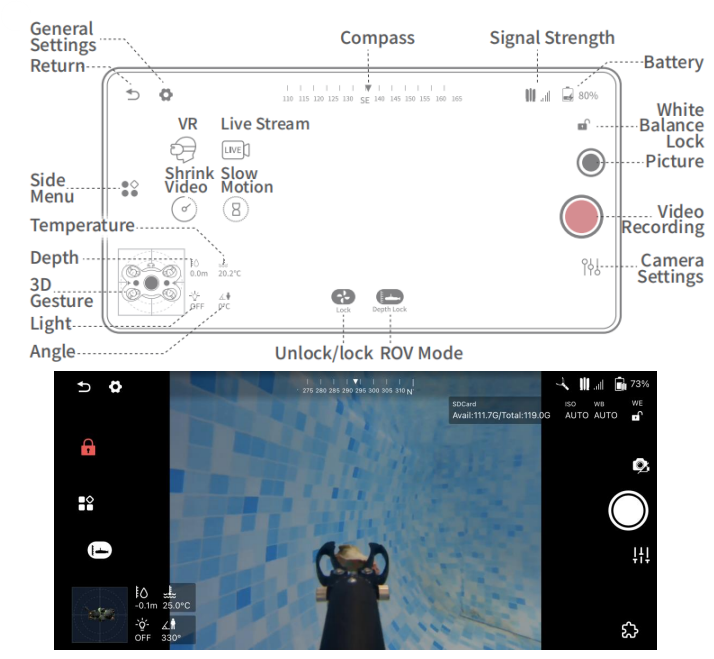
APP Interface Introduction
- Open the APP and enter the camera, and you can see the real-time scene transmission view of the camera.
Use Underwater
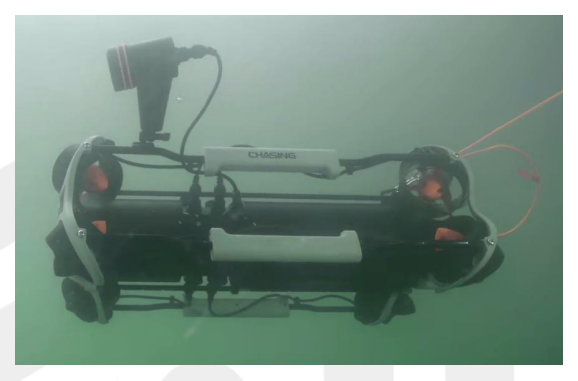
Grasp the grips on both sides of the ROV and gently throw the ROV into the water. Unlock the thruster(motors) to dive. ➢ For a better experience, it is recommended to use it where the water\ depth exceeds 1 meter
Other Aspects
Wind Down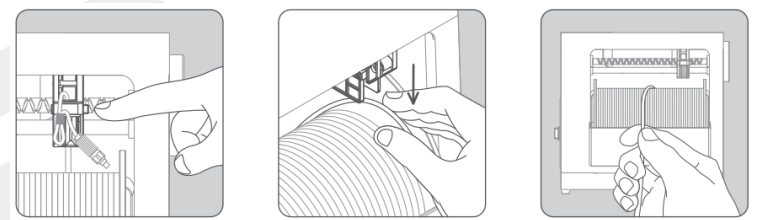
- Press the button on the right. Take out the tether from the Close the lid.
- Start to wind the side of the straightener to open the lid. straightener. down the tether by hand.
Wind Up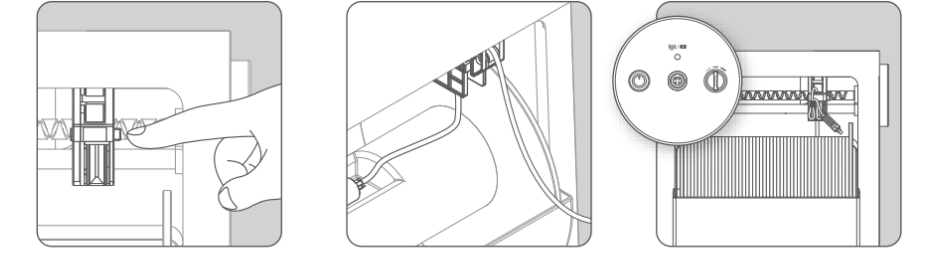
- Press the button on the right side of the straightener. Install the tether into the straightener, as shown.
- Turn on the switch, and rotate the speed switch to slow/open the lid. the picture.
- Close the lid of the straightener. fast speed and start winding.
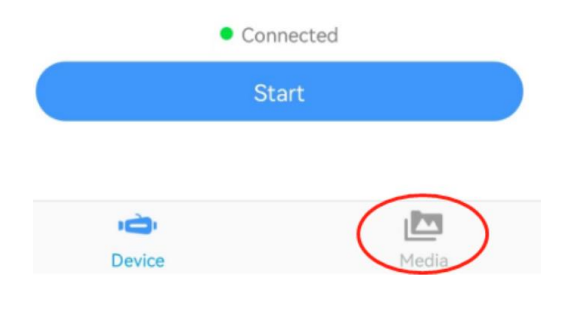
Download to Phone/Tablet
- Open the CHASING GO1 App, click the Media button in the lower right corner.
- Find the video/photo that you want to download. Click the download button, and the image will be saved directly to the phone/tablet’s photo album. Android: save to the download folder,r iPhone: save to the album

Video and Photo Download
- Turn off the Remote Controller and dry the ROV, especially the SD card socket.
- Unscrew the Micro SD card socket cover counterclockwise and remove the Micro SD card.
- Read the SD card in a Card reader, and copy the images with a computer.
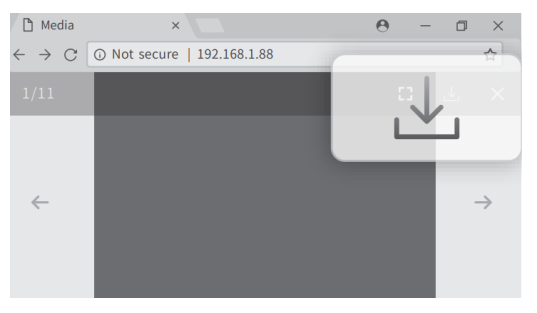
Download to the Computer
- PC connects to the remote controller’s WiFi.
- Open the web browser and type the IP address:192.168.1.88
- Find the video/photo that you want to download.
- Click the download icon and save, then the images will generally save in the Download folder.
- It is recommended to use Firefox or Google Chrome browsers for a better experience.
Disassemble
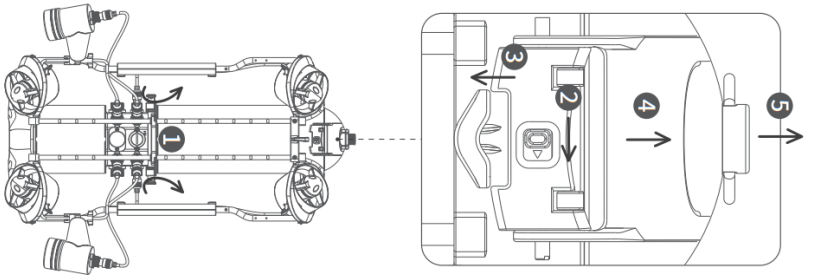
- Unlock the knobs on both sides of the fuselage and rotate them to 90°to the shallow slot
- Pull the switch on the slider and toggle the lock assembly upwards while holding the chute
- Pull the lower sides of the Pressure Plate and pull down to deform the Pressure Plate, and make the buckle come off the rear bracket.
- Pull the battery ring-pull to take out the battery cabinet slowly
Install
- Rotate the knobs on both sides of the fuselage 90 ° to the deep slot.
- Slowly install the battery cabin along the chute under the fuselage.
- Press down hard until you hear a “click” sound, and the knobs close in place.
- Pull the lower sides of the Pressure Plate by hand, pull down to deform the Pressure Plate, and make the buckle fasten on the rear bracket.
- Press down firmly on the chute of the locking assembly. When you hear a “click” sound, the buckle is snapped into place properly, and then the installation is complete.
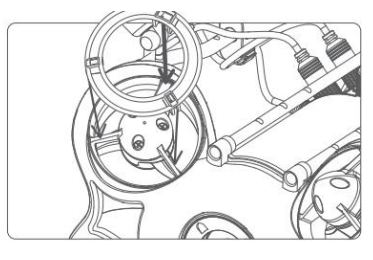
Thruster Shield.
The three snap structures on the thruster shield should correspond to the thruster conduit bracket structure one by one, then press down the shield with slight force, and when the sound of clatterings is heard, the shield is assembled in place.
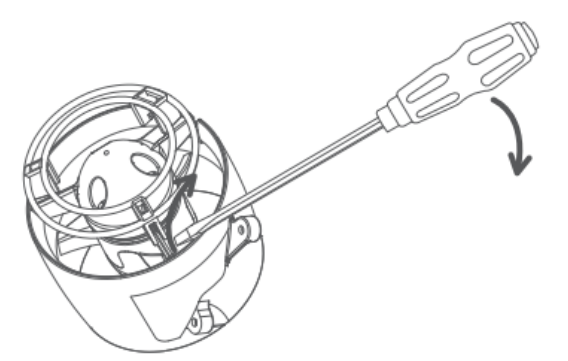
Disassemble the Thruster Shield
- Use the screwdriver(or other tools) to gently pry the shield along the edge of the shield clasp position, so that the shield clasp comes off one by one from the conduit bracket, and finally remove the thruster shield.d
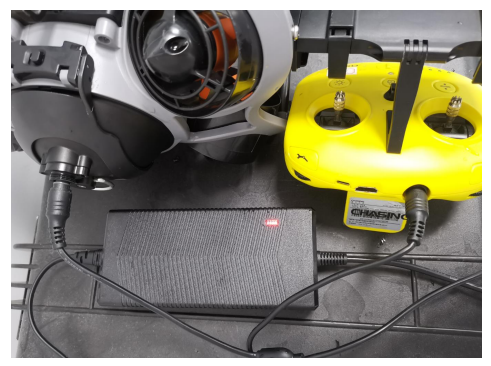
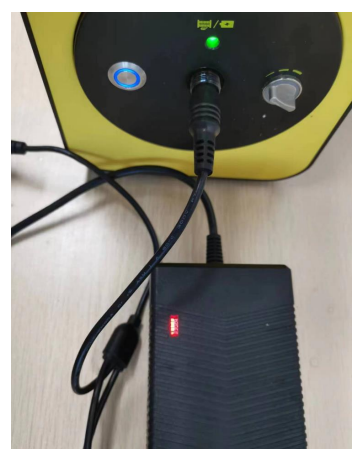
Charging
ROV & Remote Controller Charger Spec: 25.2V 8A
- Red light indicates Charging, green light indicates fully charged.
- Affully charging, please disconnect the charger in time.
- ROV charging time: 2.5H
- Remote controller charging time: 2H
E-reel
Charger Spec: 25.2V 8A/12.6V 3A
- Red light indicates Charging, green light indicates fully charged.
- After fully charging, please disconnect the charger in time.
- Charging time: 2H (12.6V) 4H (25.2V)
Maintenance & Caution
Navigation Safety
- Recommended to navigate in the open sea. Recommended to use in relatively clear water without dense algae. For the first time, it is recommended that users practice in the open sea tofamiliarize themselvesr with the basic operation of the machine.
- Pay attention to the location of the tether cable during daily operations, away from boat propellers, passing boats on the water, er and underwater obstacles such as ropes and rocks to avoid entanglement, ent causing the loss of the machine.
Battery Security
- The ROV battery is in a power-off mode when in transportation.
- Please charge it to activate the battery for the first use.
- Try to avoid running out of theROV’sV powe. Please charge it when below 25%.
- If the battery is left idle for a long time, please charge the ROV regularly every 2-3 months to keep the battery power at 50%-70%.
- After that, keep it charged for at least 12 hours.
- That is, let the battery do a deep charge/discharge learning.
- Use the Chasing standard adapter only.
Motor Maintenance
- Do not touch the rotating propellers.
- Do not unlock the thrusters for more than 30 seconds in the air to avoid ooverheatinging
- When the propellers wear out significantly, the machine’s power may decline.
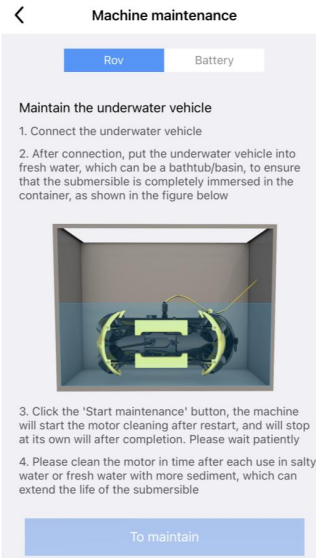
- After using the ROV in salt water, please put it in fresh water for about 1 hour, then turn it on and let the drone run for 10 minutes to discharge the salt.
- After cleaning, dry it with a towel. ※ It is recommended to use the machine maintenance function (CHASING GO1 App: Click the upper right corner →Help-Machine maintenance-ROV-To maintain)
Other advices
- Checkthat the cover of the peripheral interface and the Micro SD card interface are securely in place before use. Check whether the O-ring on the tether connector/battery socket/SD card socket is pre-dive, and make a replacement when it is missing or damaged.
- Check the Connector socket and tether pre-dive, keep dry and clean. Salt and moisture may cause corrosion of the connector. Be sure to wash the socket with fresh water if the interface has water stains, and make sure the connectors dry after cleaning.
- When not in use, please do not expose the drone and accessories to sunlight. Store it in a cool place or in a special box. The remote control is not waterproof. Please avoid being splashed with water. It cannot be washed with water; please clean it with a towel.
CHASING GO1 App
( For iOS 9.0/Android 4.4 and above )
- Android devices: Use your mobile browser to scan the QR code on the right to download or download from the Google Play/CHASING official website.
- iOS devices: Search CHASING GO1 in the App Store

Support
If you have any questions or technical issues, send an email to the after-sales services of Chasing or contact us on the official website.
- Website: https://www.chasing.com
- Address: 506 of Xita in Digital cultural industry base of Shennan 10128 Nanshan, Nantou street, Nanshan District, 518052 Shenzhen.