
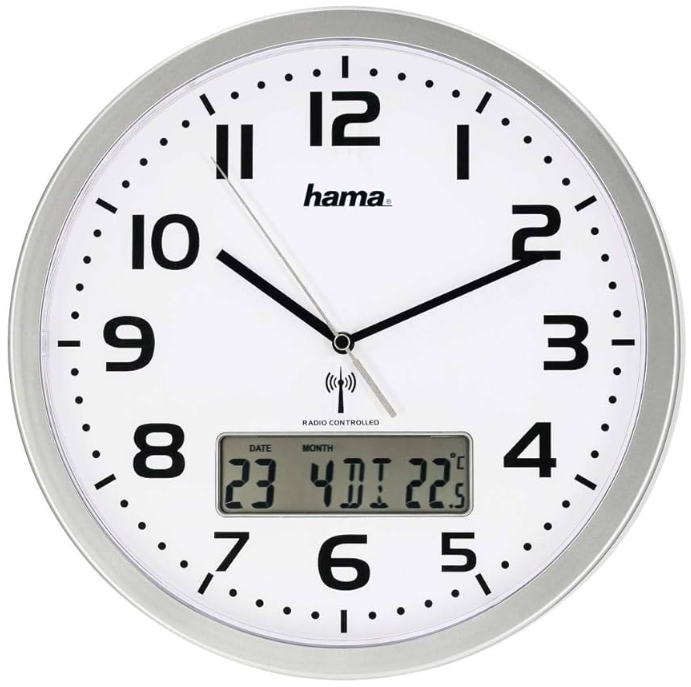
 Hama 00 222214 ISCHIA Radio Wall Clock
Safety Instructions
- The product is intended for private, non-commercial use only.
- Use the product for its intended purpose only.
- Protect the product from dirt, moisture, and overheating, and only use it in a dry environment.
- Do not operate the product outside the power limits given in the specifications.
- Do not use the product in moist environments and avoid splashes.
- Do not use the product near heaters or other heat sources or direct sunlight.
- Do not use the product in areas where the use of electronic devices is not permitted.
- Do not place the product near interference fields, metal frames, computers, TVs, etc.
- Electronic devices and window frames can negatively affect the product’s functionality.
- Do not drop the product and do not expose it to any major shocks.
- Do not open the device or continue to operate it if it becomes damaged.
- Do not attempt to service or repair the product yourself. Leave any service work to qualified experts.
- Keep the packaging material out of the reach of children due to the risk of suffocation.
- Dispose of packaging material immediately according to locally applicable regulations.
- Do not modify the product in any way. Doing so voids the warranty.
- Keep this product, like all electrical products, out of the reach of children!
- Use the item only in moderate climatic conditions.
Batteries Instructions
- Before you insert the batteries, clean the battery contacts and the polarity contacts.
- Do not allow children to change batteries without supervision.
- Replace all the batteries in a set at the same time.
- Do not mix old and new batteries, or batteries of different types or from different manufacturers.
- Do not short-circuit batteries. Do not charge batteries.
- Do not burn batteries or heat them up.
- Never open, damage, or swallow batteries or allow them to enter the environment.
- They can contain toxic, environmentally harmful heavy metals.
- Remove spent batteries from the product and dispose of them without delay.
- Ensure that batteries with damaged housings do not come into contact with water.
- Keep batteries out of the reach of children.
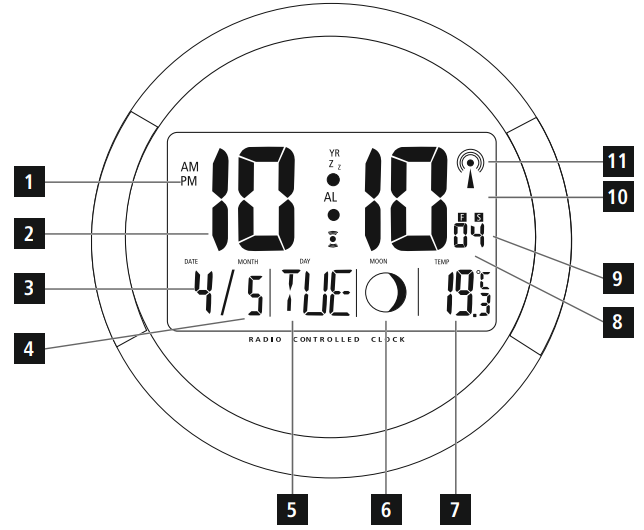
Controls and Displays
- AM/PM (12-hour format)
- Time
- Day
- Month
- Day of the week
- Moon phase
- Room temperature
- Time zone
- Summer time
- Battery symbol
- Wireless symbol
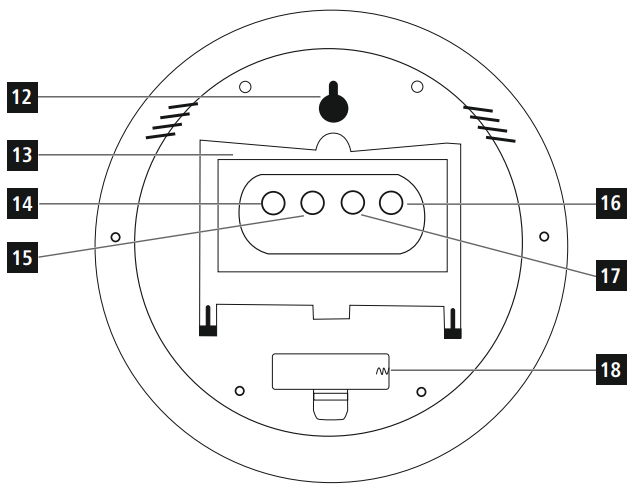
- Opening for wall mounting
- Base
- MODE button = settings/confirms the setting
- °F/°C button= switches between °C and °F
- UP button = increases the current setting; activates/deactivates manual radio signal reception; switches the display mode.
- DOWN button = decreases the current setting; activates/deactivates manual radio signal reception;
Selects the language - Battery compartment
Take your time and read the following instructions and information completely. Please keep these instructions in a safe place for future reference. If you sell the device, please pass these operating instructions on to the new owner.
Package Contents
- DCF wireless wall clock
- 1 AA battery
- These operating instructions.
Getting Started
Inserting the battery
Remove the battery that was already inserted into the clock, remove the protective film if necessary, as well as the contact interrupter, and re-insert the battery with the correct polarity. The clock is ready for operation.
Replacing the battery
Remove and dispose of any used batteries. Insert the new battery (AA). Ensure that the polarity of the battery corresponds to the symbols in the battery compartment (18).
Installation
- Before mounting the clock, ensure that the chosen wall is suitable for the weight to be mounted, and make sure that there are no electrical wires, water, gas, or other lines at the installation site on the wall.
- Purchase special fastening materials from specialised dealers.
- Do not mount the product in locations where persons might linger.
- You can mount the wall clock on a wall using the opening on the back (12).
- You can also place the wall clock on a level surface using the base (13).
Operation
Input
- Hold down the UP button (16) or the DOWN button (17) to select the values faster. 6.1.
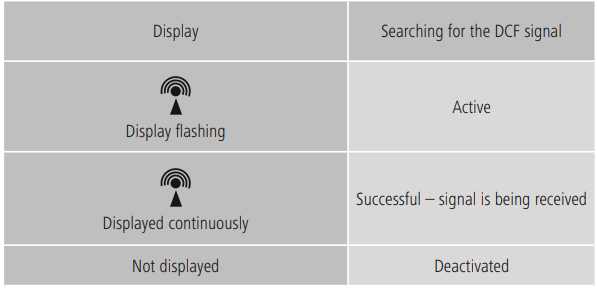
- Automatic setting using the DCF signal
- Once the batteries are inserted, the clock automatically searches for a DCF signal.
- During the search, the wireless icon (11) flashes.
- If the station still does not receive a signal, press and hold the UP button (16) and the DOWN button (17) for approx. 3 seconds to start the manual search for the DCF signal.
- The wireless icon (11) will start to flash.
Time Settings.
- The search process takes about 3-10 minutes.
- If the search fails, it ends and is repeated at the next clock hour.
- The wireless icon (11) disappears.
- In the meantime, you can, however, set the time and the date manually.
- The clock automatically continues to search for the DCF signal daily (between 1:00 a.m. and 5:00 a.m.).
- If the signal is received successfully, the manually set time and date are overwritten.
Summer Time
The clock automatically switches to summer time. S (9) appears on the display as long as summer time is activated. Press and hold the UP button (16) and the DOWN button (17) again for approximately. 3 seconds to stop the manual search.
(Manual) Settings
- Press and hold the UP button (16) and the DOWN button (17) for approximately. 3 seconds to stop the search for the DCF signal.
- The wireless Hama 00 222214 ISCHIA Radio Wall Clock icon (11) disappears, and you can set the time manually
- Press and hold the MODE button (14) for approx. 3 seconds to make the following Settings one after the other:
- Hours (2)
- Minutes (2)
- Year (2)
- Month (4)
- Day (3)
- To select individual values, press the UP button (16) or the DOWN button (17) and confirm each selection by pressing the MODE button (14).
- While you are setting the minutes or seconds, press the °F/°C button (15) to switch between the 12-hour (a.m./p.m.) and 24-hour formats.
- If you do not make an entry for 10 seconds, you automatically exit the setup mode.
- Press and hold the DOWN button (17) until the desired language for the week display (5) appears.
Time Zone
- The DCF signal can be received over long distances, but it always transmits the current Central
- European Time in Germany. Make sure you account for the time difference in countries with another time zone.
- If you are in Moscow, the time is 3 hours later than in Germany
- . This means that you should set +3 for the time zone.
- The clock then automatically sets the time to 3 hours after the DCF signal is received or relative to the manually set time.
- Press and hold the UP button (16) for approx. 3 seconds to display the time in a different time zone. The time zone icon (8) is displayed.
- Press and hold the MODE button (14) for approx. 3 seconds to set the required time zone difference. The hours display (2) begins to flash.
- To select the time difference (+/- 12 hours), press the UP button (16) or the DOWN button (17) and confirm each selection by pressing the MODE button (14).
- If you do not make an entry for 10 seconds, you automatically exit the setup mode.
- Press and hold the UP button (16) for approx. 3 seconds to return to the normal time display
- Press the °F/°C button (15) to choose between °C and °F for the temperature display.
Moon Phases
The clock indicates the current moon phase (6) with the following icons.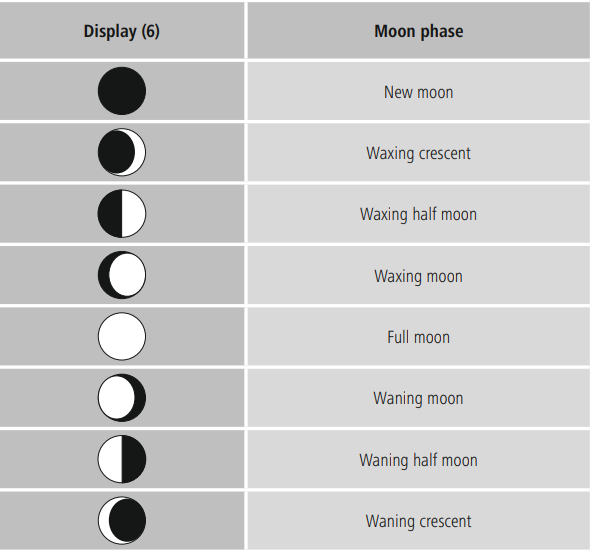
Low Battery Charge
When the battery icon (10) appears on the display, the battery charge is very low. Replace the battery immediately.
Care and Maintenance
Only clean this product with a slightly moist, lint-free cloth, and do not use aggressive cleaning agents. Make sure that water does not get into the product.
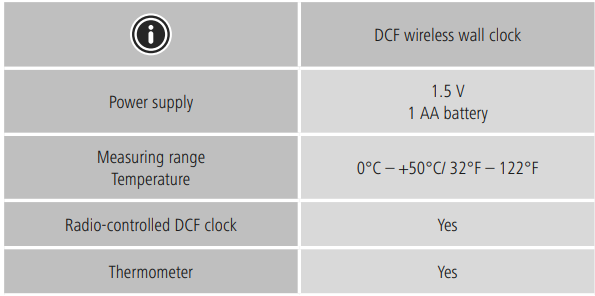
Technical Data
Warranty
Hama GmbH & Co KG assumes no liability and provides no warranty for damage resulting from improper installation/ mounting, improper use of the Hama 00222239 JAMAIKA Weather Station product, or from failure to observe the operating instructions and/or safety notes.
Disclaimer
Hama GmbH & Co KG accepts no liability or warranty for damage resulting from improper installation,
assembly, or improper use of the product or failure to observe the operating instructions and/or safety instructions.
Service and Support
Please contact the Hama product advisory service if you have any questions about the product.
Declaration of conformity
Hama GmbH & Co KG hereby declares that the radio equipment type[00176638]complies with Directive 2014/53/EU.
Customer Service
- Website: https://de.hama.com
- Ph: 49 9091 502-0
FAQs
Q: What features does the Hama FLORES Radio Alarm Clock provide?
The FLORES Radio Alarm Clock has a clear LCD, adjustable brightness, and a digital clock, FM/AM radio, alarm, and snooze features.
Q: Does it have a snooze function?
Yes, there is a snooze button on the FLORES alarm clock. Depending on the settings, you can gain an additional 5–10 minutes of sleep by pressing the Snooze button when the alarm goes off.
Q: Can I wake up to the radio?
Yes, you have the option to turn off the buzzer and wake up to the last station you tuned in to.
Q: Does it have a battery backup?
Indeed, during power failures, its battery backup keeps the time and alarm settings intact (batteries supplied separately).
Q: Can I set multiple alarms?
The clock does indeed enable two distinct alarms, each with its own time and sound type choices.
Q: Does it have a sleep timer?
It is possible to program a sleep timer to switch off the radio automatically after a predetermined amount of time, usually between 10 and 120 minutes.
Q: Can I adjust the radio antenna for better reception?
Yes, to improve signal reception, lengthen or rotate the included antenna. Since the antenna for AM is typically inside, moving the clock could be beneficial.
Q: Does it have a gradual alarm option?
To lessen abrupt loudness, certain models may have an alarm volume that increases gradually when you wake up.