
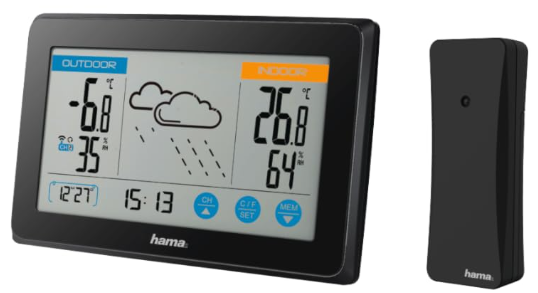
Hama 00222239 JAMAIKA Weather Station
Operating Instructions
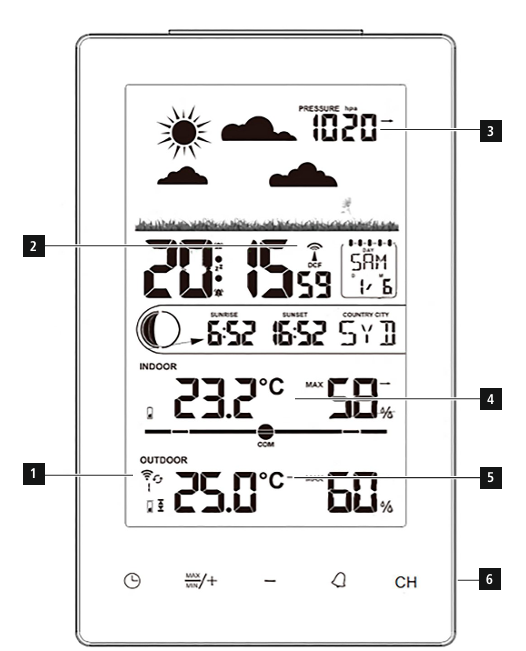
Controls and displays
- Radio symbol measuring station
- DCFradio symbol
- Air pressure
- RRoom temperature andambient humidity
- Outdoor temperature and ambient humidity
- Power supply unit connection socket
Important information-Quick-reference guide:
- This quick-reference guide contains the most important basic information, such as safety instructions and the steps necessary to operate the product.
- To help protect the environment and conserve valuable raw materials, Hama does not issue a printed manual and instead makes this available exclusively as aa PDF download
- The full text of the manual is available at the following Internet address: www.hama.com -> 00222239-> Downloads.
- Save the manual on your computer for reference and print it out if possible.
Explanation of warning symbols and notes
Risk of electric shock
This symbol indicates a risk of electric shock from touching an uninsulated product carrying hazardous voltage.
Warning
This symbol is used to indicate safety instructions to draw your attention to specific hazards and risks.
Note: This symbol is used to indicate additional information or important notes.
Package contents
- Weather station (base station for indoors /measuring station for outdoors)
- 2AAbatteries
- 1power supply unit
- These operating instructions
Safety instruction product
- CT is intended for private, non-commercial use only.
- Protect the product from dirt, moisture, and use it in dry environments only.
- Do not use the product in areas where electronic products are not permitted.
- Do not position the product near interference fields, metal frames, computers, televisions, etc. Electronic devices and window frames hurt the function of the product.
- Do not drop the product, and do not expose it to any major shocks.
- Do not attempt to service or repair the product yourself. Leave any service work to qualified experts.
- Do not modify the product in any way. Doing so voids the warranty.
- Keep the packaging material out Hama 00222239 JAMAIKA of the reach of children, the riska of suffocation.
- Dispose of packaging material immediately according to the locally applicable regulations.
- Do not use the product near heaters, other heat sources, or in direct sunlight.
- Do not operate the product outside the power specifications.
- Do not open the device or continue to operate it if it becomes damaged.
- As with all electrical products, this device should be kept out of the reach of children.
- Only use the article under moderate climatic conditions.
- Use the product only for the intended purpose.
Setup
Inserting batteries /power supply
Measuringstation
- Remove the protective film from the display.
- Open the battery compartment one back and insert 2AA batteries, observing the correct polarity.
- Then close the battery compartment cover.
Base station
- Remove the protective film from the display.
- Connect the supplied power supply Hama 00222239 JAMAIKA unit to the power supply unit connection socket (6) on the back of the battery compartment.
- Connect the weather station’s power supply unit to a correctly installed mains socket.
- Alternatively, you can also insert 2xAAA batteries. However, the display switches to unilluminated standby mode after 9seconds with battery operation.
InstallatioWe recommend
- nd initially positioning the base station and measuring station at the preferred setup locations without installing them and carrying out all the settings as described in 6. Operation.
- Do not install the station(s) until the settings are correct and the radio connection is stable.
Note
- The range of the radio transmission between the measuring station and the base station is up to 5unobstructeded areas.
- Before installing, make sure that the radio transmission is not influenced by interfering signals or obstacles such as buildings, trees, vehicles, high-voltage power lines, etc.
- Before final installation, make sure that there is sufficient reception between the desired installation locations.
- When installing the measuring station, take care to ensure this is positioned so that it is protected from direct sunlight and rain.
- The international standard height for measuring a temperature is 1.25 m(4ft) above ground.
Operation
Connection to the measuring station
- After connection to the mains supply, the base station automatically searches for a connection to the measuring station and carries out the initial setup routine.
Automatic setting according to the DCF signal
- After successful transmission of the indoor and outdoor temperatures between the measuring and base stations, the weather station (after around 3minutes) automatically starts searching for a DCFF signal. The DCF radio symbol (2) flashes during the search process. This can take 7 minutes.
- When the radio signal is received, the date and time are set automatically.
Care and maintenance
- Only clean this product using a lint-free, slightly damp cloth, and do not use any harsh cleaners.
- Ensure that no water is able to enter the product.
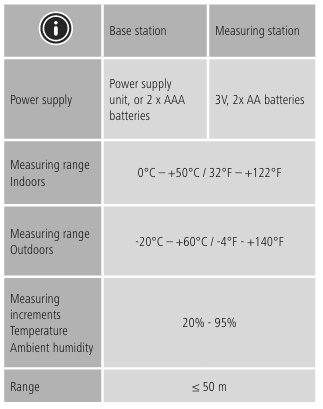
Technical data
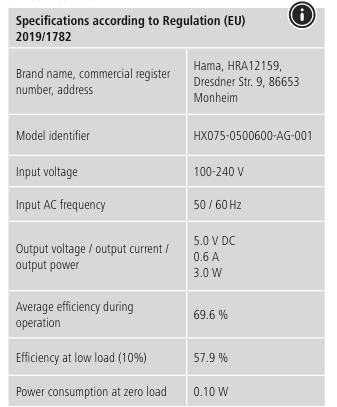
Weather station
Warranty disclaimer
Hama GmbH & Co KG assumes no liability and provides no warranty for damage resulting from improper installation/ mounting, improper use of the product, or failure to observe the operating instructions and/or safety notes.
FAQs
What features does the Hama JAMAIKA Weather Station provide?
The JAMAIKA Weather Station uses trend indicators to forecast the weather and measures temperature, humidity, time, date, and interior and outdoor conditions.
Does it measure humidity?
It does monitor indoor humidity between 20% and 95%, yes. The comfort level and humidity are shown on the main unit.
Can it display multiple time zones?
No, it simply shows local time, however if necessary, you can manually change it to reflect other time zones.
Does it include an alarm feature?
Yes, there is an alarm with a snooze feature on the station. The alarm button is used to set and activate it.
Can it forecast the weather accurately?
It is not a replacement for expert meteorological forecasts, but it does provide a broad weather trend (sunny, cloudy, wet) based on barometric pressure trends.
How often does the outdoor sensor update the main unit?
The sensor provides temperature and humidity readings almost instantly by sending data every 30 to 60 seconds.
What is the effective transmission range?
up to 98 feet (30 meters) in open area. Walls and other obstructions may limit the range.
Can it measure extreme temperatures?
Extreme cold below -20°C or heat above 60°C may not be correctly monitored by the gadget, but it covers the majority of home and garden situations.