
Hama EWS-3200 Weather Station
Safety Instructions
- The product is intended for private, non-commercial use only.
- Protect the product from dirt, moisture,ure, and overheating, and use it in dry environments only.
- Do not use the product in areas where electronic products are not permitted.
- Do not position the product near interference fields, metal frames, computers and televisions, etc. Electronic devices and window frames have a negative effect on the function of the product.
- Do not drop the product and do not expose it to any major shocks.
- Do not attempt to service or repair the product yourself. Leave any service work to qualified experts.
- Do not modify the product in any way. Doing so voids the warranty.
- Keep the packaging material out of the reach of children due to the risk of suffocation.
- Dispose of packaging material immediately in accordance with the locally applicable regulations.
- Do not use the product in the immediate vicinity of heaters, other heat sources, or in direct sunlight.
- Do not operate the product outside the power limits given in the specifications.
- Do not open the device or continue to operate it if it becomes damaged.
- As with all electrical products, this device should be kept out of the reach of children.
- Only use the article under moderate climatic conditions.
- Use the product only for the intended purpose
Batteries
- When inserting batteries, note the correct polarity (+ and – markings) and insert the batteries accordingly. Failure to do so could result in the batteries leaking or exploding.
- Only use batteries that match the specified type. Keep the instructions for the correct choice of batteries included with the operating instructions of the device, for safe future reference.
- Before you insert the batteries, clean the battery contacts and the polarity contacts.
- Do not allow children to change batteries without supervision.
- Replace all the batteries in a set at the same time.
- Do not mix old and new batteries, or batteries of different types or from different manufacturers.
Electric shock
- Do not open the device or continue to operate it if it becomes damaged.
- Do not use the product if the AC adapter, adapter cable, or power cable is damaged.
- Do not attempt to service or repair the product yourself. Leave any service work to qualified experts.
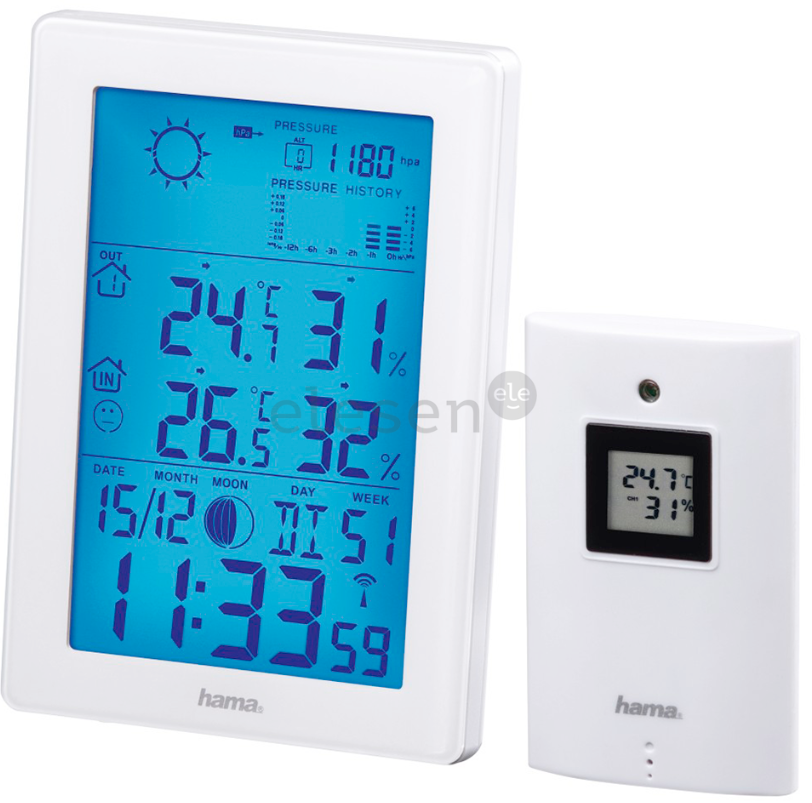
Controls and Displays
- Radio symbol measuring station
- DCF radio symbol
- Air pressure
- Room temperature and ambient humidity
- Outdoor temperature and ambient humidity
- Power supply unit connection socket
Quick-reference guide
- This quick-reference guide contains the most important basic information, such as safety instructions and the steps necessary to operate the product.
- To help protect the environment and conserve valuable raw materials, Hama does not issue a printed manual and instead makes this available exclusively as a PDF download.
- Save the manual on your computer for reference and print it out if possible.
Package Contents
- Weather station (base station for indoors / measuring station for outdoors)
- 2 AA batteries
- 1 power supply unit
- These operating instructions
Setup
- Only operate the product from an approved socket that is connected to the public power supply. The socket must be installed close to the product and must be easily accessible.
- Disconnect the product from the power supply using the On/ Off switch – if this is not available, unplug the power cord from the socket.
- If using a multi-socket power strip, make sure that the total power consumption of all connected devices does not exceed the socket strip’s maximum throughput rating.
- If you will not be using the product for a prolonged period, disconnect it from mains power.
Inserting batteries/power supply
Measuring station
- Remove the protective film from the display.
- Open the battery compartment on the back and insert 2 AA batteries, observing the correct polarity.
- Then close the battery compartment cover. Base station
- Remove the protective film from the display.
- Connect the supplied power supply unit to the power supply unit connection socket (6) on the back of the battery compartment.
- Connect the weather station’s power supply unit to a correctly installed mains socket.
- Alternatively, you can also insert 2xAAA batteries. However, the display switches to unilluminated standby mode after 9 seconds with battery operation.
Installation
- We recommend initially positioning the base station and measuring station at the preferred setup locations without installing them and carrying out all the settings, as described in 6. Operation.
- Do not install the station(s) until the settings are correct and the radio connection is stable.
- The range of the radio transmission between the measuring station and the base station is up to 50 m in unobstructed areas.
- Before installing, make sure that the radio transmission is not influenced by interfering signals or obstacles such as buildings, trees, vehicles, high-voltage power lines, etc.
- Before final installation, make sure that there is sufficient reception between the desired installation locations.
- When installing the measuring station, take care to ensure this is positioned so that it is protected from direct sunlight and rain.
- The international standard height for measuring air temperature is 1.25 m (4 ft) above ground.
- Buy special or suitable installation material from a specialist dealer for wall-mounting.
- Ensure that you do not install any faulty or damaged parts.
- Never apply force during assembly. These can damage the product.
- Before mounting, check that the wall you have chosen is suitable for the weight to be mounted.
- Also, make sure that there are no electric, water, gas, or other lines running through the wall at the mounting site.
- Do not mount the product above locations where persons might sit or stand.
Operation
Connection to the measuring station
- After connection to the mains supply, the base station automatically searches for a connection to the measuring station and carries out the initial setup routine.
- Initial setup takes around 3 minutes.
- The radio symbol measuring station (1) flashes when searching for a connection.
- Avoid any operation of the buttons during this time! Otherwise, errors and inaccuracies may occur in the values and their transmission.
- The process is finished as soon as the indoor and outdoor measurement data are displayed.
Faulty transmission of the measured values
- In some cases, interference caused by a WiFi network, computer, TV, etc., for example, may cause the transmission of measured values between the base and measuring station to fail.
- If this happens, resynchronise the stations by briefly removing the batteries from both stations and reinserting them.
- If the measured values are not transmitted again, replace the batteries with new ones.
- If necessary, choose a new location for the base station to avoid possible interference signals in the future.
- The measuring station and base station must not be positioned more than 50 metres apart.
- Stay at least 2.5 m away from interference
Automatic setting according to the DCF signal
- After successful transmission of the indoor and outdoor temperatures between the measuring and base stations, the weather station (after around 3 minutes) automatically starts searching for a DCF signal. The DCF radio symbol (2) flashes during the search process. This can take a further 7 min.
- When the radio signal is received, the date and time are set automatically.
Setting the Time
- In the event of reception problems, we recommend leaving the clock standing overnight since the interference signals are generally fewer in number at this time.
- Meanwhile, you can carry out a manual search for the DCF radio signal at a different location or set the date and time manually.
- The clock automatically continues to search for the DCF radio signal daily (01:00, 02:00, 03:00, 04:00, and 05:00). Once the signal is received successfully, the manually set time and date are overwritten.
Care and Maintenance
- Only clean this product using a lint-free, slightly damp cloth, and do not use any harsh cleaners.
- Ensure that no water is able to enter the product.
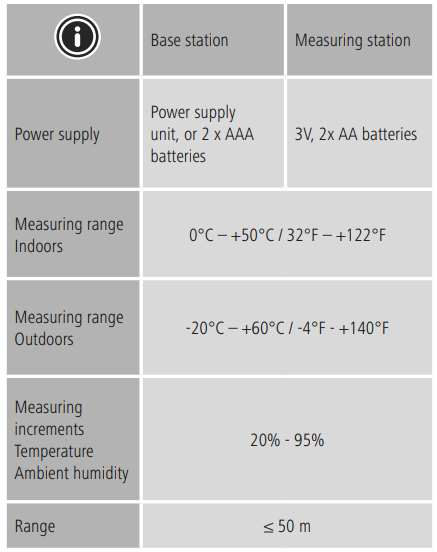
Technical Data
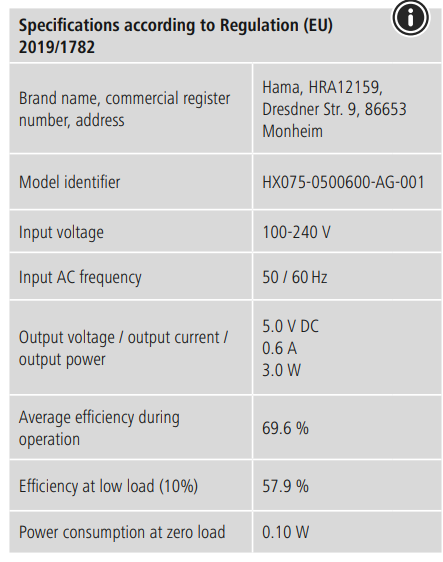
Weather Station
Warranty
Hama GmbH & Co KG assumes no liability and provides no warranty for damage resulting from improper installation/ mounting, improper use of the Hama 00222239 JAMAIKA Weather Station product, or from failure to observe the operating instructions and/or safety notes.
Declaration of Conformity
Hama GmbH & Co KG hereby declares that the Hama 00222239 JAMAIKA Weather Station radio equipment type [00222239] complies with Directive 2014/53/EU.
Customer Service
- Website: https://de.hama.com
- Ph: 49 9091 502-0
FAQs
Q: How does the outdoor sensor transmit data to the main unit?
The outdoor sensor uses radio frequency (RF 433 MHz) for wireless communication. For best results, make sure the sensor is unobstructed and within the designated range, which is usually up to 30 meters outdoors.
Q: Can the EWS-3200 automatically update the time?
Indeed, it contains a DCF radio-controlled clock feature that syncs the time automatically every day (in areas that support it).
Q: Can the station display multiple outdoor sensors?
Yes, you may monitor many areas at once with the EWS-3200 since it supports up to three exterior sensors.
Q: How do I switch between indoor and outdoor readings?
Toggle between paired outdoor and inside sensors by pressing the “CHANNEL” or sensor button.
Q: Can I mount the main unit on a wall?
Yes, there is a wall-mount slot on the rear of the main unit. With the fold-out stand, it may also stand on a level surface.
Q: Can the station measure dew point or heat index?
For availability, consult your particular handbook. Some systems use temperature and humidity sensors to automatically determine these values.
Q: Does the EWS-3200 support Celsius and Fahrenheit?
Yes, there is a specific button or item in the menu that allows you to move between °C and °F.
Q: How often does the sensor transmit data?
The outdoor sensor usually sends out a signal every 30 to 60 seconds, though this can change based on the model and configuration.