
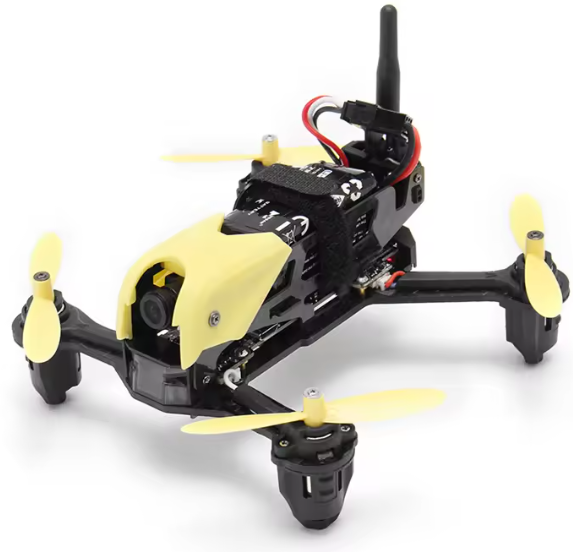
Hubsan H122D X4 STORM Micro Racing Drone
Safety Instructions
LiPo batteries are different from conventional batteries in that their chemical contents are encased in a relatively lightweight foil packaging.
- Please use Hubsan chargers for battery charging.
- Do not use or charge near sources of heat.
- Do not put the battery in contact with water or any kind of liquid
- Do not charge batteries in sunlight or near fire.
- Do not puncture or subject the battery to the force of any kind
- Do not reverse charge or reverse the battery polarities.
- This battery is prohibited for non-designated devices.
- Do not touch any kind of liquid waste or byproduct from batteries.
Instructions
Some product flight functions are restricted in certain areas. Once you use this product, you are deemed to have read carefully the relevant ICAO regulations, local airspace control provisions, and the regulations governing UAVs. You assume all liability for any non-compliance with the foregoing, are responsible for the consequences of your actions, as well as any indirect and/or direct liability that arises as a result of these limitations.
Flight environment requirements
- When flying, please stay away from obstructions, crowds, high voltage lines, trees, water, etc.
- The aircraft cannot be used in or near the Arctic Circle or Antarctica.
- Do not fly in bad weather conditions.
- Do not attempt to catch the aircraft while it is in flight
- This product is intended for experienced pilots over the age of 14.
- After every flight, completely disarm the aircraft motors and disconnect the aircraft from power.
- Then, you may power off the remote control.
Symbol Explanation
- Prohibited operation
- Important Notice
- Instruction
- Explanation/reference
Usage Advice
- Quick Start Guide)
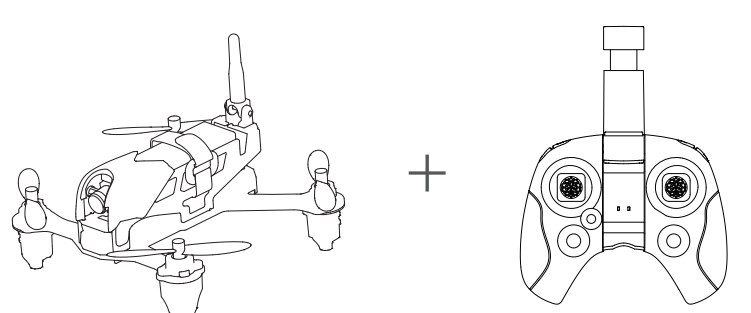
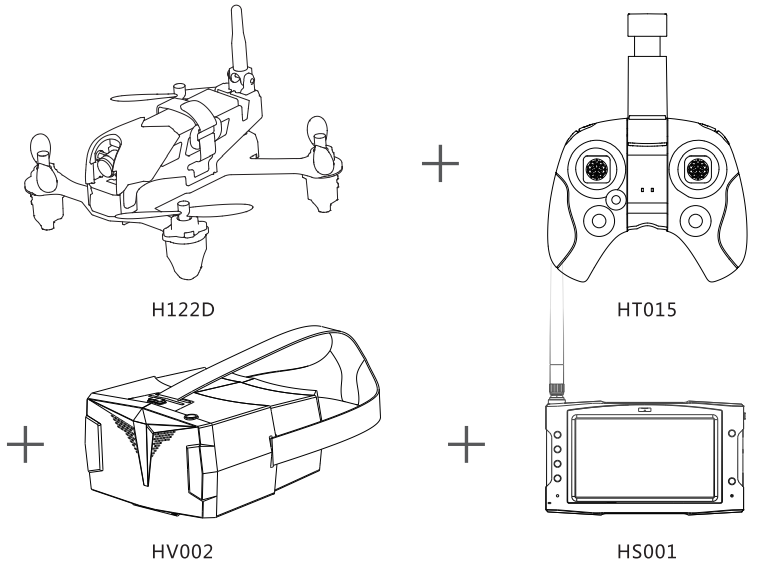
2 Configurations
- Aircraft + HT015 Transmitter

- Aircraft + HSOOI+ HT015 Transmitter+HV002 Video glasses
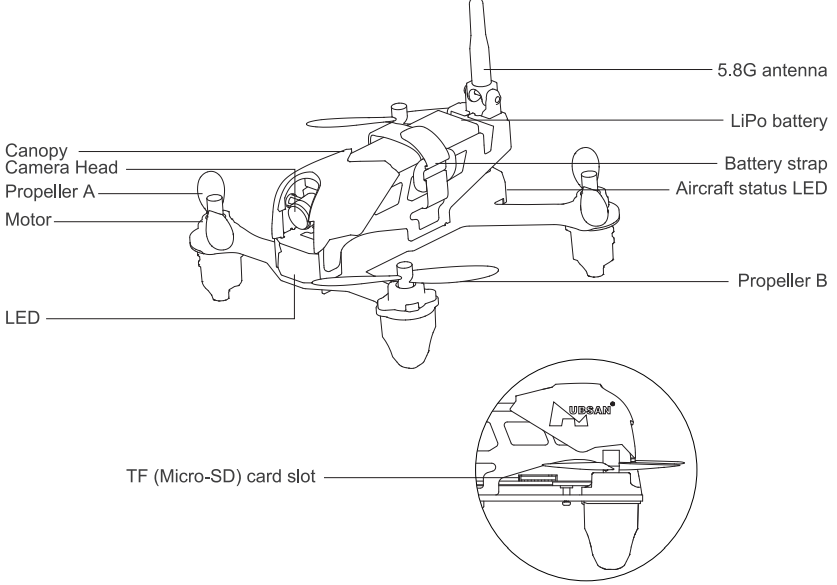
The H122D Aircraft
Getting to know your H122D
 Charging and Installing the aircraft battery
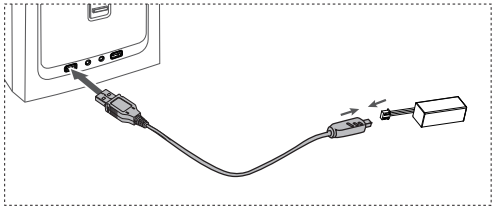
The H122D aircraft is paired with a rechargeable 7.6v, 710mAh Li-Po. Be sure to use the provided Hubsan dedicated charger for charging. Fully charge the battery before the flight. Connect the charger’s USB adapter to a PC terminal and then the battery to the charger. Charging time is approximately 130 minutes, recommended flight time is 6.5 minutes. Be sure to charge the battery before each flight.
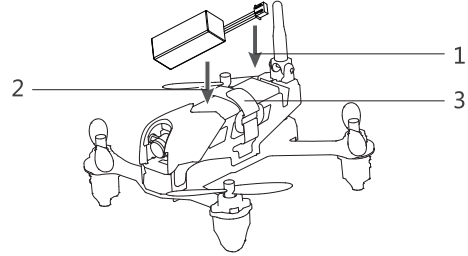
Installation
- Push the battery into its compartment with its lines facing away from the unit.
- Connect it to the drone’s power line and coil the power line into the compartment.
- Fasten the battery in place with its velcro strap.
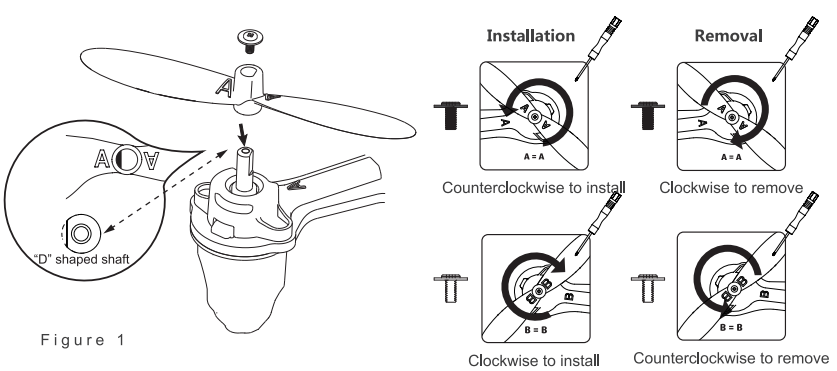
Installing and Removing propellers

Installation: Before installing propellers for the first time, please check that each Propeller A is matched with motor A and each Propeller B is matched with motor B. Align the “l” with the flat side of the “D” shaped motor shaft. Then use the provided screws and screwdriver to secure each propeller. Propeller A’s are paired with black propeller screws and are tightened counterclockwise. Propeller B’s are paired with silver propeller screws and are tightened clockwise. (as shown below)
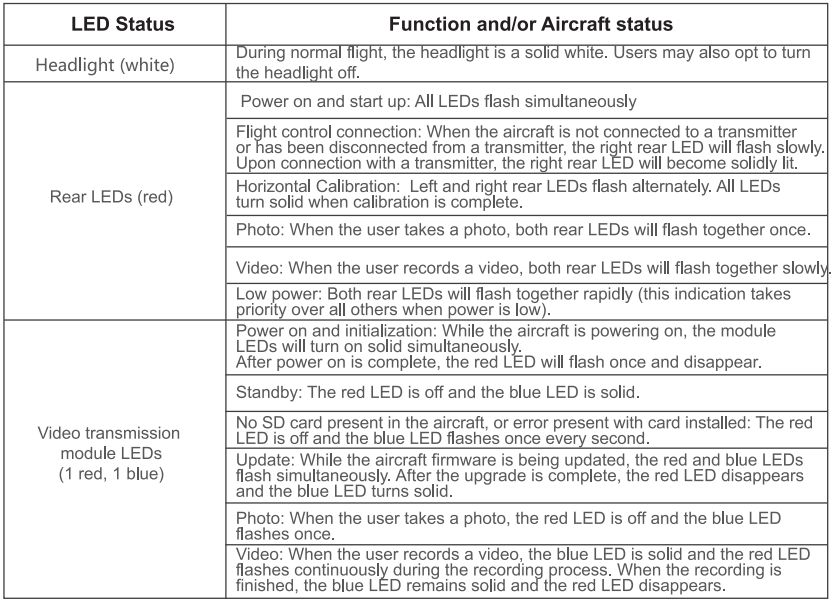
Aircraft LED Indicators
Installing the TF (Micro-SD) card
Locate the TF (Micro-SD) slot at the bottom of the aircraft. Insert the Micro-SD into the aircraft to take photos and make video recordings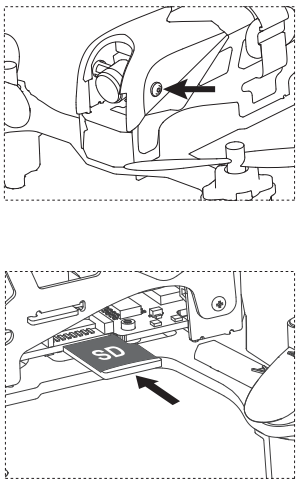
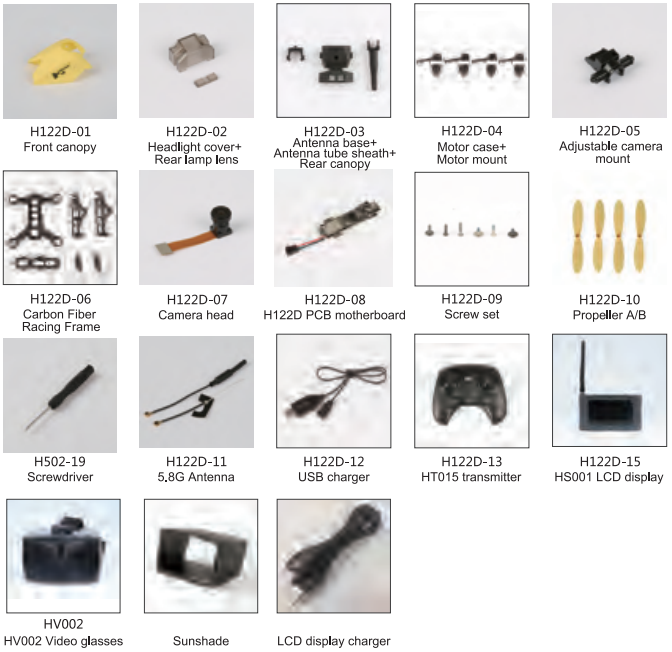
Component breakdown
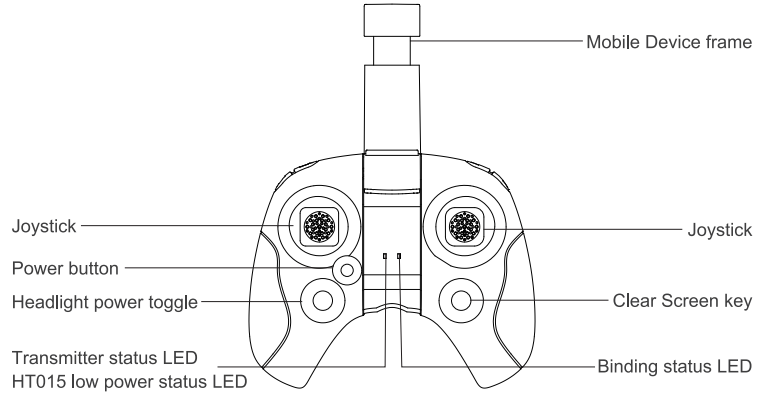
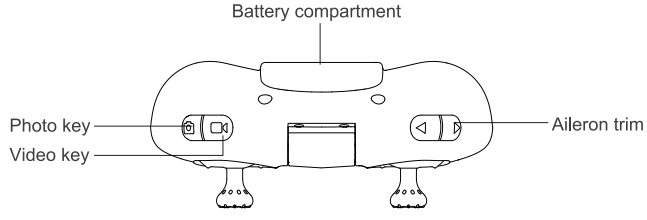
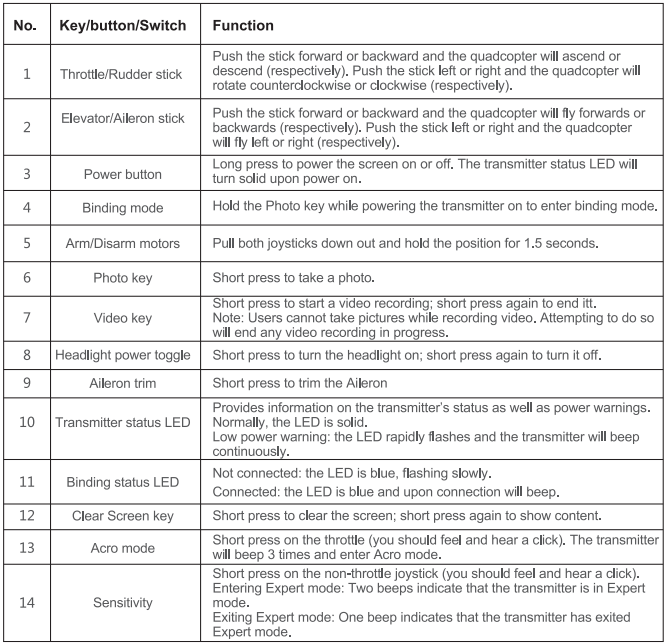
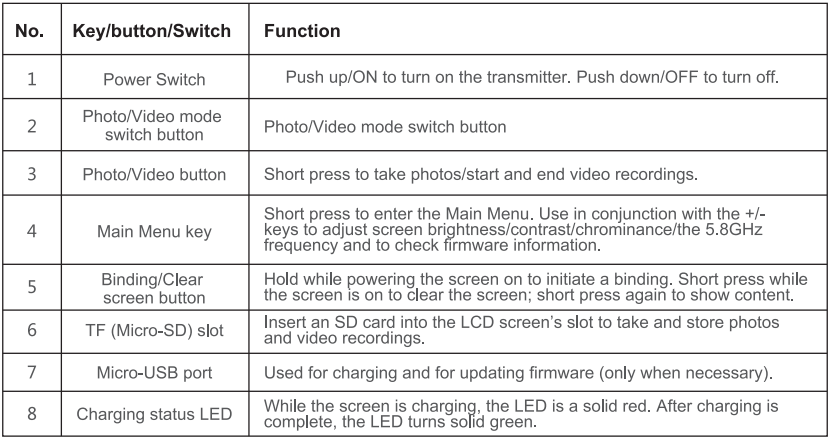
HT015 key functions
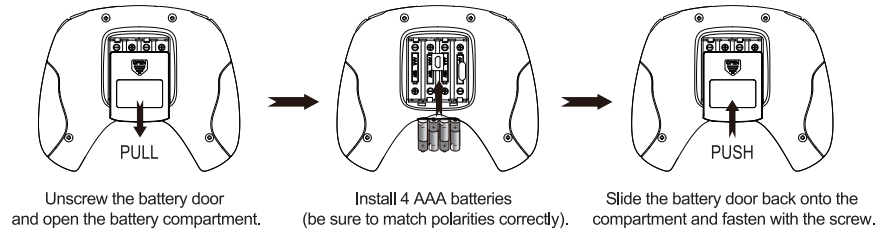
Installing the transmitter batteries
HSOOI LCD Display
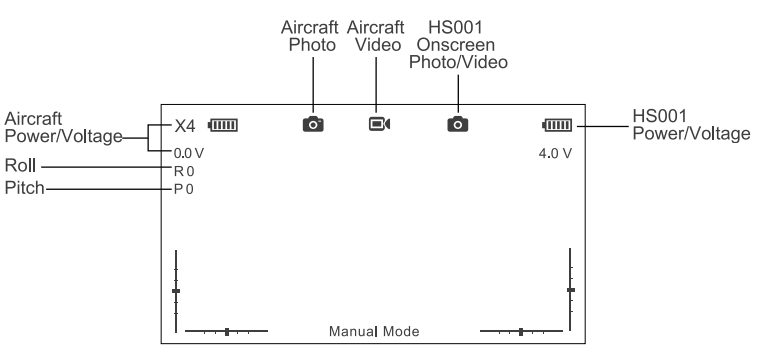
Display Component Breakdown
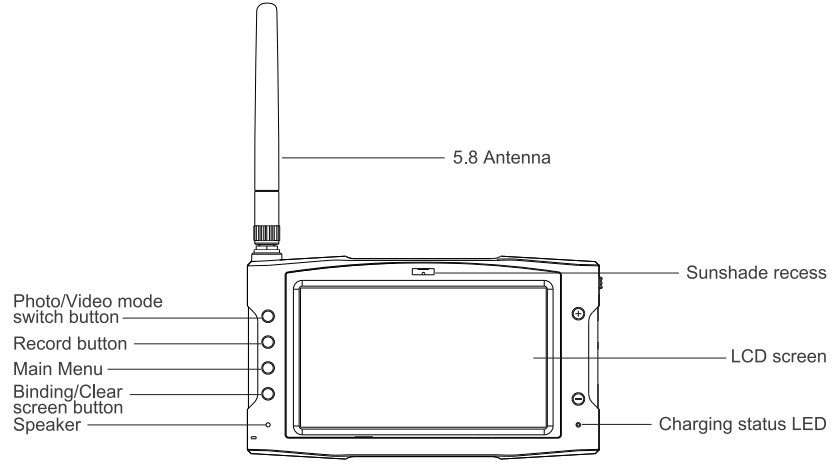
Key Functions
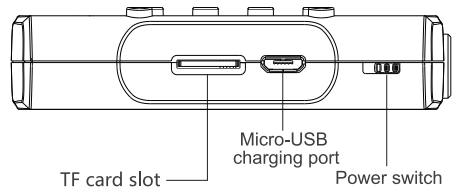
Installing the TF (Micro-SD) card
Insert the SD card in the TF card slot located on the display’s right-hand side. To eject the SD card from the slot, push the Micro-SD inwards (it will pop out).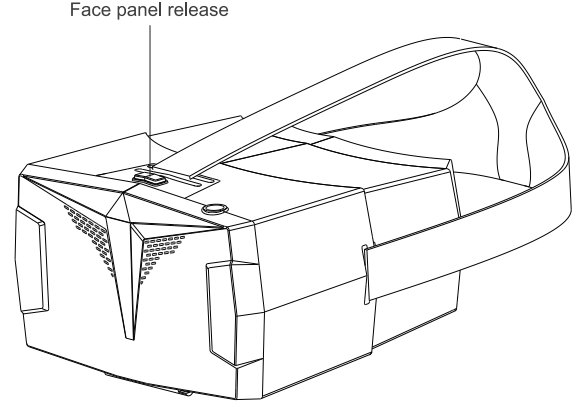
Getting Ready to Fly
Please select an appropriate flight environment.
Flight Environment Requirements
- When flying, please stay away from obstructions, crowds, high voltage lines, trees, water, etc.
- To avoid remote control signals interference, do not fly in complex electromagnetic environments.
- The H122D cannot be used in or near the Arctic Circle or Antarctica.

Pre-flight Checklist
- If you are taking pictures, insert the Micro-SD card required for taking pictures and videos.
- Ensure the camera lens is clean.
Binding the Aircraft and Transmitter
- Pull and hold the throttle to its lowest position.
- Hold down the Photo key and power the transmitter on. The transmitter’s status LED will flash red; please do not press or touch any other keys, buttons, or sticks while this process is ongoing. Users may let go of the Photo key and throttle. Connect the aircraft to its battery and allow it to bind to the transmitter. The two must be very close to each other; when the bind is successful, the binding status LED will turn green
Horizontal Calibration
Horizontal calibration is required when the aircraft drifts on the horizontal plane during flight. When this happens, land the aircraft and disarm its motors. Follow the steps below to do a horizontal/gyro calibration.
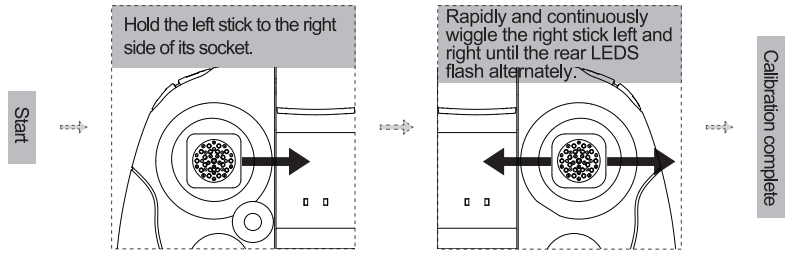
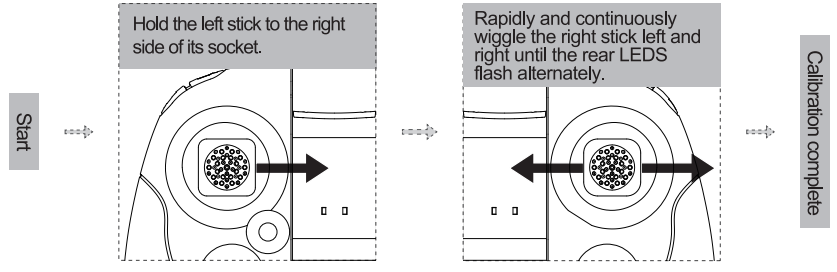
- Place the aircraft on a completely flat surface and then follow the calibration procedure below. Hold the left stick to the right side of its socket. Rapidly and continuously wiggle the right stick left and right until the rear red LEDS flash alternately.
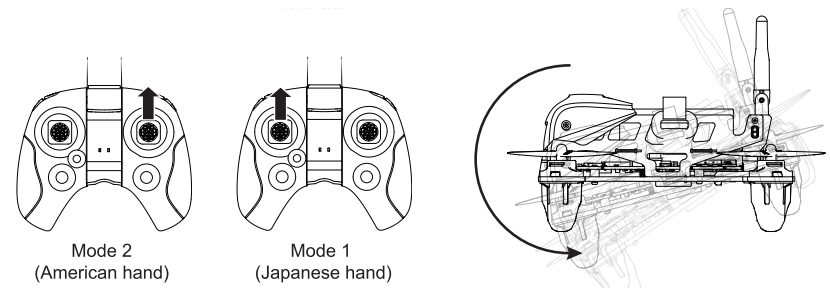
Takeoff
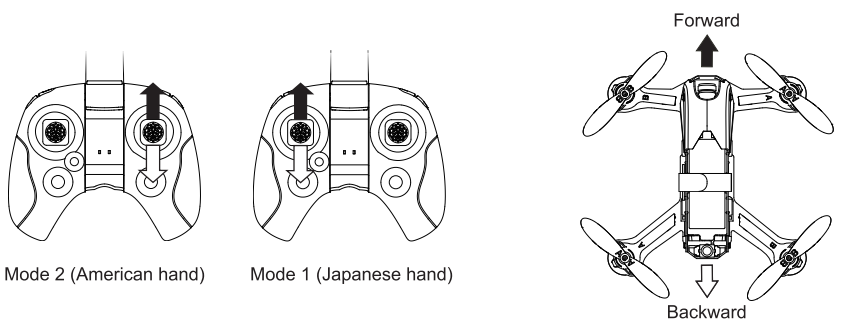
Simultaneously pull the transmitter joysticks diagonally down-out to arm the motors (as shown in the figure below). Pull the left joystick (throttle) upwards to take off.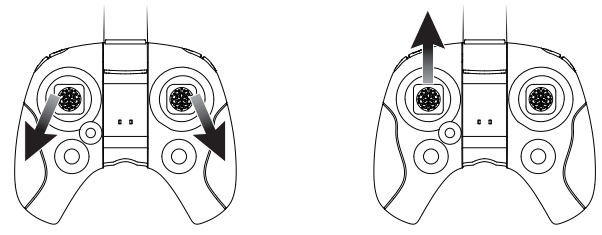
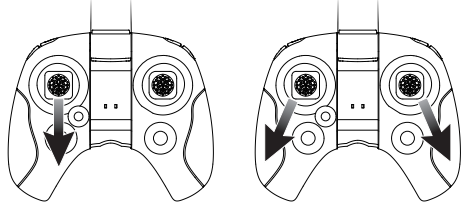
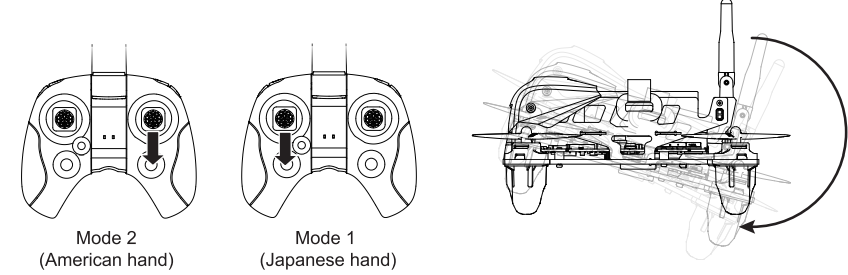
Landing
Slowly and gently pull the throttle joystick down until the copter has completed its descent on the ground. Simultaneously pull the transmitter joysticks diagonally down-out to disarm the motors. After all motors have come to a complete stop, release the joysticks.
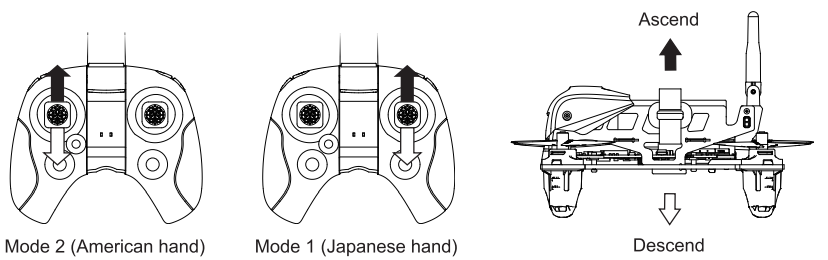
Basic Flight Operation
- The throttle controls the ascent and descent of the copter.
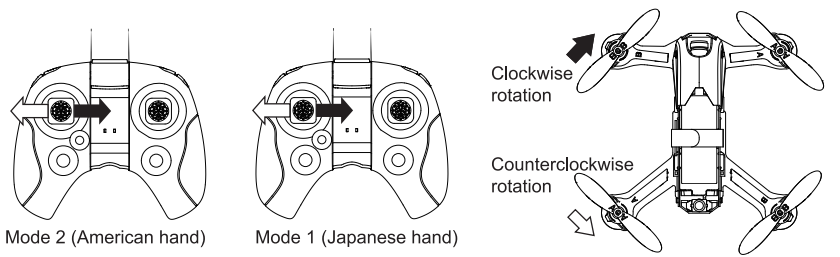
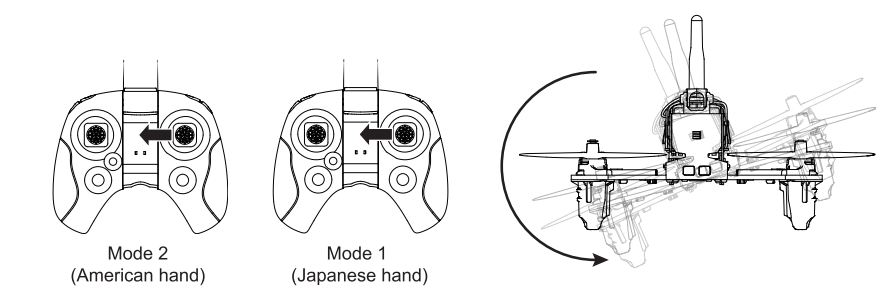
- The rudder is used to control the aircraft’s rotations.
- The elevator controls the aircraft’s forward and backward movement.
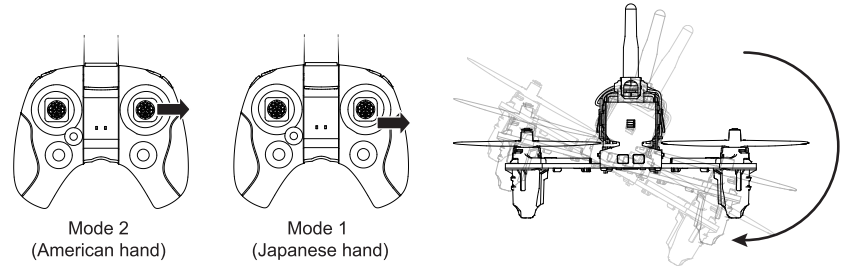
- The aileron controls the aircraft’s left and right movement.

Expert mode and Normal mode
Short-press on the non-throttle joystick (you should feel and hear a click) to enter or exit Expert mode. In Expert mode, the aircraft will respond in a very sensitive and nimble fashion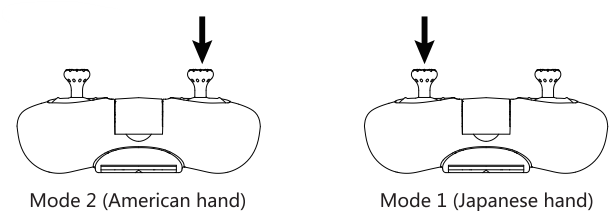
Acrobatic to Acrobatics
- Short-press the throttle (you should feel and hear a click) and push the aileron stick left. The aircraft will perform a left roll.
- Right roll Short press on the throttle (you should feel and hear a click) and push the aileron stick right. The aircraft will perform a right roll.
- Front flip. Short-press on the throttle (you should feel and hear a click) and push the aileron stick forward. The aircraft will perform a front flip.
- Backflip Short-press the throttle (you should feel and hear a click) and push the aileron stick backward. The aircraft will perform a backflip.
Binding the Aircraft and Transmitter
Pull and hold the throttle to its lowest position. Hold down the Photo key and power the transmitter on; allow the transmitter to enter binding mode.
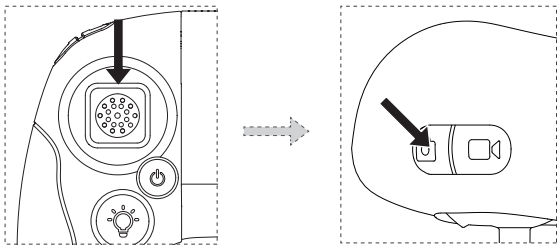
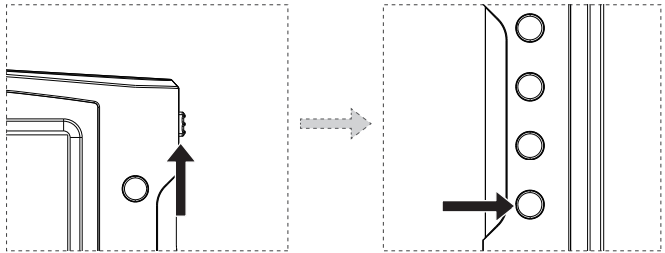
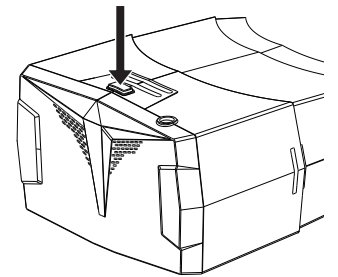
Power the HSOOI on by pushing the power switch up. Long-press the display’s binding button (shown below) to allow the HSOOI to enter binding mode. The display will beep three times.
Horizontal Calibration
Horizontal calibration is required when the aircraft drifts on the horizontal plane during flight. When this happens, land the aircraft and disarm its motors. Follow the steps below to do a horizontal/gyro calibration.
- Place the aircraft on a completely flat surface and then follow the calibration procedure below.
- Hold the left stick to the right side of its socket.
- Rapidly and continuously wiggle the right stick left and right until the rear red LEDS flash alternately.
Option I: Secure the HSOOI display to the HT015’s mobile device bracket.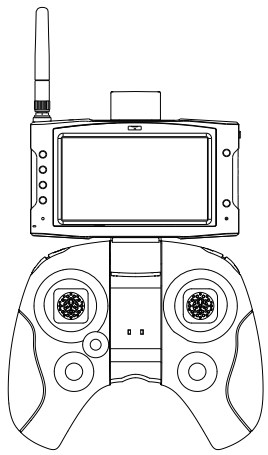
Option 2 (with the HV002 video goggles): Press the release key on the HV002 goggles to release its face panel. Install the HSOOI into the exposed compartment and shut the panel. After the installation, one may put the goggles on and adjust them to fit with the adjustable head strap.
Accessories
Frequently Asked Questions
- Aircraft and remote control are not pairing
- Check that the aircraft and remote control are both powered on.
- Turn off both the aircraft and the remote control. Rebind the aircraft to the remote control by following the rebind directions on page 7 of this guide.
- No video on the screen, or the user is experiencing strong video feed interference.
- Check whether there are strong sources of wireless interference (i.e. WIFI, electricity, radio tower frequencies, etc). If there are any, please change your flight location
- Aircraft/video feed is shaking/shaky.
- Check if the aircraft propellers are deformed or broken. Please replace them.
- Check that all aircraft body screws are firmly in place.
- Check whether any motor shafts are broken. Motors must be replaced if the shafts are broken.
FCC Information
This equipment generates, uses, and can radiate radio frequency energy and, if not installed and used in accordance with the instructions, may cause harmful interference to radio communications. However, there is no guarantee that interference will not occur in a particular installation.
- Reorient or relocate the receiving antenna.
- Increase the separation between the equipment and receiver.
- Consult the local dealer or an experienced radio / TV technician for help.
- Never leave units unattended when charging.
- Unplug the charging cable immediately after charging
- Propellers may cause injury
- This product is not a toy
- Not suitable for children under 14 years of age
Disclaimer
HUBSAN accepts no liability for damages, injuries, or any legal responsibilities directly or indirectly from the use of HUBSAN products under the following conditions:
- Subjective misjudgment and/or intentional misoperation of products.
- Any mental damage, trauma, impairment, illness, compensation caused/solicited by accidents involving HUBSAN products.
- Product operation in no-fly zones (i.e., natural reserves).
- Malfunctions or problems caused by modification, refit, replacement, or use with non-HUBSAN accessories/parts, failure to follow the guidance of the manual in assembly or operation.
- The acquisition, through the use of HUBSAN products (specifically but not limited to aircraft), of any data, audio, or video that results in infringement of law and/or rights.
- Misuse and/or alteration of batteries, product/aircraft circuits, hardware protections (including protection circuits), RC model and battery chargers.
- Users who engage in reckless, unsafe flying (with or without sufficient training).
- Non-compliance with precautions, instructions, information, and operation guidelines/methods given through official Hubsan website announcements, product quick start guides, user manuals, etc.
- Other losses, damages, or injuries that are not within the bounHubsan’sHubsan’s’s responsibility.
FAQ’S
- Update the latest firmware
- Abnormal aircraft hovering
- Change ththe ight site. Please do not fly near tall buildings and signal towers.
- Do the compass calibration and horizontal calibration
- The wind is too strong to affect the flight
- Aircraft GPS accuracy is not precise, or cannot pass the GPS accuracy test
- in the open area of the outdoors with GPS over 6 satellites
- Walk around near the aircraft
- Replace the mobile device
- The battery cannot charge. Plug the charger and battery
- Short flight time or exposure to original temperature conditions can easily reduce battery life.
- The tilt Angle of the gimbal is too large, or the gimbal shows abnormal behavior
- Restart the aircraft and recalibrate the gimbal
- Check the APP to see whether the gimbal status is normal
- Gimbal initializatiofailed.. Before starting the aircraft, remove the gimbal’s protective cover and ensure nothing blocks its movement.
- The picture is not clear.
- Check whether the lens protective filhass peeled off
- Please shoot inan environment with good lighting
- Shooting parameters setting in the camera Settings of the APP
- Place some desiccant in the protective cover of the gimbal when storing
- The pictureor video is lost
- Perform completing recording operation after recording the video, it may lead to video damage or loss.
Download App
Before flying, download and install the X-HUBSAN 2.0 APP. You could download the APP for free by scanning the code at right or searching in APP Store (IOS) Or Goggle Play.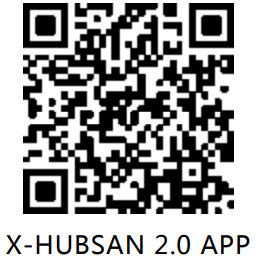
Customer Service
- Website: www.hubsan.com
- Ph: (909)444-0555