
 Kogan HSD01 8GB, 128GB Full HD Wi-Fi Speakers
Safety Instructions

- Always unplug the power cord and turn off the power before cleaning the screen.
- Do not use liquid cleaners or spray directly onto the screen.
- Wipe with a soft, damp cloth. For stubborn dirt, use LCD screen cleaner.
- Do not use accessories not recommended by the manufacturer, as this may be dangerous.
- When unplugging the power cord, hold the plug securely. Do not pull on the cord itself.
- Place the product in a well-ventilated area, away from direct sunlight, high temperatures, or humidity.
- Store at room temperature between 0°C and 40°C and below 5000m altitude.
- Do not block or cover ventilation gaps or openings, as these are required for heat dissipation.
- Do not attempt to repair or disassemble the product yourself. Contact help.Kogan.com for assistance.
- Avoid stepping on or damaging the power cord or adaptor. If the cable is damaged, do not use it.
- Unplug the power cord during thunderstorms or if the product will not be used for an extended period.
- Handle the display carefully during transport.
- Avoid pressure, sharp impacts, or contact with hard objects.
- Ensure children understand the dangers of climbing or tipping the product.
- Keep all cables organised to avoid tripping or pulling hazards.
- If using a power adaptor for charging, ensure it is certified and meets Australian safety standards.
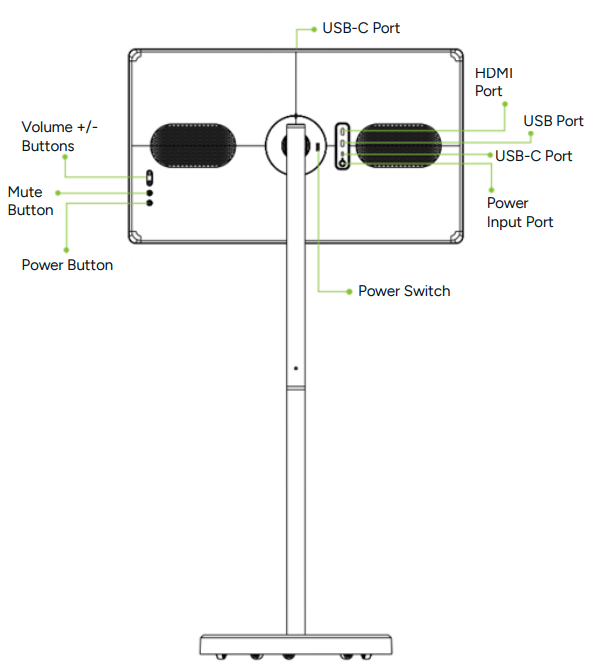
Components

Overview
Installation
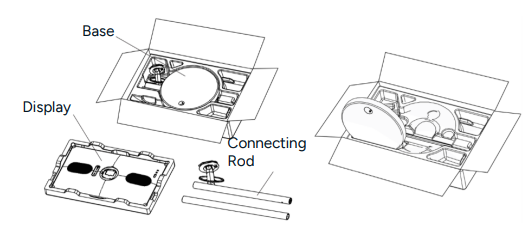
- Unpack and remove all parts, including the base, connecting rods, accessory bag, and foam cover.
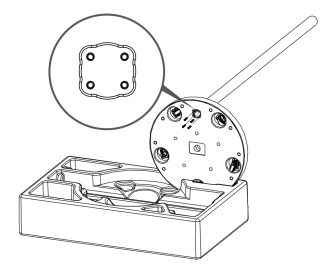
- Insert the base into the slot of the foam lower shell, ensuring the circular hole of the base is facing vertically upward.
- Install the lower section of the connecting rod into the round hole on the base.
- Insert x4 M4x18 screws from underneath the base to secure the connecting rod in place.
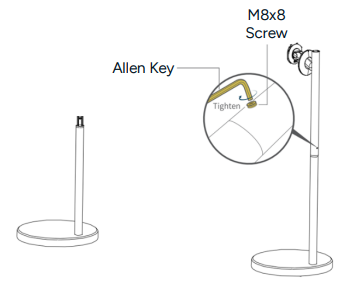
- Stand the base upright on a flat surface. Align the remaining connecting rod and attach it so that the screw holes are aligned in the middle.
- Secure the 2 connecting rods together using the M8x8 screw. Tighten using the Allen Key to secure the connecting rod.
- Hold the screen with both hands, ensuring the USB-C port is facing upward.
- Align the top metal hook on the back of the display with the bracket and press down until the bottom latch locks securely in place.
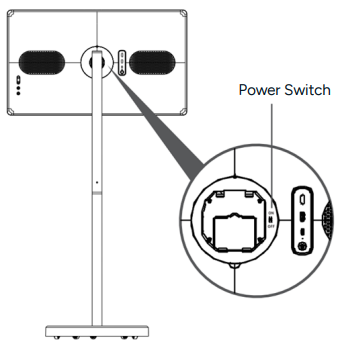
- Place the ‘Power’ switch in the ‘ON’ position and align the dots on the back cover of the rear panel with the corresponding dots on the back of the display.
- Secure the magnetic rear cover to complete the installation.

Installation Tips
- When assembling, ensure all screws on the connecting rods and brackets are securely tightened. Failure to do so may result in damage or injury.
- The product is heavy. Always have at least 2 people assist with unpacking and installation.
- Do not use foreign substances such as oil or lubricants on screws or tools during assembly.
- After installation, do not remove the cable bracket or screws.
- Always move the product in an upright position. Tilting the unit excessively may cause it to tip over, resulting in damage or injury.
Operation
Battery
- This product features a built-in battery that allows it to operate for a period of time without being connected to an external power source.
- The power level is displayed on the screen, and the indicator on the LED at the rear will change colour according to the remaining battery power.
- Charging from low to full battery takes approximately 4 hours, or around 10 hours if the product is in use while charging.
- In standby mode, the remaining battery power will gradually decrease over time. With increased frequency and duration of use, the overall battery life will decrease proportionally.
- To maximise battery lifespan, it is recommended to recharge the battery after use rather than leaving it fully charged for extended periods.
- Maintaining the battery at around 50% charge when not in use will help preserve long-term battery health.
- The stated operating times are based on laboratory testing and may vary depending on usage conditions.
Battery Indicator

Power Button
- Ensure the ‘Power’ switch is in the ‘ON’ position before first use.
- Power On
- Press and hold the ‘Power button’ for 3 seconds to turn on the device. Wait for it to boot up before using the system.
- Power Off
- Press to turn off the display. Press and hold to open the shutdown or restart confirmation interface.
- If the device cannot be turned on due to a low battery, connect the power adaptor and power cord to an electrical outlet to recharge the battery.
Volume Control
- Press ‘Volume +’ to increase the volume level.
- Press ‘Volume -’ to decrease the volume level.
- Press the ‘Mute’ button once to mute the sound and press again to unmute.
Adjusting the Display & Base
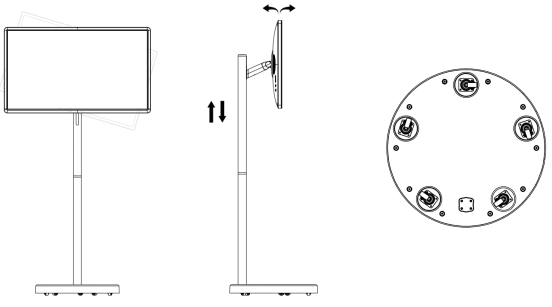
- The display can rotate 90° to the left and right.
- It can be tilted upwards by 25° and downwards by 15°.
- The display height can be adjusted up or down by 200mm.
- The base is fitted with five 360-degree swivel wheels for smooth movement in any direction.
External Source
Connect external peripheral devices using the available USB-C (supports OTG), USB-A, and HDMI ports for compatibility with a wide range of devices.
Touch Functionality

- The display features a G+G full lamination capacitive touch screen.
- It supports 10-point multi-touch operation.
- The screen allows input using fingers, an active stylus, or other conductive objects.
Specifications
- Display: 32”
- Built-in System: Android 15
- CPU:
- Octa-core 2 x ARM
- Cortex A75@2.0GHz
- 6 x ARM Cortex A55@1.8GHz
- Running Memory: 6GB/8GB (Optional)
- Storage Memory: 128GB/256GB (Optional)
- Resolution: 1920×1080 Pixels
- Refresh Rate: 60HZ
- Screen Ratio: 16:9
- Brightness: 300-350cd/m2
- Colour Gamut: 100% sRGB
- Touchscreen: Capacitive Touchscreen (10-point Touch)
- Wireless Connection
- WI-FI: 802.11a/b/g/n/ac (2.4G/5G),
- Bluetooth: 5.0
- Screen Projection: Wireless Screen Projection
- Audio Input: Built-in Microphone
- Audio Output: 8Ω 10W Bass Stereo Horn x 2
- Camera: Camera Option (supports external 500- 1300W USB 2.0 camera)
- Interface
- Type-C (supports OTG)/USB
- Interface/HDMI Interface
- Battery Type: 38400mAh (21700 cells, 4 series, 2 parallel, 14.8V, 9600mAh, 142.08Wh)
- Power Adapter: AC In 100-240V DC Out 19V 3.42A
- Base Type: 360° Movable Base
- Bracket Type: +/-90° adjustable, 40° pitch angle adjustable, 200mm up and down adjustment
- Working Temperature & Humidity: 0°C-40°C 0%-65% (non-condensing)
- Storage Temperature & Humidity: -10°C-50°C 0%-65% (non-condensing)
- Working Air Pressure & Altitude: 86kpla-106kpa ≤5000m
Declaration
Declaration of Toxic and Hazardous Substances in Electronic Information Products
| Part No | Toxic and Hazardous Substances or Elements | |||||
| Accessor
| Lead (Pb) | Mercury (Hg) | Cadmium (Cd) | Hexavalent chromium (Cr6+) | PBBs (PBB) | Polybrominated Diphenyl Ethers (PBDE) |
| Plastic Case | X | O | O | O | O | O |
| Metal Parts | O | O | O | O | O | O |
| PCB Board | O | O | O | O | O | O |
| LCD Screen Display | O | O | O | O | O | O |
| Lithium Polymer Battery | O | O | O | O | O | O |
| Touch Screen | O | O | O | O | O | O |
| Speaker | O | O | O | O | O | O |
| Package | O | O | O | O | O | O |
O: Indicates that the content of the toxic and hazardous substance in all homogeneous materials of the part is within the limit requirements specified in GB/T26572-2011
X: Indicates that the content of the toxic and hazardous substance in at least one homogeneous material of the part exceeds the limit requirement specified in GB/T26572-2011
Disposal
This marking indicates that this appliance should not be disposed of with other household wastes. To prevent possible harm to the environment or human health from uncontrolled waste disposal, recycle it responsibly to promote the sustainable reuse of material resources.
Customer Support
- Website: https://www.kogan.com/
- Ph: 1300 056 426
FAQs
Q: What are the main features of the HSD01 speakers?
High-quality audio playback, a Full HD display, Wi-Fi, and internal storage options (8GB or 128GB) for video, music, and apps are all included in the HSD01.
Q: How do I connect the speakers to Wi-Fi?
On the speaker’s display, open the Settings menu, click Wi-Fi, pick your network, and input the password.
Q: Can I play music without Wi-Fi?
Indeed. If your device lacks an internet connection, the speakers can play music via Bluetooth or local storage (USB/SD card).
Q: How much storage does the device have?
The HSD01 has 8GB or 128GB of internal storage for media files, apps, and offline entertainment, depending on the model.
Q: What audio formats are supported?
Common audio formats like MP3, WAV, FLAC, AAC, and others are supported by the HSD01. For a comprehensive list of supported file types, consult the handbook.
Q: Does the speaker support video playback?
Indeed. The HSD01 can play appropriate video files from local storage or streaming apps via Wi-Fi thanks to its Full HD display.
Q: How do I adjust volume or audio settings?
Use the device’s touch controls or buttons, or if the associated app supports it, change the settings. For personalised sound profiles, equaliser adjustments might also be accessible.