
Majority 1000003027 NAGA 40 Soundbar
Description
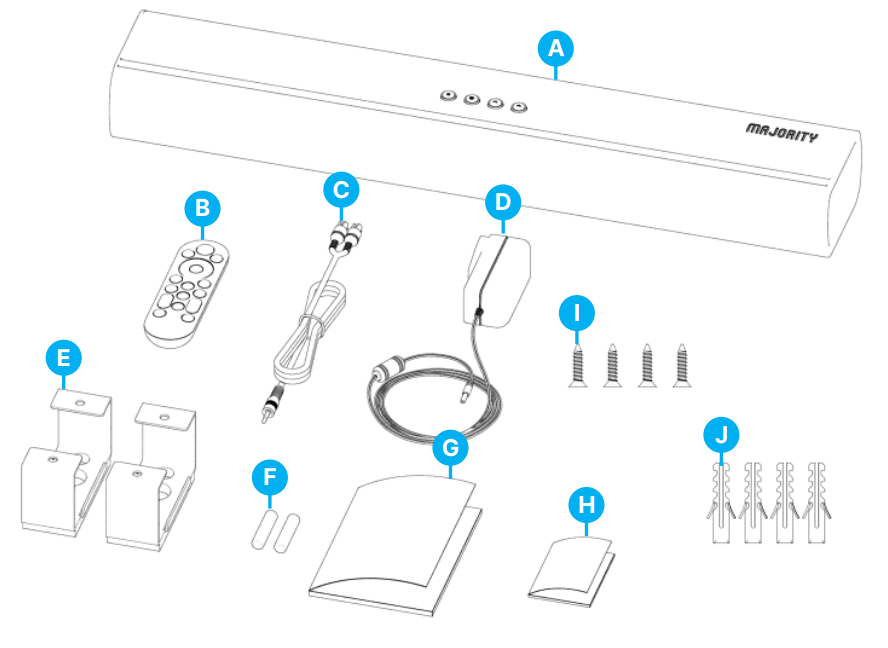
- A. Majority NAGA 40 Soundbar
- B. Remote Control
- C. 3.5mm to RCA stereo audio cable
- D. Power Adaptor
- E. Wall mount bracket x 2
- F. 2 x AAA batteries
- G. Welcome Guide
- H. User Manual
- I. 4 x Screws
- J. 4 x Wall Plugs
Basic Information
Automatic Power Off Function
The Majority of NAGA 40 will automatically go into Standby Mode after 180 minutes of no audio signal/sound received from the device that is connected with, or if the TV/ device is switched off.
Installing the Soundbar on the Wall
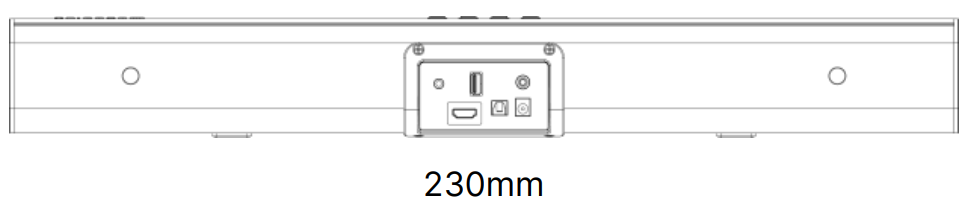
Distance between 2 wall-mount pillars at the rear panel of the soundbar.
A. Mark and drill 4 holes with 230mm distance on the same horizontal level.

- Mark the position of 4 holes and drill holes accordingly.
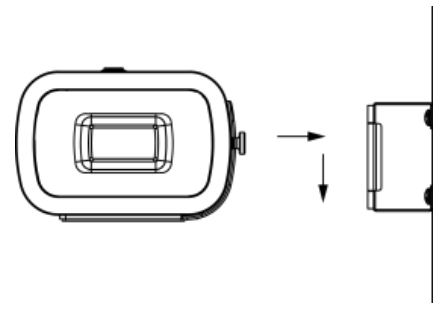
- Insert 4 pcs of screws into 2 wall-mount brackets and fix them.
Place the soundbar in the wall-mount brackets as shown below.
 Controls & Functions
Front, Top & Rear View
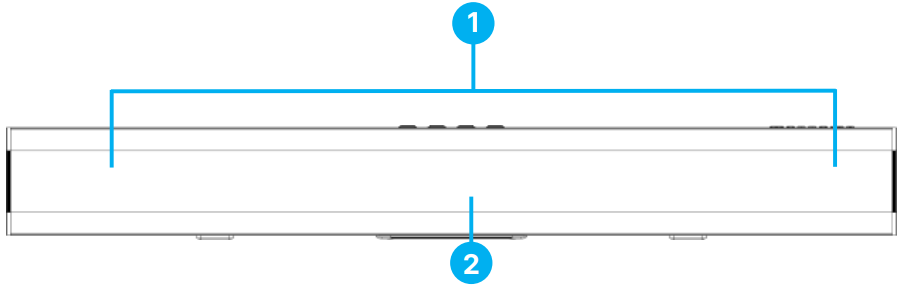
- Left & Right Speaker Drivers
- Mode LED light indicator
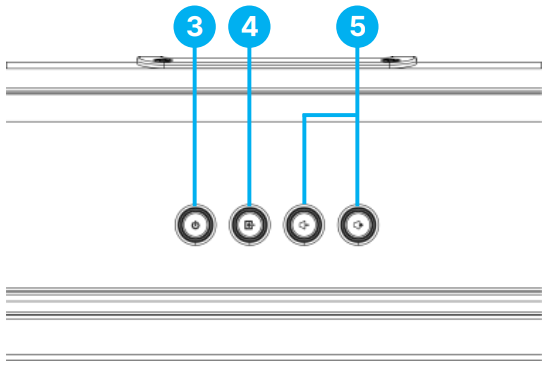
- Power ON/OFF
- Press the INPUT button to change the modes between BT, OPTICAL, AUX, USB or ARC. Press and hold for 2 seconds to disconnect the existing Bluetooth device and search for other Bluetooth devices.
- Adjust the volume up or down.
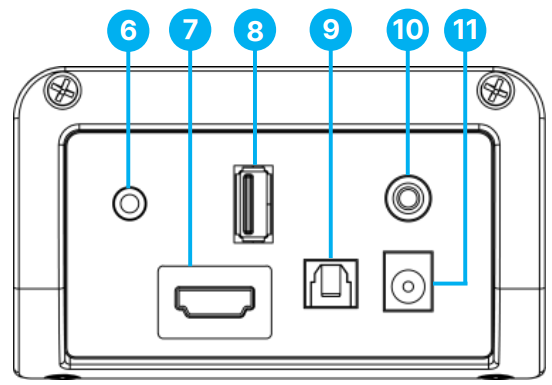
- 3.5mm AUX Input port
- HDMI ARC Input port
- USB Playback port
- OPTICAL Input port
- SUBWOOFER OUT jack. To connect with an external active subwoofer (not included).
- DC 18 V IN socket (power cable port)
Remote Control
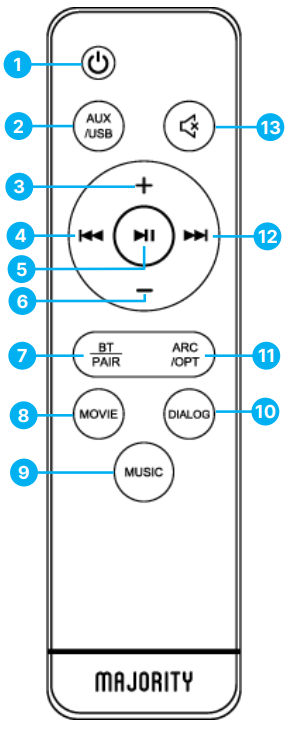
- Power ON/ OFF
- AUX/USB Mode. Press once to change in AUX mode.
- Press again to change the soundbar mode to USB mode.
- Volume +
- Previous/back- Press to go back one audio track whilst in USB or Bluetooth mode.
- Play/Pause- Press to play/pause audio while in Bluetooth or USB mode
- Volume –
- BT/Pair- Press to change the soundbar mode to Bluetooth to pair with a device.
- Press and hold for three seconds to unpair.
- 9, 10 – Movie, Music, Dialogue sound equalisers.
- Press any of these to add sound effects as per the content watched or played.
- ARC/OPT. Press to change the soundbar mode to ARC. Press once again to change into Optical mode.
- Next/ Forward – Press to skip to the next audio track while in Bluetooth or USB mode.
- Mute. Press to mute the audio played. Press once again to unmute.
Connecting to The Power Outlet
Connecting to the Mains Socket
Ensure that the power supply voltage is within the range of 100V~240V. Any other voltage may cause damage to the unit. Unwind the mains cable to its full length. Connect the mains plug to a mains socket. Ensure that the mains plug is fully inserted into the mains socket. The mains plug/appliance coupler is used as the disconnect device. The disconnect device must remain readily operable. Insert the power adaptor end into the Soundbar DC port (Ref 11).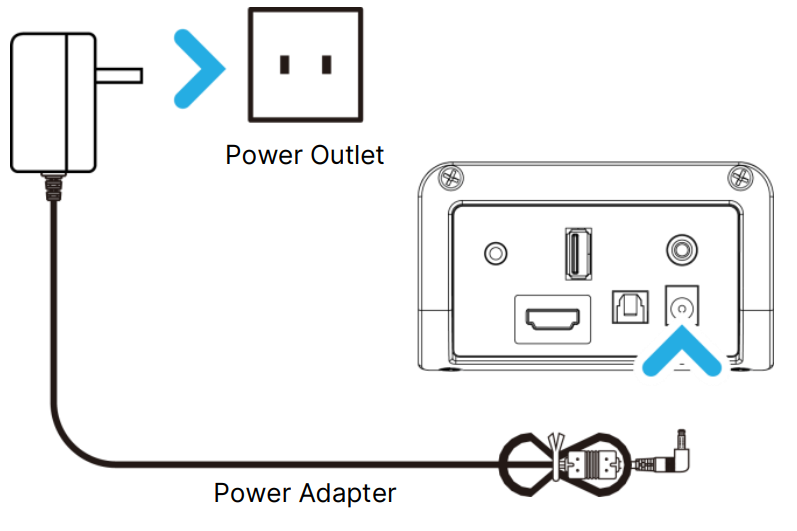
Ensure all audio cable connections of the unit are properly inserted before connecting the soundbar to the mains power socket. Unplug the power cord from the outlet when the unit is not in use for an extended period of time.
Changing soundbar mode
LED light indicator colour/mode
| Input | Use | Remote Control Button | Colour |
| OPTICAL | Connecting the soundbar with the Optical Cable (not included) to the Optical port of a TV, PC, DVD player or any other similar device with an optical output port. | ARC/OPT | Yellow |
| ARC | Connect the soundbar with an HDMI (ARC) Cable to the HDMI(ARC) port of the TV. | ARC/OPT | White |
| Bluetooth | Pairing the soundbar via Bluetooth with a TV, phone, or other similar device to play audio from NAGA60. | BT/ PAIR | Blue |
| USB | USB Playback port- to be used to play audio from a USB stick (not included). | AUX/USB | Purple |
| AUX IN | Connecting the soundbar with 3.5mm stereo cable, with a TV, PC, or other similar devices | AUX/USB | Green |
USB Input
Using the USB Playback Port
- Plug in a USB stick to the USB jack port (Ref 8) on the soundbar.
- Press the ‘AUX/USB’ button (Rem 2) on the remote control to change the mode to USB. The LED light indicator will turn PURPLE.
- Once in USB mode, the soundbar will automatically start playing audio from the USB stick.
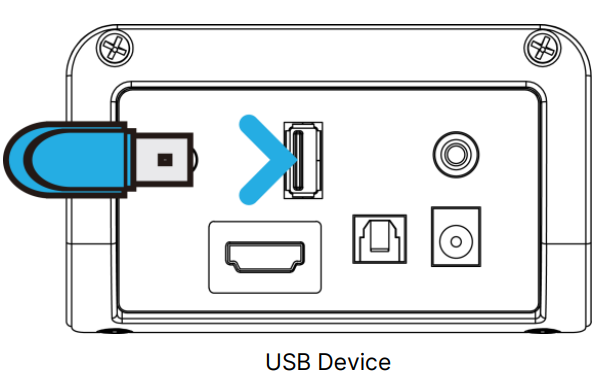
- The maximum memory size of a USB stick is 64GB.
- The USB sticker must be formatted into FAT32 before use.
- The supported audio file formats are MP3/WAV.
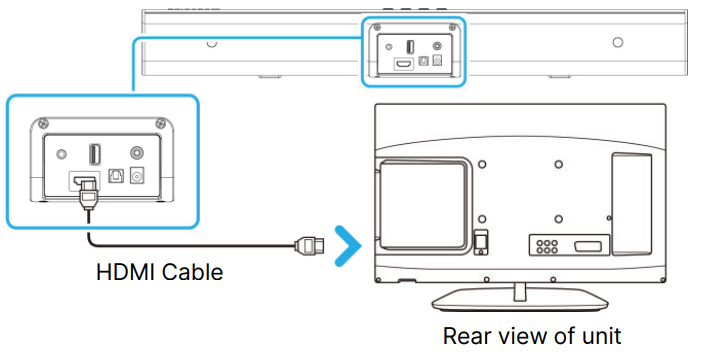
ARC Input
Using the ARC Input
Before connecting, switch off both the soundbar and TV.
Connect the soundbar to the TV.
- Plug in the ARC cable ( not included) to the ARC jack port on the rear panel of the Soundbar (.ef 7).
- Plug the other end of the cable into the TV’s HDMI ARC output port. Switch on the TV set.
Change the soundbar mode to ARC.
- Press the ‘POWER’ button on the top panel. Ref 3) of the soundbar or remote control (Rem 1) to switch the soundbar on.
- Press the ‘INPUT’ button repeatedly on the soundbar (Ref 4) or the ARC/OPT button on the remote control (RRef11) until ARC Mode is selected. The LED light indicator will turn WHITE.
Adjust the TV audio settings.
- Ensure the TV audio settings are set to HDMI ARC sound output, and the audio format is set to PCM. Enable HDMI–CEC on TV settings.
Optical Input
Using the Optical Input
Before connecting, switch off both the soundbar and the TV. Connect the Majority NAGA 40 with an audio source such as TV, PC, or similar with an Optical Audio Output using a Digital Optical Audio cable (not included).
Connect the soundbar to the TV, PC, or audio source.
- Insert one end of the Digital Optical Audio cable into the optical output on the audio source and the other end into the Optical Input on the Soundbar. Ref 9).
- Press the ‘POWER’ button on the soundbar (.ef 3) or on the remote control Rem 1) to switch the soundbar on.
Change the soundbar mode to Optical.
- Press the ‘INPUT’ button repeatedly on the Soundbar. Ref 4) or the ARC/OPT button on the remote control (Rem. 11) until Optical Mode is selected. The LED light indicator will turn YELLOW.
Adjust the audio settings on the TV and PC audio source.
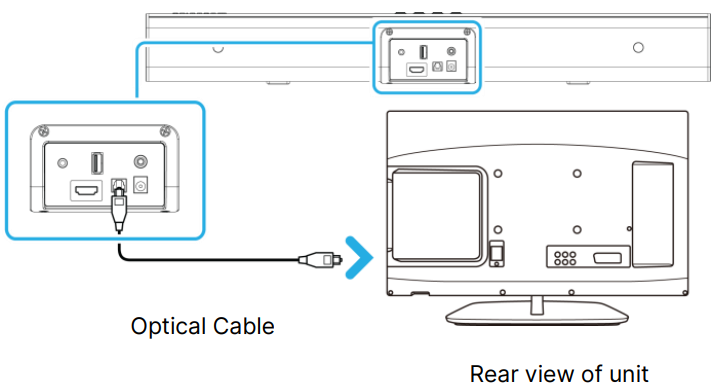
- Using the native controls on your connected device, make sure the audio settings are on and set to Digital Optical Audio and the audio format is set to PCM. Audio from the connected audio source will now be heard through the NAGA 40.
AUX Input
Using the AUX Input
- Before connecting, switch off both the soundbar and the device you are about to connect.
Connecting to External Devices
- Insert one end of the 3.5mm audio cable into the AUX input socket on the rear panel of the soundbar.
- Insert the other end into the audio output/headphone output of an external device, such as a PC, MP3 player, phone, tablet, TV or another audio source.
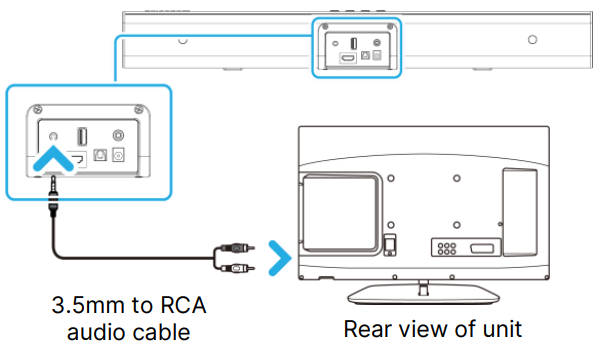
Connecting to TV
- Insert the 3.5mm cable end into the AUX input port on the rear panel of the soundbar Ref 6).
- Insert the two RCA-coloured ends into the TV’s RCA audio output ports.
Change the soundbar mode to AUX.
- Press the ‘POWER’ button on the soundbar panel (Re.. 4) or the remote control (Rem. 1) to switch the soundbar on.
- Press the ‘INPUT’ button repeatedly on the soundbar (Ref. 4) or the ‘AUX/USB button on the remote control (Rem. 2) until AUX mode is selected. The LED indicator light will turn GREEN.
Bluetooth Mode
Bluetooth Operation
The Majority NAGA 40 can be paired via Bluetooth with any Bluetooth-enabled device, such as a smart TV, PC, phone, tablet, or similar device, to play audio through the soundbar. Press the ‘POWER’ button on the soundbar (Ref 3) or on the remote control (Rem 1) to switch on the unit.
Activating Bluetooth Mode
- Press the ‘INPUT’ button on the soundbar repeatedly (Ref 4) or press the ‘BT/PAIR’ button on the remote control (Rem 7).
- The LED indicator light will turn BLUE. Whilst the soundbar is searching for a device to pair with, the blue LED indicator will flash a blue light.
Pairing with a Bluetooth Device
- Enable Bluetooth connectivity on your device and start searching for the soundbar.
- Select ‘NAGA 40’ from your device’s Bluetooth list when prompted.
- If a password is required, enter ‘0000’.
Successful Connection
- When successfully paired, a beep will be heard from the soundbar, and the LED indicator will stop flashing a blue light.
- Once paired, the soundbar will remain connected unless manually unpaired by the user or until the device is reset.
Reconnecting or Unpairing a Device
- If your device becomes unpaired or fails to connect, repeat the above steps.
- To unpair the soundbar from a connected device, press and hold the ‘BT/PAIR’ button on the remote control (Rem. .7) for 3 seconds. The blue LED light will start flashing, indicating that the soundbar is now searching for a new device to pair with.
Specification
| Power Supply | DC18V 1.3A |
| Frequency Response | 30Hz-20KHz |
| SNR | 70dB |
| Separation | 54dB |
| Bluetooth | V5.0 |
| Dimension (LxHxW) | 386 x 77.7 x 117mm |
| Net Weight | 1.4 kg |
Troubleshooting
| Observation | Potential Cause/Solution |
| No power/function | Check that the power is switched on at the wall socket. Check that the power adaptor is properly connected to the power outlet. |
| No sound | If connected to another device, increase the volume level on your audio source. |
| No sound in Bluetooth mode | Check that you have pressed the ‘BT/PAIR’ button before pairing. Increase the volume on the soundbar and on your device. Check whether the external device requires the password ‘0000’. |
| Function disturbance | Switch off and unplug the unit. Leave for 2 minutes and switch the soundbar on again. If a particular mode is causing problems, please try an alternative connection to your TV, such as Optical or Bluetooth. |
| No sound when connected and switched to OPTICAL mode | Check and ensure the audio setting of the input source (e.g. TV, games console, DVD player, etc.) is set to PCM mode while using a digital connection (such as Optical, HDMI or RCA). |
Warranty
All products come with a standard 12-month warranty. All items must be registered within 30 days of purchase for the warranty to be valid. Once on the web page, use the menu to find ‘Register Your Product’. You will also be given the chance to extend your warranty for an additional 24 months, free of charge.
Customer Support
- Website: www.majority.co.uk
FAQs
Q: What is the Majority NAGA 40 Soundbar?
The NAGA 40 is a small, all-in-one soundbar with a broad soundstage, strong bass, and crisp conversation to improve TV audio. It works well in small to medium-sized spaces.
Q: What is the total power output?
With its 40 watts of RMS power, the soundbar produces clear and engrossing sound for gaming, music, and movies.
Q: Does the soundbar include a subwoofer?
With integrated bass drivers, the NAGA 40 provides better low-frequency response without requiring an additional subwoofer.
Q: Can I control it with a remote?
Indeed. The soundbar has a special remote control that allows you to pick sound settings, change inputs, and adjust volume from a distance.
Q: Does it support wall mounting?
Indeed. Because mounting brackets are supplied, installing the NAGA 40 beneath or above your TV is simple.
Q: What is the frequency response?
With a frequency range of 60 Hz to 20 kHz, the NAGA 40 provides a well-balanced audio experience with distinct highs and rich lows.
Q: Does it support Dolby or DTS?
The NAGA 40 does not support complete Dolby Atmos or DTS decoding, but it does offer improved stereo audio and virtual surround sound.
Q: How long is the wireless Bluetooth range?
In open areas, the soundbar may provide wireless Bluetooth connectivity for up to 10 meters, or roughly 33 feet.