
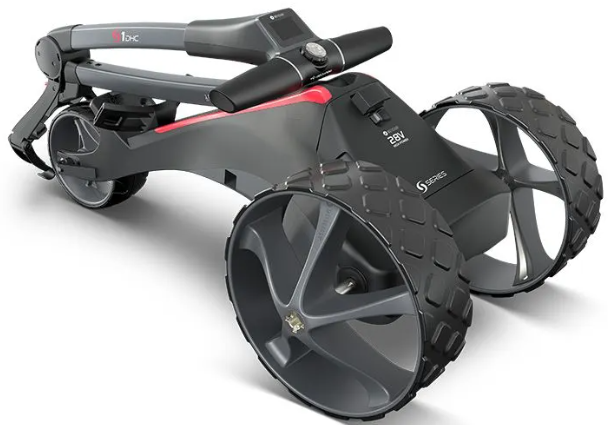
MOTOCADDY S1 DHC Electric Trolley
Introduction to DHC
The letters DHC stand for ‘Downhill Control’ and mean that your trolley will automatically maintain a controlled speed whilst travelling down hills. Whenever you are looking to move the trolley, even if just to reposition it ready to use, always put it on a low speed setting to make it easier to steer.
Locating your Serial Number
The serial number for this S-Series trolley is located on the trolley’s underside, on top of the motor. Please ensure you keep hold of the packaging in case you need to return your trolley for any reason. 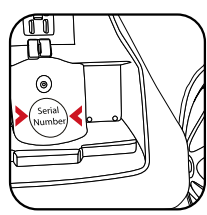
Information about DHC (Downhill Control) models
The information in this instruction manual applies to both standard and DHC electric trolley models. For DHC-specific functionality, please turn to page 19.
DESCRIPTION
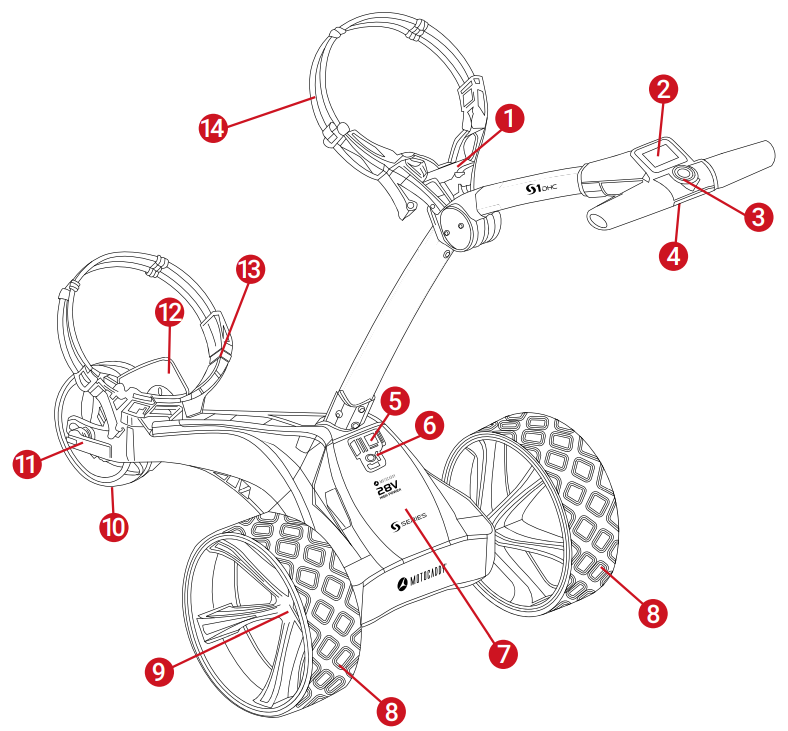
- Folding Release Latch
- LCD Display Screen
- On/Off & Speed Control Button
- USB Port (on underside of handle)
- Pop-Up Charging Port
- Battery Release Catch
- Battery
- Rear Wheels
- Rear Wheel Release Catch
- Front Wheel
- Front Wheel Adjuster
- EASILOCK Lower Bag Support
- Lower Bag Support Strap
- Upper Bag Support
Safety cut-out
This Motocaddy trolley is fitted with a timed safety cut-out feature. Once started, the trolley will automatically cut power to the motor after ten minutes to reduce the risk of damage to the trolley. Pressing the On/Off button will restart the trolley.
Safe use of your Trolley
Motocaddy trolleys are designed for the transportation of golf bags and clubs contained within. Using the trolley for any other purpose may cause damage to the trolley and cause harm to the user.
- Do not attempt to transport any other equipment.
- The trolley is not designed for the transportation of people.
- The maximum rated load suitable for this trolley is 20kg.
- Do not use the trolley to assist you when walking up hills.
- Submerging the trolley in water (e.g., a lake) is likely to cause damage to the trolley.y;
- Do not operate the trolley whilst under the influence of drugs or alcohol;
- This trolley can be used by children aged 8 years and above and persons with reduced physical, sensory, or mental capabilities or lack of experience and knowledge if they have been given supervision or instruction concerning the use of the trolley in a safe way and understand the hazards involved. Children shall not play with the trolley. Children shall not make cleaning and user maintenance without supervision.
Caring for your Trolley
Although your Motocaddy trolley has been weatherproofed, please follow these simple guidelines to help protect your trolley:
- Do not store your trolley outside.
- Try to minimise exposure to rain as much as possible with an umbrella during heavy rainfall.
- Wipe excess water from the trolley before storage.
- Never use a pressure washer to clean your trolley. To prevent water damage, wipe down with a damp cloth.
- Avoid using high-pressure air hoses near moving components.
This Motocaddy trolley is designed to require very little maintenance. We do, however, recommend checking your trolley before each use to ensure:
- There is no buildup of excess mud and dirt.
- The rear wheels are securely fitted and turn freely.
- The front wheel nut is on tightly, and the quick-release lever is clamped down.
- The front wheel is not clogged up and turns freely.
Only original Motocaddy parts should be used when repairing your trolley.
Important Battery Safety & Care Information
- Always recharge as soon as possible after finishing your round, regardless of the number of holes played – ideally within 12 hours. Leaving batteries uncharged for extended periods may reduce capacity and could void your warranty.;
- Never leave batteries charging for longer than necessary – disconnect once the green LED light indicates the battery is fully charged;
- Ensure that only Motocaddy 28V Lithium batteries are charged with Motocaddy 28V Lithium battery chargers (Model LC-2323) and the charger is always connected to an earthed socket outlet;
- Batteries must be stored and charged on a dry, non-carpeted surface at a temperature ranging between 10°C and 30°C – charging outside these temperatures may reduce capacity;
- The battery and charger must only be opened and maintained by authorised personnel. Unauthorised opening increases the risk of safety issues and will invalidate your warranty.
- Take care not to drop the battery as this may cause damage to the internal cells, which could affect battery performance and safety.
Charging your Lithium Battery
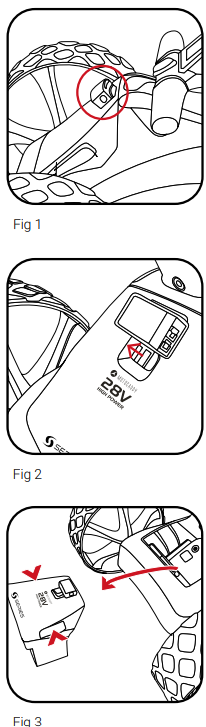
The Lithium battery can be left on the trolley or removed for charging. It is possible to charge the battery while the trolley is folded or unfolded. If folded, the charging port will become automatically accessible (fig. 1). If removing the battery for charging, slide the battery release catch to the left (fig. 2) and lift the battery using the two grab handles provided (fig. 3). If the charging port is not visible – for example when the trolley is unfolded or battery has been removed – it can be pulled out manually.
- Plug the Motocaddy 28V Lithium battery charger into an earthed mains power socket
- The charger light will be GREEN when not attached to a battery to indicate that it is ready to charge
- Attach the charger cable to the charging port, matching the black and grey connections
- The charger light will indicate the charging phase:
- RED – Battery charging
- GREEN – Battery fully charged
- The charging process will take between 3 to 5 hours, depending on the depth of discharge. This may take longer for the first few charges.
- Once charging is complete, disconnect the charger from the mains power supply and battery.y
- The charging port will need to be pushed into the battery to switch the power on fothe r next use.
Recommendations for hibernation of Lithium Batteries during the winter months
If, for any reason, your Lithium battery is not going to be used for lengthy periods, e.g., 3 months over the winter, it is advised to store the battery fully charged. Before the battery is used again, recharge it (top it up) prior to use. The battery must not be left for longer than 2 months without charging, as this could invalidate your warranty.
We recognise that extended absences are not always planned; however, when it is likely that you will not be using your battery for a period of time, it is good practice to follow these steps to extend the life of your Lithium battery. Please ensure that the charger is ALWAYS disconnected from the battery after charging.
Battery Management System (BMS)
Motocaddy Lithium batteries are fitted with a comprehensive battery management system (BMS) to protect the battery from excessive abuse, high currents, deep discharge, and overcharge. When the battery is delivered, there may be no output as the BMS is designed to maximize safety whilst shipping. Please ensure that the battery is fully charged before connecting it to your trolley, as this will activate the BMS and effectively ‘switch on’ the battery. From time to time, at deep discharge long-term storage, the BMS may switch off the battery. A full battery charge will rectify this problem.
Motocaddy golf trolleys are designed to work with the BMS system installed in the Lithium batteries, and the battery meter is also synchronised to work in conjunction with the battery. I, for any reason, the voltage on the battery falls below the low battery warning on the trolley, then the BMS may disable the battery to protect it. Again, if this occurs, please recharge fully. Please be aware that Lithium batteries tend to ‘drop off’ quickly at the end of the cycle, so it is not advisable to attempt to play excessive holes as the BMS will activate for protection purposes.
Attaching the Wheels
This trolley does not have a specific left and right wheel. To attach the rear wheels, follow these simple steps:
- Push and hold the quick-release button in towards the centre of the wheel
- Slide the wheel onto the trolley axle as far as it will go (onto the inner groove)
- Once in position, release the button and pull the wheel outwards slightly to lock
- An audible ‘click’ will confirm the wheel is in the correct position
The outer groove can be used as a “free-wheel” option if you run out of battery power. Simply slide the wheel onto the outer groove and pull the wheel outwards slightly to lock. Once connected, the wheel will spin freely without resistance in both directions.
Inverting the Wheels
- Push and hold the quick-release button while sliding the wheel off the axle.
- Flip the wheel over, push and hold the button, then slide onto the axle
- Release the button and pull the wheel out slightly until it engages with the free wheel groove
Adjusting the Front Wheel Alignment
In the unlikely event that your trolley is not tracking in a straight line, the alignment of the front wheel can
be adjusted to rectify the fault. To alter the alignment of the front wheel, follow these simple steps: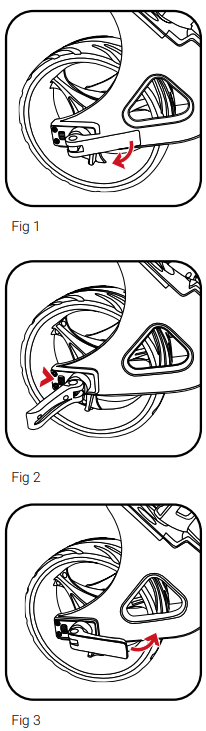
- Lift the thequick-releasee lever positioned on the front wheel housing and loosen the wheel nut
- If your trolley is veering to the right, you will need to turn the left-hand dial clockwise and the right-hand dial anti-clockwise
- If your trolley is veering to the left, you will need to turn the right-hand dial clockwise and the left-hand dial anti-clockwise
- Tighten the wheel nut and push down the lever to lock the wheel back into place
Unfolding your Trolley
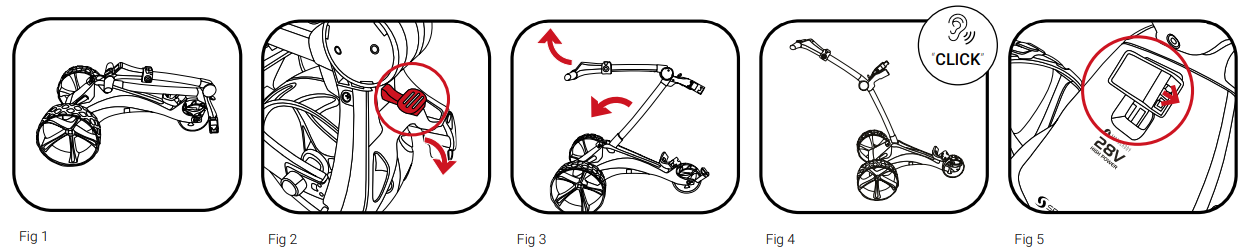
- Position the trolley with all three wheels in contact with the ground
- Locate the red release latch positioned above the upper bag support
- Push the red release latch down while lifting the handle – the trolley will unfold in one motion
Folding your Trolley

- Position the trolley in its assembled position (fig. 1)
- Locate the red release latch positioned above the upper bag support
- Push the red release latch away from you towards the upper bag support straps.
- Lower the handle while folding the frame down and forward towards the front wheel.
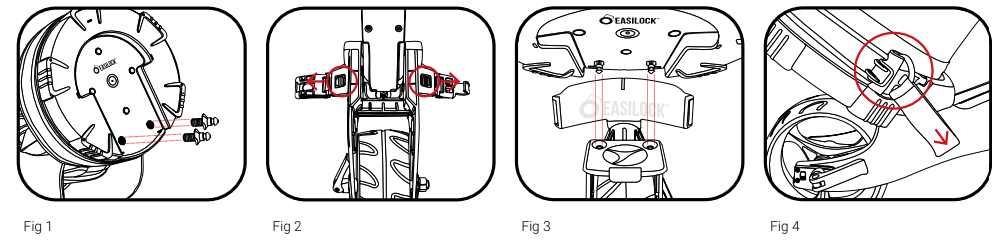
Lower Bag Support with EASILOCK™ Bag
This securely attaches the bag, reduces twisting, and removes the need to use a lower bag strap.
- If attached, remove the two lower bag support elastic straps by pressing and holding the back of the clip before pulling outwards (fig. 2)
- Align the cutout on the bag base with the lower MOTOCADDY S1 DHC Electric Trolley vbag support platform to align the bag pins with the holes on the trolley (fig. 3)
- Lower the bag until the pins align with the two holes. You should hear a positive “Click” as the bag locks into position.
Lower Bag Support with Non-EASILOCK™ Bag
If you are using a non-EASILOCK™ golf bag, please do not remove the two lower bag support elastic straps:
- Position your bag so it is resting on the lower bag support platform and in the cradle of the upper bag support
- Stretch the lower bag strap around the bag base and loop the rounded bar underneath the bag support hook (fig. 4)
Upper Bag Supports
- Stretch the elasticated strap around the bag & loop the rounded bar underneath the hook (fig. 1)
- Position the two placement straps centrally on your golf bag (fig. 2)
Adjusting the Bag Supports
- Unclip the elasticated straps from the housing by pulling outwards in the direction shown (fig. 3)
- Move the bar as required to tighten or loosen the MOTOCADDY S1 DHC Electric Trolley strap fitting. Pulling the bar downwards will tighten, upwards will loosen (fig. 4)

Starting, Stopping & Changing Speed
The S1 is very simple to control. The trolley has 9 speed settings (1 to 9) with 1 being the slowest and 9 the fastest. To increase the speed, rotate the speed dial clockwise, or anti-clockwise to decrease the speed.
To start the trolley, simply select your required speed setting and press the button. The trolley will smoothly accelerate until it reaches the selected speed. To stop MOTOCADDY S1 DHC Electric Trolley the trolley, simply press the button again – there is no need to reduce the speed setting. The speed number will start flashing when you press the button.
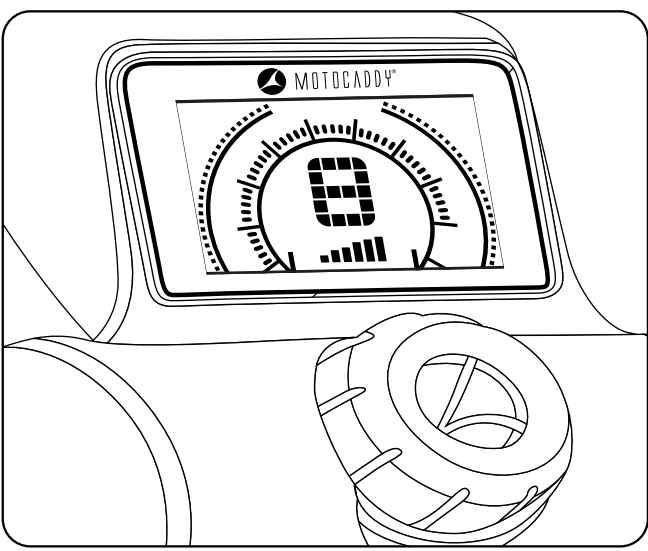
Battery Meter
The S1 includes an on-screen battery meter, which indicates remaining battery capacity. The number of illuminated bars will decrease as the battery capacity reduces.
A fully charged battery will show from left to right – two short red bars, two medium orange bars, and two larger green bars (fig. 1).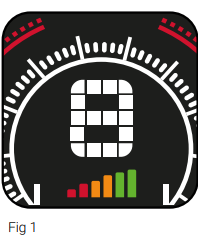
Should your battery capacity drop too low, the trolley will cut the power to the motor. If this should happen, please charge your Lithium battery before further use. It is possible to use the outer “free-wheel” groove to complete your round if required.
USB Charging Port
This trolley features a USB charging port designed to charge USB-powered devices during your round. Simply remove the covering cap and plug a USB cable into the charging port located on the underside of the handle. The rate of charge will be slower than a mains AC charger and similar to plugging the device into a PC.
The USB charger takes power from the main trolley MOTOCADDY S1 DHC Electric Trolley battery, and continuous charging will reduce the battery capacity between charges.
Adjustable Distance Control
The S1 features a basic, easy-to-use Adjustable Distance Control, which allows you to send your trolley ahead of you from 15 to 45 yards.
- While stationary, select the speed at which MOTOCADDY S1 DHC Electric Trolley you wish your trolley to set off at
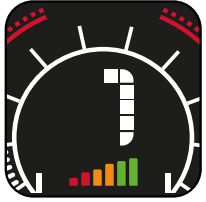
- Hold down the On/Off button for 3 seconds, the number “1” will flash on the display (fig. 1). There are three settings for the distance: 1 = 15 yards, 2 = 30 yards, and 3 = 45 yards
- Turn the button clockwise to increase and anti-clockwise to decrease to your preferred distance
- Press the On/Off button to set the trolley in motion.
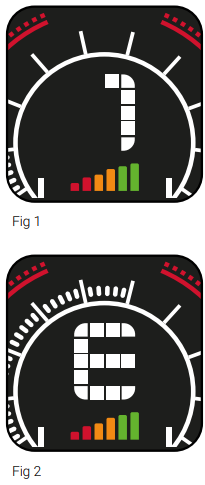
In the unlikely event that your trolley fails to register distance whilst in ADC mode, the trolley will cut
power to the motor to prevent the trolley from travelling too far. The trolley screen will flash “E” to indicate.
Using the DHC Parking Brake
To use this feature, the trolley must be in a stationary position. Once activated, the screen will toggle between ‘P’ and number ‘1’ (Fig. 2). To release the parking brake, press the On/Off button to start the trolley.
Customer Support
- Email: @motocaddy.com.
- Tel: +44 (0)1279 712370
FAQs
Q: What does “DHC” mean in the S1 DHC model?
Ans: The acronym for Downhill Control is “DHC.” This mechanism ensures a steady pace and stops the tram from rushing away downhill by automatically controlling its speed when descending slopes.
Q: How does the electronic parking brake work?
Ans: The parking brake stops the tram from rolling on hillsides by locking the wheels when it is engaged. It’s particularly helpful when shooting on hills or uneven terrain. Holding down the handle’s brake button will activate it.
Q: How do I adjust the trolley’s speed?
Ans: To change speed (1–9 levels), press the plus (+) and minus (–) buttons next to the handle display. To start or pause movement at the speed of your choice, press the start/stop button.
Q: Can I fold the trolley with the battery attached?
Ans: Indeed, the Motocaddy S1 DHC saves time by allowing folding while the battery is still in place. To prevent damage, it is still advised to take the battery out for charging or transportation.
Q: Can I push the trolley manually if the battery dies?
Ans: Indeed. Although the DHC model has motor resistance, pushing the trolley by hand is more difficult than pushing a typical push trolley. Adjust the wheel position to activate freewheel mode (according to the handbook).
Q: Is there a way to lock the speed or resume the last used speed?
Ans: Indeed. You don’t have to reset the tram every time you restart it because it resumes at the last speed you specified.
Q: Can I track how far I’ve walked or played using the trolley?
Ans: GPS and an odometer are not features of the S1 DHC. Use a wearable golf GPS or the Motocaddy M5 GPS variant if you require distance tracking.