
NANNY BM-02 Baby Breathing Monitor
Product Designation
- The BM-02 Baby breathing monitor is a certified Class IIb medical device that monitors a baby’s breathing. It cannot be used to restore vital functions and is not a therapeutic device.
- It does not replace proper childcare. It is intended for use by health care providers and for care in the home environment. The product is intended to provide a warning, by an optical and acoustic warning, that the respiration has stopped or the respiration rate has decreased.
- It thus warns of the possible danger of respiratory arrest that may occur in young infants (for example, due to sudden infant death syndrome – SIDS) or due to other causes (suffocation, an illness, etc.).
- Due to the nature and purpose of use, no side effects or other contraindications are known.
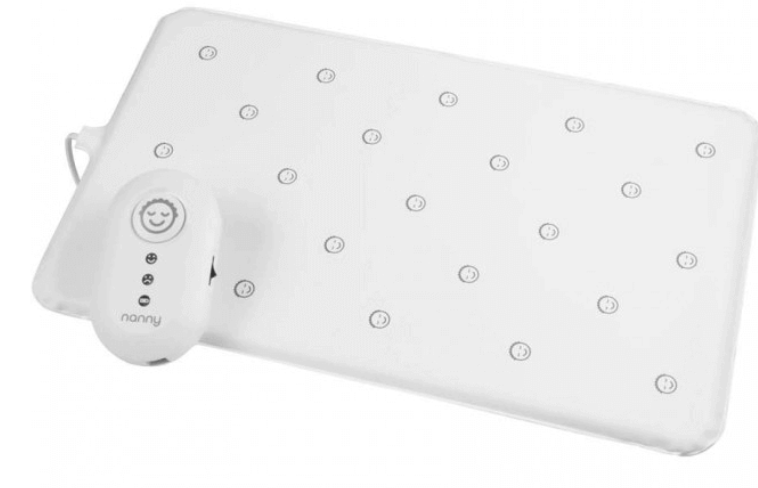
- BM-02 consists of a sensor pad with a sensitive detector that is placed under the baby’s mattress and of an electronic unit with indication lamps and an acoustic alarm.
- The device has very simple controls. It is battery-operated and runs its proper function auto-test upon startup. It does not affect or restrict the baby’s movement. In oxygen-enriched environments, just the sensor pad can be used.
Ambient conditions
Package contents
- Sensor pad, control unit,
- 5 m long extension cable,
- plastic wall attachment,
- splitting connector,
- 2 antibacterial tissues,
- 2 alkaline batteries type AA LR6 1.5 V.
- Product service life: 2 years (from the date of purchase).
- Certification was carried out by the following notified body: EZÚPrague, No. 1014.
General procedures for child emergency care
First aid – steps designed to save someone’s life in the case of arrested breathing or blood circulation. Warning: First aid should be administered by an experienced first-aider! The basic procedures of child emergency care include a sequence of steps designed to restore sufficient breathing and blood circulation in children who have suffered breathing or blood circulation arrest. The following procedure applies to babies, newborns, and infants:
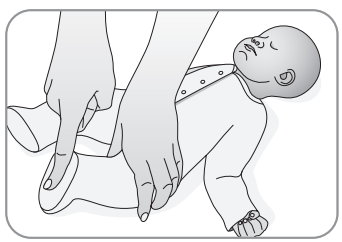
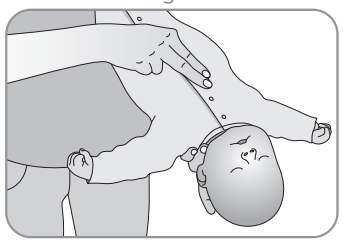
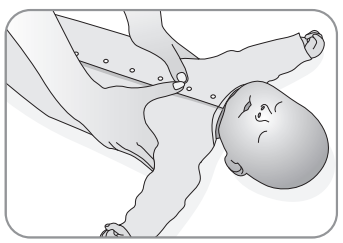
Check the Baby’s Consciousness
- Call the baby distinctly and loudly.
- If the baby does not respond, tap or scratch its sole to elicit the baby’s response (Fig. 1).

- Alternatively, rub the baby’s back with your hand for several seconds.
- If the baby is lifeless and unresponsive, she is unconscious.
- Call your local UK emergency rescue service on 999 or dial the European emergency telephone number 112.
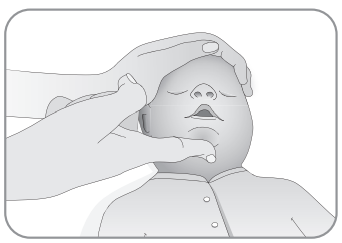
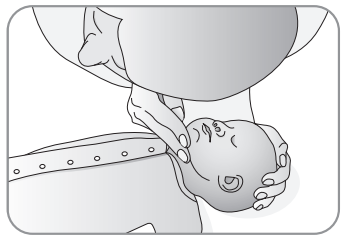
Open your Baby’s Airway
- Check the baby’s mouth. Remove obvious obstacles and objects with your fingertips.
- Put one hand on the baby’s forehead and tilt its head a little, while gently lifting the chin with the fingers of your other hand (Fig. 2).
- Keep the airway clear by placing some support under the baby’s shoulders.
- If you suspect that the baby has inhaled a foreign object (i.e. the breathing problem occurred suddenly – for instance, while eating, playing with a tiny toy; or the baby is coughing, wheezing, has audible diffi culty breathing, its face is reddish and neck and face are swollen meanwhile the skin may turn blue or grayish), try to remove the object from the airways as follows:
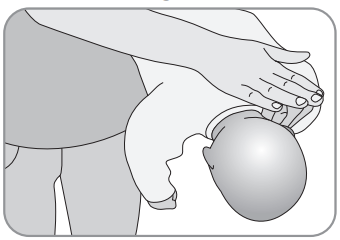
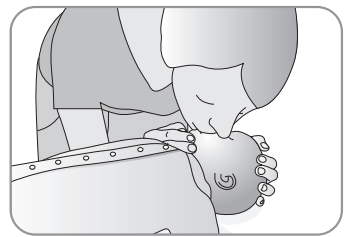
Give 3–5 Backslaps
- Position the baby with her face down on your forearm. Her head must be lower than the rest of her body. Support her head and body with your hands all the time (Fig. 3).
- Give her 3–5 slaps between her shoulder blades with 2–3 of your finfingersth your hand; your hand must be oriented away from the airways.
- Alternatively, hold the baby by its ankles (the ankle area must not be covered with clothes), turn her with her head facing down, and perform the same maneuver. If the maneuver is not successful, do the following:
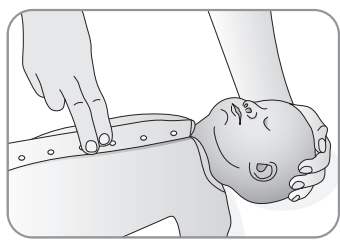
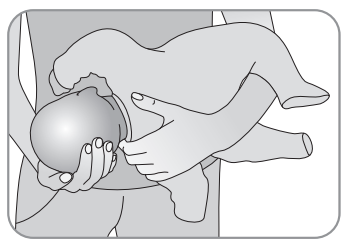
Give 3–5 Chest Thrusts
- Position the baby with her face up on your forearm, tilting her head gently (Fig. 4).
- Press the lower half of the chest bone 3–5 times with twfingersrs. Give her about 1 thrust in 3 seconds.
- At the end of each step, check the baby’s mouth to see if a foreign object has been dislodged.
- If the respiration problem continues, repeat the individual steps 1–3 times and call – or have somebody call – your local emergency telephone number 999 or 112.
Restore Breathing
- Listen and look to check whether the baby is breathing (Fig. 5).
- If the baby does not breathe, start rescue breathing immediately; simultaneously call – or have somebody call – your local emergency telephone number 999 or 112.
- Place one hand on the baby’s forehead and keep her head tilted a little. Lift her chin with your other hand and seal your mouth around the baby’s mouth and nose (Fig. 6).
- Initiate rescue breathing with 2–5 breaths so that at least 2 breaths are efficient enough.
- Check the efficiency of breaths by watching the bay’s chest – the chest should rise visibly upon breathing in and fall upon breathing out.
- Watch the volume of the inhaled air. It must be neither too small (the chest does not rise or fall)nor too big. Inappropriate air volume would cause damage to the baby’s lungs and airways, and its overall condition would get even worse.
- The baby’s chest should rise and fall approximately as if the baby were breathing on its own. Never give breaths if you feel obvious resistance!
- Give 30 breaths in 1 minute to a newborn (i.,e. 1 breath in 2 seconds), and 20 breaths in 1 minute to an infant (i.e., 1 breath in 3 seconds).
Check Blood Circulation
- If the baby does not show any signs of proper blood circulation (i.e., she is unable to move, cough, or breathe), start cardiac massage (chest compressions) immediately.
- Put the baby on her back on a firm surface.
- Place your index finger and middle finger on the lower third of the chest bone – about 1.5 cm (1-1-finger-widthnder the imaginary line between her nipples (Fig. 7).
- Alternatively, you can hold the baby’s torso firmly in your hands while pressing her chest bone with your thumbs being crossed (Fig. 8) or with two fingers.
- Compress the baby’s chest by about 2–3 cm (approx. by 1/3 of her torso diameter).
- Frequency of compressions: 120/min in newborns and 100/min in infants.
- Resuscitate newborns at a ratio of 1 breath to 3 chest compressions and infants at a ratio of 2 breaths to 30 chest compressions, provided there is only one first-aider. If there are two first-aiders, they give 2 breaths per 15 chest compressions.
- Take a short break after each sequence of compressions to catch your breath.
- After completing every 3rd to 5th cycle, check whether respiration and blood circulation have been restored.
Putting in the Recovery Position
- If your resuscitation efforts are successful and the baby’s respiration and blood circulation are restored, put her in the recovery position.
- Hold the infant in your arms with her face facing yours and her head slightly tilted to the side.
- This position provides prevention against suffocation with a swallowed tongue or vomit (fig.9).
- Keep monitoring the baby at all times, especially focusing on her breathing and on the signs of uninterrupted blood circulation. Watch the color of her skin.
- If her skin begins to turn blue or gray, it may be a sign of a relapse of breathing or blood circulation failure.
- Make sure that the baby’s proper body temperature is maintained. Above all, protect her against hypothermia.
End Resuscitation
Keep resuscitating until the baby begins to show signs of life (spontaneous breathing, pulse, movements),
until a qualified paramedic arrives, or until you are absolutely exhausted. Note: A newborn is less than 1 A
month old. An infant is 1 month to 1 year old.
Reference Materials
- ERC Guidelines for resuscitation 2010,
- První pomoc u dětí (First Aid for Children) – MUDr. Pavel Srnský, ČČK 2007
The product underwent clinical testing and was registered by the Health Ministry of the Czech Republic as a medical device class IIb. JABLOTRON a.s. Hereby declares that the BM-02 complies with the essential requirements and other respective provisions of Directives MDD 93/42/EEC and 2007/47/ EC, and 2011/65/EU (RoHS). The original of the Declaration of Conformity can be found..
Installation Instructions
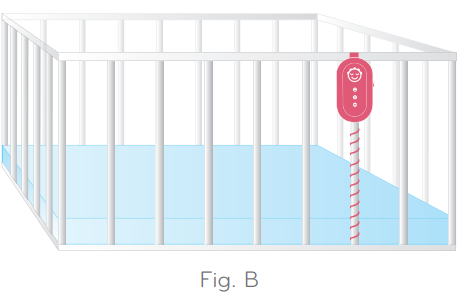
- Place the sensor pad into the crib (pram, Moses basket, etc.) under the mattress (or cushion) underneath the area where the baby will be sleeping – see the figure.
- The center of the sensor pad should be approximately where the baby’s chest is.
- If there is only a bed frame in the crib, place a firm board under the sensor pad; e. g. hardboard, plywood, etc.
- The baseboard should not cover the whole crib surface so as not to prevent air circulation
- It’s a satisfactory size, overhangs the sensor pad by approximately. 3 cm on each side.
- For further installation advice and instructions, read page 8, Frequently Asked Questions.
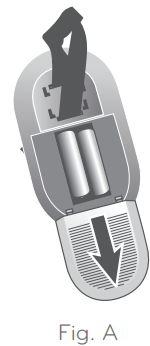
- Insert batteries into the device (the battery compartment cover is on the back of the device).
- To remove the battery compartment cover, push its straight edge gently and move it towards the round edge – see Fig. A.
- Insert batteries. Only use new alkaline batteries – AA LR6 type (do not use rechargeable batteries).
- Seal the battery compartment cover and turn the switch to position I.
- If the batteries are in good condition, all 3 indicators will flash one after another, and you will hear a beep.
- If there is no beep after turning the unit ON, check the batteries.
- Wait approx. 3 seconds before turning the unit on again, after turning the unit on, its electronic system checks the batteries and functions.
- When used for a bigger baby, mount the unit outside her reach.
- It is also possible to attach the unit to the wall by means of a plastic holder (included in the supplied items).
- To remove the battery compartment cover, push its straight edge gently and move it towards the round edge – see Fig. A.
- Connect the sensor pad’s cable to the evaluation unit.
- To disconnect the cable from the evaluation unit, push the connector lever towards the cable.

Signaling & Control Elements
- Switch – position 0 = OFF, I = ON
- Green indicator – it flickers briefly to confirm the baby’s breath (movement).
- Red indicator – it flickers to indicate a warning alarm.
- Red indicator – it flickers to indicate a low battery
Using the BM-02 Monitor
Before using the BM-02, read this manual carefully, especially paying close attention to the chapter “First.
Aid – General Procedures of Emergency Child Care! For information
- Put the baby in the crib.
- Turn on the evaluation unit (activation is confirmed by a beep and flickering indicators).
- The green indicator flickers in response to the baby’s breathing or movements. The flickering may be
irregular – its frequency corresponds to the baby’s breathing or movements. - Before taking the baby out of the crib, make sure to turn the evaluation unit off.
- If the device does not detect any breathing or movement of the baby, the green indicator does not flicker; a red indicator begins to flicker after approximately. 20 seconds, and then the alarm goes off. Moreover, the alarm is activated when the baby’s breathing frequency drops below 8 breaths per minute.
Alarm status
- If the evaluation unit detects that the baby has not taken a breath for longer than about 20 seconds, the following type of alarm goes off: firstly, there is a short acoustic pre-alarm followed by an intensive acoustic alarm accompanied by the flickering red indicator. If the child is breathing too slowly – less than 8 intakes per minute- the following type of alarm goes off: there is an immediate acoustic alarm, and the red light is flickering. Check the baby. If she isn’t breathing, try to wake her up. If she does not wake up, start administering first aid immediately (release her airways, start mouth-to-mouth resuscitation, etc.).
- We recommend contacting a doctor depending on the circumstances. In some cases, the alarm signal itself rouses the baby strongly enough to make her take a breath. To turn the alarm off, press the switch on the evaluation unit. Exceptionally, a false alarm may occur, which is the case especially when the sensor pad is not fitted properly (see the Installation Instructions and the Frequently Asked Questions) or when the baby can crawl and move outside the reach of the sensor pad inside the crib.
- We hope you hear the alarm signal only once: when testing our product.
Sensor pad
- A sensor pad can be bought as a separate item. It is available under item No. BM-02D.
- It is extremely handy when the device is used in several places, e.g., in another crib, at grandma’s, etc. In this case, the evaluation unit is the only thing you have to remember to take along.
- The sensor pad may be placed in incubators by health care providers.
Function test
Check the operation of the device as follows (recommended testing frequency is once a week)
- When the baby is in the crib and the BM-02 is on, the green indicator must flicker with the rhythm of the baby’s breath.
- Leave the BM-02 on and take the baby out of the crib. The indicator usually keeps flickering for a while until the crib stops shaking.
- Do not hold on to the crib because the BM-02 could detect your breath and movements.
- When the crib has been still for about 20 seconds, the evaluation unit gives off a warning beep, and then an alarm signal is activated.
- While the alarm is on, the red indicator keeps flickering. The alarm can be turned off with the switch.
If the BM-02 does not work, check whether
- The evaluation unit confirms the activation of the BM-02 by a low beep and flickering.
- If it does not, check the batteries.
- The green indicator stops flickering after taking the baby out of the crib.
- If it does not, the BM-02 detects disturbing vibrations – see the following information.
Battery replacement
The device checks its battery status. When the batteries are running low, a necessary replacement is signaled by the indicator with the battery symbol flickering red. Also, the device does not confirm the activation of the switch when the batteries are discharged.
Turn off the device before replacing the batteries. Remove the battery compartment cover (see the Installation Instructions – page 4) and take out the original batteries. Always use only new, branded alkaline AA LR6 batteries (the polarity is clearly marked in the battery compartment). Once you have replaced the batteries, turn the device on briefly – its activation must be confirmed by a beep. Do not use rechargeable batteries. When finished using the device, take the batteries out.
Cleaning and maintenance
Besides battery replacement, the device does not require any special maintenance. We recommend that you occasionally check the sensor pad in the crib to make sure that no moisture precipitates in the area where the pad touches the mattress. You should turn the pad inside the crib by 180° once in a while, or turn it over and air it. Clean the pad with a slightly moist cloth. (Do not use aggressive detergents.).
Despite resistance to foreign elements or liquids, their intrusion can damage the device. The product is supplied with an antibacterial tissue for disinfecting the pad, if necessary. The frequency of cleaning does not affect the service life of the product. Protect the sensor pad, supply cable, and connector from mechanical damage (shocks, sagging, tensile stress, etc.). If you detect any damage, contact the vendor or the manufacturer’s service department directly (page 11).
Technical Data
| Power | 3 V 2×1.5 V AA LR6 size alkaline batteries | ||
| Standby current | 0.2 mA | ||
| Alarm current | 100 mA | ||
| Battery low indication level | 2.38 V ± 0.15 V | ||
| Monitored breathing frequency | <8 breaths/minute (i.e.<0.13 Hz) | ||
| Average battery life – home health care | 6 months (gets reduced by frequent alarm testing) | ||
| Average battery life – health care providers | 4 months (gets reduced by frequent alarm testing) | ||
| Sensor pad | type BM-02D, max. size 305×500×15 mm, weight: 1000 g, material: PVC-P, cable length 1.2 m | ||
| Acoustic alarm level | 80 dB @ 1 m ± 5 % | ||
| Control unit | max. size 140×80×35 mm, weight 123 g, material ABS | ||
| Operating conditions | +5 °C to +40 °C, relative humidity 15 % to 93 %, 700 – 1200 hPa | ||
| Transport and storage | 0 °C to +40 °C, relative humidity 10 % to 85 %, 700 – 1200 hPa | ||
| Product characteristics | BM-02D type BF applied part | ||
Meets the following standards
- EN 60601-1 ed. 2 2:2007 + A1:2014
- EN 60601-1-2 ed. 3:2016
- EN 60601-1-6 ed. 3:2010 + A1:2015
- EN 60601-1-11 ed. 2:2016
- EN ISO 10993-1:2021, EN 62366-1:2019
- EN ISO 14155:2021, EN 14971:2020
- EN ISO 13485 ed. 2:2016, EN IEC 63000:2019
- EN 62304:2006 + A1:2016
Customer Service
- Address: JABLOTRON a.s. Pod Skalkou 4567/33, 466 01 Jablonec nad Nisou, CZECH REPUBLIC
- Tel:+420 483 559 811
- E-mail: support@monitornanny.co
For your local support
- Website: www.monitornanny.com
- Date of issue: 2025-01-01 (ver. 25)
FAQs
Q: What is the NANNY BM-02 Baby Breathing Monitor?
A non-invasive tool for tracking your baby’s breathing patterns is the NANNY BM-02. It gives parents peace of mind when they sleep or rest by instantly alerting them if irregular or nonexistent breathing is detected.
Q: How does the BM-02 monitor my baby’s breathing?
A delicate pressure sensor pad that is positioned beneath the infant’s bedding is used by the gadget. It transmits information to the monitor unit after identifying minute chest movements brought on by breathing. Similar sensor technology is used in other vital sign monitors, such as the Seeed Studio MR60BHA1 Heartbeat Detection Sensor, which detects heartbeats in real-time.
Q: At what age can I use the BM-02?
Newborns to toddlers, usually between the ages of 0 and 24 months, can use the monitor. Make sure the infant cannot access the gadget or cables and that the sensor pad fits securely beneath the mattress.
Q: Can I use the monitor on different types of cribs or beds?
Yes, the majority of toddler beds and normal cot mattresses are compatible with the BM-02.
Q: How do I know the monitor is working properly?
Depending on the model, a constant green or blue light shows proper operation. During setup, some models produce a brief beep to verify sensor detection.
Q: What should I do if the alarm goes off?
Check on your infant right away if the alarm goes off. The alert might sound if there is no movement or erratic respiration. An alarm is a safety alert, not a misleading warning; thus, you should never disregard it.