
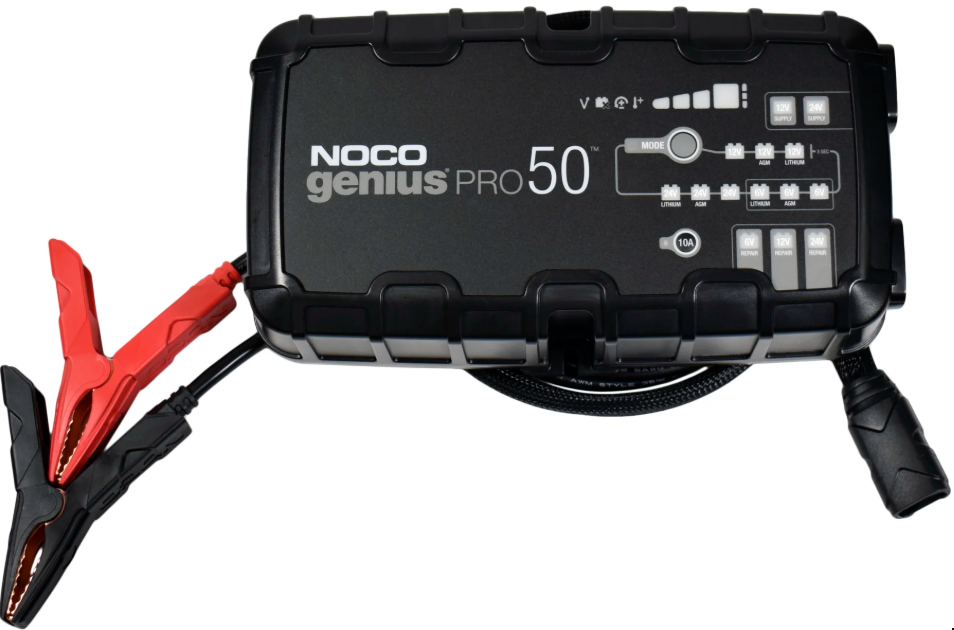
NOCO GENIUSPRO50 50A Professional Battery Charger
DANGER
READ AND UNDERSTAND ALL SAFETY INFORMATION BEFORE USING THIS PRODUCT. Failure to follow these safety instructions may result in ELECTRICAL SHOCK, EXPLOSION, FIRE, which may result in a SERIOUS INJURY, DEATH, or PROPERTY DAMAGE.
- Electrical Shock Product is an electrical device that can shock and cause serious injury. Do not
cut power cords. Do not submerge in water or get wet. - Explosion: Unmonitored, incompatible, or damaged batteries can explode if used with the product. Do
not leave the product unattended while in use. Do not attempt to charge a damaged or frozen battery.
Use the product only with batteries of the recommended voltage. Operate the product in well-ventilated areas. - A fire product is an electrical device that emits heat and is capable of causing burns. Do not cover the
product. Do not smoke or use any source of electrical spark or fire when operating the product. Keep the
product away from combustible materials. - Eye Injury: Wear eye protection when operating the product. Batteries can explode and cause flying
debris. Battery acid can cause eye and skin irritation. In the case of contamination of eyes or skin,
flush the affected area with running clean water and contact poison control immediately. - Explosive Gases Working in the vicinity of a lead-acid battery is dangerous. Batteries generate explosive
gases during normal battery operation. To reduce the risk of battery explosion, follow all safety information instructions and those published by the battery manufacturer and the manufacturer of any equipment intended to be used in the vicinity of the battery. Review cautionary markings on these products and on the engine.
Important Safety Instructions
About GENIUSPRO50
The NOCO GENIUSPRO50 represents some of the most innovative and advanced technology on the market, making each charge simple and easy. It is quite possibly the safest and most efficient charger you will ever use. The GENIUSPRO50 is designed for charging all types of 6V, 12V, and 24V lead-acid batteries, including Wet (Flooded), Gel, MF (Maintenance-Free), CA (Calcium), EFB Enhanced Flooded Battery), and AGM (Absorption Glass Mat), in addition to 6V, 12V, and 24V Lithium (LiFePO4) batteries. It is suitable for charging battery capacities up to 2000 Amp-Hours (6V and 12V), 1000 Amp-Hours (24V), and maintaining all battery sizes.
Getting Started
Before using the charger, carefully read the battery manufacturer’s specific precautions and recommended rates of charge for the battery. Make sure to determine the voltage and chemistry of the battery by referring to your battery owner’s manual prior to charging.
Mounting
It is important to keep in mind the distance to the battery. The DC cable length from the charger, with either the battery clamp or eyelet terminal connectors, is approximately 72 inches (182.88cm). Allow for 12 inches (30.4cm) of slack between connections.
Proposition 65
Battery posts, terminals, and related accessories contain chemicals, including lead. These materials are known to the State of California to cause cancer and birth defects, and other reproductive harm.
Personal Precaution
Only use the product as intended. Someone should be within range of your voice or close enough to come to your aid in case of an emergency. Have a supply of clean water and soap nearby in the case of battery acid contamination. Wear complete eye protection and protective clothing while working near a battery. Always wash your hands after handling batteries and related materials. Do not handle or wear any metal objects when working with batteries, including tools, watches, or jewelry. If metal is dropped onto a battery, it may spark or create a short circuit, resulting in electrical shock, fire, or explosion, which may result in injury, death, or property damage.
Minors
If the product is intended by “Purchaser” to be used by a minor, the purchasing adult agrees to provide detailed instructions and warnings to any minor before use. Failure to do so is the sole responsibility of the “Purchaser,” who agrees to indemnify NOCO for any unintended use or misuse by a minor.
Choking Hazard
Accessories may present a choking hazard to children. Do not leave children unattended with the product or any accessory. The product is not a toy.
Handling
Handle the product with care. The product can become damaged if impacted. Do not use a damaged product, including, but not limited to, cracks to the casing or damaged cables. Do not use the product with a damaged power cord. Exposure to humidity and liquids may damage the product. Store and operate products in dry locations. Do not allow the charger to remain wet. Do not disconnect the product by pulling on the cables.
Modifications
Do not attempt to alter, modify, or repair any part of the product. Disassembling the product may cause injury, death, or property damage. If the product becomes damaged, malfunctions, or comes in contact with any liquid, discontinue use and contact NOCO. Any modifications to the product will void your warranty.
Accessories
This product is only approved for use with NOCO accessories. NOCO is not responsible for user safety or damage when using accessories not approved by NOCO.
Location
Prevent battery acid from coming in contact with the product. Do not operate the product in a closed-in area or an area with restricted ventilation. Do not set a battery on top of the product. Position cable leads to avoid accidental damage by moving vehicle parts (including hoods and doors), moving engine parts (including fan blades, belts, and pulleys), or what could become a hazard that may cause injury or death.
Operating Temperature
This product is designed to work in ambient temperatures between -4° F and 122° F (-20° C and 50° C). Do not store or operate outside of the specified temperature ranges. Do not charge a frozen battery. Discontinue use of the product immediately if the battery becomes excessively warm.
Storage
Do not use or store your product in areas with high concentrations of dust or airborne materials. Store your product on flat, secure surfaces so it’s not prone to falling. Store your product in a dry location. The storage temperature is -30ºC – 60ºC (average temperature). Never exceed 80ºC under any condition.
Compatibility
The product is only compatible with 6-volt, 12-volt, and 24-volt Lead-Acid, AGM, and 6-volt, 12-volt, and 24-volt Lithium batteries. Do not attempt to use the product with any other type of battery. Charging other battery chemistries may result in injury, death, or property damage. Contact the battery manufacturer before attempting to charge the battery. Do not charge a battery if you are unsure of the battery’s specific chemistry or voltage.
Medical Devices
The product may emit electromagnetic fields. The product contains magnetic components that may interfere with pacemakers, defibrillators, or other medical devices. These electromagnetic fields may interfere with pacemakers or other medical devices. Consult with your physician before use if you have any medical devices, including pacemakers. If you suspect the product is interfering with a medical device, stop using the product immediately and consult your physician.
Cleaning
Power off the product before attempting any maintenance or cleaning. Clean and dry the product immediately if it comes in contact with liquid or any type of contaminant. Use a soft, lint-free (microfiber) cloth. Avoid getting moisture in openings.
Explosive Atmospheres
Obey all signs and instructions. Do not operate the product in any area with a potentially explosive atmosphere, including fueling areas or areas that contain chemicals or particles such as grain, dust, or metal powders.
High-Consequence
Activities. This product is not intended for use where the failure of the product could lead to injury, death, or severe environmental damage.
Radio Frequency Interference product is designed, tested, and manufactured to comply with regulations governing radio frequency emissions. Such emissions from the product can negatively affect the operation of other electronic equipment, causing it to malfunction.
Model Number GENIUSPRO50
This device complies with Part 15 of the FCC Rules. Operation is subject to the following two conditions: This device may not cause harmful interference, and
- This device must accept any interference received, including interference that may cause undesired operation.
NOTE:
This equipment has been tested and found to comply with the limits for a Class A digital device, pursuant to Part 15 of the FCC Rules. These limits are designed to provide reasonable protection against harmful interference when the equipment is operated in a commercial environment. This equipment generates, uses, and can radiate radio frequency energy and, if not installed and used in accordance with the instruction manual, may cause harmful interference to radio communications. Operation of this equipment in a residential area is likely to cause harmful interference, in which case the user will be required to correct the interference at his own expense.
How To Use
Charging Modes
The GENIUSPRO50 has seventeen (17) modes: Standby, 12V, 12V AGM, 12V LITHIUM, 6V, 6V AGM, 6V LITHIUM, 24V, 24V AGM, 24V LITHIUM, 6V REPAIR, 12V REPAIR, 24V REPAIR, 12V SUPPLY, 24V SUPPLY, 10A Mode and Force Mode. Some charge modes must be pressed and held for three (3) to five (5) seconds to enter the mode. These “Press and Hold” modes are advanced charging modes that require your full attention before selecting. It is important to understand the differences and purpose of each charge mode. Do not operate the charger until you confirm the appropriate charge mode for your battery. Below is a brief description: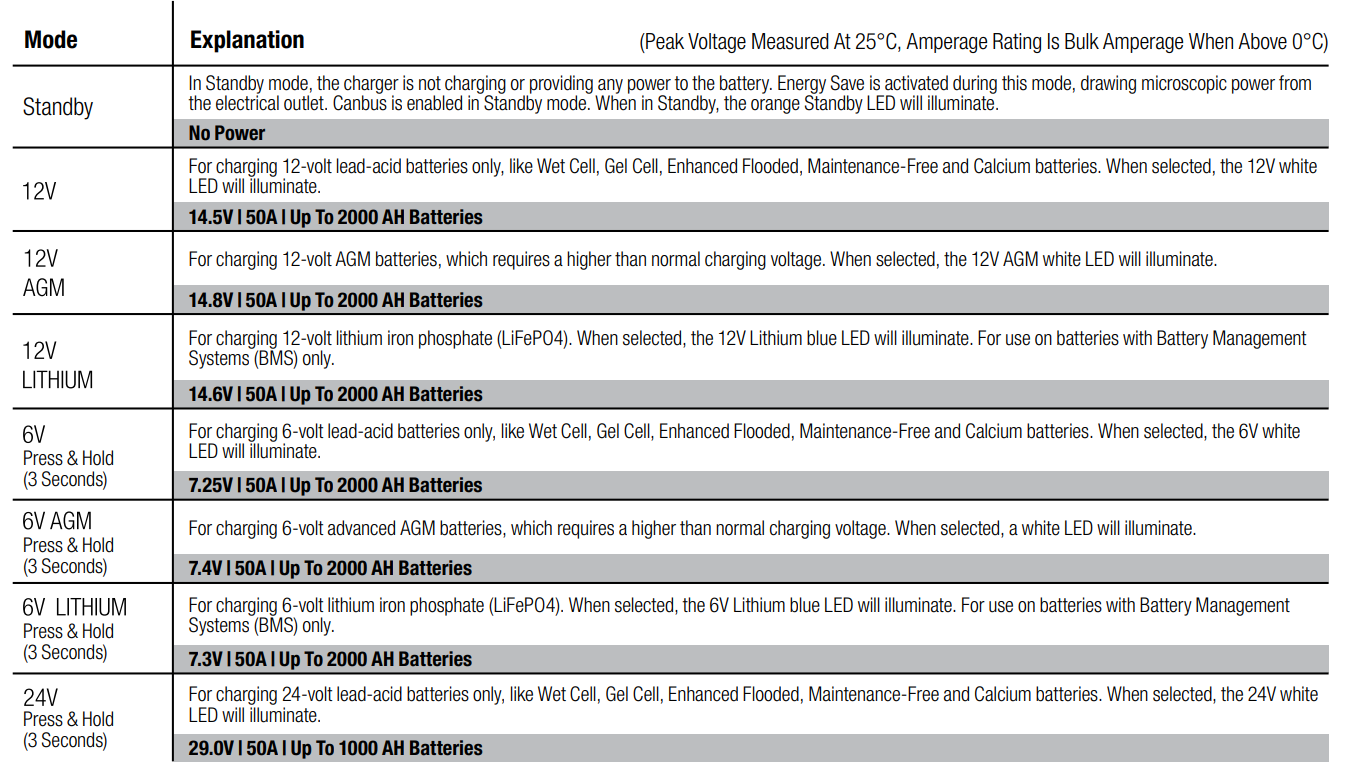
Using Lithium Charge Modes.
Lithium charge modes are designed for 6-volt, 12-volt, and 24-volt lithium iron phosphate (LiFePO4).
CAUTION
USE THIS MODE WITH EXTREME CARE. THIS MODE SHOULD ONLY BE USED WITH 6-VOLT12-VOLTLT, AND 24-VOLT LITHIUM BATTERIES THAT HAVE A BUILT-IN BATTERY MANAGEMENT SYSTEM (BMS). LITHIUM-ION BATTERIES ARE MADE AND CONSTRUCTED IN DIFFERENT WAYS, AND SOME MAY OR MAY NOT CONTAIN A BATTERY MANAGEMENT SYSTEM (BMS). CONSULT THE LITHIUM BATTERY MANUFACTURER BEFORE CHARGING AND ASK FOR RECOMMENDED CHARGING RATES AND VOLTAGES. SOME LITHIUM-ION BATTERIES MAY BE UNSTABLE AND UNSUITABLE FOR CHARGING
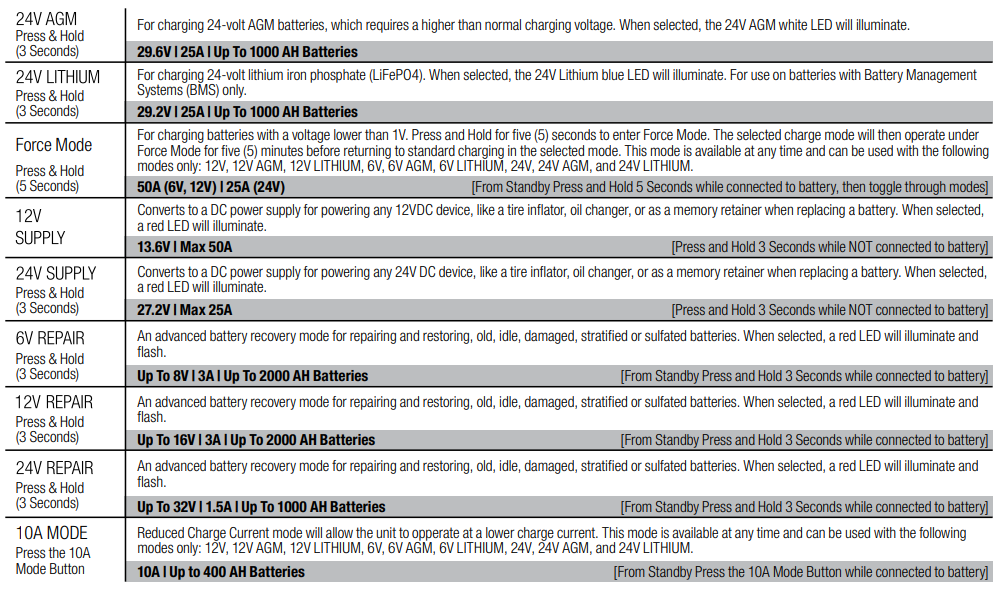
Using Supply Modes. [Press and Hold 3 Seconds While Not Connected To Battery
Supply Mode converts the charger to a constant voltage DC power supply. It can be used to power 12VDC devices, tire inflators, seat heaters, and more. As a power supply, it can also be used to retain a vehicle’s on-board computer settings during battery repair or replacement. 13.6V Supply (12V Supply) provides 13.6-volts up to 50A. Charger output voltage will drop if the output load exceeds the 50A current limit. 27.2V Supply (24V Supply) provides 27.2-volts up to 25A. Charger output voltage will drop if the output load exceeds the 25A current limit. CAUTION.
USE THIS MODE WITH EXTREME CARE. SUPPLY MODE DISABLES SAFETY FEATURES AND LIVE POWER IS PRESENT AT THE CONNECTORS. DO NOT TOUCH CONNECTIONS TOGETHER. RISK OF SPARKS, FIRE, EXPLOSION, PROPERTY DAMAGE, INJURY, AND DEATH. Using Repair Modes. [From Standby Press and Hold 3 Seconds While Connected to the Battery] Repair is an advanced battery recovery mode for repairing and storing old, idle, damaged, stratified, or sulfated batteries.
Not all batteries can be recovered. Batteries tend to become damaged if kept at a low charge and/or never allowed to receive a full charge. The most common battery problems are battery sulfation and stratification. Both battery sulfation and stratification will artificially raise the open circuit voltage of the battery, causing the battery to appear fully charged, while providing low capacity. Use Repair in an attempt to reverse these problems. For optimal results, take the battery through a full charge cycle, bringing the battery to full charge, before using this mode. Repair Mode can take up to four (4) hours to complete the recovery process and will return to Standby when completed. Repeated repair cycles may be needed depending on the size and condition of the battery; however, battery temperature must be closely monitored.
CAUTION
USE THIS MODE WITH CARE. THIS MODE IS FOR 6-VOLT, 12-VOLT, AND 24-VOLT LEAD-ACID BATTERIES ONLY. THIS MODE USES A HIGH CHARGING VOLTAGE AND MAY CAUSE SOME WATER LOSS IN WET (FLOODED) CELL BATTERIES. BE ADVISED, SOME BATTERIES AND ELECTRONICS MAY BE SENSITIVE TO HIGH CHARGING VOLTAGES. TO MINIMIZE RISKS TO ELECTRONICS, DISCONNECT THE BATTERY BEFORE USING THIS MODE.
Force Mode. [Press & Hold for 5 seconds
Force mode allows the charger to manually begin charging when the connected battery’s voltage is too low to be detected. If battery voltage is too low for the charger to detect, press and hold the mode button for 5 seconds to activate Force Mode, NOCO Professional Battery Charger, then select the appropriate mode. All available modes will flash. Once a charge mode is selected, the Charge LEDs and the selected mode LED will alternate between each other, indicating Force Mode is active. After five (5) minutes, the charger will return to the normal charge operation, and low voltage detection will be reactivated.
Using “Reduced Charge Current Mode”. [Press the 10A Mode Button
Reduced Charge Current mode will NOCO Professional Battery Charger allow the unit to operate at a charge current of 10A. This mode is available at any time and can be used with the following modes only: 12V AGM, 12V LITHIUM, 6V, 6V AGM, 6V LITHIUM, 24V, 24V AGM, 24V LITHIUM, and Force mode.
Connecting to the Battery
Do not connect the AC power plug until all other connections are made. Identify the correct polarity of the battery terminals on the battery. Do not make any connections to the carburetor, fuel lines, or thin sheet metal parts. The instructions below are for a negative ground system (most common). If your vehicle is a positive ground system (very uncommon), follow the instructions below in reverse order.
- Connect the positive (red) eyelet terminal connector to the positive (POS, P,+) battery terminal.
- Connect the negative (black) eyelet NOCO Professional Battery Charger terminal connector to the negative (NEG, N,-) battery terminal.
- Connect the battery charger to a suitable electrical outlet. Do not face the battery when making this connection.
- When disconnecting, disconnect in the reverse sequence, removing the negative first (or positive first for positive ground systems).
Begin Charging
- Verify the voltage and chemistry of the battery.
- Confirm that you have connected the battery clamps or eyelet terminal connectors properly, and the AC power plug is plugged into an electrical outlet.
- [First time use] The charger will begin in Standby mode, indicated by an orange LED. In Standby, the charger is not providing any power.
- Press the mode button to toggle the NOCO Professional Battery Charger to the appropriate charge mode (press and hold for three seconds to enter an advanced charge mode) for the voltage and chemistry of your battery.
- The mode LED will illuminate the selected charge modee and the Charge LEDs will illuminate depending on the health of the battery.y) indicating the charging process has started.
- The charger can now be left connected to the battery at all times to provide maintenance charging.
Auto-Memory: The charger has built-in auto-memory and will return to the last charge mode when connected. To change modes after the first use, press the mode button.
Understanding Charge LEDs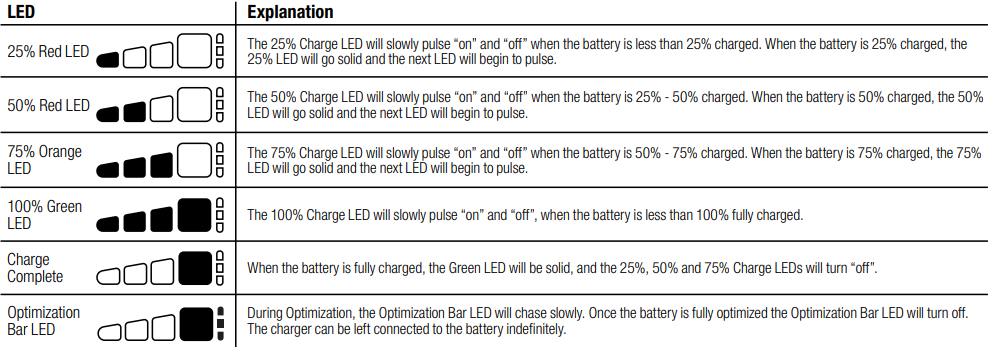
Understanding Error LEDs
Error Conditions will be indicated by the following LEDs.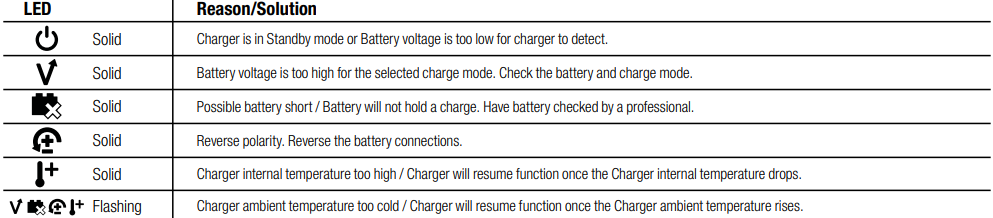
Charging Times
The estimated time to charge a battery is shown below. The size of the battery (Ah) and its depth of discharge (DOD) greatly affect its NOCO Professional Battery Charger charging time. The charge time is based on an average depth of discharge to a fully charged battery and is for reference purposes only. Actual data may differ due to battery conditions. The time to charge a normally discharged battery is based on a 50% DOD. Temperature will also impact charging times. The GENIUSPRO50 Series features thermal compensation that automatically adjusts charging profiles to maximize charging performance.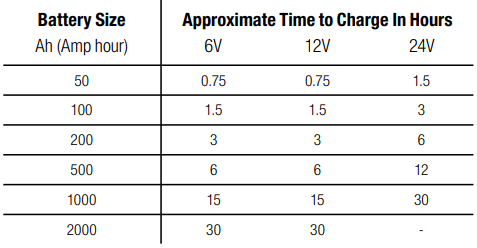
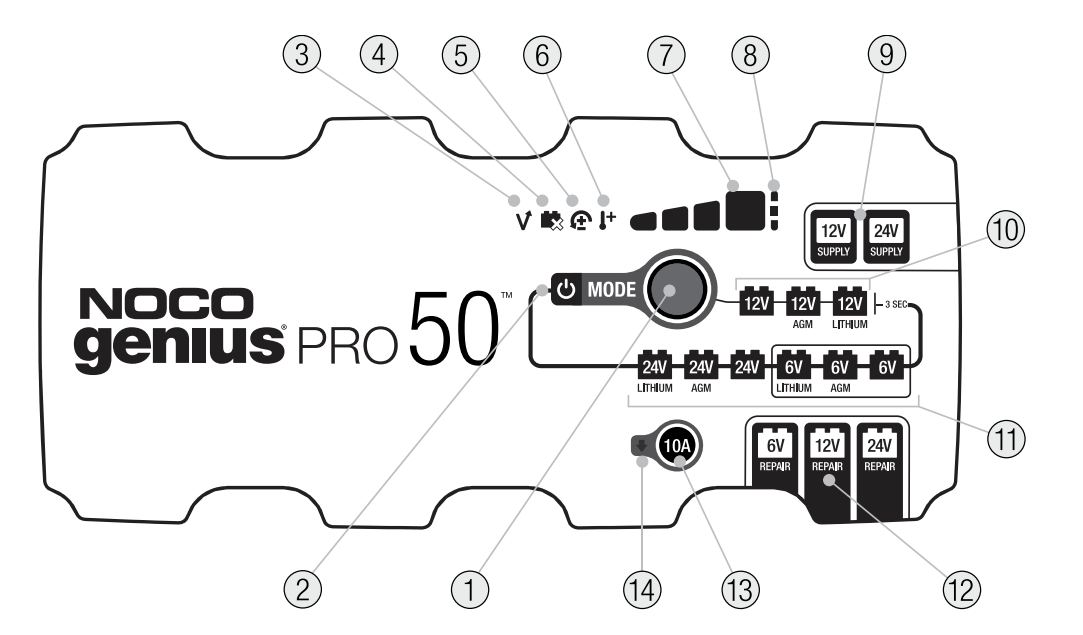
- Mode Button Push to cycle through charging Modes.
- Standby LED Illuminates when the charger is in Standby Mode, the charger is not charging or providing any power to the battery.
- Overvoltage Error LED Illuminates solid Red; Battery Voltage is above the Protect voltage.
- Bad Battery Error LED illuminates solid Red when a connected battery will not hold a charge.
- Reverse Polarity Error LED Illuminates solid Red when reverse polarity is detected.
- Hot LED illuminates solid or flashes Red when the internal temperature is too high.
- Charge LED indicates the connected battery(s) state-of-charge.
- Optimization Bar LED slowly chases Green when the battery is fully charged and is in the optimization stage.
- 12V / 24V Supply Mode LED Illuminates solid Red when Supply mode is selected.
- Mode LED indicates the Charge Mode the charger is currently in. Push the MODE button to cycle through charge Modes.
- Press and Hold» Mode LED button must be pressed and held for 3 seconds to enter the mode.
- 6V / 12V / 24V Repair Mode LED When selected, a red LED will illuminate and flash.
- 10A Mode Button Push to activate Reduced Charge Current Mode.
- 10A Mode LED “Reduced Charge Current Mode” Illuminates solid White when Reduced Charge Current Mode is active.
Technical Specifications
- Input Voltage AC: 100-240 VAC, 50-60Hz
- Working Voltage AC: 100-240 VAC, 50-60Hz
- Output Power: 750 W Max
- Charging Voltage: Various
- Charging Current: 50A (6V, 12V), 25A (24V)
- Low-Voltage Detection: 1V (6V, 12V, 24V)
- Back Current Drain: <0.5mA
- Ambient Temperature: -20°C to +50°C
- Type of Batteries: 6V, 12V, 24V
- Battery Chemistries: Wet, Gel, MF, CA, EFB, AGM, Calcium, Lithium (LiFePO4)
- Battery Capacity: (6V and 12V) Up to 2000Ah, (24V) Up To 1000Ah. Maintains All Battery Sizes
- Housing Protection: IP20
- Cooling: Forced Air
- Dimensions: (L x W x H): 12.3 x 6.9 x 3.6 Inches
- Weight: 5.0 lbs
3 Year Hassle-Free Warranty
NOCO warrants that this product (the «Product») will be free from defects in material and workmanship for a period of three (3) years from the NOCO Professional Battery Charger date of purchase (the «Warranty Period»). For defects reported during the Warranty Period, NOCO will, at its discretion, and subject to NOCO’s technical support analysis, either repair or replace defective Products. Replacement parts and products will be new or serviceably used, comparable in function and performance to the original part, and warranted for the remainder of the original Warranty Period.
NOCO’S LIABILITY HEREUNDER IS EXPRESSLY LIMITED TO REPLACEMENT OR REPAIR. TO THE MAXIMUM EXTENT PERMITTED BY LAW, NOCO SHALL NOT BE LIABLE TO ANY PURCHASER OF THE PRODUCT OR ANY THIRD PARTY NOCO Professional Battery Charger FOR ANY SPECIAL, INDIRECT, CONSEQUENTIAL OR EXEMPLARY DAMAGES, INCLUDING, BUT NOT LIMITED TO, LOST PROFITS, PROPERTY DAMAGE OR PERSONAL INJURY, RELATED IN ANY WAY TO NOCO Professional Battery Charger THE PRODUCT, HOWSOEVER CAUSED, EVEN IF NOCO HAD KNOWLEDGE OF THE POSSIBILITY OF SUCH DAMAGES.
THE WARRANTIES SET FORTH HEREIN AREinstead ofF ALL OTHER WARRANTIES, EXPRESS, IMPLIED, STATUTORY OR OTHERWISE, INCLUDING, WITHOUT LIMITATION, THE IMPLIED WARRANTIES OF MERCHANTABILITY AND NOCO Professional Battery Charger FITNESS FOR A PARTICULAR PURPOSE, AND THOSE ARISING FROM COURSE OF DEALING, USAGE, OR TRADE PRACTICE. IF ANY APPLICABLE LAWS IMPOSE WARRANTIES, CONDITIONS, OR OBLIGATIONS THAT CANNOT BE EXCLUDED OR MODIFIED, THIS PARAGRAPH SHALL APPLY TO THE GREATEST EXTENT ALLOWED BY SUCH LAWS.
This Warranty is made solely for the benefit of the original purchaser of the Product from NOCO or from NOCO-approved reseller or distributor and is not assignable or transferable. To assert a warranty claim, the purchaser must:
- Request and obtain a return merchandise authorization («RMA») number and return location information (the «Return Location») from NOCO Support by emailing support@no.co or by calling 1.800.456.6626; and
- Send the Product, including RMA number, receipt, or a warranty fee (fee required only if not providing receipt) of 45% of MSRP of the defective Product (the «Warranty Fee») [RMA will include applicable Warranty Fee amount] to the Return Location. DO NOT SEND IN PRODUCT WITHOUT FIRST OBTAINING AN RMA FROM NOCO SUPPORT
The original purchaser is responsible (and must prepay) all packaging and transportation costs to ship products for warranty service.
NOTWITHSTANDING THE ABOVE, THIS LIMITED WARRANTY IS VOID AND DOES NOT APPLY TO PRODUCTS THAT:
- (a) are misused, mishandled, subjected to abuse or careless handling, accident, improperly stored, or operated under conditions of extreme voltage, temperature, shock, or vibration beyond NOCO’s recommendations for safe and effective use;
- (b) improperly installed, operatedd or maintained;
- (c) are/were modified without the express written consent of NOCO;
- (d) have been disassembled, altered, or repaired by anyone other than NOCO;
- (The defects of which were reported after the Warranty Period. THIS WARRANTY DOES NOT COVER:
- normal wear and tear;
- cosmetic damage that does not affect functionality; or (3) Products where the NOCO serial number is missing, altered, or defaced.
HASSLE-FREE WARRANTY CONDITIONS
These conditions apply only to the Product during the Warranty Period. The Hassle-Free Warranty is void either by elapsed time from the date of purchase (elapsed time from the serial number date, if no proof of purchase) or from the conditions listed earlier in this document. Return Product with the appropriate documentation.
With Receipt:
0-3 Years: No charge. With proof of purchase, the warranty period begins on the date of purchase.
With NO Receipt:
0-3 Years: No charge. With no proof of purchase, the warranty period begins on the serial number date.
We recommend registering your NOCO product in order to upload proof of purchase and extend your effective warranty dates. You may register your NOCO product online at: no.co/register. If you have any questions regarding your warranty or product, contact NOCO Support (email and phone number above) or write to: The NOCO Company, at 30339 Diamond Parkway, #102, Glenwillow, OH 44139 USA.
FAQs
Q: What types of batteries can the GENIUSPRO50 charge?
Lithium-ion batteries (LiFePO4) and 12V and 24V lead-acid batteries (such as AGM, GEL, and Flooded) are compatible with the GENIUSPRO50. It is appropriate for deep-cycle, marine, and automotive applications.
Q: What is the maximum charging current?
Large batteries or several batteries connected in parallel can be charged quickly with this professional charger’s 50 amp charging current.
Q: Can the charger handle multiple batteries at once?
Indeed. Depending on your wire configuration and battery type, the GENIUSPRO50 can charge several batteries in parallel or simultaneously in dual-battery mode.
Q: Is it safe to leave the battery connected after charging?
Indeed. The GENIUSPRO50’s float modes and automatic maintenance securely keep batteries fully charged without harming or overcharging them.
Q: How do I connect the charger to a battery safely?
The black clamp should be connected to the negative (-) terminal, and the red clamp to the positive (+). Make sure the battery management system (BMS) is compatible with lithium batteries. Before turning on, make sure all connections are correct.
Q: Does the charger have protection features?
Indeed. It is safe for professional and industrial use because it has protection against reverse polarity, short circuits, overvoltage, and overtemperature.
Q: Can the GENIUSPRO50 charge deeply discharged or frozen batteries?
Indeed. It features a low-temperature correction capability to safely charge batteries in cold conditions, as well as a reconditioning mode for deeply drained lead-acid batteries. Before charging, frozen batteries need to be thawed.
Q: How do I select the correct charging mode?
In auto mode, the charger recognises the type of battery automatically; for certain battery chemistries, you can manually choose between lead-acid or lithium modes using the touchscreen interface.