
NVIDIA DGX Spark Personal AI Desktop Chip
Introduction
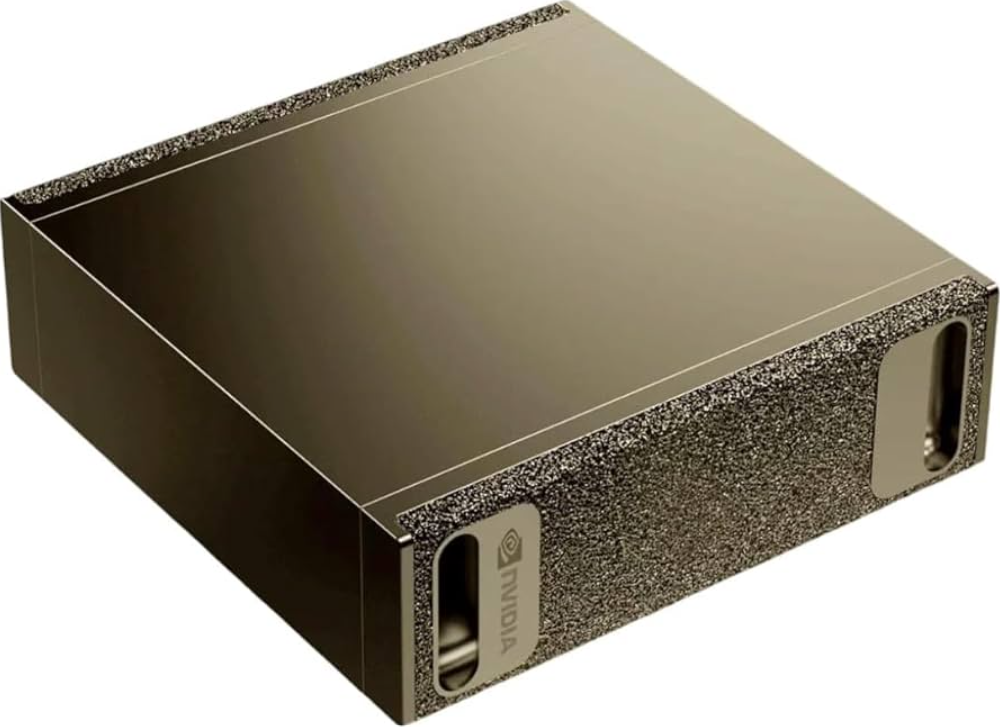
The DGX Spark is NVIDIA’s compact AI computer designed for developers, data scientists, and AI researchers who need powerful computing capabilities for AI development and deployment.
Getting Started
DGX Spark Release Notes
This section provides release notes for the DGX Spark, including information about new features, known issues, and software version updates.
Current Software Versions
The following table shows the current version information for the DGX Spark software stack.
Use the supplied power adapter for optimal performance
For optimal performance, use the supplied power adapter with the DGX Spark system. Using a different adapter may reduce performance, prevent boot, or cause unexpected shutdowns.
Memory-Usage: Not Supported
On iGPU platforms, nvidia-smi will display “Memory-Usage: Not Supported” even though per-process GPU memory is listed. This is expected because iGPUs do not have dedicated framebuffer memory.
Memory reporting differences with unified memory architecture
DGX Spark systems use a unified memory architecture (UMA), where the GPU shares system memory (DRAM) with the CPU and other compute engines. This design reduces latency and allows larger amounts of memory to be used for GPU workloads. On UMA systems, the CPU can dynamically manage DRAM contents, including freeing up memory by swapping pages between DRAM and the system’s SWAP area.
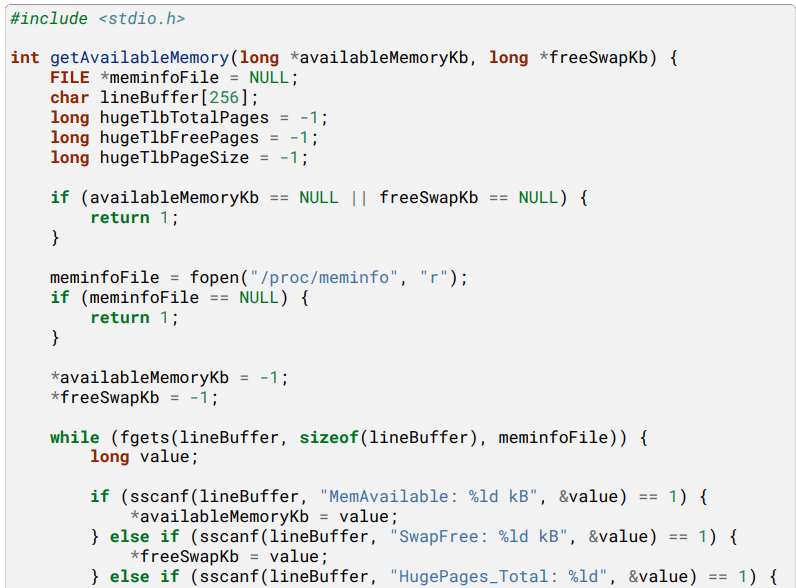
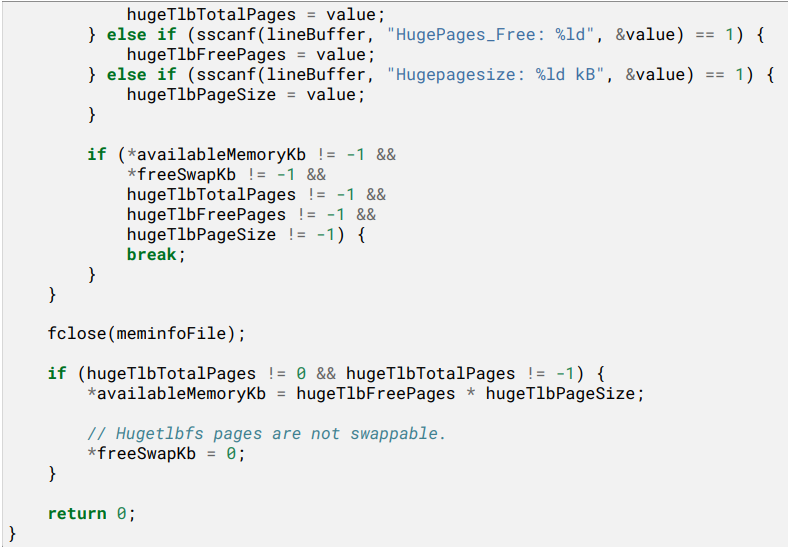
However, the cudaMemGetInfo API does not account for memory that could potentially be reclaimed from SWAP. As a result, the memory size reported by cudaMemGetInfo may be smaller than the actual allocatable memory, since the CPU may be able to release additional DRAM pages by moving them to SWAP. To more accurately estimate the amount of allocatable device memory on DGX Spark platforms, CUDA application developers should consider the possibility of DRAM reclamation via SWAP and not rely solely on the values returned by cudaMemGetInfo. The following provides an example implementation using C standard libraries.
As a workaround for debugging purposes, you can flush the buffer cache manually with the following
command.
Hardware Overview
Powered by the NVIDIA Grace Blackwell architecture, DGX Spark enables developers, researchers, and data scientists to prototype, deploy, and fine-tune large AI models on their desktops. This section provides information about the hardware components and specifications.
System Overview
The DGX Spark features
- NVIDIA Grace Blackwell architecture with integrated GPU and CPU
- 20-core Arm processor with high-performance cores
- 128 GB unified system memory
- Compact desktop form factor
- Advanced connectivity, ty including Wi-Fi 7, 10 GbE, and ConnectX-7
- Support for AI models up to 200 billion parameters (or 405B for dual-Spark configuration)
Component Descriptions
The DGX Spark includes the following components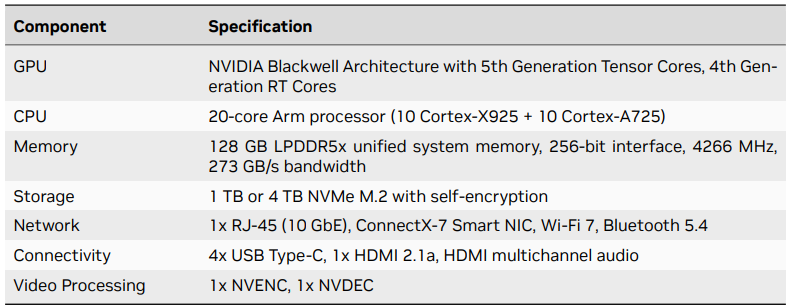
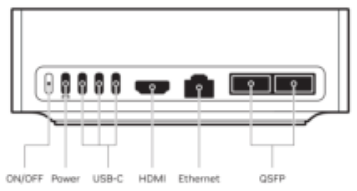
Rear Panel
- Power button
- 4x USB Type-C (one for power delivery)
- 1x HDMI 2.1a display connector
- 1x RJ-45 Ethernet connector (10 GbE)
- 2x QSFP Network connectors (ConnectX-7)
Performance
- AI Compute: Up to 1,000 TOPS (trillion operations per second) inference and up to 1 PFLOP
(petaFLOP) at FP4 precision with sparsity - CUDA Cores: 6,144
- Copy Engines: 2 (enables simultaneous data transfers to and from GPU memory, improving
throughput for AI workloads) - CPU Performance: 20 cores (10 Cortex-X925 + 10 Cortex-A725)
- Memory Bandwidth: 273 GB/s
- Memory Channels: 16 channels (256 bit) LPDDR5X 8533
AI/ML Capabilities
- Model Support: AI models up to 200 billion parameters
- Tensor Performance: 5th Generation Tensor Cores with FP4 support
- Framework Support: PyTorch, TRT-LLM, and other AI frameworks
- Use Cases: Inference, deployment, and fine-tuning of large language models
Power and Thermal Management
- Power Supply: 240W external power supply (included)
- GB10 SOC Thermal Design Power (TDP) is 140W
- 100W is available for other system components (ConnectX-7, Wi-Fi, SSD, USB-C, etc.)
- Usage Requirement: Use of the provided 240W power supply is required for optimal performance.
- Input Voltage: Standard AC power input
Thermal Management
- Cooling Solution: Integrated thermal management system
- Form Factor: Compact design optimized for desktop placement
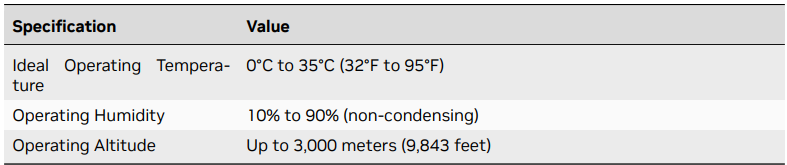
- Operating Temperature: 0°C to 35°C (32°F to 95°F) Preliminary specifications
Initial Setup – First Boot
This guide walks you through setting up your DGX Spark for the first time. You’ll choose how to access your system during the initial setup, and run the first-time setup utility to configure everything. The access method you choose is only for completing the initial setup – after setup is complete, you can access your DGX Spark any way you like: locally with a monitor and keyboard, over the local network from another computer, or a mix of both.
What You’ll Do
This setup process includes:
- Choosing how to access the system during initial setup (with a display, or as a network appliance)
- Preparing your system and connections
- Running the first-time setup utility to configure your system
Choose how to access your system during initial setup
To complete the initial setup, you’ll need to access your DGX Spark. You can do this in one of two ways: With a Display (Local Setup)
- Connect keyboard and mouse via USB or Bluetooth
- Connect a display to work directly on the system
- Follow the setup wizard on screen
Over the Network (as a Network Appliance)
- Access the system over your local network from another computer
- Use another computer to complete the setup via a web browser
- No Spark display or keyboard required for the setup process
Get Ready
Before starting, ensure you have:
- A fast, reliable internet connection (Wi-Fi or Ethernet) to download required updates during the initial setup process. Connections using captive portals (such as hotel or airport Wi-Fi) or those prone to disconnections (like phone hotspots) are not recommended.
- If you do not have access to a stable connection, consider downloading the system recovery media and using System Recovery to install the latest software for your DGX Spark.
- For Local Setup: A display, keyboard, and mouse connected (or available using Bluetooth).
- For Network Setup: A computer on the same network to access the setup interface.
- Power connected to the system (the system will start automatically when power is applied).
Run the First-Time Setup
The first-time setup utility will guide you through:
- Powering on and initializing the system
- Selecting your preferred setup mode
- Downloading and installing critical updates
- Completing your initial configuration
The way you start the installation depends on your chosen access method: With a Display (Local Setup)
- Power on the system
- The first-time setup utility will start automatically on the connected display.
- Use your wired keyboard and mouse (already connected) to navigate.e
- If a keyboard or mouse is not detected, you will be prompted to put your Bluetooth devices in pairing mode: USB devices can be plugged in at any time and should start working, even if detected improperly.
- Bluetooth devices can be put into pairing mode and will generally still pair while on the “Get Started” screen (exception – keyboards that require a passcode to type in won’t work on this screen).
- Once you click on “Get Started,” Bluetooth pairing stops, so you will have to power cycle to try again.
- Follow the on-screen prompts to complete the setup process.
Over the Network (as a Network Appliance)
- Power on the system. This creates a Wi-Fi hotspot that you will use to connect to the system and continue the setup process. The SSID and password for the Wi-Fi hotspot are printed on a sticker attached to the Quick Start Guide included with your DGX Spark’s packaging. ing.
- From another computer, connect to the Spark’s Wi-Fi hotspot using the SSID and password provided on the Quick Start Guide. A captive portal page will open in the default web browser on your computer. If it does not open automatically, use your browser to navigatethe Spark’s system setup page listed on the Quick Start Guide.
- Follow the on-screen prompts to continue the setup process. When the DGX Spark joins your home network, its Wi-Fi hotspot will turn off, and your computer will reconnect to the device through your Wi-Fi network to resume the setup process. If you are not able to connect to the DGX Spark after it joins your home network, you must connect a display/keyboard/mouse to continue.
What to Expect During Setup
The first-time setup utility will guide you through several configuration steps. Simply follow the onscreen prompts to complete each step.
- Language and Time Zone Selection: Choose your preferred language and time zone settings for the system. Note that the input fields will filter as you type.
- Keyboard Layout Selection (Local Setup only) Select your keyboard layout (e.g., US keyboard vs. Russian keyboard). This screen only appears when using a display during setup.
- Terms and Conditions Review and accept the terms and conditions to continue with the installation.
- User Account Creation: Create your username and password for system access.
- Information Sharing Settings (Option: al) Configure analytics and crash reporting preferences. You can skip this step if desired.
- Wi-Fi Network Selection:tion Select your Wi-Fi network. This step is automatically skipped if an Ethernet cable that is providing internet access is connected.
- Wi-Fi Pas::sword Enter the password for your selected Wi-Fi network.
- Joining Wi-Fi Network The system connects to your Wi-Fi network and tears down the access point. Your computer will automatically reconnect to your default network.
Installation Complete
The device will reboot automatically when installation is complete, and you can then use it normally.
Next Steps
Congratulations! Your DGX Spark is now ready to use. Here are the recommended ways to access and start working with your system:
Access Your System
- Locally: Use your DGX Spark like any desktop computer with a monitor, keyboard, and mouse
- Over the Network: Connect to your DGX Spark from another computer on the same network using the NVIDIA Sync tool (see NVIDIA Sync), SSH, or remote desktop.
- Mix Both: Use whatever access method fits your current workflow – you can switch freely between local and network access.
- Dashboard Access: Use the built-in DGX Dashboard for system monitoring, updates, and JupyterLab access. See DGX Dashboard for more information

Additional Resources
- Visit the NVIDIA Spark Developer Portal at https://build.nvidia.com/spark for the latest guides, tutorials, and updates.
- Refer to DGX Spark Release Notes for the latest software updates and features.
- See Known Issues for troubleshooting common problems
System Configuration and Operation
Configuring and operating your DGX Spark effectively is key to delivering consistent results across AI/ML workflows. This section provides an overview of the platform, recommended UEFI settings, clustering procedures, and foundational security guidance to help you deploy, manage, and scale with confidence.
Powered by the NVIDIA Grace Blackwell architecture, DGX Spark enables developers, researchers, and data scientists to prototype, deploy, and fine-tune large AI models on their desktops.
Flexible Access and Usage
The DGX Spark is designed for maximum flexibility in how you access and use it. You can seamlessly switch between different access methods based on your needs:
- Local Access: Connect a keyboard, mouse, and monitor to work directly on the system Network
- Access: Access your system from another computer on the same network using SSH, NVIDIA Sync, or remote desktop tools.
- Hybrid Usage: Mix and match access methods – work locally one day and over the network the next, or even simultaneously
Key Capabilities
Your DGX Spark enables you to:
- Run Inference: Deploy models for real-time AI applications
- Develop AI Models: Train and fine-tune models with up to 200 billion parameters
- Process Data: Handle large datasets with high-performance computing
- Experiment Freely: Test new ideas without cloud computing costs
- Scale Workloads: Connect multiple systems for larger projects
System Architecture
The DGX Spark is built on NVIDIA’s Grace Blackwell architecture, providing:
- Unified Memory: 128 GB of high-bandwidth memory for large models
- High-Performance Computing: 20-core ARM64-based processor with integrated GPU
- Advanced Connectivity: Wi-Fi 7, 10 GbE, CX7 NIC, and multiple I/O options
- Compact Form Factor: 150mm x 150mm x 50.5mm desktop design
Software
Your system comes pre-configured with:
- NVIDIA DGX OS: Optimized operating system for AI workloads
- Development Tools: CUDA, cuDNN, and NVIDIA’s development ecosystem
- Container Support: Docker and NVIDIA Container Runtime for easy deployment
- NGC Integration: Access to NVIDIA’s container registry
To begin using your DGX Spark
- Initial Setup: Follow the Initial Setup – First Boot to configure your system
- Explore Examples: Try sample workloads to understand capabilities
- Configure Development Environment: Set up your preferred tools and frameworks
- Start Building: Begin your AI development projects
UEFI Settings
This topiguideson accessing and configuring the UEFI settings for the DGX Spark system. While there are no Spark-specific features that require UEFI configuration, you may need to access the UEFI for general system configuration or troubleshooting purposes.
Accessing UEFI
To access the UEFI setup menu
- Power on or restart the system. Immediately press Esc or Del during the boot process and keep holding it until the UEFI setup menu appears. The UEFI setup menu will appear.
UEFI Documentation
The DGX Spark system uses an AMI UEFI. For detailed information about UEFI settings and configuration options, refer to the AMI UEFI Manual.
General UEFI Configuration
While there are no Spark-specific UEFI requirements, you may need to configure general system settings such as:
- Basic settings (date and time, system language)
- Power-on behavior
- Device boot order
- Security settings (TPM, secure Boot, passwords)
- Network configuration
- RAM disk configuration
Spark Stacking
Overview
This guide explains how to connect two DGX Spark systems into a virtual compute cluster using simplified networking configuration and a QSFP/CX7 cable for high-performance interconnect. The goal is to enable distributed workloads across Grace Blackwell GPUs using MPI (for inter-process CPU communication) and NCCL v2.28.3 (for GPU-accelerated collective operations). Additional Information can be found in the Connect Two Sparks playbook.
System Requirements
Before you begin, ensure the following:
- Both DGX Spark systems have Grace Blackwell GPUs, are connected using a QSFP/CX7 cable, and are running Ubuntu 24.04 (or later) with NVIDIA drivers installed
- The systems have internet access for initial software setup
- You have sudo/root access on both systems
Automatic IP assignment
Follow these steps on both DGX Spark nodes to configure network interfaces using netplan. The following commands should be run in a terminal session (either local or remote).
- 1. Download the netplan configuration file.
- Set appropriate permissions on the configuration file.
- Apply the netplan configuration
Manual IP assignment
Follow these steps to manually assign IP addresses for dedicated cluster networking.
- On Node 1, assign a static IP address and bring up the interface
- Set appropriate permissions on the configuration file
- Apply the netplan configuration
Manual IP assignment
Follow these steps to manually assign IP addresses for dedicated cluster networking.
- On Node 1, assign a static IP address and bring up the interface
- On Node 2, assign a static IP address and bring up the interface
- From Node 1, verify connectivity by testing the connection to Node 2
- From Node 2, verify connectivity by testing the connection to Node 1
Run the DGX Spark Discovery Script
This step will automatically identify interconnected DGX Spark systems and set up SSH authentication without requiring a password. The following commands should be run in a terminal session (either local or remote) on both nodes.
- Download the discovery script.
- Make the script executable.
- Run the discovery script
Install Required Software and Verify the Configuration
With the networking configured and the systems able to communicate with each other, the next step is to install the required software for distributed workloads and run test workloads to verify that GPU-to-GPU communication is working correctly and to measure performance across the stacked systems. For complete instructions on building NCCL, running the NCCL test suite, and interpreting the results, see the NCCL Stacked Sparks playbook.
Software
The DGX Spark comes with a comprehensive software stack optimized for AI development, machine learning, and data science workflows. This section provides detailed information about the included software components and their configuration.
DGX OS
NVIDIA DGX OS is a customized Linux distribution that provides a stable, tested, and supported operating system foundation for running AI, machine learning, and analytics applications on DGX systems. It includes platform-specific optimizations, drivers, and diagnostic tools tailored for NVIDIA hardware. DGX OS serves as the underlying operating system for your DGX Spark, providing:
- A robust Linux foundation optimized for AI workloads
- Pre-configured drivers and system settings for NVIDIA hardware
- Security updates and system maintenance capabilities
- Compatibility with the broader NVIDIA software ecosystem
Release Cadence
DGX OS follows a regular release schedule with updates typically provided twice per year, around February and August, for the first two years after initial release. Additional updates and security patches are provided between major releases and throughout the support lifecycle.
NVIDIA Sync
NVIDIA Sync is a system tray utility that provides a simple way to access your DGX Spark system remotely from another machine. Whether your DGX Spark is connected to a monitor or not, NVIDIA Sync makes it easy to connect your favorite development tools and access the system from anywhere on your network.
Installation
- Download the latest version of NVIDIA Sync from https:// build.nvidia.com / spark / connect-to-your-spark/sync. Installers are available for Windows, macOS, and Linux. Run the installer.
Connecting to Your Spark
The first time you launch NVIDIA Sync, you’ll be prompted to connect to your DGX Spark. Provide your DGX Spark’s machine name and your login credentials.
Configuring Applications
After connecting to your DGX Spark, NVIDIA Sync will automatically scan your local machine for compatible applications that can connect remotely to the DGX Spark. Select the applications you want to configure. The selected applications will be configured to use your DGX Spark as a remote compute resource.
This means you run the application interface locally on your workstation, but all compute workloads (such as code execution, model training, and data processing) run on the DGX Spark. Your files, code, and development environment are synchronized to the DGX Spark, giving you the full power of the DGX Spark’s GPUs while using familiar local tools.
All configured applications are accessible from the NVIDIA Sync system tray icon. You can change your application selections at any time from the NVIDIA Sync settings window. If an application is marked as “unavailable” in the settings, it means the application is not installed on your local machine.
DGX Dashboard
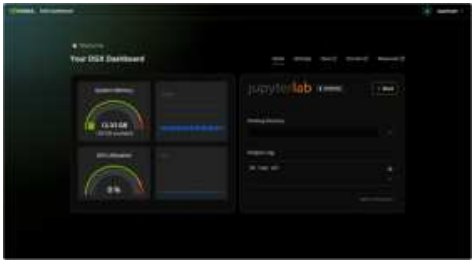
The DGX Spark comes with a built-in dashboard that provides an overview of the system’s current operational metrics, the ability to apply updates, change some system settings, and access local Jupyter Notebooks.
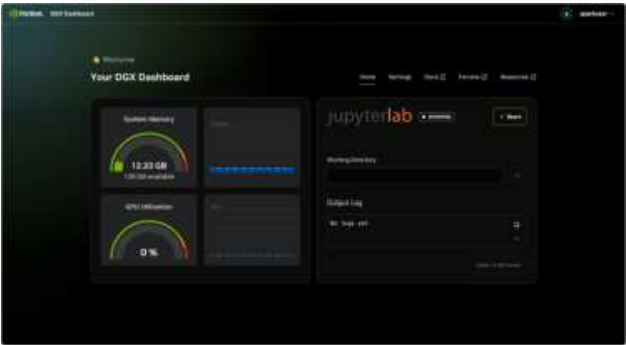
The DGX Dashboard provides real-time system monitoring and integrated JupyterLab access
Integrated JupyterLab
The dashboard includes an integrated JupyterLab instance that provides a convenient development environment:
- When started, JupyterLab creates a virtual environment in the specified working directory and automatically installs a set of recommended packages
- If you enter a new working directory and start JupyterLab, a new environment will be created
- Each user account on the device is assigned a port located in /opt/nvidia/dgx dashboardservice/jupyterlab_ports.yaml
- To access JupyterLab remotely, you must tunnel it just like the dashboard itself. The port to tunnel is in the ports file. Using NVIDIA Sync, this tunnel is managed for you automatically and just w.orks
Accessing the Dashboard
The dashboard can be accessed locally by clicking on the “Show Apps” button in the bottom left corner of the Ubuntu desktop. Then, in the app grid, select the “DGX Dashboard” shortcut to open the dashboard in your default web browser. Remotely, the dashboard can be accessed using NVIDIA Sync or via a manually created SSH tunnel.
If using NVIDIA Sync, after connecting, simply click on the “DGX Dashboard” button, and the dashboard will open in your default web browser at http://localhost:11000. To manually access over SSH, first open a tunnel, e.g., ssh -L 11000:localhost:11000 @. Then, open the dashboard in your web browser at http://:11000.
NVIDIA Container Runtime for Docker
The NVIDIA Container Runtime enables Docker containers to access GPU resources on DGX Spark systems. This runtime acts as a bridge between Docker and the NVIDIA drivers, allowing containers to utilize GPU acceleration for AI/ML workloads, CUDA applications, and other GPU-accelerated software.
Key benefits: – Seamless GPU access within containers – Automatic driver and library management – Support for multi-GPU configurations – Compatibility with popular container orchestration platforms. The runtime works in conjunction with the NVIDIA Container Toolkit, which provides the necessary components to expose GPU devices and CUDA libraries to containerized applications. The NVIDIA Container Toolkit is preinstalled and configured on DGX Spark systems.
This includes:
- NVIDIA Container Runtime
- Docker integration
- GPU device access configuration
- CUDA library management
Add User to Docker Group
By default, Docker requires sudo privileges to run commands. Adding your user tDockerdocker group allows you to run Docker commands without sudo, which provides:
- Convenience: No need to type sudo before every Docker command
- Better workflow: Seamless integration with development tools and scripts
- Reduced friction: Faster iteration when working with containers
Basic GPU Access
Run a container with GPU access using the –gpus flag: This command: – Runs an interactive container (-it) – Enables access to all GPUs and uses the NVIDIA Container Runtime for Docker (–runtime=nvidia –gpus=all) – Uses the NVIDIA CUDA development image – Executes nvidia-smi to display GPU information.
Set GPU Capabilities
Control which GPU capabilities are available to the container
Test GPU Access
- Run the test command to verify GPU access
- Check runtime configuration
- Verify NVIDIA runtime is available
NGC
NVIDIA GPU Cloud (NGC) is a comprehensive registry of GPU-optimized containers, pre-trained models, and AI/ML software that enables rapid development and deployment of AI applications. For DGX Spark users, NGC provides access to the latest frameworks, tools, and optimized environments specifically designed for the Grace Blackwell architecture. Key benefits for DGX Spark users:
- Optimized Containers: Pre-configured environments with the latest AI/ML frameworks, CUDA, and libraries optimized for Grace Blackwell GPUs
- Pre-trained Models: Access to state-of-the-art models and model collections for various AI tasks
- Rapid Development: Skip complex environment setup and focus on your AI/ML projects
- Cutting-edge Software: Access to the latest NVIDIA software stack and experimental features
NGC is particularly valuable for DGX Spark users because it provides the most current and optimized software stack for this new platform, ensuring you have access to the latest performance optimizations and features.
Create an NGC Account
- Visit the NGC website
- Click Sign Up and create a free account
- Verify your email address
Generate an API Key
- Log in to your NGC account
- Navigate to Setup -> API Key
- Click Generate API Key
- Copy and securely store your API key
Install NGC CLI (Optional)
The NGC CLI provides convenient command-line access to NGC resources. Your DGX Spark system requires the ARM64 version of the NGC CLI, which can be found on the ARM64 Linux tab at https://org.ngc.nvidia.com/setup/installers/cli.
Authenticate with Docker
- Configure Docker to access NGC registries
Pull and Run a Container
- Browse NGC resources through the web interface:
- Containers: AI/ML frameworks, development environments, and specialized tools
- Models: Pre-trained models for computer vision, natural language processing, and more
- Helm Charts: Kubernetes deployment configurations
Container Management
- Pin Versions: Use specific container tags for reproducible environments
- Regular Updates: Periodically update to newer container versions for the latest optimizations
- Resource Limits: Set appropriate memory and CPU limits for your workloads
Data Persistence
- Volume Mounts: Mount your data directories into containers for persistence
- Model Storage: Store trained models and checkpoints outside containers
- Configuration: Keep configuration files in version control
Security
- API Key Security: Store your NGC API key securely and rotate it regularly
- Container Scanning: Scan containers for vulnerabilities before use
- Network Security: Use appropriate network configurations for your environment
Getting Help
- NGC Documentation: Visit the NGC documentation
- Community Forums: Join the NVIDIA Developer Forums
OS and Component Update Guide
This section guides updating the operating system, software components, and firmware on your DGX Spark. The DGX Spark runs on NVIDIA DGX OS, which is an Ubuntu-based Linux distribution optimized for AI workloads.
Update Methods
We strongly recommend using the DGX Dashboard for all system updates on your |spark|. The dashboard ensures your system stays up to date with the latest NVIDIA-optimized components and configurations. While standard Ubuntu package management methods will work, the dashboard provides the most reliable and tested update path for your DGX system.
Using DGX Dashboard for Updates
The DGX Dashboard is the primary and recommended way to perform system updates on your DGX Spark. It provides a centralized interface for:
- Viewing available system updates
- Installing security patches and system updates
- Managing NVIDIA driver updates
- Managing firmware updates
- Monitoring update status and progress
Manual System Updates
For advanced users or when the DGX Dashboard is not available, you can perform system updates manually using the following steps:
- Open a remote or local terminal on the DGX Spark device.
- Run the following commands.
- Update the package lists and upgrade all installed packages (including OS components and drivers)
- Refresh the firmware metadata and upgrade all firmware components
- Reboot the system to apply updates
Update Best Practices
- Use the DGX Dashboard: Always prefer the DGX Dashboard for system updates to ensure compatibility and optimal performance.
- Regular updates: Check for updates regularly, especially security patches
- Backup before major updates: Always back up critical data before major system changes
- Stable power: Ensure your system has a stable power supply during updates
- Maintenance windows: Schedule updates during planned maintenance windows when possible
- System Recovery: This section provides information about system recovery procedures for your DGX Spark.
System Recovery Overview
The system recovery process for the DGX Spark allows you to restore the operating system and firmware to their original factory state. This process is useful when dealing with system corruption, fatal configuration errors, or other issues that prevent normal system operation.
Recovery Requirements
Before beginning the recovery process, ensure you have the following:
- A USB flash drive with a 16GB or larger capacity
- A keyboard and display connected to your DGX Spark
- Access to download the recovery media from NVIDIA support
Recovery Process Steps
The recovery process involves downloading recovery media, creating a bootable USB drive, and following a series of UEFI configuration steps. Follow these steps carefully to ensure a successful system recovery.
- Download Recovery Media:
- Download the recovery media archive file (tar.gz format) from https://developer.nvidia.com/ downloads/dgx-spark/dgx-spark-recovery-image-1.91.51-1.tar.gz.
- Save the file to your local system
- Create Recovery USB Drive:
- Download and unzip the recovery media archive file
- Insert the USB drive into your system
- Within the extracted files, use one of the following commands to create the recovery drive:
Boot from Recovery USB Drive
- Disconnect any external storage devices from the DGX Spark
- Connect the USB drive to one of the USB ports on your DGX Spark
- If your DGX Spark is powered off, boot the device into UEFI settings by holding down the Del key immediately after powering on the device
- Restore UEFI Defaults:
- Tap the Right Arrow key to select the “Save & Exit” page within the UEFI settings
- Tap Down Arrow to select “Restore Defaults” and select “Yes” in response to “Load Optimized Defaults.”
- Select “Save Changes and Reset” – the device will reboot
- While the device is rebooting, hold down the Del key to re-enter UEFI settings a second time
- Restore UEFI Defaults:
- Tap the Right Arrow key to select the “Save & Exit” page within the UEFI settings
- Tap Down Arrow to select “Restore Defaults” and select “Yes” in response to “Load Optimized
Defaults” - Select “Save Changes and Reset” – the device will reboot
- While the device is rebooting, hold down the Del key to re-enter UEFI settings a second time
Boot from Recovery Media
- While the device is rebooting, hold down the Del key to re-enter UEFI settings a third time
- Tap the Right Arrow key to select the “Save & Exit” page in UEFI settings
- Tap Down Arrow to move to the “Boot Override” section
- Select the USB drive and tap Enter
- The device will reboot using the USB drive – follow the on-screen steps to update your firmware and reinstall the OS on the device’s SSD
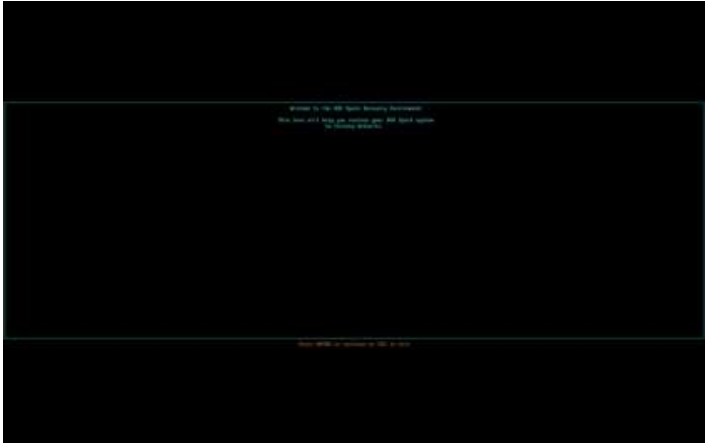
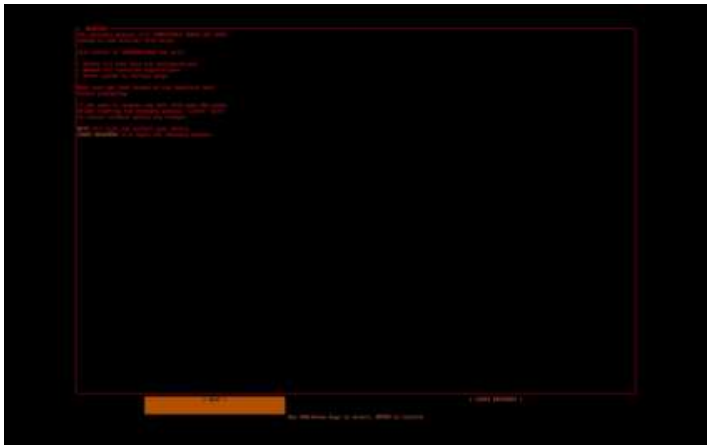
Restore System from Recovery Environment
- On the welcome screen, press Enter to continue. To cancel the process, press Esc.
- On the warning screen, select [EXIT] to restart without proceeding, or select [START RECOVERY] to begin reflashing the SSD. Be aware that this will completely erase the internal SSD on the DGX Spark.
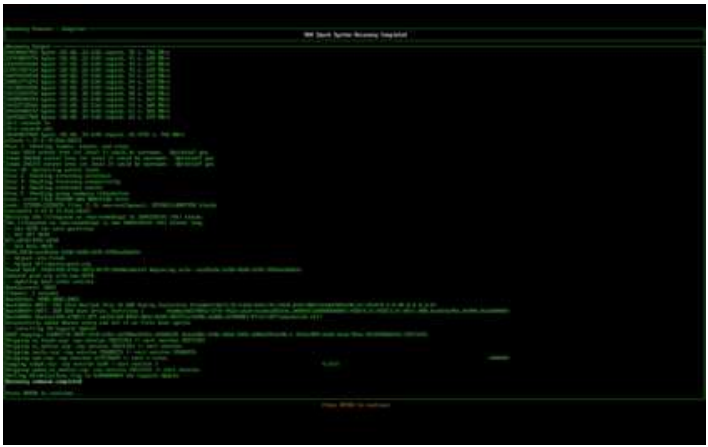
- Monitor the Recovery Progress screen for detailed output from the recovery process and the progress of the SSD reflash.
- When the process is complete, review the progress screen and follow the prompt to continue. Scroll or page through the recovery output if needed, for example, during customer support.
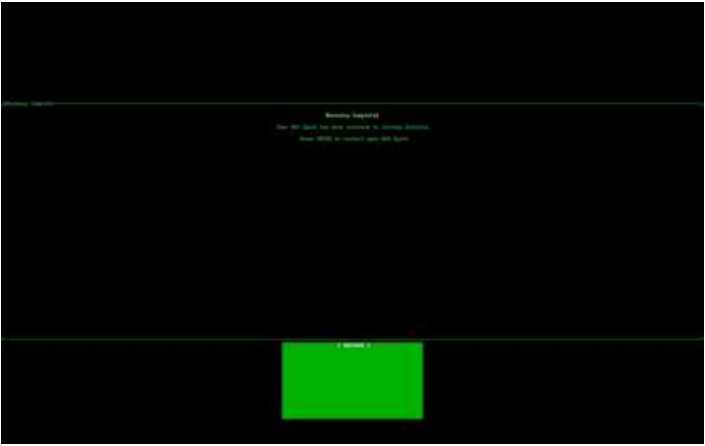
- On the final screen, confirm that the DGX Spark has been reset to factory state and press Enter to restart the device.

Third-Party License Notices
This NVIDIA product containsthird-partyy software that is being made available to you under their respective open source software licenses. Some of those licenses also require specific legal information to be included in the product. This section provides such information.
Physical Specifications
- Form Factor
- Chassis Type: Small form factor (SFF)
- Dimensions: 150 mm (L) x 150 mm (W) x 50.5 mm (H)
- Weight: 1.2 kg (2.6 lbs)
Environmental Requirements
Troubleshooting
If you experience issues after making UEFI changes:
- Revert to UEFI defaults and restart
- Apply changes incrementally to identify problematic settings
- Update to the latest UEFI version if available
- Consult the AMI UEFI manual for specific setting descriptions
- For additional troubleshooting guidance and support options, see Spark Maintenance Troubleshooting
- Ensure the QSFP/CX7 interface is active and used for IP assignment
- Verify connectivity between nodes via ping
- Check your interface bindings with ip a and ethtool
- If the discovery script fails, manually verify SSH connectivity between nodes
- For additional troubleshooting guidance and support options, see spark-maintenancetroubleshooting
Next Steps
Once tested, this configuration can be scaled to support:
- Job orchestration with Slurm or Kubernetes
- Containerized execution with Singularity or Docker
LIBICONV Library
Copyright (C) 2007 Free Software Foundation, Inc. <http:∕∕fsf.org∕> Everyone is permitted to copy and distribute verbatim copies of this license document, but changing it is not allowed. Preamble The GNU General Public License is a free, copyleft license for software and other kinds of works. The licenses for most software and other practical works are designedto take away your freedom to share and change the works.
Therefore, you have certain responsibilities if you distribute copies of the software, or if you modify it: responsibilities to respect the freedom of others. For example, if you distribute copies of such a program, whether gratis or for a fee, you must pass on to the recipients the same freedoms that you received. You must make sure that they, too, receive or can get the source code. And you must show them these terms so they know their rights. Developers who use the GNU GPL protect your rights with two steps:
- Assert copyright on the software, and
- Offer you this License, giving you legal permission to copy, distribute,e and∕or modify it.
Trademarks
NVIDIA, the NVIDIA logo, DGX, DGX-1, DGX-2, DGX A100, DGX H100/H200, DGX B200, DGX Station, DGX Station A100, and DGX Spark are trademarks and/or registered trademarks of NVIDIA Corporation in the United States and other countries.
Customer Support
- Website: https://www.nvidia.com/