
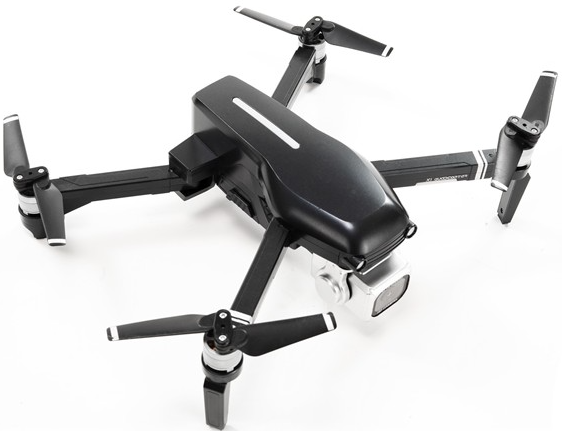
PRO FLIGHT PFBD303 Folding Drone with HD Camera
Safety Instructions
- This manual contains instructions for safety, operation, and maintenance.
- Avoid exposure to water, as moisture can cause damage to the electronics.
- Never operate your drone when the controller or drone batteries are low.
- Mishandling of batteries can result in a fire, personal injury, and /or property damage.
- If at any time the battery begins to balloon or swell, discontinue use immediately.
- If charging or discharging, discontinue and disconnect.
- Continuing to use, charge,e or discharge a battery that is ballooning or swelling can result in fire.
- Always store the battery at room temperature in a dry area for best results.
- Do not store the battery or drone in a car or direct sunlight.
- Never use any other type of battery charger other than the one supplied with the drone.
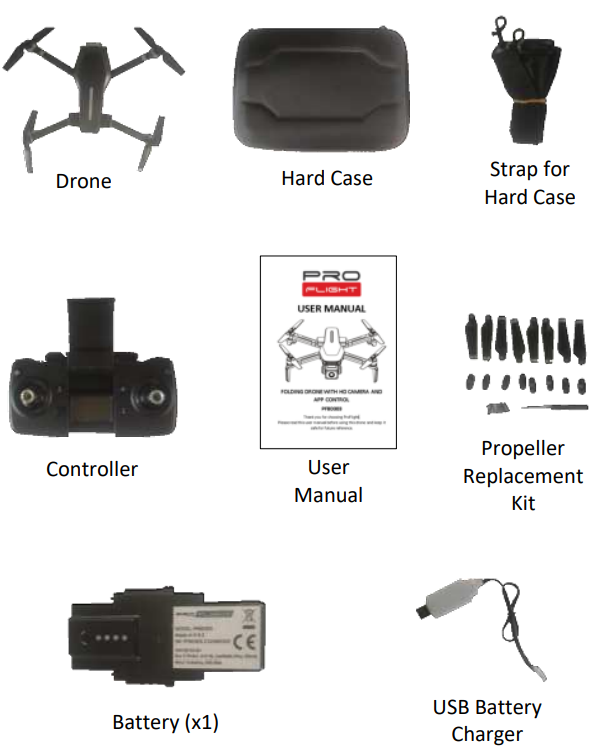
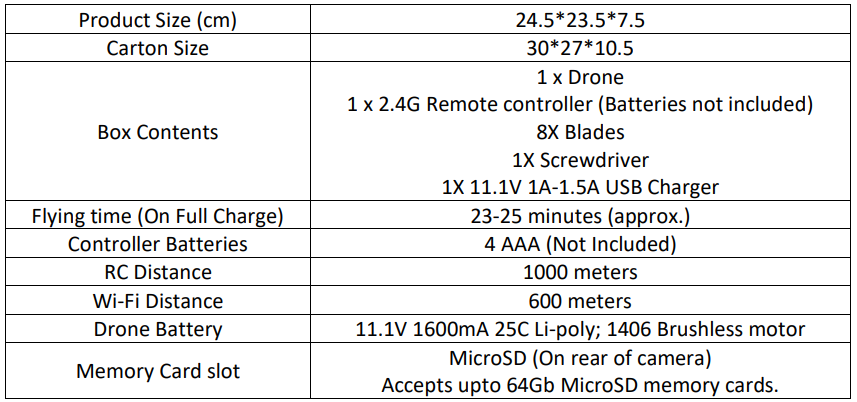
Package Content
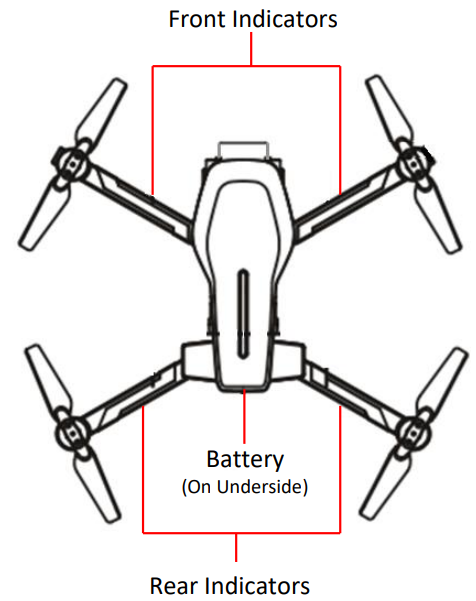
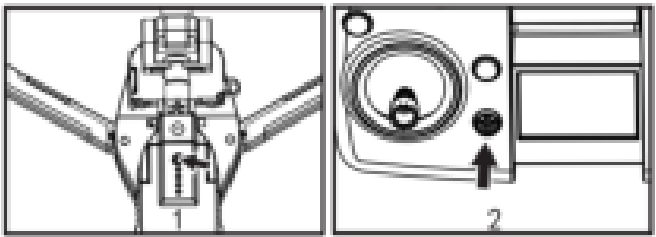
Removing the Battery
With the rear of the drone on a flat surface, slide the two tabs on the side of the drone downwards at the same time. While both tabs are pressed down, twist the top of the battery (By the power button) out of the drone. Please note this may take some force.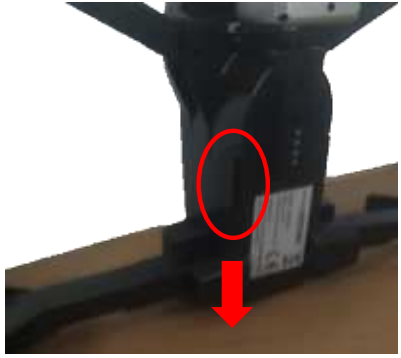
Charging the Code
Use only the supplied USB Li-Po charger to charge your battery. To charge the battery, it must first be removed from the drone, following the instructions above. Plug the charger into a USB socket, and the LED on the charger will light up Red. Attach the charger to the battery; the LED on the charger will start to slowly flash. When the battery is fully charged, the LED on the charger will turn off. Charging should take around 4-5 hours. DO NOT leave the battery unattended whilst charging.
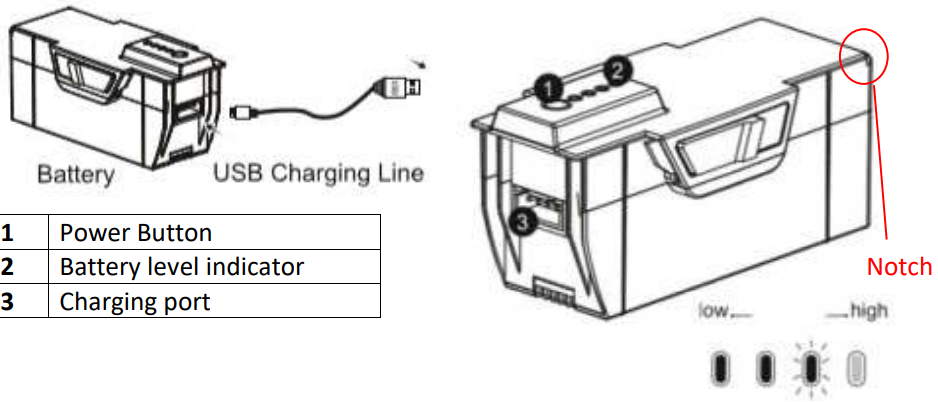
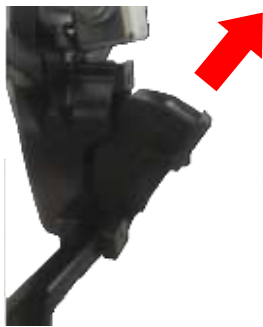
Refitting the Battery
Slide the rear of the battery into the battery compartment on the base of the drone at an angle of around 30 – 45 degrees. Ensure the notch on the rear of the battery slides under the ledge at the rear of the battery (See the diagram on the previous page for the location of the notch).
Installation
Remove the retaining screw from the top of the battery cover on the rear of the controller. Unclip the battery cover and insert 4 x AAA batteries (Not Supplied), making sure that the correct polarity is followed. Once the batteries are correctly installed, the battery cover must be refitted.

Overview
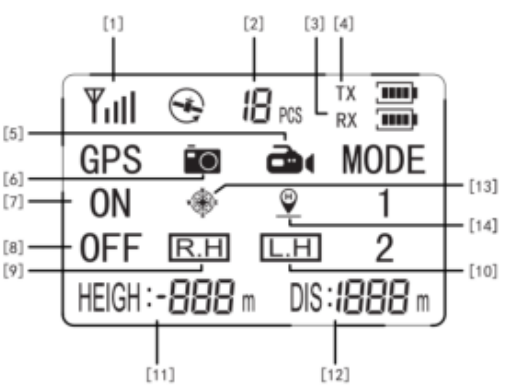
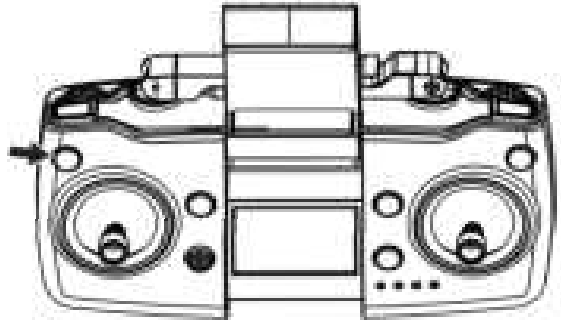
Display
- CONTROLLER SIGNAL LEVEL
- NUMBER OF GPS SATELLITES
- DRONE BATTERY LEVEL
- CONTROLLER BATTERY LEVEL
- VIDEO INDICATOR
- PICTURE INDICATOR
- GPS ON
- GPS OFF
- HIGH SPEED
- LOW SPEED
- FLIGHT ALTITUDE
- FLIGHT DISTANCE
- HEADLESS MODE
- ONE BUTTON RETURN

How To Control
Usage Instructions
POWER
Once the drone is turned on, press the power button on the drone to turn it on. The controller will automatically connect to the drone, and once successfully connected, the drone will change from flashing quickly to flashing slowly.
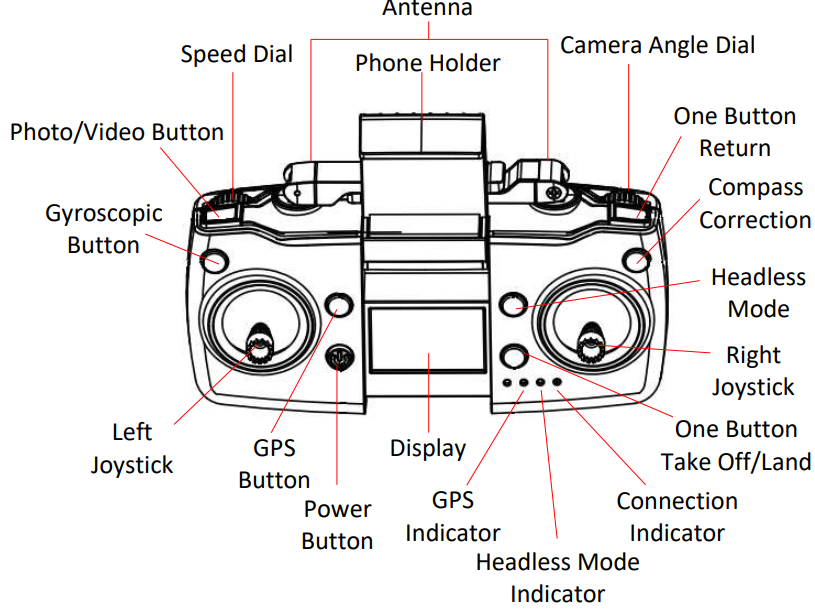
SPEED DIAL
Use the SPEED DIAL to change the flight mode from Low Speed (Beginner) to High Speed (Advanced). The display on the controller will indicate the currently selected speed mode (R.H = High Speed, L.H = Low Speed)
PHOTO/VIDEO BUTTON
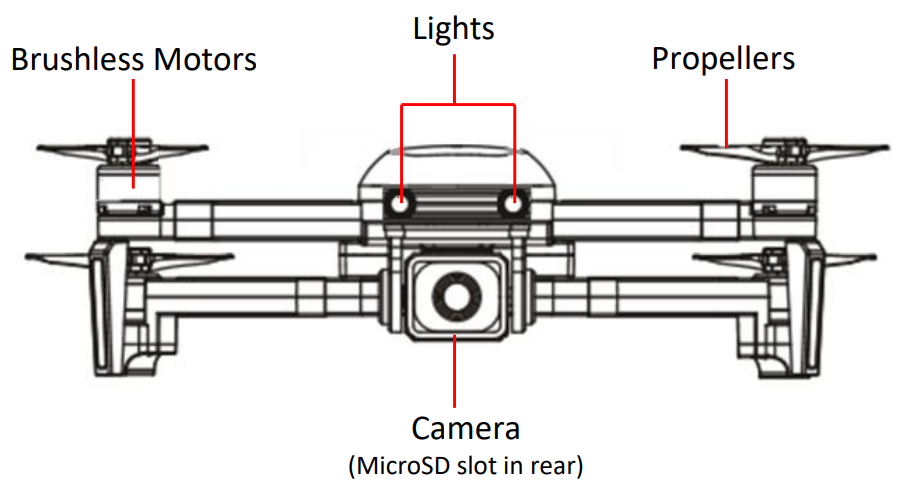
To use the Photo and video functions from the controller, a suitable MicroSD card must be correctly inserted into the rear of the camera. Photo: Press once to take a photo. Video: Press and hold for 2 seconds to start recording a video. The video symbol will show on the display. To stop recording, press and hold the video button for 2 seconds again. Note that if power is disconnected during recording, the video file will be corrupted.
COMPASS CORRECTION BUTTON
Press and hold the compass correction button for approx. 2 seconds until the controller beeps. The LEDs on the drone will flash quickly. Pick up the drone and hold it around 1 meter from the ground, with the base facing the ground. Turn the drone clockwise repeatedly (approx. 3-6 full rotations) until the controlleremits a sound. Then hold the drone vertically with the camera facing the groundand turn clockwise again until the controller emits a long sound indicating compass correction has been successful.
Gyroscopic Correction Button
Place the drone on a flat surface. Press the gyroscopic calibration button, and the drone will flash quickly. This indicates that calibration has been successful. You can now search for GPS signals by pressing the GPS button.
GPS BUTTON
Press to turn the GPS Feature on and off. Note that when the GPS is turned off or the GPS signal is insufficient, a number of features are deactivated.
INSERTING A MEMORY CARD
A Suitable MicroSD card (up to 64gb) can be inserted into the rear of the camera. It should be pressed fully into the housing of the camera. You will hear a click,k and the memory card will move slightly back before locking in position. To ensure smooth recording of video, we would advise the use of a Class 10 card. Removal of the card is the opposite of insertion. Press the card to unlock it, and it will then be ejected from the rear of the slot.
Preparing For Flight
- Before flying the drone, ensure the pilot has fully read the instructions and understands how to control the drone during flight.
- Visually inspect the drone for signs of damage. Do not operate the drone if damaged.
- Ensure the batteries in the controller and the drone have a suitable level of charge before flight.
- Find a suitable place to fly the aircraft, away from people, buildings, gs, and vehicles.
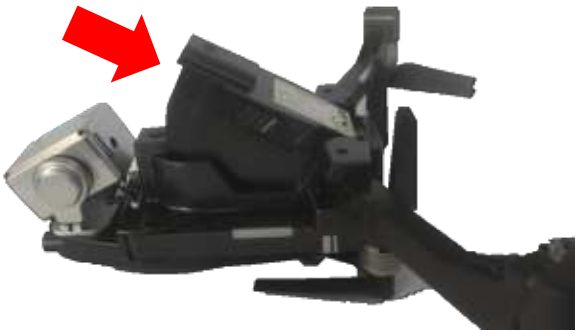
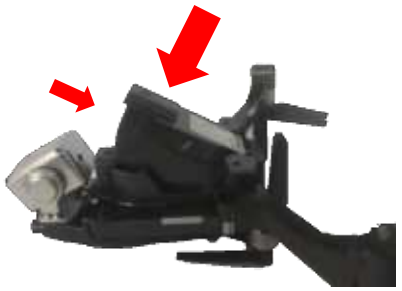
UNFOLD THE DRONE
Unfold the legs on the drone. The longer front legs should be unfolded into the flight position first, followed by the shorter rear legs. Ensure that all legs are in their fully unfolded position.
Pair the Controller
Press the power button on the drone once so the battery lights illuminate, and then press and hold the power button for 3 seconds; the LED on the drone will flash. Then press the power button on the controller, and the flashing light on the drone will become slower, indicating that pairing is complete.
CALIBRATE THE DRONE
After pairing, place the drone on a flat surface. Press the gyro calibration button, and the drone will flash quickly. This indicates that calibration has been successful. It is also advisable to conduct the compass calibration as shown on page 11. You can now search for GPS signals by pressing the GPS button. If you don’t require GPS signals, you can go directly to the next step.
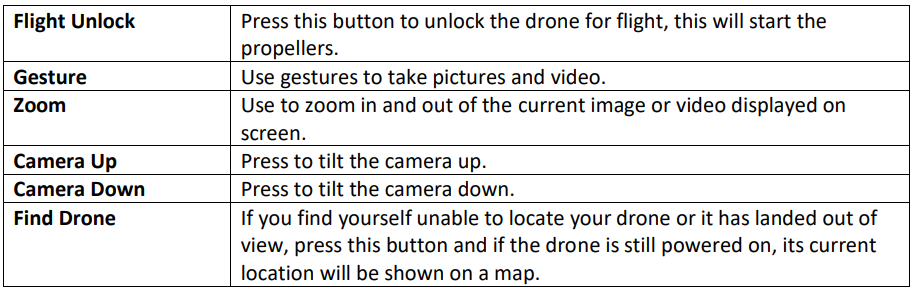
UNLOCK THE DRONE FOR FLIGHT
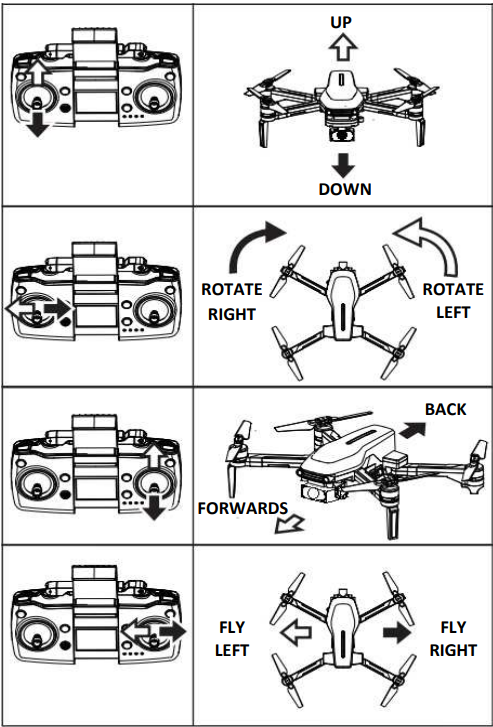
To unlock the drone for flight, push the throttle lever (Left) and the direction lever (Right) in the direction of the arrows shown to initiate flight and start the drone’s propellers. You can now start flying by using the throttle or the one button take off.
After Flight
Once your flight has completed, and the propellers have stopped spinning
- Pick up the drone and hold the power button on the battery to turn the drone off.
- Fold the arms of the drone until they sit close to the body of the drone. The rear legs must be folded first, followed by the front legs. DO NOT FORCE THE ARMS AWAY FROM THE BODY AS THIS MAY RESULT IN DAMAGE.
- Turn the controller off using the POWER button.
- Place the drone and accessories back into the storage case.
- The drone should be fully charged before a period of storage to protect the battery.
REPLACEMENT OF THE PROPELLERS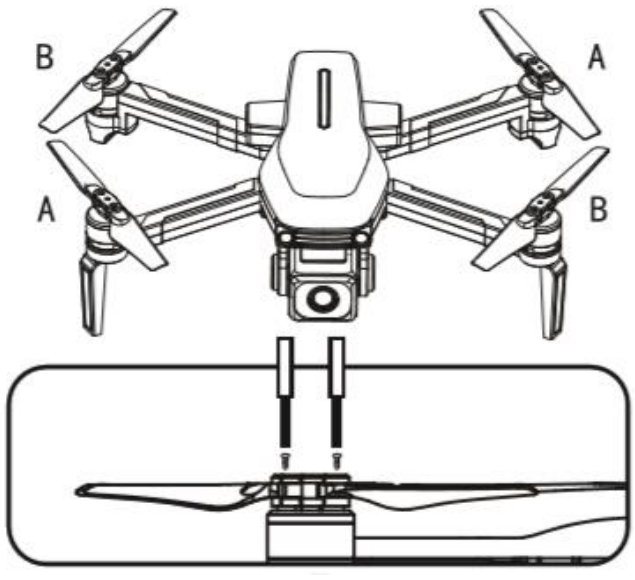
Installing the App
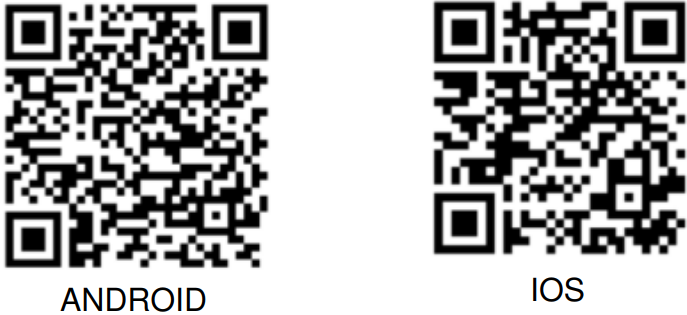
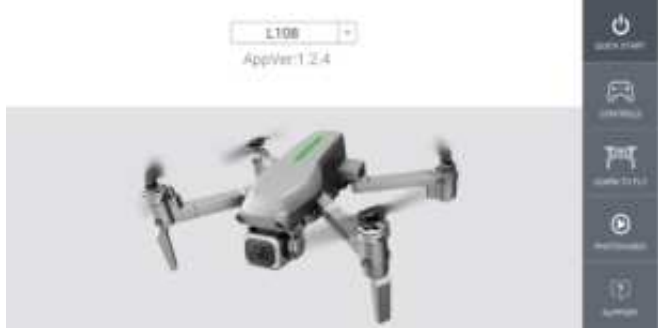
Install the RC GPS app on your device by scanning the relevant QR code below.
CONNECTING USING THE APP
Before connecting, it is advisable to turn off mobile data on your phone. The pictures provided are for guidance only; the steps may differ slightly depending on the operating system of the phone used.
- Turn on the aircraft.
- Turn on the Controller (If planning to control via the controller rather than the App, otherwise miss this step).
- Open the RC GPS App on your phone.
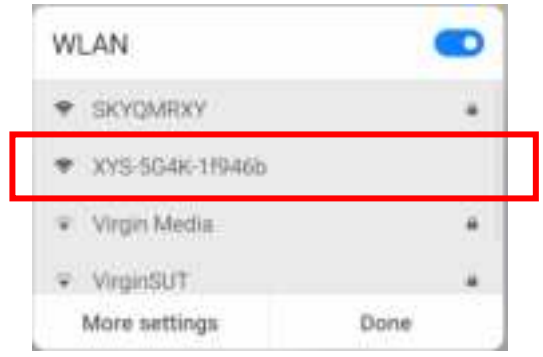
- The drone will automatically create a WiFi hotspot. Swipe down from the top of your screen to access the available WiFi Networks. Select the WiFi network created by the drone, which will be in the format: XYS-XXXXXXX.XXX
- Exit the WiFi settings menu and return to the app.
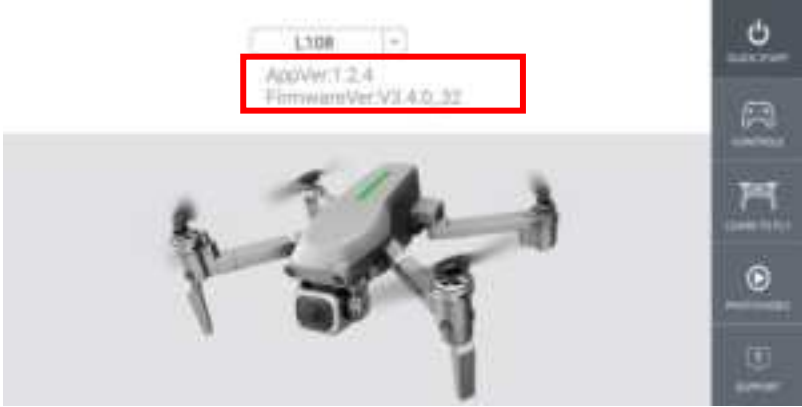
- The app will now show the Firmware version of the drone, signalling that the connection is successful.
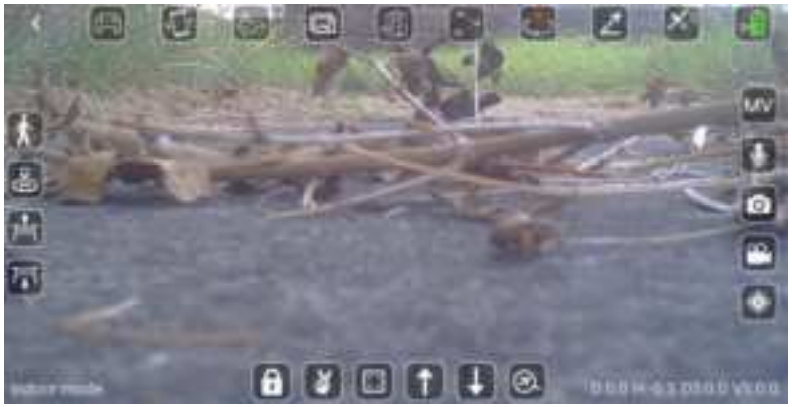
- Press the CONTROLS button on the right-hand side of the screen. The drone will now enter the flight screen, ready for flight, and will display the output from the drone’s camera.
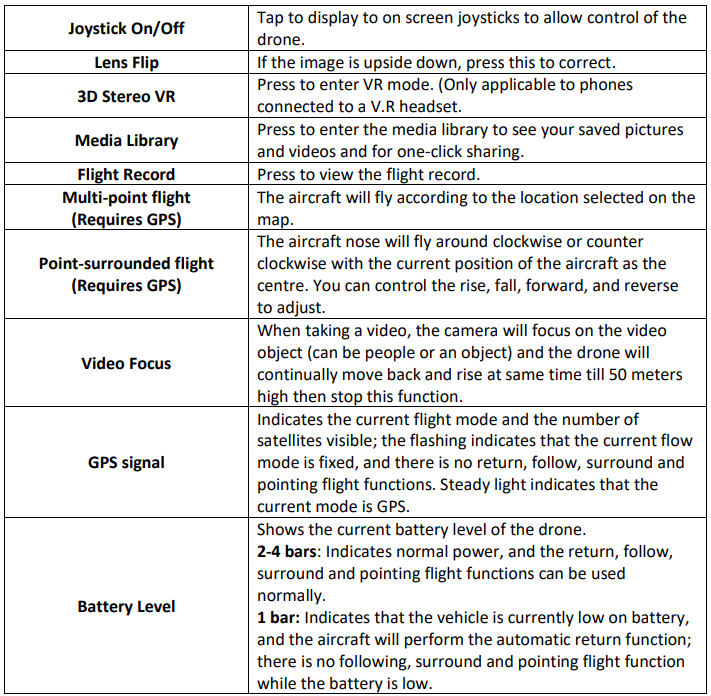
Controlling the App
First, press the unlock button to unlock the drone for flight. The propellers will start to spin. If this does not happen, swipe from the top of your screen, turn off your phone’s W,iFi and reconnect using steps 4 – 8 on the previous page.

Specifications
Troubleshooting

Customer Service
- Tel: 0330 390 3062
- Website: https://proflight.co.ke/