
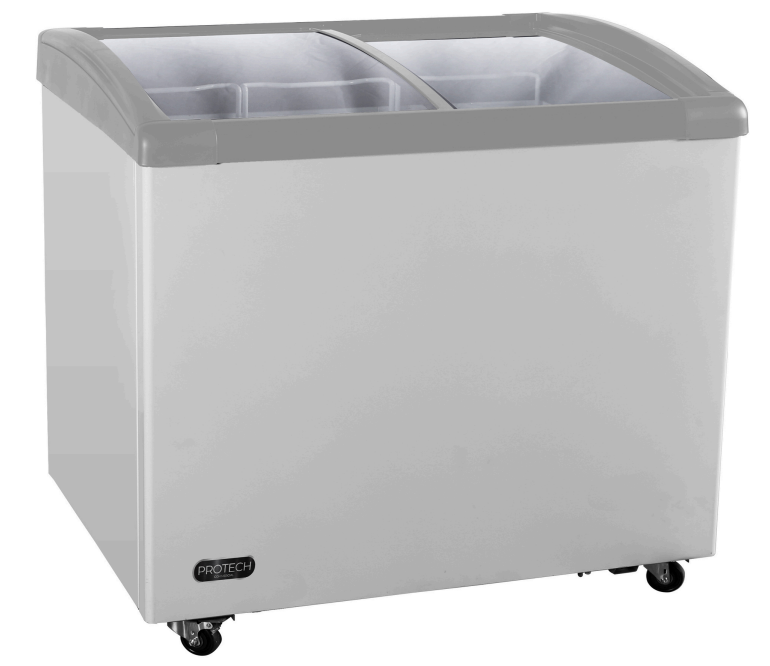
PROTECH DSF-401WG Merchandiser Refrigerator
Safety Instructions
The PROTECH DSF-401WG Merchandiser Refrigerator must be handled carefully to ensure safe and proper operation.
- Read all instructions before using the freezer.
- Never clean freezer parts with flammable fluids. The fumes can create a fire hazard.
- Do not use an excessively wet cloth, industrial solvents, or oil-based products to clean this freezer.
- The fumes can create a fire hazard.
- Do not abuse, sit on, or stand on the freezer.
- Use the freezer only for its intended function. Any other use will void the warranty.
- During installation, the power supply must not be excessively or dangerously bent or flattened.
- Make sure the power plug is fully and firmly placed into the wall socket.
- Do not use multiple sockets or an extension cord, as they may overheat and become a risk of fire.
- Make sure the power plug is clean before usage.
- After turning the freezer off, please unplug the power plug from the socket.
- Make sure your hands are dry when connecting the power plug.
- Never modify, remove, or attempt to repair the power plug yourself.
- Do not repair, disassemble,/or modify the freezer by yourself.
- Allow at least 5″ of air space on all sides of the freezer for good air circulation.
- Always place the freezer on a hard, level, and even surface that can support the unit when it is full.
- Ensure objects are not obstructing the air vent.
- Never insert your fingers or other objects into the air outlets.
- The wires in the mains lead are colored in accordance with the following code:
- Green or Green with a yellow strip: Grounding
- White: Neutral
- Black: Live
Description
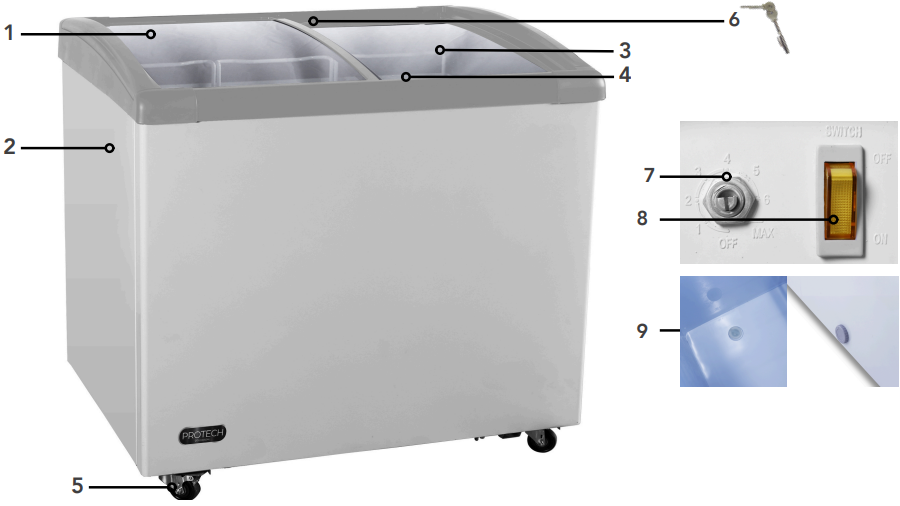
| Part | Description | |
| 1 | Dual Sliding Tempered Glass Doors | |
| 2 | Durable Coated Steel Exterior | |
| 3 | Freezer Basket (3) | |
| 4 | Internal Light | |
| 5 | Mobility Wheels (4), Lockable (2) | |
| 6 | Lock and Key | |
| 7 | Temperature Control Knob | |
| 8 | Internal Light Switch | |
| 9 | Internal Drain Plug (inside) and Drain Outlet (rear) |
Operation
Proper operation of the PROTECH DSF-401WG Merchandiser Refrigerator ensures optimal performance and maintains the correct temperature inside the unit.
If the ambient temperature exceeds or falls below these recommended ranges, it may affect the performance of the freezer. For instance, placing the freezer in extremely cold or hot conditions can lead to fluctuations in interior temperatures.
Temperature Control
The markings “1 – MAX” indicate the different temperature settings, with “1” representing cold and “MAX” indicating the coldest range (-0.4℉ to -14.8℉). The factory default setting is “4”, with the internal temperature approximately -7.6℉.
Typically, setting “4” or “5” is suitable for ice cream and similar products. Setting it to “MAX” will cause the compressor to run continuously.
Setting
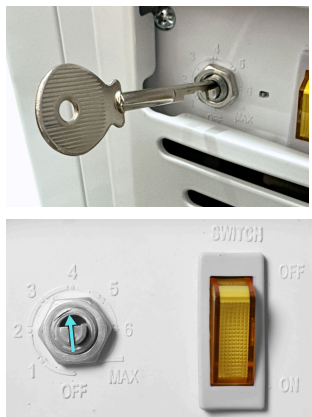
- Use when a colder temperature is not required.
- Normal setting suitable for daily use.
- Use when a colder temperature is desired.
- MAX Use when the freezer needs to operate at its coldest temperature.
Locking Wheels
The wheels on this freezer are pre-installed and essential to the appliance’s functionality. Please note that these wheels are not intended to be removed. 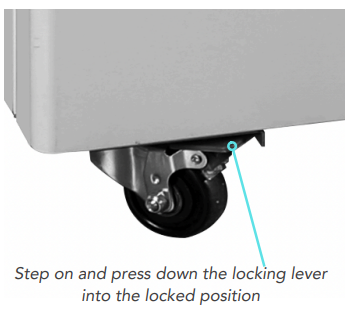
To lock
- Step on and press down the locking lever into the locked position.
- You may need to apply some pressure to engage the lock fully.
- Once engaged, the wheel should no longer rotate freely, securing the freezer in place.
To disengage
- Pull up the locking lever into the unlocked position.
- You may hear or feel a click as the lock disengages.
- With the lock released, you can now move the freezer as needed.
Installation
To reduce the risk of fire, electrical shock, or injury when using your PROTECH DSF-401WG Merchandiser Refrigerator, follow these basic precautions.
- Read all instructions before using the freezer.
- Never allow children to operate, play with, or crawl inside the freezer.
- Never clean freezer parts with flammable fluids or harsh chemicals. The fumes can create a fire hazard or explosion.
- Do not store or use gasoline or any other flammable vapors or liquids in the vicinity of this or any other freezer.
- The fumes can create a fire hazard or explosion.
Prepation
- Remove the exterior and interior packing.
- Before connecting the freezer to the power source, let it stand upright for approximately 4 hours.
- Clean the interior surface with lukewarm water using a soft cloth.
Location & Setup
- The freezer is designed for freestanding installation.
- Allowance of at least 5 inches (127mm) of space between the back and sides of the freezer is suggested, which allows proper air circulation to cool the compressor and condenser.
- Avoid locating the appliance in an area that may be exposed to excessive moisture.
- Place the freezer on a hard and level floor that is strong enough to support it when it is fully loaded.
- Installing the freezer on carpet is not recommended.
For those looking for another freestanding option, the PROTECH CBC-1200WG Freestanding Refrigerator offers similar features with larger storage capacity.
Freestanding Installation
- A freestanding installation will allow you to install the freezer in any place you desire, provided that the required clearance space around the freezer is respected.
- In every setting, there must be adequate ventilation and access for service. Never install or operate the unit in an enclosed area, such as a closed cabinet.
Electrical Connection
- This freezer requires a standard 115/120 Volt AC ~/60Hz electrical ground outlet with a three-prong plug.
- Ensure that the wall outlet and circuit are properly grounded by a qualified electrician.
- Secure the cord behind the freezer to prevent accidental injury.
Usage Guidelines
- Always plug the freezer into its own individual electrical outlet, matching the voltage rating on the freezer label, to prevent overloading circuits.
- Avoid pulling the power cord to unplug the freezer; grip the plug firmly and pull straight out from the receptacle.
- Immediately repair or replace frayed or damaged power cords to prevent electrical hazards.
Extension Cord
- Due to potential safety hazards, it is strongly recommended not to use an extension cord with this freezer.
Power Failure
- Most power failures are resolved within a few hours and should not significantly affect the temperature of your freezer if you minimize opening the freezer cover.
- If the power outage is expected to last longer, take the necessary steps to disconnect your freezer to prevent potential hazards.
- Failure to unplug the freezer during an extended power outage could result in electrical shock or personal injury.
Specififcations
|
| |||||||||||||||
| ||||||||||||||||
| ||||||||||||||||
| ||||||||||||||||
| ||||||||||||||||
| ||||||||||||||||
| ||||||||||||||||
| ||||||||||||||||
| ||||||||||||||||
| ||||||||||||||||
|
Care & Maintainance
- Disconnect the freezer from the power supply by unplugging the power plug from the wall socket.
- Do not touch the power plug with wet hands. Never unplug the unit by pulling the cord.
- Leave the sliding display door open to facilitate air circulation and prevent mold, mildew, and unpleasant odors.
Draining
Before cleaning or maintaining, disconnect the unit from power. Avoid touching the plug with wet hands and never pull on the plug to unplug it. To prevent damage, do not use sharp or metallic tools to scrape frost. Defrost when frost is ¼” thick, as indicated on page 9.
To drain
- Remove the clear drain plug from the base and the black drain plug from the side to drain water.
- Sponge up excess water from the bottom.
- Clean the interior and dry it with a soft cloth.
- Replace the drain plugs, plug the unit back in, set the temperature, and return the food.
Cleaning
- Turn off the power, unplug the freezer, and remove all items, including shelves.
- Wipe the interior with a warm water and baking soda solution. The solution should consist of about 2 tablespoons of baking soda to one quart of water.
- Clean the shelves with a mild detergent solution.
- Wipe the exterior cabinet with warm water and mild liquid detergent.
- Avoid using steel wool or steel brushes on the stainless steel surface, as these may cause erosion and rusting.
Vacation Time
- For short vacations lasting less than two days, leave the freezer operating.
- For longer vacations, if the freezer will not be used for an extended period, remove all items, turn off the freezer, and thoroughly clean and dry the interior.
Moving Freezer
- Remove all items from inside the freezer.
- Turn the adjustable legs up to the base to avoid damage.
- Tape (we recommend using painter’s tape) the sliding display door shut.
- Ensure the freezer remains secure in the upright position during transportation and protect the exterior with a blanket or similar item.
Storage
- Ensure adequate spacing between items in the freezer to allow for proper ventilation and even freezing.
- Wrap moisture-sensitive foods in sealed bags to prevent odor mixing and frost formation.
- Always cool food before placing it in the freezer; avoid putting hot food directly inside.
- The freezer is designed for storing and displaying packaged foods only.
Defrosting
- To defrost the freezer, first remove the interior drain plug and unscrew the drain outlet from the back of the freezer to allow the water to drain.
- To defrost, set the thermostat dial to “OFF,” and defrosting should occur within a few hours.
- Once defrosting is complete, return the thermostat control knob to the desired setting.
- It is important to never use a knife or any other metal instrument to scrape ice or frost.
- To reduce frost, minimize the opening and closing of the doors.
- Ensure the doors are closed completely and there are no gaps that may allow air inside.
- Keep the freezer in a location within the recommended ambient conditions, along with proper clearance.
Placement
- Position the freezer in a dry and well-ventilated place, away from direct sunlight, heaters, and corrosive gases or chemicals.
- Clean the interior surface with lukewarm water using a soft cloth.
- Failure to do so can result in back or other injury.
Normal Sounds
Your new PROTECH DSF-401WG Merchandiser Refrigerator may produce sounds that are unfamiliar to you. Hard surfaces, like the floor and walls, can amplify these sounds. Here are common sounds you may hear and their possible causes:
- Rattling Noises – These noises may originate from the flow of refrigerant or the water line. Items stored on top of the freezer can also contribute to rattling sounds.
- Compressor Sounds – The high-efficiency compressor may emit pulsating or high-pitched sounds during operation.
- Water Flow – Water running from the evaporator to the water reservoir may result in a splashing sound.
- Refrigerant Circulation – At the end of each cycle, you may hear a gurgling sound caused by refrigerant flowing in the freezer.
- Condenser Fan – You may notice the sound of air being forced over the condenser by the condenser fan.
Troubleshooting
| PROBLEM | POSSIBLE CAUSES | SOLUTIONS | |||||||
|
|
| |||||||
|
|
| |||||||
One-Year Limited Warranty
Should your PROTECH DSF-401WG Merchandiser Refrigerator prove defective within one year from the date of purchase, contact PROTECH’s Customer Support Team with the serial number and proof of purchase to make a warranty claim. Under this warranty, PROTECH will repair or replace any parts found defective with new or remanufactured parts or exchange the defective product with a new, refurbished, or remanufactured product at our discretion.
This warranty is not transferable. After the expiration of the warranty, the cost of labor and parts will be the responsibility of the original owner. Please package the product carefully in its original packaging to avoid damage in transit. PROTECH is not responsible for damage resulting from shipper mishandling or improper packaging. Please retain the original box and packaging materials.
Warranty Does Not Cover
- Acts of God, such as fire, flood, hurricanes, earthquakes, and tornadoes.
- Damage, accidental or otherwise, to the product while in the possession of a consumer, not caused by a defect in material or workmanship.
- Damage caused by consumer misuse, tampering, lack of maintenance, or failure to follow the care and
special handling provisions in the instructions. - Damage to the finish of the case or other appearance parts caused by wear.
- Damage caused by repairs or alterations to the product by anyone other than authorized by the
manufacturer. - Removal, Replacement, Packaging, Freight, and Insurance costs for the warranty service.
- Products sold AS IS or from an unauthorized reseller.
- Products that have had their serial numbers removed or defaced.
Customer Support
- Email: support@whynter.com
- Website: WWW.WHYNTER.COM
- Tel: 800-443-6153
Product contents and specifications may change without notice. Copyright © 2024
FAQs
Q: Can it be used as a refrigerator (above-freezer temperatures) or is it strictly a freezer display unit?
It is advertised as a freezer for showcasing and storing frozen foods, such as ice cream. The recorded temperature range extends into the freezer (negative) range.
Q: How do I claim the warranty or get service support?
Under typical commercial use, this model is covered by a one-year limited guarantee (for materials and workmanship).
Q: What type of defrost system does the DSF-401WG use?
This implies that you will periodically need to turn off the appliance and let the frost to melt on its own. When the amount of frost on the walls or baskets is more than ¼ inch (6 mm), defrost.
Q: How long should I wait before loading food after plugging in the unit?
Before putting goods inside, let the unit operate for at least three to four hours following the initial installation or relocation.
Q: Can I use an extension cord or power strip for the freezer?
Voltage dips from extension cables or power strips may result in compressor overheating or startup failure.
1 Comment
Pingback: PROTECH CBC-1200WG Freestanding Refrigerator | User Guide