
TCL 98QM8K QLED 4K HDR 98 Inch Mini LED

Important Information
This symbol indicates that this product incorporates double insulation between the hazardous main voltage and user accessible parts. When servicing, use only identical replacement parts.
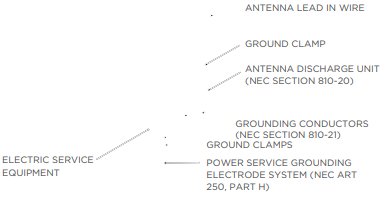
Cable TV Installer: This reminder is provided to call your attention to Article 820-40 of the National Electrical Code (Section 54 of the Canadian Electrical Code, Part 1) which provides guidelines for proper grounding and, in particular, specifies that the cable ground should be connected to the grounding system of the building as close to the point of cable entry as practical.
Important Safety Instructions
- Read these instructions. Keep these instructions. Heed all warnings. Follow all instructions.
- Do not use this apparatus near water. Clean only with a dry cloth.
- Do not block any ventilation openings. Install in accordance with the manufacturer’s instructions.
- Protect the power cord from being walked on or pinched, particularly at plugs, convenience receptacles, and the point where they exit from the apparatus.
- When not in use, tie up the power cordset with a cable tie or with something similar.
- It should not be near sharp edges as it may cause abrasion of the power cordset.
- When put into use again, please make sure the power cordset is not damaged.
- No open flame sources, such as lit candles, should be placed on, under, or near the apparatus.
- Unplug this apparatus during lightning storms or when unused for long periods of time.
- Only use attachments/accessories specified by the manufacturer.
- Keep at least 1 inch of ventilation space between the apparatus and all other surfaces.
- Do not expose the apparatus to any external heat sources.
- Do not place any heat sources, such as candles, lamps, etc., on the apparatus.
- Do not expose the device to high levels of humidity or to any possible sources of moisture.
Before Initial Setup
Protect against power surges.
- Connect all components before you plug any power cords into the wall outlet or power strip.
- NEVER plug your TV into an outlet that is controlled by a wall switch.
- Turn off the TV before you connect or disconnect any cables.
- Make sure all antennas and cables are properly grounded. Refer to the Important Safety Instructions.
Safety information
- Prevent the TV from overheating by placing it in an area with good ventilation. Do not block ventilation holes on the TV. Position the TV so air can circulate freely on all sides.
- Do not stack objects on the TV. If you place the TV on a stand, make sure you allow adequate ventilation. If you connect an audio receiver or amplifier to the TV, place it on the top shelf so the heated air will not overheat the TV.
Avoid audio interference
- Position cables properly; insert each cable firmly into the designated jack.
- Route all cables down one side of the back of the TV instead of straight down the middle.
- If your antenna uses 300-ohm twin lead cables, do not coil the cables.
- Keep twin lead cables away from audio/video cables.
Set up your new TV
Open the box and remove the TV and other items. Be careful, the TV may be heavy! We strongly recommend that at least two people unbox the TV. Be sure to check all the foam packaging, as the stands from some TVs are stored in the foam for protection.
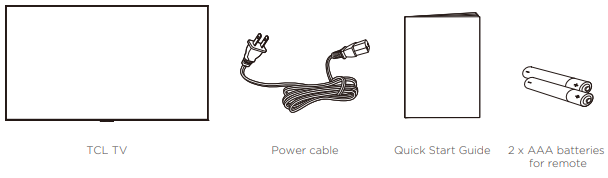
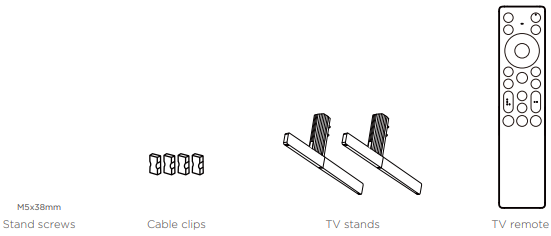
What’s in the box
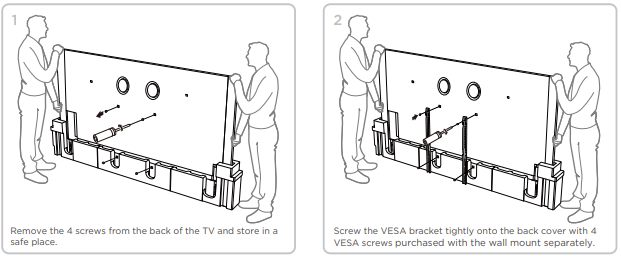
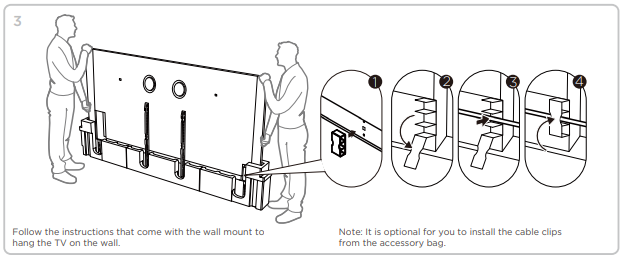
To mount on a wall
If you are mounting your TCL Google TV to the wall, do not attach the TV base stand or TV stand column. To mount your TV to the wall, purchase a VESA wall mount according to these specifications: • 98″ model VESA 600×500, 4 M8x16mm screws. The VESA number is the horizontal and vertical measurement of the mounting holes. For example, 200 x 200 indicates that the mounting holes are spaced 200mm horizontally and 200mm vertically. Follow the directions supplied with the wall mount to mount the TV to the wall.
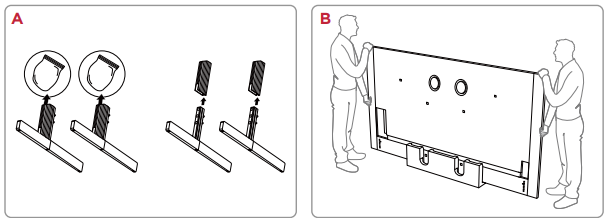
To use the Stand
- Take the stand screws and cable covers out of the TV stands.
- Carefully remove the foam packaging on the left and right sides of the TV.
- Leave the TV on the bottom foam packaging.
- Align the stands with the screw holes located on the TV.
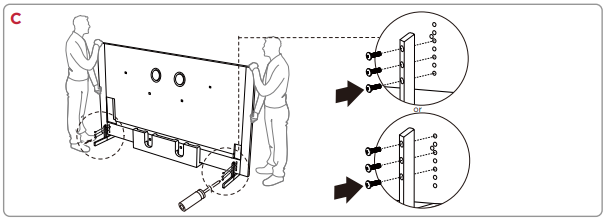
- Secure the stands to the TV with the supplied stand screws.
- The stands can be installed at a higher or lower position, as illustrated.
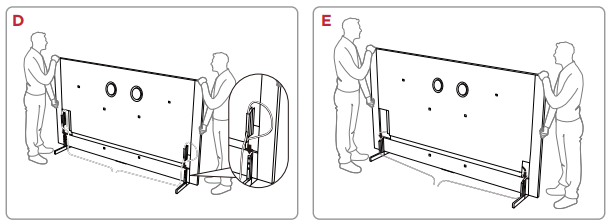
- Route the cables and install the cable covers as illustrated.
- Stand installation is completed.
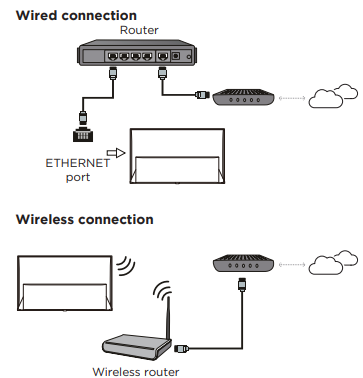
Connect to the Internet
The following instructions are just the usual ways to connect your TV to the wired or wireless network. The connection method may be different depending on your actual network configuration. If you have any questions about your home network, please refer to your Internet service provider.
Network Settings
- Press the remote control to display the TV homepage.
- Press the remote control, select All settings, and press OK to enter the Settings menu.
- Select Network & Internet, press OK to enter the submen,u and follow the on-screen guidance to set up your network.
Switch the TV on and off
- When the power cord is connected, the TV will be turned on directly or be in standby mode.
- If the TV is in standby mode, press the button on the remote control to turn it on.
- To put the TV into standby mode, press the button on the remote control.
- The TV set remains powered on, but with low energy consumption.
- To completely turn the TV off, unplug the power cord from the wall outlet.
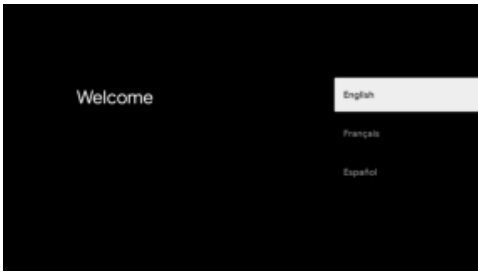
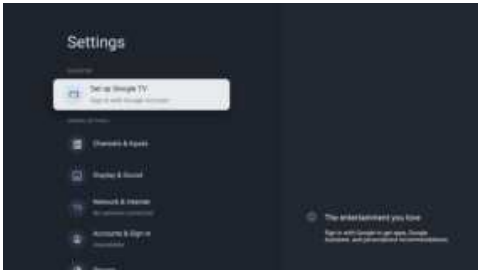
Initial Setup
The first time you switch the TV on, the Welcome screen appears, which guides you through the initial setup process. Follow the on-screen instructions to finish the initial setup process, ss including selecting the language, connecting to the network, and more. During each step, either make a choice or skip the step. If you skip a step, you can perform the setup later from the settings menu.
Operations
Accessing channels
In TV homepage, press the button on the remote control to display the live antenna TV channels and select Search to scan channels. Press tCH/buttonsons to change channels.
Watching connected devices
In TV homepage, press the remote control, select Inputs, and press OK to display the source list. Press the Left/Right button to selectthe input source and press OK to confirm.
Adjusting volume
Press the VOL/buttons on the remote control to increase or decrease the volume. Press the button on.
Using the Power Button on your TV
In addition to using the remote control to control your TV, you can also use the button on your TV. You can turn on the TV from standby mode by pressing the button on your TV. While the TV is on, the multi-function menu appears when pressing the button on your TV. For more information on how to use the multi-function menu, please refer to the figure below.
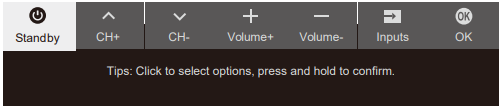
- Press the button to move the highlight to the next function selection.
- Press and hold the button for more than 2 seconds to confirm your selection
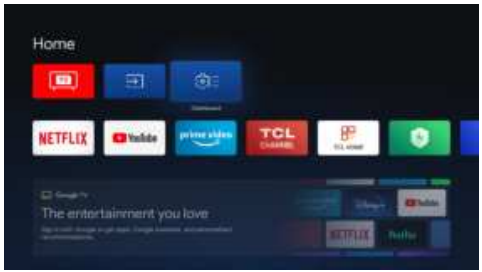
Accessing the TV homepage
The basic TV homepage allows you to enjoy Internet Applications, specially adapted Internet websites, and change your TV settings.
Accessing the TV homepage
- Press the remote control to display the TV homepage.
- Press the Up/Down/Left/Right button and OK to enter the desired Apps, functions, or settings.
- Press to return to the homepage
Using the TV settings menu
- Press the remote control to display the TV homepage.
- Press the remote control, select All settings, and press OK to enter the Settings menu.
- Press the Up/Down button to select menu options, then press OK to enter the option list or the
corresponding submenu. - Press to return to the previous menu.
- Press to close the settings menu and return to the homepage.e
General Settings
- Channels & Inputs: Adjust the channel settings, scan for channels, ls and adjust input settings.
- Display & Sound: Adjust the picture settings and adjust to experience the different sound effects.
- Network & Internet: Configure the Wi-Fi and internet settings. The network status is also displayed.
- Accounts & Sign In: Sign in to your Google account to make the most of your TV.
- Privacy: Adjust your privacy settings.
- Apps: View the list of recently opened apps, all installed apps, and the system apps.
- System: Adjust the system settings of the TV.
- Remotes & Accessories: Search for Bluetooth accessories and pair them with your TV.
- You can set up your TV to make it visible to all nearby Bluetooth devices.
- Help & Feedback: Visit Google TV Help.
Adjusting your TV
Channels & Inputs
The channels and inputs menus are used to scan and maintain your channels, and access the Electronic Program Guide. Adjust the input settings. The menus are only available in TV mode.
- In TV mode, press the remote control, select All settings, and go to Channels & Inputs.
- Press the Up/Down button to select the item you want to set, and then press OK.
- Set the channel and input items to your preferences one by one.
Channels
- Channel Scan: Search channels automatically or manually.
- Country/Region: The TV installs and arranges channels according to your country or region.
- Automatically: Press the Up/Down button to select Scan Automatically and press OK to enter.
- Manually Scan: Scan channels manually by entering parameters such as channel number or frequency.
- Edit Channels: After the automatic search, channels are arranged in a preset order.
- Clear Channel List: Reset all channel lists.
- EPG: Access electronic program guide.
- Channel Diagnostics: Test your TV’s pictures, sound, and signal.
- Authentication for TV service: Verify the authenticity of a selected TV service and inform you when it is not trusted.
Broadcasting & Operating Environment

External Inputs
You can see the connected input, standby inputs, and set the name of these inputs, and select whether to display them in the input list.
- External devices control (CEC): Control the devices connected by HDMI.
- HDMI Control: Allows control of compatible HDMI-connected devices.
- eARC: Support for high-quality sound output from HDMI4 (ARC/eARC) audio devices.
- Power on the TV in sync: Allows the power to be turned on the TV synchronously when turning on the compatible HDMI-connected device.
- Device standby in sync: Allows the compatible HDMI-connected devices to synchronously stand by while the TV is on standby.
- Auto Switch: Automatic standby to save energy when the HDMI-connected device is not in use.
Display & Sound
The menus are used to obtain the best picture and audio settings according to your preference and
the type of program you are watching. The menus can be set up for every broadcasting type and
every input source.
- Press the remote control, select All settings, and go to Display & Sound.
- Press the Up/Down button to select the item you want to set, and then press OK.
- Set the picture and audio items to your preferences one by one.
Picture
- Picture Mode: Select a picture mode optimized for different viewing conditions.
- Intelligent: Automatically adjusts the best image based on the content and viewing environment.
- Vivid: Enhanced colors and contrast.
- Standard: Optimized to save power, recommended for daily use.
- Sports: Suitable for watching sports content, fast-moving scenes aresmootherh.
- FILMMAKER MODE: Restore the real film scene and feel the filmmaker’s expression of the image.
- Movie: Suitable for watching movies, can enhance picture quality performance for films.
- Adaptive Color Temperature: Automatically adjusts the screen color temperature based on the ambient room light.
- Color Temperature: Adjust the color temperature of the picture.
- White Balance: Adjust the white balance level.
- Color Space: Adjust the color reproduction range.
- Clarity: Adjust settings such as Sharpness and Digital Noise Reduction.
- Sharpness: Adjust the detail of the picture.
- Digital Noise Reduction: Reduces the compression noise.
- Noise Reduction: Reduces the random noise.
- Gradation Clear: Removes noise caused by gradation.
- Precision Detail: A Dolby Vision technology that shows more detail in the bright and dark areas of the image, giving you a clearer and more realistic visual experience.
- Motion: Adjust motion, such as LED Motion Clear and Blur Reduction.
- Motion Clarity: Intelligently adds motion compensation frames to reduce jitter and drag, making motion pictures look smoother and clearer.
- LED Motion Clear: Controls the LED backlight to make the fast-moving images clear.
- Refresh Rate: Prevent screen tearing to improve the gaming experience.
- Restore Defaults: Resets all custom settings of the current picture mode. Press the Left/Right button to select OK and then press OK.
Screen Settings
- Auto Detect: Automatically adjusts the viewable screen according to the received signal.
- Aspect Ratio: Adjust the aspect ratio and viewable screen area.
- Overscan: Adjusts the picture size so that objects appear bigger, but the edges of the picture are lost.
Sound
- Sound Mode: Select the sound mode that best suits your audio needs.
- Movie: Optimized surround sound for an immersive experience.
- Speech: Focus on vocals anenhanceed the vocal clarity.
- Music: Optimized sound details and enhanced musical layering.
- Games: Optimized surround sound for an enhanced gaming experience.
- Night: Optimize the dynamic amplitude of sound for a soothing atmosphere at night.
- Sports: Improved spatial distribution for an enhanced experience.
- Beosonic: Adjust the sound profile according to your personal preference in Beosonic.
- Equalizer: Adjust the sound based on different frequencies.
Audio Output Settings
- Audio Output: Select the device you wish to output audio to.
- Auto: Your TV will automatically select the highest priority device to output.
- Internal Speaker: Audio outputs from TV speakers.
- Wired Headphones: Audio outputs from connected wired headphones.
- ARC: Audio outputs from ARC connected device.
- Bluetooth: Audio outputs from a Bluetooth-connected device.
- Optical: Audio outputs from Optical connected device.
- External Subwoofer: Audio outputs from the External Subwoofer and the TV speaker at the same time. Please manually select this mode after connecting the device.
System
Follow these instructions to configure various system settings.
- Accessibility: Configure captions, high contrast text, text to speech.
- About: Check the detailed information of the TV, such as system update, device name, status, model, and version, product information, etc.
- Date & Time: This function needa s network connection, and then you can set the date and time.
- Language: Select a menu language. The selected menu language will also be set as the voice recognition language.
- Keyboard: Configure the settings of the on-screen keyboard. You can set the language and check the version, terms of service, privacy policy, and open source licenses.
- Storage: View the memory usage status, clear data, cache, and defaults, and open, force stop, or disable an app. Besides, you can add or remove an app’s permissions to access your contacts, location, and microphone, etc.
- Ambient mode: You should set up Google TV to enable the function that can show the weather, time, etc, with Ambient. You can also set Google Photos, art gallery, and experimental.
- Power & Energy: Configure the screen saver settings, including power on behavior, Energy saver, Sleep Time,r and Standby Mode.
- Cast: Let others control your cast media. Show a notification on all Android devices connected to your Wi-Fi and let them control media casting to this device.
- System sounds: You can set the system sounds to off, low, medium, or high.
- AirPlay and HomeKit Settings: Wirelessly share content with this TV using Apple AirPlay and control this TV using the Home app on your iPhone, iPad, or Mac.
- TCL Account & Sign In: You can add accounts
Password in Parental Control
- Set the password in the All settings > System > Parental Controls menu.
- The super password is 0423. If you forget your code, enter the super password to override any existing codes
Troubleshooting
Please check the following list before requesting service
There is no picture or sound
- Make sure the power cord is properly inserted in the power outlet.
- Make sure the source type is set correctly.
- Make sure the antenna is properly connected.
- Make sure the volume is not set to minimum, or the sound is not set to mute.
- Make sure the headphones are not connected.
- The TV may be receiving a signal other than from TV broadcasting stations.
- Make sure the antenna cable is properly connected.
- Consider whether your TV signal is being properly received.
The picture is too dark, too light, or tinted
- Check the color adjustment.
- Check the brightness setting.
- Check the sharpness function.
The remote control does not work.
- Check the batteries of the remote control.
- Make sure the remote sensor window on the front of the TV is not in strong fluorescent lighting.
- Try to clean the remote sensor window on the front of the TV with a soft cloth.
FCC Information
This equipment has been tested and found to comply with the limits for a Class B digital device, pursuant to Part 15 of the FCC Rules. These limits are designed to provide reasonable protection against harmful interference in a residential installation. This equipment generates, uses, and can radiate radio frequency energy and, if not installed and used in accordance with the instructions, may cause harmful interference to radio communications. However, there is no guarantee that interference will not occur in a particular installation. If this equipment does cause harmful interference to radio or television reception, which can be determined by turning the equipment off and on, the user is encouraged to try to correct the interference by one or more of the following measures:
- Reorient or relocate the receiving antenna.
- Increase the separation between the equipment and receiver.
- Consult the dealer or an experienced radio/TV technician for help.
This device may not cause harmful interference, and this device must accept any interference received, including interference that may cause undesired operation.
- Supplier Name: TTE Technology, Inc. (dba TCL North America)
- Supplier Address: 189 Technology Drive, Irvine, CA 92618, USA
Recycling Information
Click on our convenient interactive map to quickly locate a solution in your community. TCL encourages consumers to always look for a recycling or reuse alternative to discarding televisions and other electronics, and in many areas, TCL has programs for consumers todrop offf and recycle televisions free of charge.
Legal Statement
Due to the various capabilities of products featuring the SmartTV – Services, as well as limitations in the available content, certain features, applications, and services may not be available on all devices or in all territories. Please visit our website for more information on specific device information and content availability. The services and availability of content through SmartTV are subject to change from time to time without prior notice.
Without limiting the generality of this disclaimer, TCL expressly disclaims any responsibility or liability for any change, interruption, disabling, removal of,f or suspension of any content or service made available through this device. TCL may impose limits on the use of or access to certain services or content, in any case and without notice or liability. TCL is neither responsible nor liable for customer service related to the content and services.
How to Get Service
- A representative must troubleshoot your problem over the telephone, via chat, or through e-mail before receiving service.
- TCL is not responsible for transportation costs for warranty coverage, including but not limited to Unit repair or replacement, to the Authorized TCL Service Center or TCL-designated address.
- However, TCL will pay for return shipping to a United States address only. TCL will provide instructions for packaging and shipping the Unit to the Authorized TCL Service Center or TCL-designated address.
What your warranty does not cover
- A Unit sold in “As-Is”, “Used”, “Factory Reconditioned”, “Factory Re-Certified”, or “Refurbished” condition or with faults. Extended Service Plans purchased from Retailers.
- Service calls to your home for delivery or pick-up, installation, instruction, replacement of house fuses, connection of house wiring or plumbing, or to correct unauthorized repairs.
- Installation and related adjustments, or damage resulting from installation.
- Damage resulting from non-approved installation or repair methods.
- Damage from misuse, abuse, neglect, insects, normal wear and tear, cosmetic damage, mishandling, faulty installation, inadequate electrical wiring, or power line surges.
- Damage caused by operating the Product in a corrosive or wet atmosphere.
- Use of accessories or components that are not compatible with this Product.
- A Unit purchased or serviced outside of the United States.
- Costs of shipping the Unit to the Authorized TCL Service Center or TCL-designated address. TCL will pay for return shipping to the customer to a United States address only
How State Law relates to this warranty
- Some states may not allow the exclusion or limitation of incidental or consequential damages, or limitations on how long an implied warranty lasts, so the above limitations or exclusions may not apply to you.
- This warranty gives you specific legal rights, and you also may have other rights that vary from state to state.
If you purchased your Unit outside of the United States or seek warranty service coverage outside of the United States, this warranty does not apply. Contact your dealer for warranty information. Costs of such service calls are the sole responsibility of the purchaser.
Customer Support
- Website: www.tcl.com/au
- Ph: 1300 738 149.