
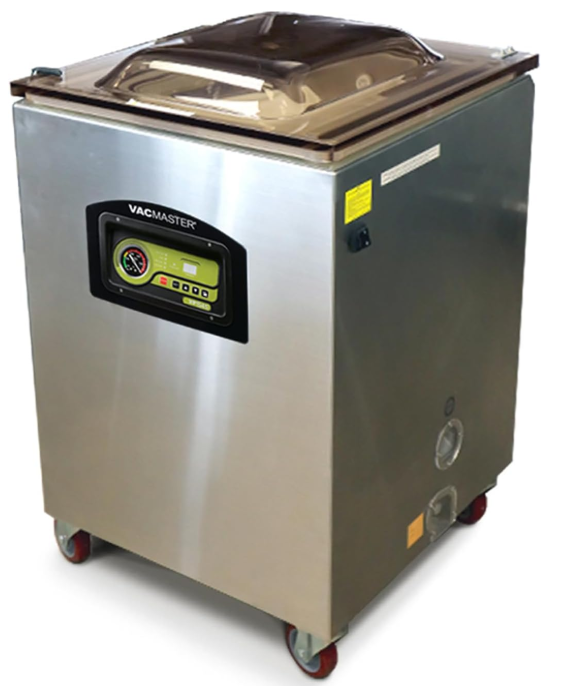
VacMaster VP540 Chamber Vacuum Sealer
Safety Instructions
- Never let the vacuum sealer run unattended.
- Disconnect the vacuum sealer from the power source before leaving the work area.
- To protect against the risk of electric shock, do not immerse the cord, plug, or vacuum sealer in water or other liquids.
- To reduce the risk of electric shock and injury to persons, disconnect from the power supply when not in use, before cleaning, and before servicing.
- Call the provided customer service number for information on examination, repair, or adjustment.
- The use of accessory attachments not recommended by the appliance manufacturer may cause injuries.
- Do not use outdoors. Optimal operating temperature range is 65° to 75°.
- Do not disassemble this appliance beyond the instructions provided.
- Doing so may result in personal injury.
- Do not place on or near a hot gas or electric burner, or in a heated oven.
- Do not use for anything other than the intended purpose.
- This appliance is for commercial use only.
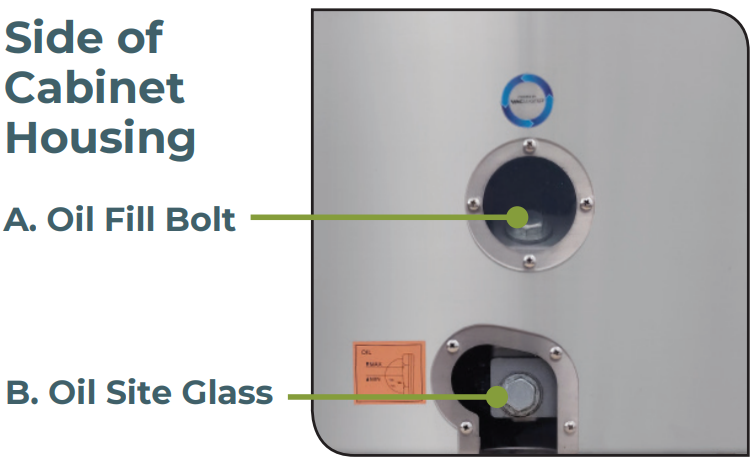
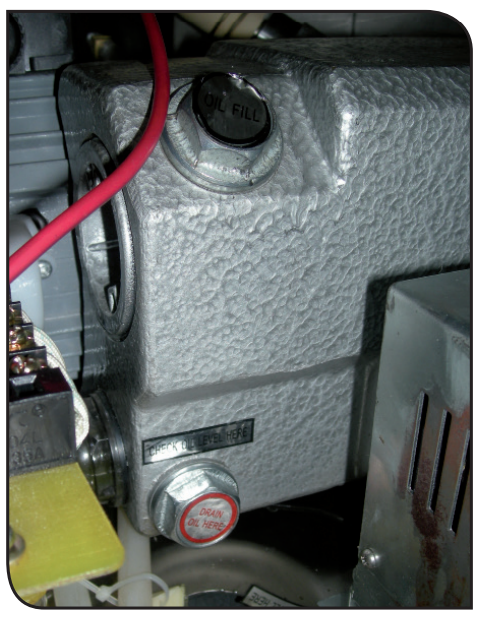
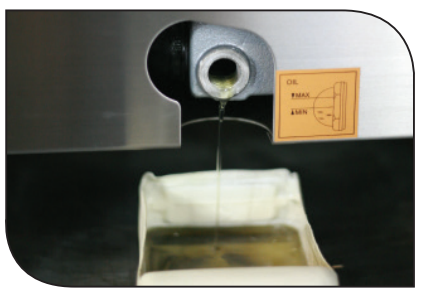
Adding Oil to a Vacuum Pump
Turn off and unplug the machine to prevent electrocution.
- Using VacMaster-approved 10W non-detergent hydraulic oil, fill the enclosed plastic oil bottle.
- Locate the oil fill bolt (A) on the top of the vacuum pump.
- Remove oil fill bolt.
- Watching the oil site glass (B), insert the end of the oil bottle into the hole.
- Fill oil level between 1/2 to 3/4 of site glass.
- Do not overfill. Overfill can cause damage to the vacuum pump
- Replace and tighten the bolt on to vacuum pump.
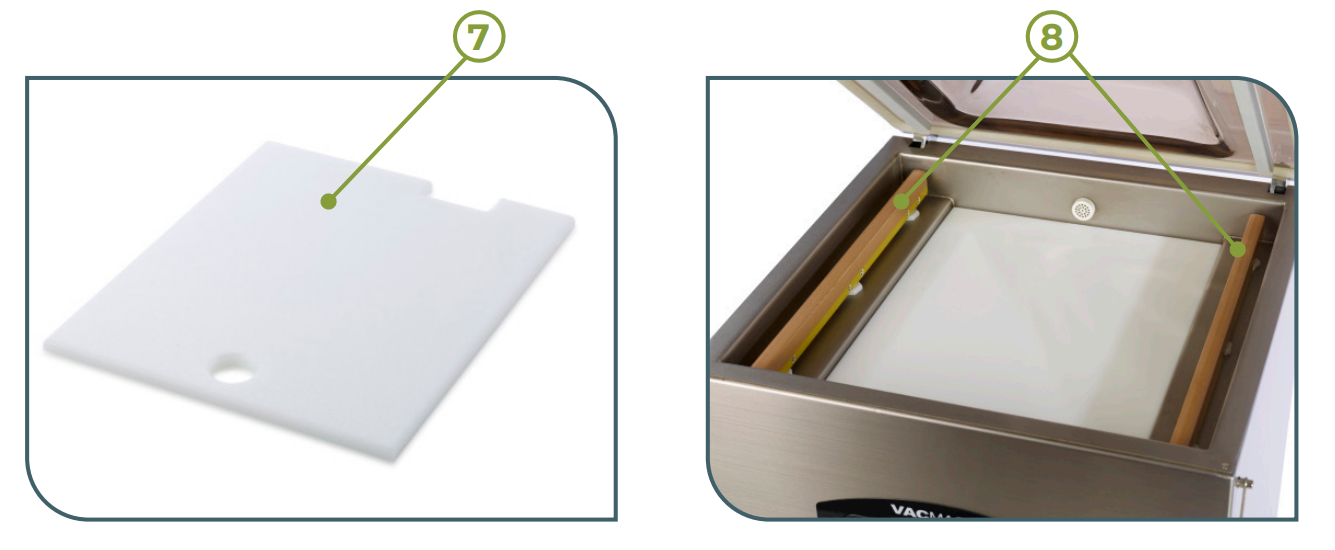
Features
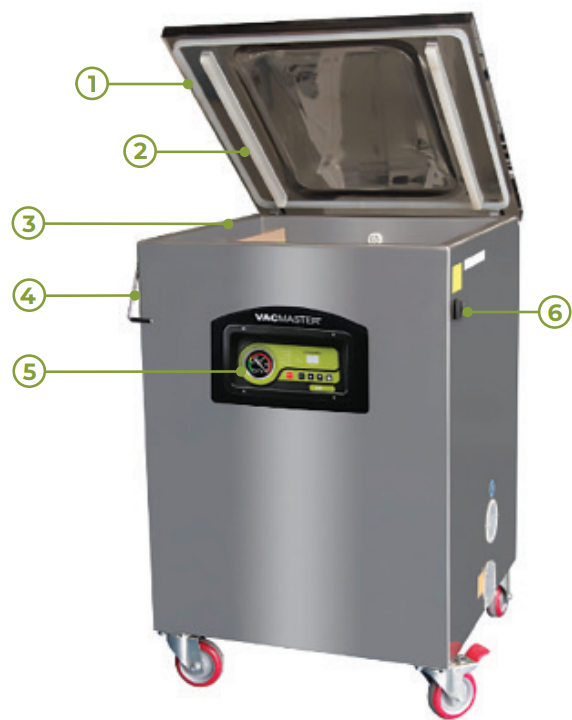
- Lid Gasket
- Seal Pads
- Vacuum Chamber
- Lid Lock
- Control Panel
- Power Switch
- Filler Plates
- Seal Bars
Description
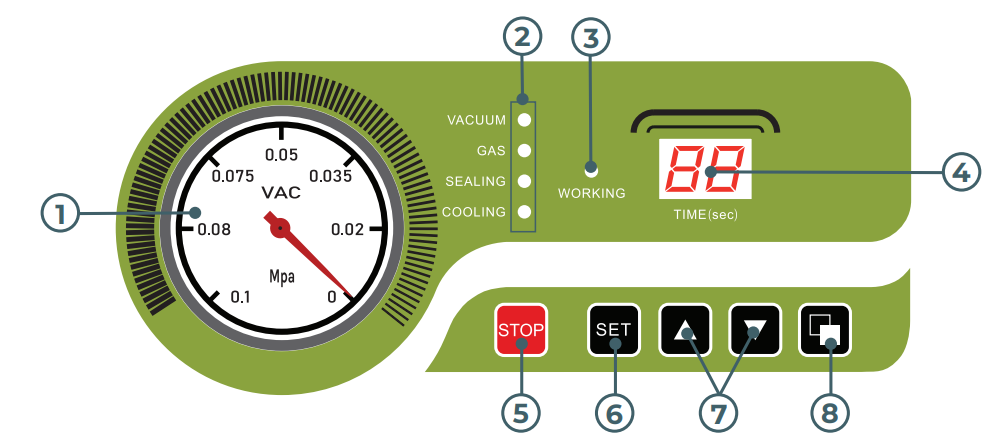
- Vacuum Gauge – Indicates the vacuum level inside the chamber.
- Function Lights: Vacuum – Illuminates to adjust vacuum time as well as during the vacuum process. During setup, adjust the vacuum time using the UP/DOWN Buttons.
- Gas – This model does not offer the gas flush option.
- Sealing – Illuminates to adjust the vacuum time as well as during the sealing process. During setup, adjust the sealing time using the UP/DOWN Buttons.
- Cooling – Illuminates to adjust vacuum time as well as during the cooling process. During setup, adjust the cooling using the UP/DOWN buttons.
- Working Indicator Light – Illuminates to indicate the machine is in use.
- LED Screen (Time) – Displays current function or cycle time, measured in seconds.
- STOP Button – Press to stop the cycle and immediately seal the pouch. This button will only work when the machine is in the vacuum process.
- SET Button – Press to select the vacuum time, sealing time, or cooling time. Use with the UP/DOWN buttons.
- UP/DOWN Buttons – Press to increase or decrease vacuum time, sealing time, or cooling time.
- Program Button – Use to program 10 unique vacuum and seal time cycles
How to Change the Oil
- Run the vacuum process a couple of times to “warm up” the oil.
- Turn off the machine and unplug it to prevent electrocution.
- Locate the drain & fill plugs on the side of the unit.
- Locate the drain bolt on underneath side of the vacuum pump.
- For access and ease of draining the oil, position the machine so the drain bolt is “clear” and the dirty oil can be captured.
- Oil will flow immediately when the bolt is removed. Place a catch cup underneath before removing the drain bolt.
- Capture oil from the pump. When oil is completely drained, replace and tighten the bolt. (Dispose of old oil properly, according to your local and state regulations.)
- Follow the “Adding Oil to Vacuum Pump” instructions at the beginning of the manual. Do not use the machine until oil has been added.
Maintenance
The VP540 vacuum pump requires periodic oil changes. Required oil change schedule:
- First oil change: 1 week after use.
- Future oil changes: every 3 months or 250 cycles.
- Using the pump site glass, check the oil level and color frequently.
- Oil must remain between 1
- With use, the pump oil will become cloudy, dark, or even “milky”.
- Once oil becomes discolored, change oil by replacing it with new VacMaster® vacuum oil.
Set Up – Powering up the VP540
- Attach the power cord and plug the machine into a grounded electrical outlet.
- Properly insert the electrical cord into the power outlet on the back of the machine, and then plug the cord into the wall outlet.
- Open the machine lid – Release the lid lock, located on the right side of the machine, and allow the lid to lift and remain open.
- Do not stand over the lid.
- To power ON, press “I” on the power switch.
- To power OFF, press “O” on the power switch.
Set Up
To adjust/set the timing controls, press the SET button on the control panel until the required label (Vacuum, Sealing, or Cooling) is illuminated. For each selection, the current time setting will show on the LED Screen. All time settings are displayed in seconds. For initial testing, the time settings should be:
- Vacuum Time – 40 seconds
- Sealing Time – 1.2 seconds
- Cooling Time – 2.2 seconds
Timing Controls
Vacuum Time: To increase or decrease the vacuum time, press the SET button until VACUUM is illuminated and then use the UP/DOWN buttons to adjust the vacuum time accordingly. The time setting will display on the LED Screen on the control panel.
Sealing Time: To increase or decrease the sealing time, press the SET button until SEALING is illuminated and then use the UP/DOWN buttons to adjust the sealing time to accommodate your application. It is recommended that you make adjustments in 0.2-second increments to avoid melting the pouch.
Cooling Time: To increase or decrease the cooling time, press the SET button until COOLING is illuminated and then use the UP/DOWN buttons to adjust the cooling time accordingly.
Installation
- Select a vacuum chamber pouch.
- Select the proper size of vacuum chamber pouch for the product that you are packaging.
- Make sure that the mouth of the pouch does not exceed the length of the seal bar, and make sure the entire pouch fits inside the chamber.
- Allow 3” of extra headspace at the top of the pouch to ensure a quality, air-tight seal. The VP540 accepts vacuum chamber pouches up to 16” W x 18” L in size.
- Fill the pouch and place it inside the chamber.
- Fill the pouch with the product to be vacuum packaged and place the pouch inside the chamber.
- Keep pouches that contain liquids or wet products below the height of the seal bar.
- Lay the pouch flat inside the chamber, with the opening of the pouch across the seal bar.
- Make sure that the pouch lies flat across the seal bar and is free of wrinkles.
- Close the machine lid to vacuum and seal.
- Close the lid and press down firmly for 2-3 seconds or until the vacuum gauge begins to move.
- When the lid opens, remove and inspect the pouch.
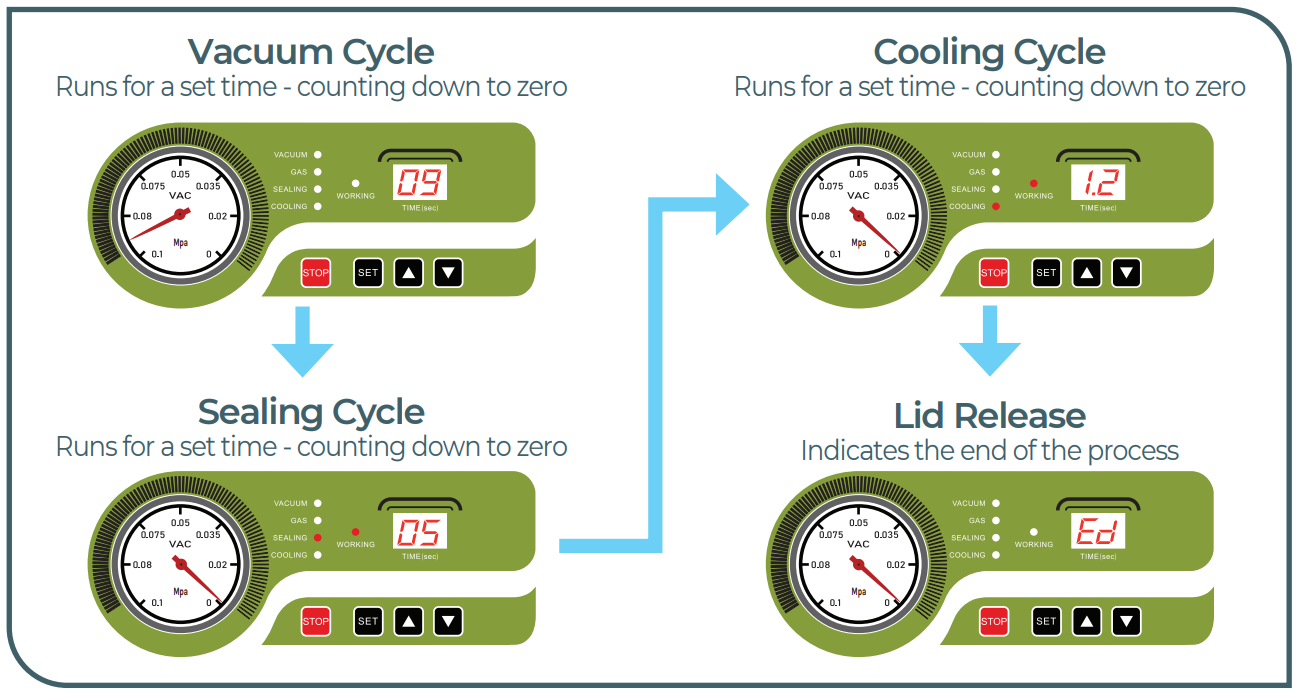
Vacuum Confirmation
- Check the quality of the vacuum by looking at the tightness of the pouch and the product.
- Look for air pockets or air leaks. If you notice that the product is vacuum-packed tightly, then increase the vacuum time by 5 seconds, vacuum, and seal again.
Seal Confirmation
- Inspect the pouch seal. A positive seal will appear clear upon inspection.
- If the seal is spotty or incomplete, increase the seal time by 0.1 second.
- If the seal appears white or milky, decrease the seal time by 0.1 second.
- Once the settings are determined for your application, vacuum and seal again.
- If the product is vacuumed and sealed tightly, then the process is complete.
- ED Code – stands for end of demonstration. You are ready for a new cycle.
Programmable Vacuum Cycle Instructions
This VacMaster chamber vacuum sealer is now equipped with a new feature that allows you to program and store up to 10 different seal cycle settings. Changing from liquids to solids to delicate items has never been easier to get that perfect amount of vacuum and a double seal for an additional layer of protection.
Also included is an oil change alert that, after 250 uses, reminds you to change the oil. This reminder is intended to keep your machine in tip-top shape. As a rule of thumb, change your oil at the 250-mile alert or after 3 months, whichever comes first.
CO Code – This stands for change oil. Once complete, press “Set” ” Up” “Down” (all 3) at the same time for 3 seconds. This will reset and clear this code.
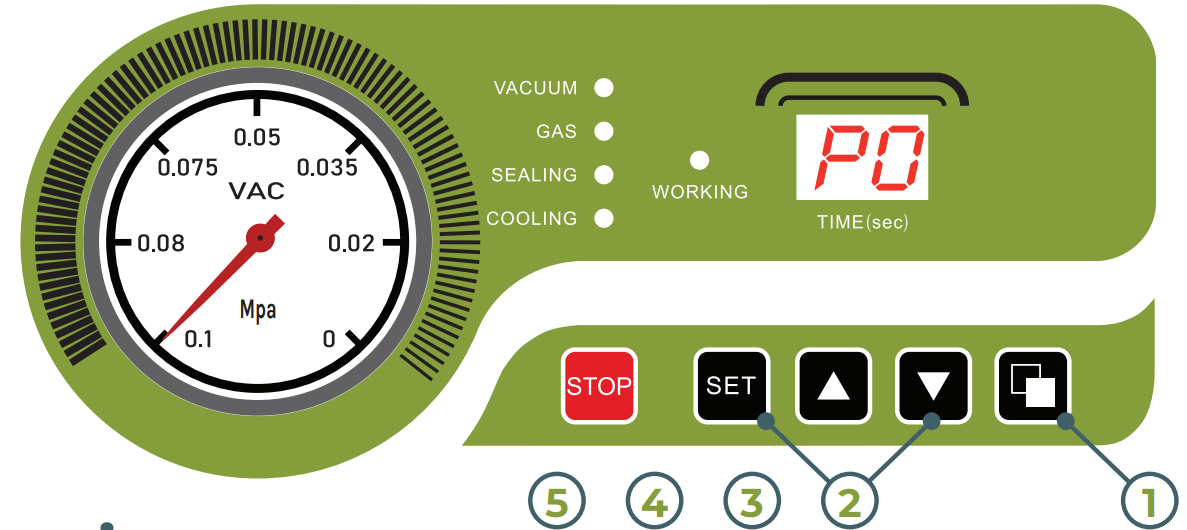
- Press the program button on the right side of the control panel to bring up P0 on the LED Display.
- Press the SET button to change your desired vacuum time.
- Use up or down arrows to adjust the desired vacuum time.
- Press SET again to change the seal time.
- Use up or down arrows to adjust desired seal time.
- Press the SET button again to change your cool-down time.
- Use up or down arrows to adjust desired cool-down time.
- Add at least 1 Second more to the cooling time over the sealing time.
- Press SET one last time to save the settings.
- You are now ready to vacuum seal.
- Set up and save up to 10 unique settings.
- To change the programmed setting, simply press the program button.
Program Settings
- The vacuum time can be adjusted to your desired length.
- Suggested vacuum time should be set to
- 18-20 for liquids/powders.
- 35-40 is a good starting point for other products.
All settings are for 3 mil bags. The seal time and cool-down time should only be changed if you move up in the thickness of bags. For different thickness bags, increase both seal and cool down times by .2 seconds at a time until you get a good seal. Please scan the QR code for an instructional video on the programmable functions.
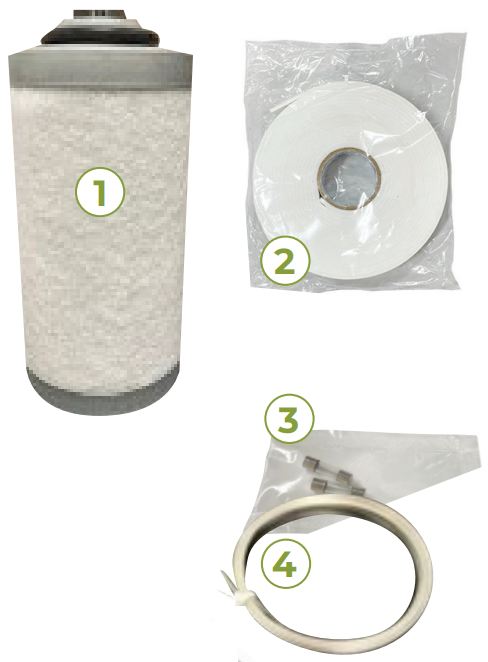
Maintenance Kit
- Exhaust Filter: Spare filter; should be checked every 6-12 months. If the filter looks dirty or saturated in oil, it will need to be changed. If the filter looks clean, it is ok to put it back into the pump & motor assembly.
- Double-Sided Tape: Used for adhering the top bar that holds the seal pad in the lid.
- 20-AMP Fuses (2x): Used for replacing fuses located on the heating transformer.

- Hex/Allen Wrench: Used to remove tension blocks that hold the seal wire to the base of the seal bar.
- Reversible Screwdriver: Used to un-thread screws on the cabinet of the machine and the screws to move the chamber.
- Oil Fill Bottle/Oil: Used to fill the pump with oil.

Maintenance
Using the pump site glass, check the oil level and color frequently.
- Oil must remain between ½ to ¾ of site glass.
- With use, the pump oil will become cloudy, dark, or even “milky.” Once oil becomes discolored, change the oil using new VacMaster® vacuum oil.
- First oil change: one week after use.
- Future oil changes: every 3 months, or 250 cycles; whichever comes first.
Changing/Replacing Oil
Remove the oil drain bolt – Locate the oil fill bolt on the side of the machine. Place an oil catch cup under the drain bolt. Using your 7/8” socket wrench, remove the oil drain bolt. Oil will immediately begin to flow out of the machine.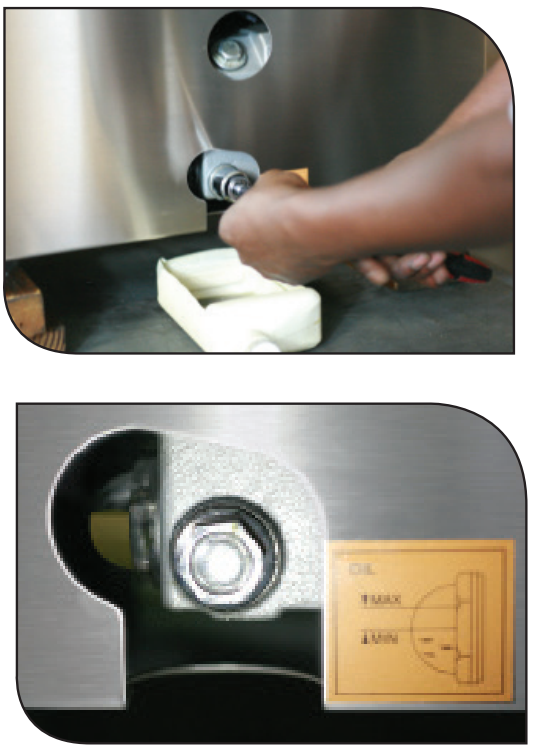
Capture oil – When oil is completely drained, replace the VacMaster VP540 Chamber Vacuum Sealer drain bolt. Dispose of old oil properly, according to your local and state regulations. Refill pump with new oil – Follow the “Adding Oil to the VP540” instructions on page 3.
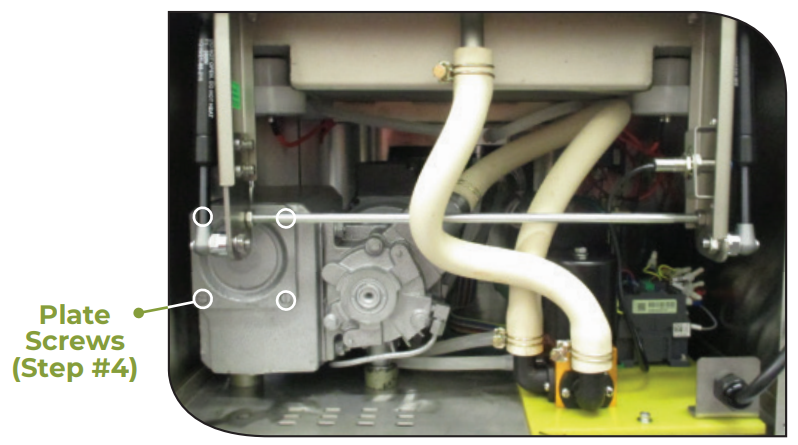
Changing the Filter
- Remove the back panel.
- Remove the screws that hold the Upper Chamber in place – Two located on the front corners and two located on the back.
- Pull the chamber assembly back about 3-4 inches
- Remove the 4 screws that hold the filter plate on the end of the pump
- Remove the plate and spring
- Remove the exhaust filter
- Install a new filter
- Reassemble all of the
pieces in reverse order!
Vacuum Packaging Guidelines
- Vacuum packaging is NOT a substitute for VacMaster VP540 Chamber Vacuum Sealer canning.
- Vacuum packaging cannot reverse the deterioration of foods.
- Vacuum packaging is NOT a substitute for refrigeration or freezing.
- Some fruits and vegetables may release gases, known as outgassing.
- You can reduce the growth of microorganisms at temperatures of 34ºF or less.
- Freezing at 0ºF will not kill microorganisms, but reduces the chances of them growing.
- For long-term food storage, always freeze vacuum-packed foods.
- Use VacMaster® Bone Guards to cover an item’s sharp edges to prevent pouch punctures.
- Allow foods and liquids to cool to room temperature before vacuum packaging.
- Avoid overfilling the pouch. Leave 3” of space between the contents and the open end of the pouch.
- This prevents spills during the vacuum sealing process.
- VacMaster® pouches are boilable, freezable, and microwavable.
- When microwaving, it is important to pierce the pouch.
LID Assembly
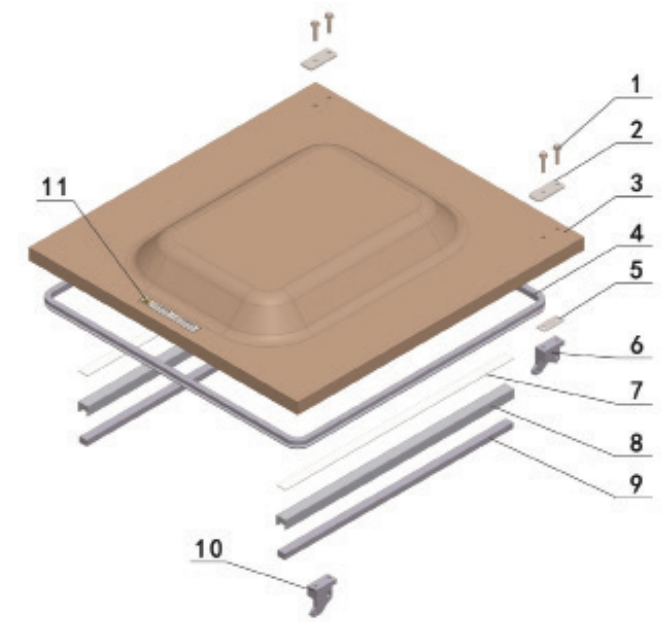
| Part # Part Name Qty | |||
| 1 | Hexagon head flange bolts | 4 | |
| 2 | Upward Platen for Glass Cover | 2 | |
| 3 | 979501 | Domed Lid | 1 |
| 4 | 979429 | Lid Gasket | 1 |
| 5 | Lower Platen for Glass Cover | 2 | |
| 6 | 979552 | Hinge Set (Left & Right) | 2 |
| 979553 | Hinge Pin | 2 | |
| 7 | 979825 | Double-sided tape | 1 |
| 8 | 977485 | Seal Pad / Top Bar Holder (NSF) | 2 |
| 979505 | Seal Pad / Top Bar Holder | 2 | |
| 9 | 977481 | Seal Pad (NSF) | 2 |
| 979423 | Seal Pad | 2 | |
| 10 | 979552 | Hinge Set (Left & Right) | 2 |
| 979553 | Hinge PIn | 2 | |
| 11 | Adhesive Tape | 1 | |
Chamber Assembly
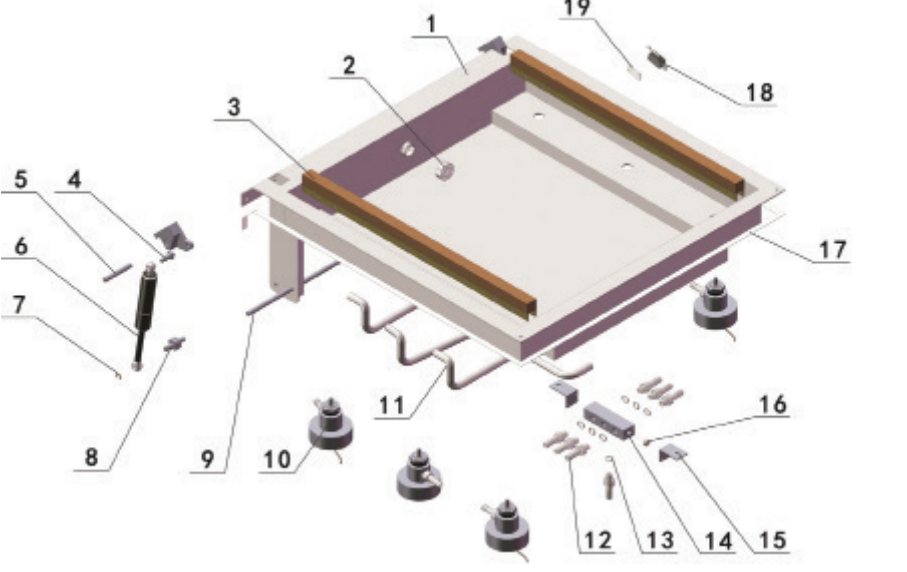
| Part # Part Name Qty | |||
| 1 | Chamber Assembly | 1 | |
| 2 | Exhausting hole cover | 1 | |
| 3 | 979473 | Seal Bar Assembly (NSF) | 1 |
| 979500 | Seal Bar Assembly | 1 | |
| 4 | 979358-8 | Upper Anchor Bolt (<04/2010) | 2 |
| 5 | 979553 | Hinge Pin | 2 |
| 6 | 979366 | Gash Shock | 2 |
| 7 | 977216 | Retaining Ring / E-clip | 2 |
| 8 | 979358-8 | Upper Anchor Bolt (<04/2010) | 2 |
| 9 | Supporting Rod of Hinge | 1 | |
| 10 | 978380 | Piston Assembly (NSF) | 6 |
| 979380 | Piston Assembly | 6 | |
| 11 | 979156 | Silicon Vacuum Hose | |
| 12 | M10x1 Solenoid valve pipe connections | 7 | |
| 13 | O-ring | 7 | |
| 14 | Dispenser | 1 | |
| 15 | Mounting Foot | 2 | |
| 16 | End Cap | 1 | |
| 17 | EVA Seal Bar | 1 | |
| 18 | 977482 | Microswitch (NSF)(Black Switch) | 1 |
| 979322 | Microswitch | 1 | |
| 19 | 979399 | Seat, microswitch | 1 |
Packaging Information
With the VP540, you can easily package a wide variety VacMaster VP540 Chamber Vacuum Sealerv of sizes and shapes. You can also prep and store smaller individual serving portions as well as bulk items.
- Keeps food fresh 3-5 times longer than conventional storage bags.
- Several sizes available to meet your packaging needs.
- Terrific for hundreds of applications in and out VacMaster VP540 Chamber Vacuum Sealer of the kitchen
- Safe for freezer, refrigeration, and microwave use.
- When a normal bag becomes compromised, VacMaster VP540 Chamber Vacuum Sealer the pouch will begin to delaminate.
- Bag thickness available in standard 3mil or heavy-duty 4 4mil.
The chamber of the VP540 can easily vacuum package the following sizes of vacuum pouches:
| Part # Part Name Qty | |||
| 1 | Hexagon head flange bolts | 4 | |
| 2 | Upward Platen for Glass Cover | 2 | |
| 3 | 979501 | Domed Lid | 1 |
| 4 | 979429 | Lid Gasket | 1 |
| 5 | Lower Platen for Glass Cover | 2 | |
| 6 | 979552 | Hinge Set (Left & Right) | 2 |
| 979553 | Hinge Pin | 2 | |
| 7 | 979825 | Double-sided tape | 1 |
| 8 | 977485 | Seal Pad / Top Bar Holder (NSF) | 2 |
| 979505 | Seal Pad / Top Bar Holder | 2 | |
| 9 | 977481 | Seal Pad (NSF) | 2 |
| 979423 | Seal Pad | 2 | |
| 10 | 979552 | Hinge Set (Left & Right) | 2 |
| 979553 | Hinge PIn | 2 | |
| 11 | Adhesive Tape | 1 | |
60 Assorted Vacuum Chamber Pouches:
- 20 (8″ X 8″)
- 20 (8” X 12″)
- 20 (10″ X 13″)
2 Filler Plates Maintenance Kit User’s Guide
Want Recipes, Tips, and Videos?
Check out our Blog or find us online.

- Check out our Blog
vacmasterfresh.com/fresh-bites-blog/ - Check out our Channel
youtube.com/@VacMasterFresh
Limited Warranty
ARY, Inc. | 11880 College Blvd., Suite 550, Overland Park, KS 66210 | VacMasterFresh.com | 800.821.7849 VP540 Chamber Vacuum Sealer | User Guide ARY, Inc., a distributor and manufacturer of vacuum packaging and other machines (collectively, the “Goods”), extends to the purchaser of the Goods a Limited One Year Warranty, from the receipt of the Goods, under terms and VacMaster VP540 Chamber Vacuum Sealer conditions set out herein.
Replace or repair any defective materials and workmanship (and return the Goods to the purchaser without charge). Refund the purchase price, or (iii) grant a reasonable allowance with the foregoing procedure.
Limitataions
This express warranty is the only warranty applicable. It excludes all other express oral or written warranties and all warranties implied by law with respect to the Goods, including any warranties of merchantability or fitness for a particular purpose.
ARY, Inc.’s maximum liability hereunder, arising from any cause whatsoever, whether based in contract, tort (including negligence), strict liability, or any other theory of law, shall not exceed the purchase price.
Customer Support
- Website: www.vacmasterfresh.com/product-registration/
- Visit: vacmasterfresh.com/contact-us/
- Tel: 1-866-384-8432.
FAQs
What is the VacMaster VP540 designed for?
A chamber vacuum sealer of commercial quality designed for high-volume applications is the VP540. It is a common option for restaurants, butcher shops, and food processors because it is perfect for sealing liquids, solids, powders, and even delicate foods.
How does a chamber vacuum sealer differ from an external suction sealer?
The VP540 employs a chamber technology that simultaneously removes air from the bag and chamber, in contrast to external sealers. As a result, it may vacuum-seal moist foods and liquids without removing them from the bag.
What bag types are compatible with the VP540?
In contrast to the textured bags used in external vacuum sealers, the VP540 requires smooth (non-embossed) vacuum chamber pouches.
How do I adjust the vacuum and seal time?
Depending on the type of food and bag thickness, adjust the suction, seal, and cooling times using the digital control panel.
Can I seal liquids like soups or marinades?
Indeed! The VP540’s ability to reliably vacuum-seal liquids without spilling is one of its key benefits. For high-volume liquid content, employ shorter vacuum times and make sure the liquid stays below the seal line.
Is this machine suitable for non-food uses?
Indeed, vacuum sealing electronics, medical supplies, lab materials, and other non-food products that require moisture protection and a longer shelf life is another application for the VP540.