
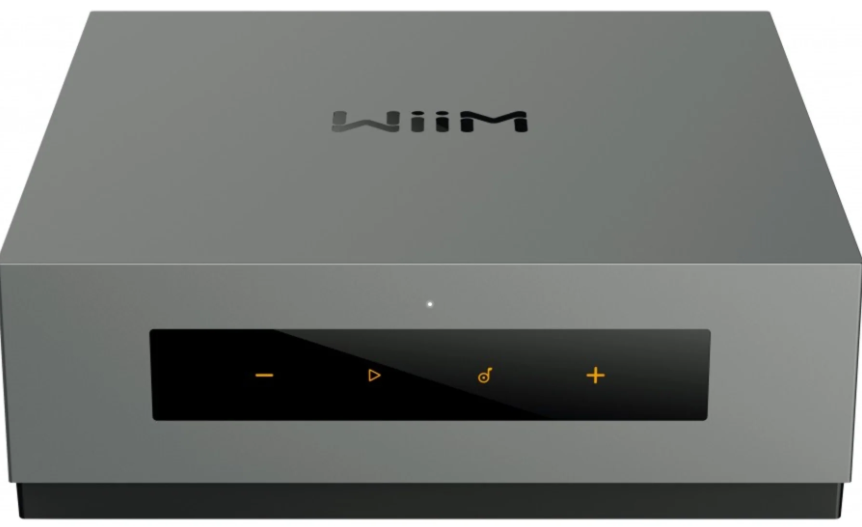
 WiiM CI MOD A80 Stereo Streaming Amplifier
Safety Instructions
- Clean only with a dry cloth. Do not block any ventilation openings.
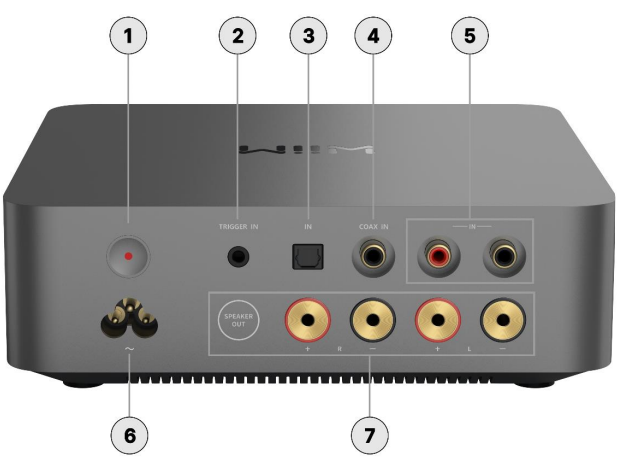
- Install in accordance with the manufacturer’s instructions.
- Only use attachments/accessories specified by the manufacturer.
- Unplug this apparatus during lightning storms or when unused for long periods of time.
- To reduce the risk of fire or electrical shock, do not expose this product to rain, liquids or moisture.
- Keep the product away from fire and heat sources.
- Do NOT place naked flame sources, such as lighted candles, on or near the product.
- Do NOT make unauthorised alterations to the product. Do not use in vehicles or boats.
- Use this product only where the power supply is provided.
- Where this unit or the appliance coupler is used as the disconnect device, the disconnect device shall remain readily operable.
- Due to ventilation requirements, we do not recommend placing the product in a confined space such as a wall cavity or in an enclosed cabinet.
Content Package
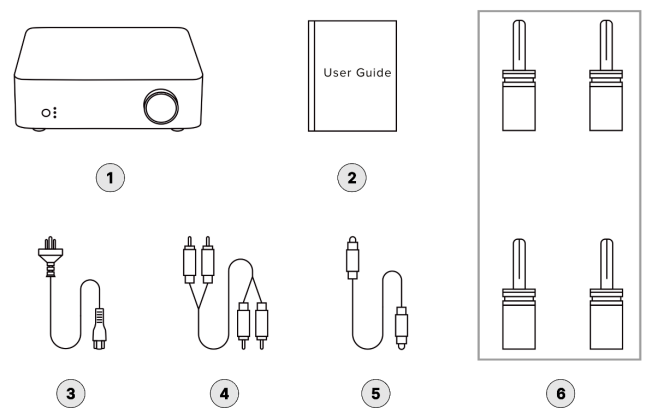
- WiiM Vibelink Amp x 1
- Quick start guide x 1
- 100~240V AC power cable x 1
- RCA audio cable x 1
- Optical cable x 1
- Speaker banana plugs x 4
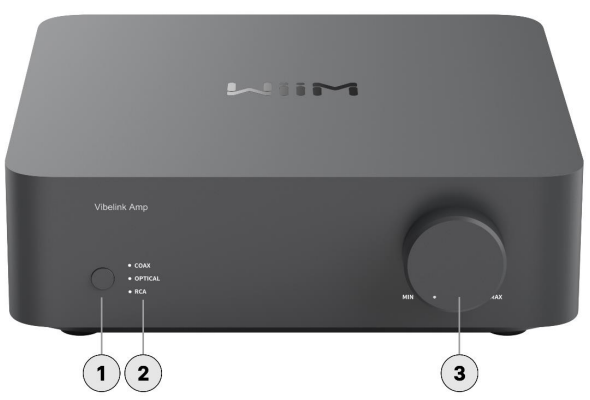
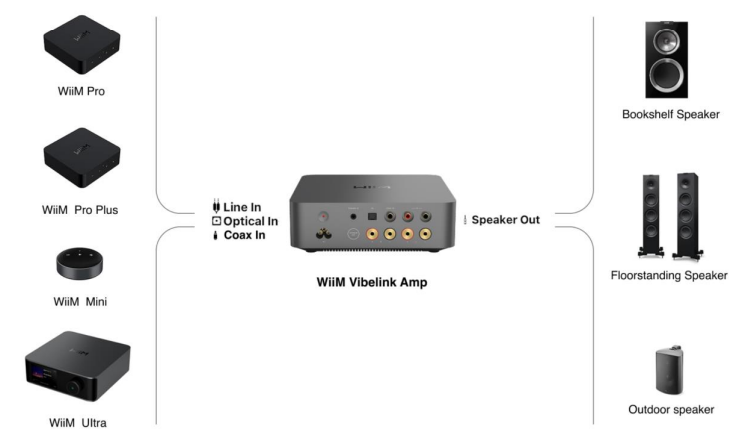
Front Panel Controls and Lights
Each numbered control or interface on the front panel is explained below:
Back Panel Controls and Interfaces
Each numbered control or interface on the back panel is explained below:
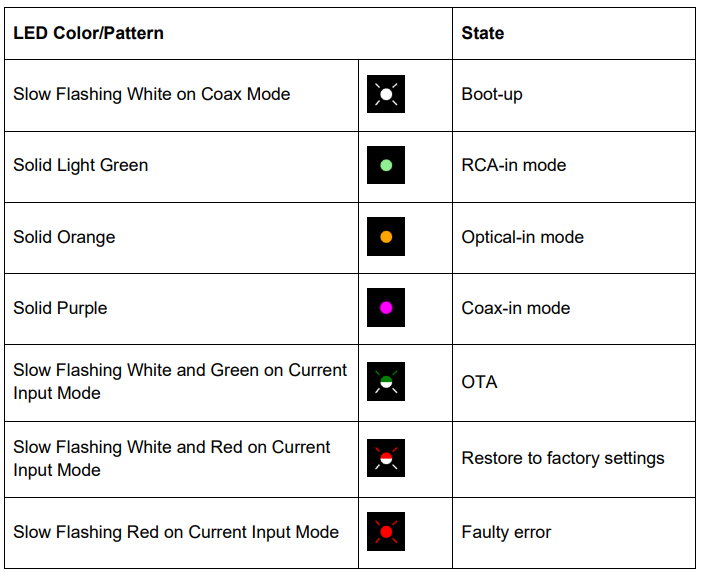
LED Status Light
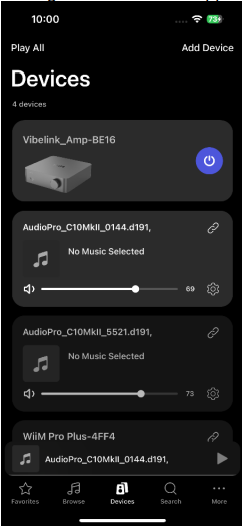
Typical Use
The WiiM Vibelink Amp is designed to enhance your existing audio setup with its powerful amplification capabilities and superior sound quality. Here are a few common use cases for the WiiM Vibelink Amp:
- Power Your Favourite Passive Speakers: Connect and power your traditional wired passive speakers, including bookshelf, floor-standing, in-wall, in-ceiling or outdoor speakers.
- High-Quality Audio: The WiiM Vibelink Amp supports bit-perfect, high-resolution audio formats and delivers rich, detailed sound, enhancing the listening experience of your existing audio system.
- Audio System Integration: The WiiM Vibelink Amp offers a range of analog and digital input interfaces, making it easy to connect various audio devices, such as a turntable or CD player, into one seamless system.
- WiiM System Integration: Easily integrate the WiiM Vibelink Amp into your WiiM system by connecting it to a WiiM streamer’s output, such as a WiiM Mini or WiiM Ultra. Once connected, it seamlessly receives streaming audio, delivering a unified, high-quality listening experience.
- Home Theatre Integration: Elevate your entertainment experience effortlessly with the WiiM Vibelink Amp’s Optical In interface. Plug in your TV and immerse yourself in rich stereo sound for shows, movies, and video games.
Other Devices
To use the WiiM Vibelink Amp, you will need a few essential devices and components. Here’s a list of what you’ll need:
Passive Speakers
The WiiM Vibelink Amp is designed to connect to your passive speakers, such as bookshelf, floor-standing, in-wall, in-ceiling or outdoor speakers. Make sure you have the appropriate speakers in place.
A WiiM Streamer
The WiiM Vibelink Amp is designed to seamlessly connect with a WiiM streamer, including the WiiM Mini, WiiM Pro, WiiM Pro Plus, and WiiM Ultra.
Third-party Audio Source
The WiiM Vibelink Amp can also connect to third-party audio sources via analog or digital interfaces, such as a CD player or turntable.
Power Source
The WiiM Vibelink Amp needs to be connected to a power source using the included power cable. Ensure that you have an electrical outlet nearby to power the device.
Audio Devices Work
The WiiM Vibelink Amp can work with your passive speakers, including bookshelf, floorstanding, in-wall, in-ceiling or outdoor speakers. It can play audio from a WiiM streamer— such as the WiiM Mini, WiiM Pro, WiiM Pro Plus, or WiiM Ultra—as well as from other sources like a TV or CD player.
How to Get Started
Before using your WiiM Vibelink Amp, follow these main steps to set it up:
- Connect the WiiM Vibelink Amp to passive speakers.
- Connect the WiiM Vibelink Amp to an audio input source.
- Power on the WiiM Vibelink Amp.
- Set input mode on the WiiM Vibelink Amp.
By completing these steps, your WiiM Vibelink Amp will be ready for use. The following sub-chapters will provide detailed instructions for each step.
Audio Output
The WiiM Vibelink Amp features the Speaker Out interface, which is designed to connect to passive speakers.
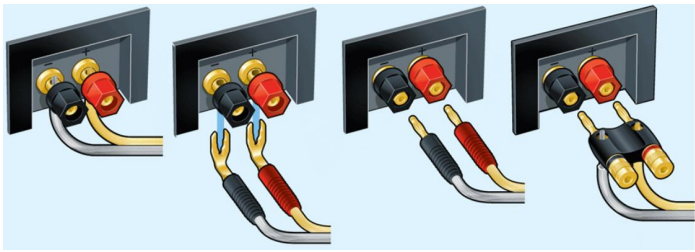
Cable Requirement
Use two speaker cables. There are multiple ways to connect speaker cables from your passive speakers to the WiiM Vibelink Amp, i.e., bare wire, spade connectors, or banana plugs. Here are some connector examples (credit: Crutchfield).
Cable Connection Steps
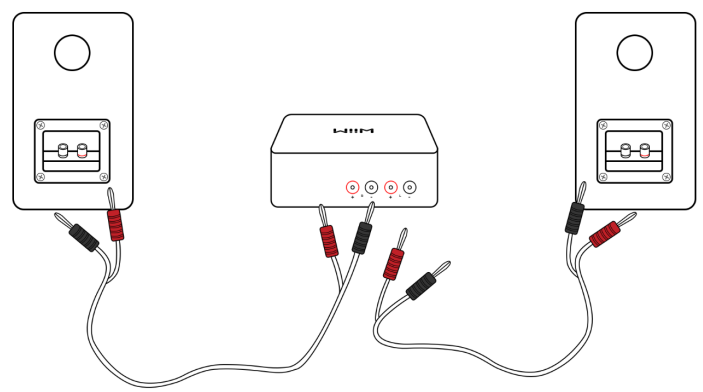
- Use one speaker cable to connect the left passive speaker to the left (L) terminals on the WiiM Vibelink Amp.
- Use the other speaker cable to connect the right passive speaker to the right (R) terminals on the WiiM Vibelink Amp.
- Ensure that the connector colours (red and black) match the corresponding terminals on the WiiM Vibelink Amp and the speakers.
Audio Input
The WiiM Vibelink Amp features three distinct audio input interfaces:
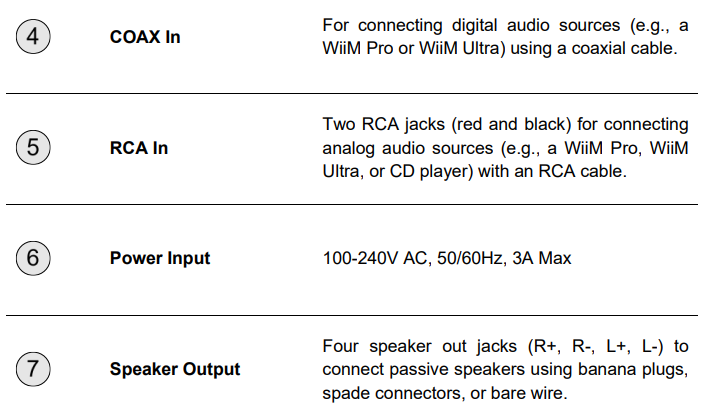
- Analog RCA In
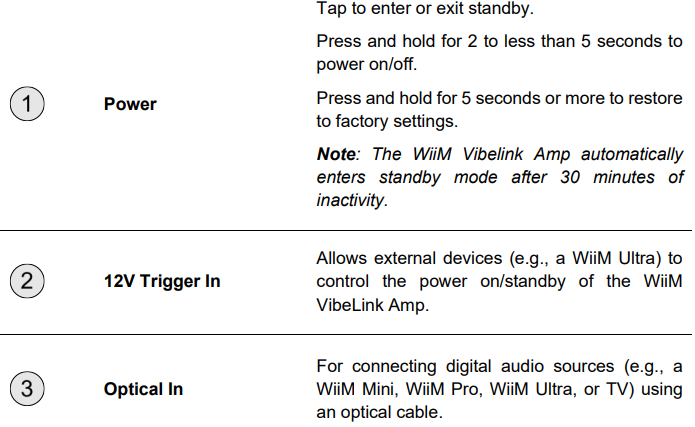
- Digital Optical In
- Digital COAX In
The WiiM Vibelink Amp functions as a high-performance amplifier. It can directly stream both analog and digital audio from sources such as CD players, vinyl turntables, and TVs. Alternatively, when connected to a WiiM streamer (e.g., the WiiM Mini, WiiM Pro, WiiM Pro Plus, or WiiM Ultra), it integrates seamlessly into the WiiM system, enabling seamless streaming and a high-fidelity audio experience.
The Optical In and COAX In interfaces on the WiiM Vibelink Amp support PCM audio format only. Please ensure that the audio source device connected to the WiiM Vibelink Amp is set to output audio in PCM format. Otherwise, you may not hear the sound.
Scenario 1
The RCA In interface on the WiiM Vibelink Amp is typically used to connect to a WiiM streamer (e.g., WiiM Pro Plus, WiiM Ultra), CD Player, or turntable with a preamp to receive analog audio input.
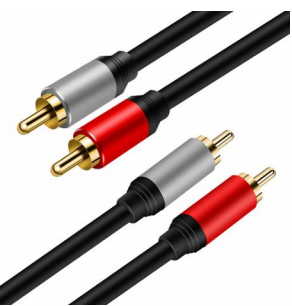
Cable Requirement
One of the following two types of cables might be used.
- An RCA-to-RCA cable as below
- An Aux-to-RCA cable as below
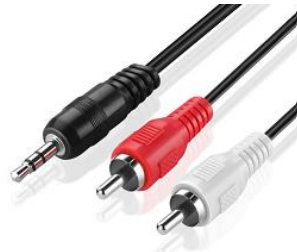
Cable Connection Steps
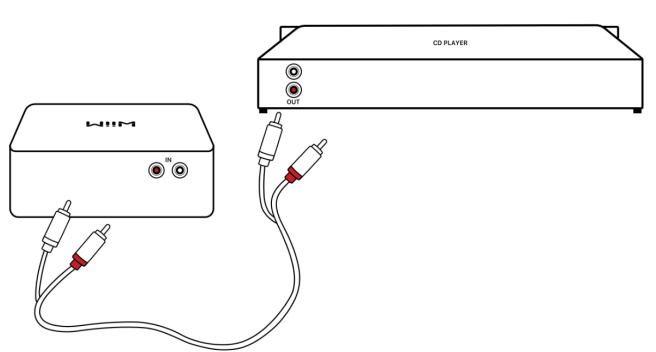
- Plug the RCA connectors on one end of the cable into the RCA In port on the WiiM Vibelink Amp.
- Plug the other end of the cable into the AUX Out or RCA Out port on your audio source.
Scenario 2
The Optical In interface on the WiiM Vibelink Amp is typically used to connect to a WiiM streamer (e.g., WiiM Mini, WiiM Pro, WiiM Ultra), TV, or CD player to receive digital audio input.
Cable Requirement
Use a TOSLINK optical cable as shown below.

Cable Connection Steps

- Plug one end of the optical cable into the Optical In port on the WiiM Vibelink Amp.
- Please ensure the insertion direction of the optical cable matches the port. Incorrect insertion may damage the optical door.
- Plug the other end of the cable into the Optical Out port on the TV or PC.
The Optical In interface on the WiiM Vibelink Amp supports the PCM audio format only. Please ensure that the audio source device connected to the WiiM Vibelink Amp is set to output audio in PCM format. Otherwise, you may not hear the sound.
Scenario 3
The COAX In interface on the WiiM Vibelink Amp is typically used to connect to a WiiM streamer (e.g., WiiM Pro, WiiM Pro Plus, WiiM Ultra), CD player, or DAC to receive digital audio input.
Cable Requirement
Use a coaxial digital audio cable with 75-ohm impedance as below.
Cable Connection Steps
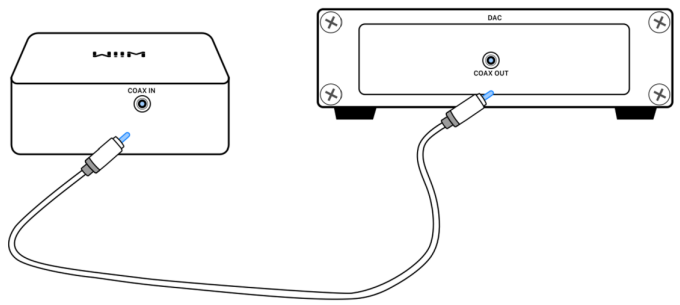
- Plug one end of the coaxial cable into the COAX In port on the WiiM Vibelink Amp.
- Plug the other end of the cable into the COAX Out port of your external device.
The COAX In interface on the WiiM Vibelink Amp supports the PCM audio format only. Please ensure that the audio source device connected to the WiiM Vibelink Amp is set to output audio in PCM format. Otherwise, you may not hear the sound.
Use 12V Trigger In
- The WiiM Vibelink Amp features a 3.5mm 12V Trigger In port that automatically activates the amplifier or places it in standby mode based on the power status of a connected audio device (e.g., WiiM Ultra). This seamless integration streamlines your system’s operation and reduces energy consumption.
- To use this function, simply connect the WiiM Vibelink Amp’s 12V Trigger In port to the external device’s 12V Trigger Out port using a compatible 12V trigger cable.
- The WiiM Vibelink Amp supports 3.5 mm Mono TS and 3.5 mm Stereo TRS cables.
Power Control and Sleep Mode
- The WiiM Vibelink Amp features power control to improve energy efficiency.
- When put into standby via the 12V trigger input, the WiiM Vibelink Amp will automatically enter sleep mode after 30 minutes, reducing power consumption to just 0.5W.
- While in sleep mode, the WiiM Vibelink Amp can be awakened in any of the following ways:
- Via the 12V trigger input.
- By tapping the Power button. For details, see Front Panel Controls and Lights.
- Through the WiiM Home app.
Power On the WiiM Vibelink Amp
Before connecting the power to the WiiM Vibelink Amp, it is crucial to first connect your speakers and any other audio ports. This sequence is important to safeguard both your equipment and the quality of your audio experience. By following this procedure, you ensure a safe and efficient setup process for the WiiM Vibelink Amp.
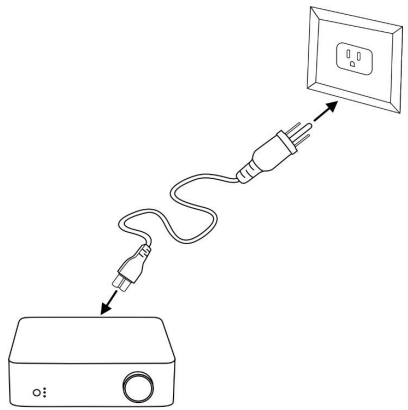
Use the supplied AC power cable to connect the WiiM Vibelink Amp to a power outlet. This cable is specifically designed to support a wide range of voltages, accommodating 100- 240V AC, 50/60 Hz, with a maximum current of 3A. This flexibility ensures that the WiiM Vibelink Amp can be safely and effectively powered in various locations. Once plugged into a power source, the WiiM Vibelink Amp will automatically power on.
Set Input
Press the Mode Switch button on the WiiM Vibelink Amp to select the input mode corresponding to the interface used to connect your audio source. For details, see Front Panel Controls and Lights. Make sure to select the correct input mode. Otherwise, you may not hear the sound.
Play and Enjoy Music at Home
Once the above connections and settings are complete, it’s time to immerse your space in rich, high-quality audio. Simply play music from your favourite audio sources, such as a TV, WiiM streamer, amplified turntable, CD player and enjoy crisp, immersive sound that elevates your home listening experience.
Technical Specifications
| Category | Specification |
| Audio Amplification | TI TPA3255 Class-D with PFFB (Post-Filter Feedback) technology |
| DAC IC | ESS ES9039Q2M |
| Analog Out SNR | 120 dB |
| THD+N (Analog Out) | -105 dB (0.0005%) |
| Audio Input Ports | RCA In:0 Pure analog signal path (no ADC conversion) |
| Optical In: Up to 192kHz/24-bit Supports Stereo PCM, but not Dolby Digital or DTS | |
| COAX In: Up to 192kHz/24-bit, Supports Stereo PCM, but not Dolby Digital or DTS | |
| Audio Output Ports | Speaker Out: Four gold-plated binding posts (supports banana plugs or bare wire connections) 100 Watts/channel at 8Ω or 200 Watts/channel at 4Ω
|
| 12V Trigger In | 3.5 mm port |
| Auto Standby Mode | Automatically enters standby mode after 30 minutes of inactivity. |
| LED | Three RGB LEDs indicate source input and device status |
| Control | Volume knob, mode switch, power on/off |
| Weight | 2.05 kg (4.5 lbs) |
| Dimension | 7.9 x 7.9 x 2.58 in (200 x 200 x 63 mm) |
| Power Input | 100-240V AC input, 50/60Hz, 3A Max |
FCC/IC Statement
This device complies with part 15 of the FCC rules. Operation is subject to the following two conditions: (1) this device may not cause harmful interference, and (2) this device must accept any interference received, including interference that may cause undesired operation.
The manufacturer is not responsible for any radio or TV interference caused by unauthorised modifications or changes to this equipment. Such modifications or changes could void the user’s authority to operate the equipment. Any changes or modifications not expressly approved by the party responsible for compliance, the user’s authority to operate the equipment.
This device complies with Industry Canada license-exempt RSS standard(s). Operation is subject to the following two conditions:
- This device may not cause interference, and
- This device must accept any interference, including interference that may cause undesired operation of the device.
CE Statement
Do not use the device in environments at too hot or too cold, never expose the device to strong sunshine or too cold environments. The suitable temperature for the product and accessories is 0°C to 40°C. This product can be used across EU member states. EU Regulatory Conformance Hereby, Linkplay Technology Inc. declares that this device complies with the essential requirements and other relevant provisions of the EMC Directive 2014/30/EU and the LVD Directive 2014/35/EU.
Customer Support
If you are unable to resolve your issue, please follow one of the methods below to reach out to us for assistance.
- Email: support@wiimhome.com
- Website: https://www.wiimhome.com/support/wiimvibelink
- Ph: 510-585-3943
FAQs
Q: How much power does the A80 deliver?
For standard bookshelf speakers, in-wall/ceiling speakers, or small to medium living room configurations, the amplifier’s 60 watts per channel into 8 Ω or 120 watts per channel into 4 Ω are adequate.
Q: What kind of DAC and audio quality does it offer?
The A80’s 32-bit ESS Sabre ES9018K2M DAC provides high-fidelity DAC performance. It is suitable for streaming high-resolution music since it allows gapless playback and bit-perfect audio up to 24-bit/192 kHz.
Q: What input and output options does it provide?
Analogue RCA (line-in), digital optical (SPDIF), HDMI ARC for TV or video source, USB host (for playback from local storage), and Bluetooth 5.3 are the inputs.
Q: Does it support multi-room audio or grouping with other devices?
Yes, multi-room and multi-zone audio are supported by the hardware. You may stream synchronised music in many rooms by integrating it with other compatible speakers or devices.
Q: What connectivity does it support (Wi-Fi, Ethernet, Bluetooth)?
The A80 offers a variety of wireless options, including Wi-Fi 6E (multi-band: 2.4, 5, and 6 GHz) for reliable streaming and Bluetooth 5.3 for direct device connection.
Q: Why choose A80 over a separate streamer + amp + DAC?
Because it combines all of the elements into a single, small, effective chassis, it reduces component clutter, saves space, and simplifies wiring. That’s more practical than juggling several boxes for a lot of users.
1 Comment
Your point of view caught my eye and was very interesting. Thanks. I have a question for you.