
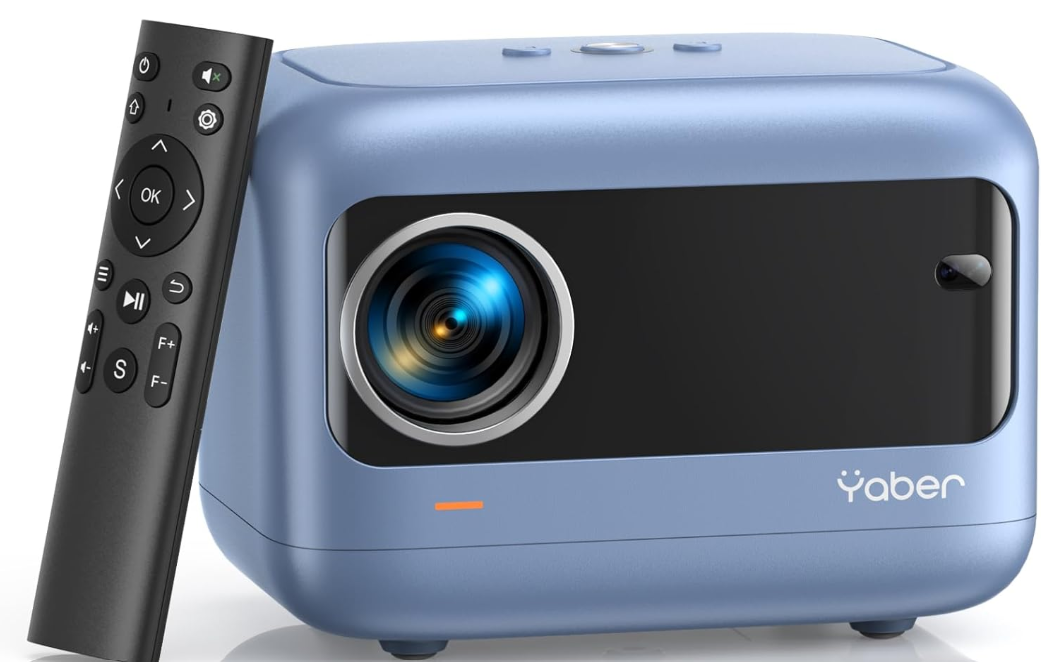
Yaber L1 5G WiFi and Bluetooth Projector
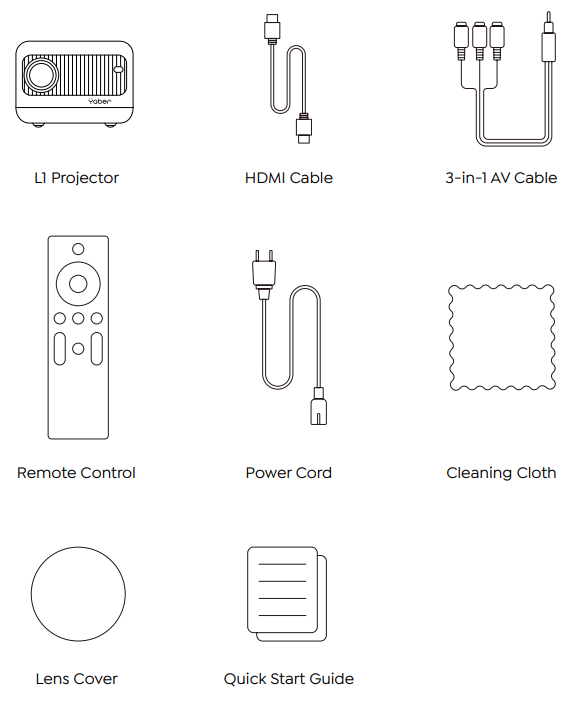
Package List
Projector Overview
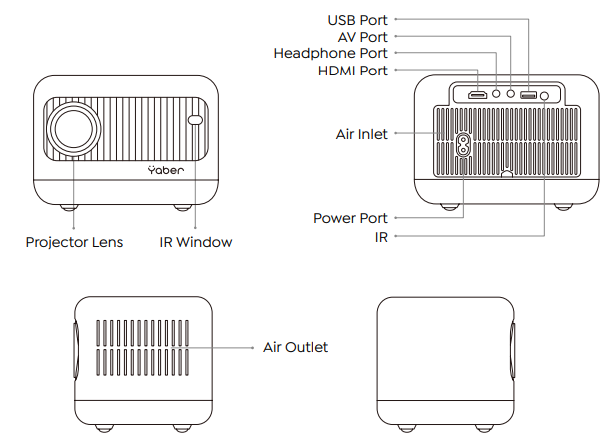
| IR Window | Infrared signal receiver |
| Projector lens | Optically coated glass lens |
| Power Cord Port | Power Cord Port |
| Headphone Jack | 3.5mm Headphone Output |
| HDMI Port | HDMI input |
| USB Port | USB port |
| AV Port | Audio input |
| Air Inlet | Prevent the projector from overheating |
| Air Outlet | Prevent the projector from overheating |
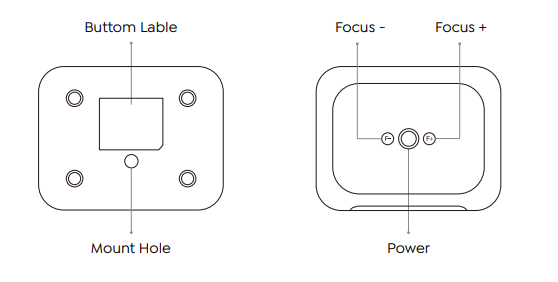
| Power | Turn on/off the power |
| Focus + | Adjust to clear image |
| Focus – | Adjust to clear image |
Remote Contol
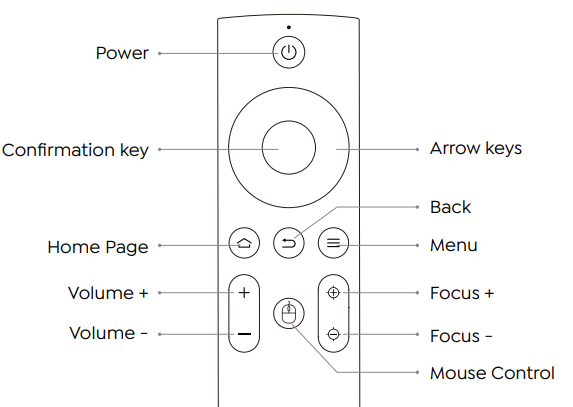
| Power | Turn on/off the power |
| Arrow keys | Used to adjust the parameter of the projector in the menu mode |
| Menu | Press once: Operate picture and sound settings in AV or HDMI Mode. Press twice in succession: select 16:9/4:3 projection. |
| Home Page | Enter the home page |
| Volume + | Volume up |
| Volume – | Volume down |
| Focus + | Adjust to clear image |
| Focus – | Adjust to clear image |
| Confirmation key | Confirm the option/Play or pause the video |
| Back | Return to the previous menu |
| Mouse Control | Active Mouse for Netflix |
Installation
Installation Method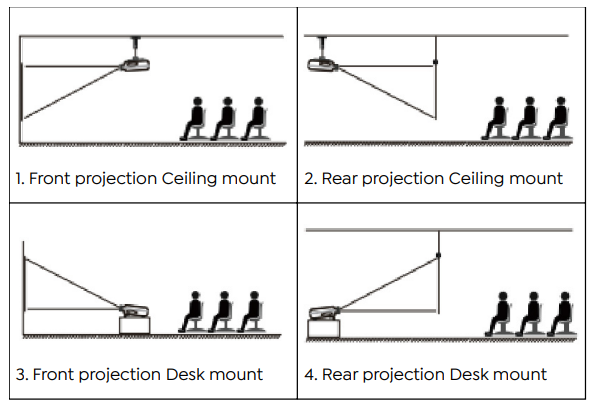
The projector can be hung on the ceiling with a special hanger frame and placed on a stable desk to project the image according to the operating environment and requirements. In addition, the projector can be installed using the following methods:
Keep the projector at a height where its lens is axially symmetric to the screen. If this is not possible, use the keystone correction function to adjust the projection image.
| Aspect | Ratio: 16:9 | |
| Distance (ft.) | Screen Size | |
| 4.4 | 45″ | |
| 5.9 | 60″ | |
| 7.5 | 80″ | |
| 9.8 | 100″ |
The recommended projection distance is about 7.5ft; the shortest projection distance is 4.4ft.
The image size depends on the distance between the projector and the screen; there may be 3%
deviation among the above-listed data. Different settings cause various distances.
Install on the Ceiling
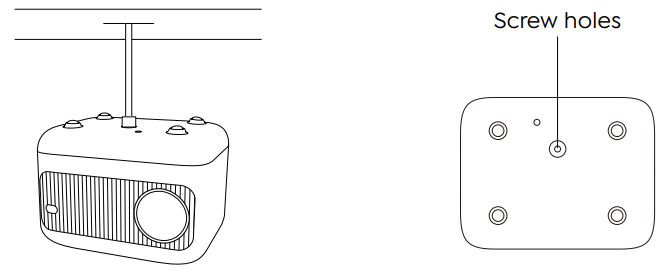
The projector can be hung on the ceiling with a special hanger frame and placed on a stable desk to project the image according to the operating environment and requirements. In addition, the projector can be installed using the following methods:
- Please purchase a universal projector ceiling mount.
- In the center of the bottom of the projector, you will see the screw holes and use the M5*11mm screws for installing the ceiling, and then install it.
Starting Projector
- Press the power key on the remote controller or projector, tand he indicator light will turn blue.
- Use the focus function of the projector to get the best image performance.
- Use the keystone function of the projector to get a rectangular projection screen.
- Connect the external device (smartphone, iPad, Fire TV, TV box, DVD player, Computer, etc.) to the corresponding interfaces of the projector.
- Select the ” ” menu, enter the [ Common ], then you can select the option [ Language ] to set your preferred language.
Image Adjustment
When using the projector for the first time, it normally displays an unclear image. This is due to the lens being out of focus or the incorrect trapezoid setting. Please follow the steps below to correct:
Focus Adjustment
Focus Ring
If the image is not clear. You can use the manual focus function, and press the focus buttons “F+” and “F-” on the remote control to adjust the focus of the lens until the image is clear.
Digital 4D Keystone Correction
Use the digital 4D keystone correction of the projector to change the image to be rectangular (vertical and horizontal). Please refer to page 16 of this manual.
Setting Up The Projector
The projector’s home page is as follows
Select The Insert Signal Source
Select the desired insert signal source (HDMI/AV) on the homepage.
USB Disk Input Mode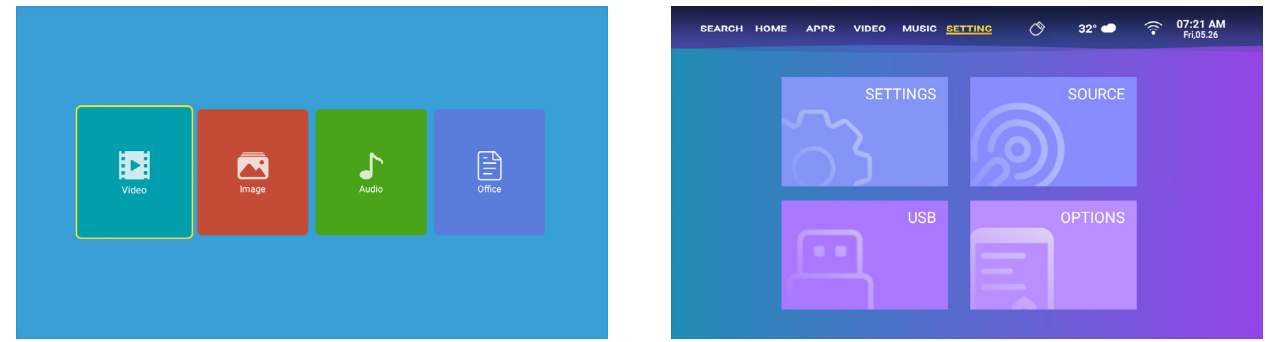
- Insert the USB Disk, select the icon [USB] on the Settings Page.
- Select the option [All/Video/Audio/Image].
- Select the desired file (or folder to enter the subfolder) in the USB disk, then press the [ OK ] button to play it.
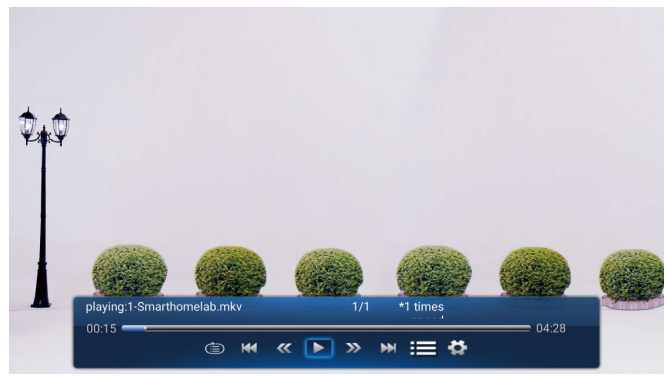
Play Interface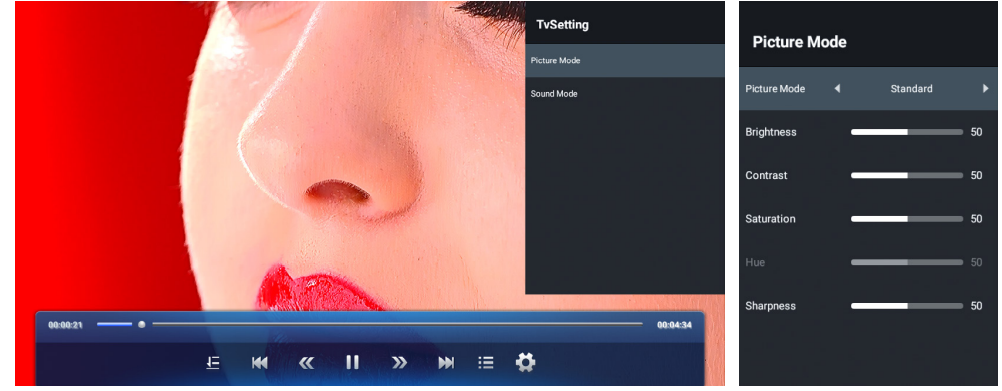
| Menu | Function |
| Select play mode (directory play/single cycle/directory loop) | |
| Switch to the previous video. | |
| Fast Backwardrewinds the video quickly while playing it. The rewinding speed ranges from 2X to 32X | |
| Play or pause the current video. | |
| Fast Forward pushes the video forward quickly while playing it. The forward speed ranges from 2X to 32X | |
| Switch to the next video. | |
| Select all playlists in the current folder. | |
| Playing settings |
| Playing settings | Include | Function | |||
| Video subtitle | close, inner, external | Set multiple modes of video subtitles | |||
| Breakpoint play | close, open | You can set the video continue to play from the point where it was stopped | |||
| Audio track | Audio track | You can see the audio information | |||
| Display mode | 16:9, full, over, auto, 4:3 | You can set the video aspect ratio | |||
| Picture settings | Picture Mode, Color Temperature, Reset to Default | You can set the picture information | |||
| Sound settings | Sound Style, Equalizer Detail, Reset to Default | You can set the sound information | |||
| Menu | Content | Mode | Function | ||
| Picture Mode | Standard/Vivid/Soft/ Pc Mode/User | Brightness | Modify the picture parameters in the range 0 -100 | ||
| Contrast | |||||
| Saturation | |||||
| Hue | |||||
| Sharpness | |||||
| Sound Mode | User/Standard/News/ Music/Movie/Sports | 120Hz | Modify the sound parameters in the range 0 -100 | ||
| 500Hz | |||||
| 1.5KHz | |||||
| 5KHz | |||||
| 10KHz | |||||
Music Play Interface
| Menu | Function |
| Select play mode (directory play/single cycle/directory loop) | |
| Switch to the previous video. | |
| Fast Backward rewinds the video quickly while playing it. The rewinding speed ranges from 2X to 32X | |
| Play or pause the current video. | |
| Fast Forward pushes the video forward quickly while playing it. The forward speed ranges from 2X to 32X | |
| Switch to the next video. | |
| Select all playlists in the current folder. | |
| Playing settings |
Picture Play Interface
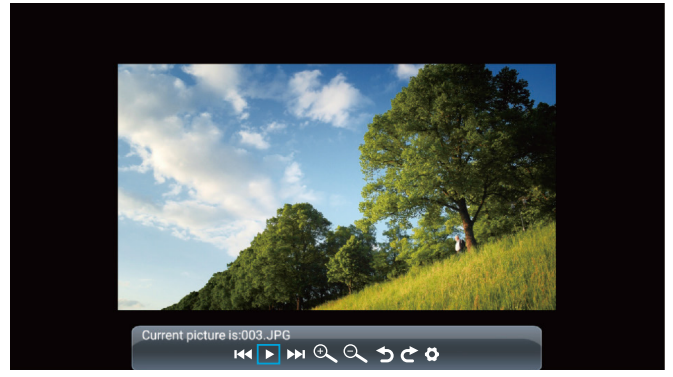
| Menu | Function |
| Switch to the previous picture. | |
| Play or pause the current picture. | |
| Switch to the next picture. | |
| Zoom in image | |
| Zoom out image | |
| Flip picture 90°to the left |
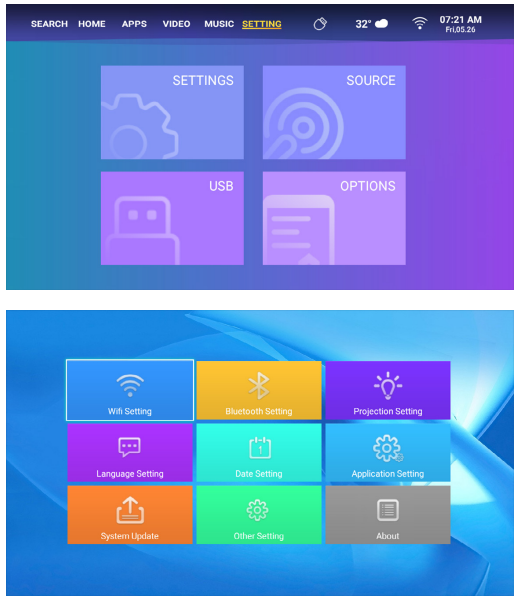
WiFi Setting
Wireless Connection
- The fluency of screen mirroring with wireless connection will be affected by the network environment.
- A bandwidth of 100 Mbps or more is recommendedwhen using screen mirroring.
- Make sure your mobile device is close to the projector when usinga wireless connection.
- A distance of within 1 meter is recommended.
- Some mobile devices may not support screen mirroring due to the compati- bility.
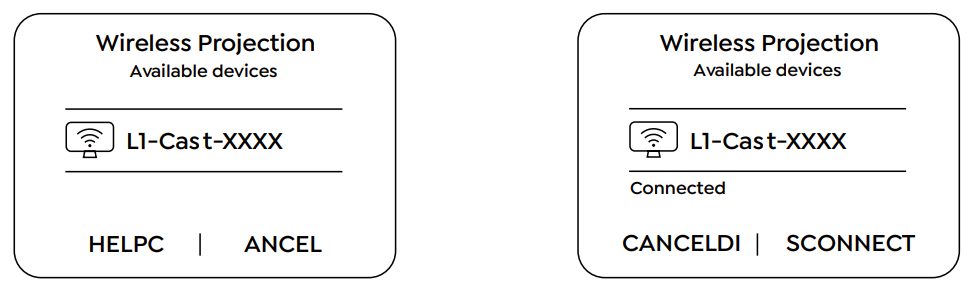
iOS Cast (for iOS Devices)
- Go to Settings page – Select [ SETTINGS ] – Select [WiFi Settings]- Connect to your home WiFi from the list.
- Select the [ SETTINGS ] menu on your iOS device – Turn on the [ Wi-Fi ] function – Connect your iOS device to the same home network as the projector.
- Open the [ Control Center ] on your iOS device – Select the [ Screen Mirroring ] function Select and connect the iOS Cast receiver named [ L1-XXXX ] – your iOS device screen will be displayed on the projection screen after 3 seconds.
MaxhubShare (for Android Devices)
- Go to “APPS” page – Select “My Apps” row – Find [ iOS Cast ] App – Press the OK button to enter the [ iOS Cast ] menu.
- Select the [ Settings ] menu on your Android device — Select the [ Screen mirroring ] function — Select your Miracast receiver named [ L1-AnCast-XXXX ]– your Android device screen will be displayed on the projection screen after 3 seconds.
- On your Android device, tap [ Settings ] – [ WLAN Display ] – Turn [ Wi-Fi ] ON, and connect to your home WiFi.

Bluetooth Setting
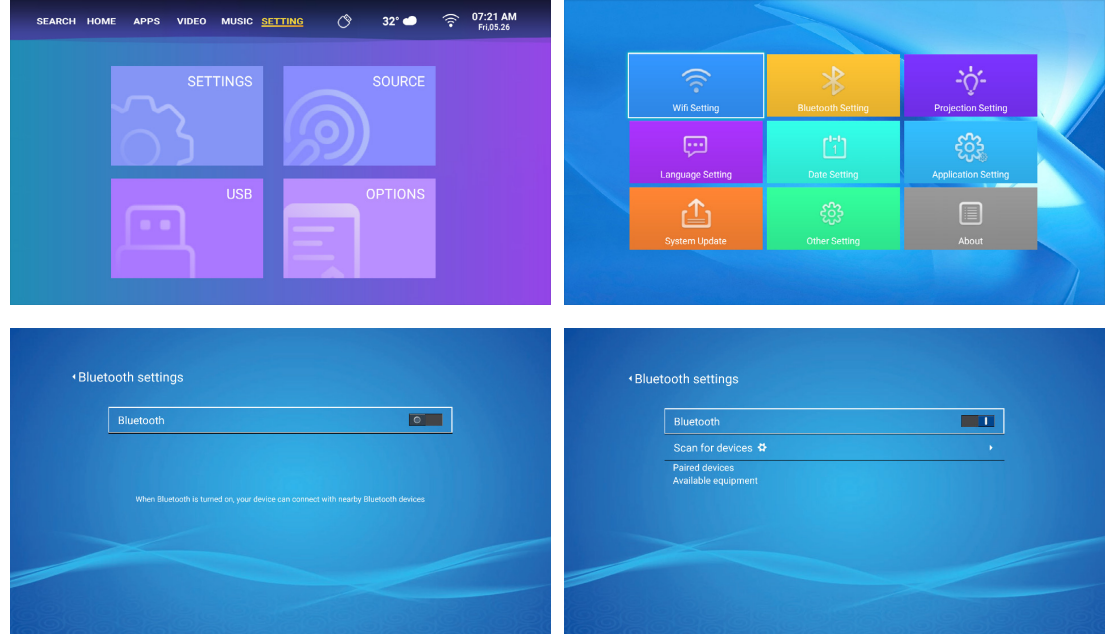
Go to setting page — Select the [ ] — Select the [ Bluetooth ] Option — Open the Bluetooth function and your Bluetooth device — Scan the Bluetooth devices nearby automatically -Choose the Bluetooth device desired — it will be paired and connected automatically
Projector Image Setting
Projection Mode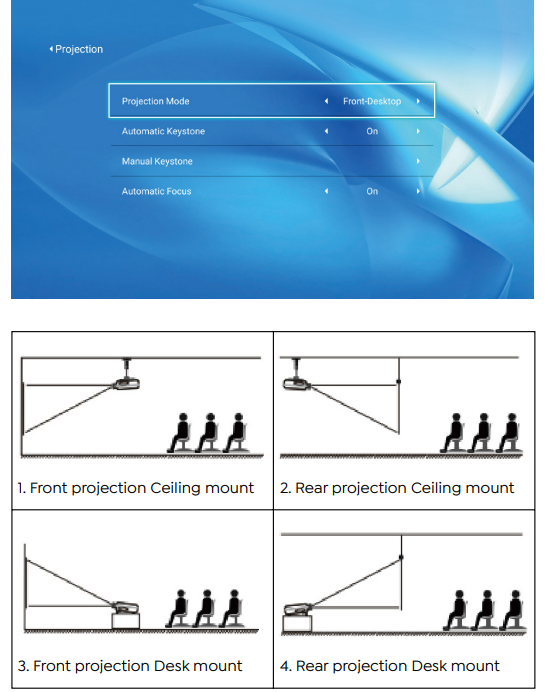
Horizontal & Vertical Keystone Correction
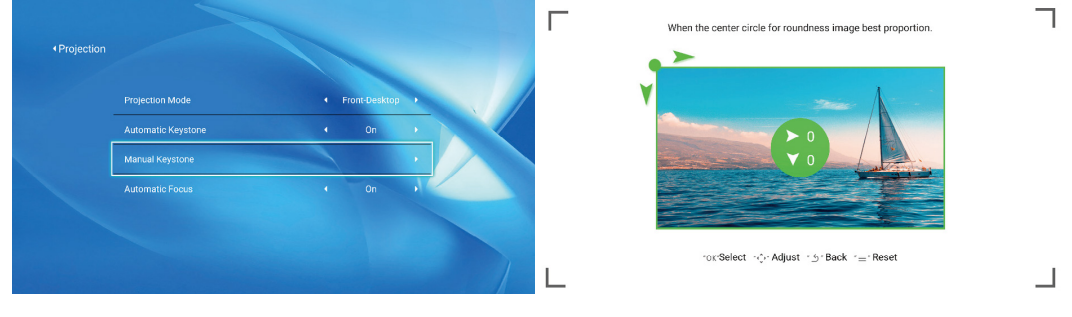
When the projection screen is not rectangular, it can be adjusted by 4-point keystone correction. Step 1: Go to “the SETTING” page – Select the [ SETTINGS ] menu – Select the [Projection Mode] option. Step 2: Press the arrow keys on the remote controller or projector to adjust the horizontal or vertical parameters until the projection screen becomes the desired rectangle.
- OK Pick point Press the OK button on the remote controller or projector to enter the adjustment interface.
- Adjustment: Press the arrow keys on the remote controller or projector to adjust the horizontal or vertical parameters.
- Back: Press the key on the remote controller to go back to the previous page.
- Reset: Press the key on the remote controller to restore the original parameters.
Digital Zoom
- Step 1: Select the [ Digital Zoom ] option and press the OK button on the remote controller or projector to enter the submenu.
- Step 2: By pressing the button on the remote controller or projector, you can reduce the height and width of the projection size up to 50%.
System Update
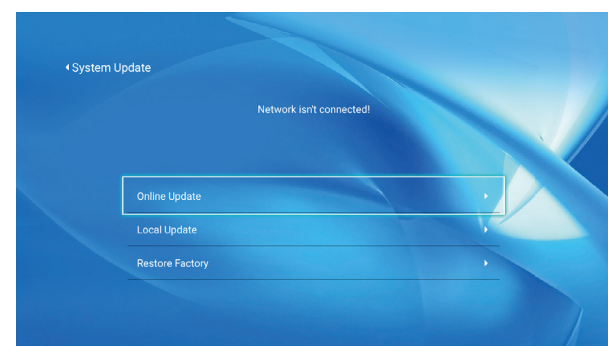
| Menu | Function |
| Online Update | Online update |
| Local Update | Local update |
| Restore Factory | Restore the user operation application configuration and system settings |
Common
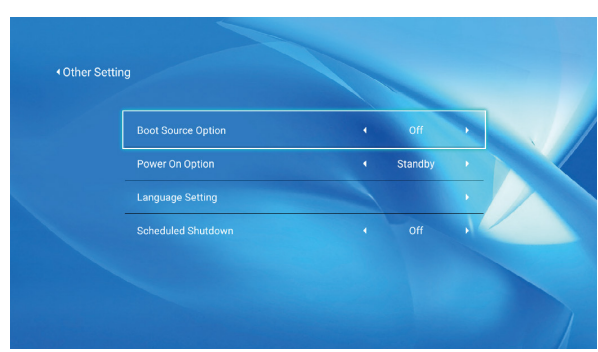
| Menu | Function |
| Boot Source Option | Off/HDMI/AV |
| Power On Option | Direct/Standby |
| Language Setting | Set up the language |
| Scheduled Shutdown | Off/10min/20min/30min/60min/120min |
About the Direct/Standby Power On Option
- Direct Mode: When the projector is powered on, it will be automatically turned on.
- Standby Mode: When the projector is powered on, you need to press the [ ] button on the remote controller or the projector to turn it on.
Signal Lines ConnectionConnection
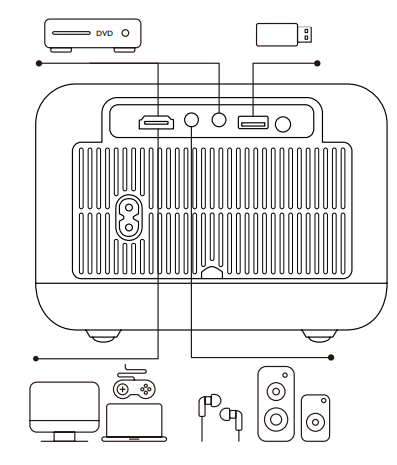
The YABER L1 projector has 4 interfaces, HDMI port/ USB port/ 3.5mm headphone output/ AV in. Please select the correct connecting port to connect your device (PC, Phone, DVD Player, Sound bar, USB, PS4, etc.).
HDMI port
- Connect your TV stick or laptop to the HDMI port of the projector.
- Enter the home page to select the corresponding HDMI as the signal source.
DVD Player
- Connect your TV stick or laptop to the HDMI port of the projector. Connect the colorful female connectors to your DVD player’s RCA cable with the 3-in-1 AV cable in the package.
- Connect the black connector to the AV port of the projector, and enter the home page to select [AV] as the signal source.

- Or connect to the DVD Player with the HDMI cable in the package.

Sound bar/Speaker

If your speaker has an AUX port, please use your 3.5mm audio cable connect the projector and your speaker as the picture shows, enter the home page to select [ AV ] as the signal source.
Safe Shutdown
- Press the [ ] button on the projector or remote controller, then press the OK key to power off the projector.
- Unplug the power cord of the projector.
- Cover the lens and store the projector in a cool and dry place
YABER Lifetime Professional Support
Dear valued customer!
Thank you for choosing the Yaber projector. This manual will help you navigate through all the features. We understand that there may be many questions and concerns that arise during the use of the projector. We are also eager to hear your feedback. However, leaving a review on the product page does not get the fastest solution. Many common problems, such as inability to l. auto focus or keystone, sound issues, WiFi or Bluetooth connection issues, can usually be resolved with appropriate settings adjustments.
Rest assured, our service team will offer the solution to youwithinh 24 hours. Your satisfaction is our top priority. If you encounter any issues, we sincerely hope you will allow us to make things right. We also encourage you to thoroughly explore the contents of this manual first. We wish you an outstanding experience with the projector. Yaber Consumer Service Team
FCC Warning
This device complies with Part 15 of the FCC Rules. Operation is subject to the following two conditions: This device may not cause harmful interference, and (2) this device must accept any interference
received, including interference that may cause undesired operation.
- Reorient or relocate the receiving antenna.
- Increase the separation between the equipment and receiver.
- Connect the equipment to an outlet on a circuit different from that to which the receiver is connected.
- Consult the dealer or an experienced radio/TV technician for help.
IC Warning
This device complies with Industry Canada’s license-exempt RSSs. The operation is subject to the following two conditions: This device may not cause interference, and this device must accept any interference, including interference that may cause undesired operation of the device.”
Customer Service
- Website: https://www.yaber.com/
- Timings: 9:00 am to 7:00