
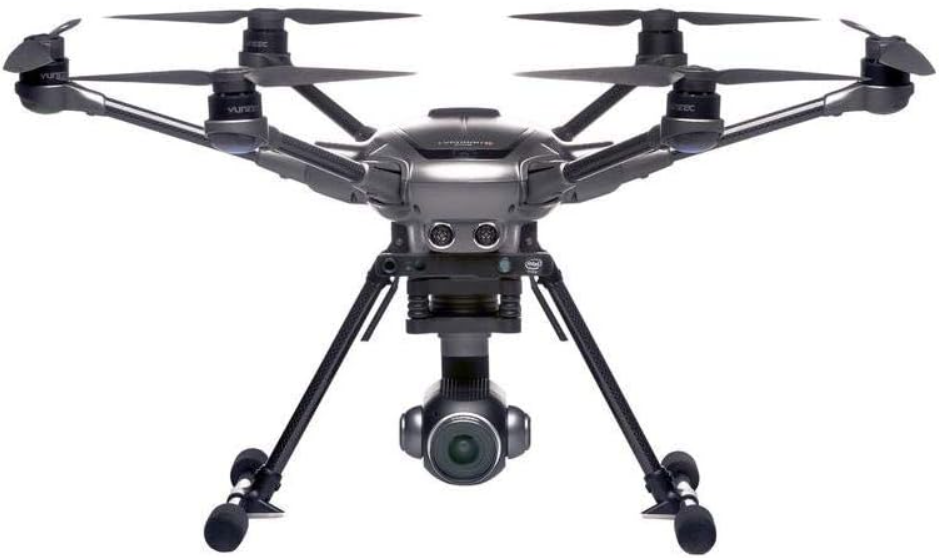
YUNEEC ST16S Typhoon H Plus Pro Hexacopter
Introduction
The TYPHOON H PLUS provides high-end image quality combined with the reliability and automated flight modes every photo and videographer desires. The TYPHOON H Plus hexacopter is equipped with a 1″ camera with 4K video resolution, a PX4-based flight controller, flight modes from Follow Me and Point of Interest to Curve Cable Cam. Relevant core areas of the TYPHOON H PLUS have been completely redesigned to provide more reliability and power for your everyday needs.
To meet different \ needs for function and portability, TYPHOON H PLUS has two configurations: the professional version with Intel ® RealSense ™, equipped with a portable backpack, and the advanced version with Sonar Collision Avoidance. TYPHOON H plus with Intel ® RealSense ™ technology builds a 3D model of the world. The Intel ® RealSense ™ module provides high-quality depth to the host system and enables the drone to make intelligent choices about creating routes around obstacles.
Parts List
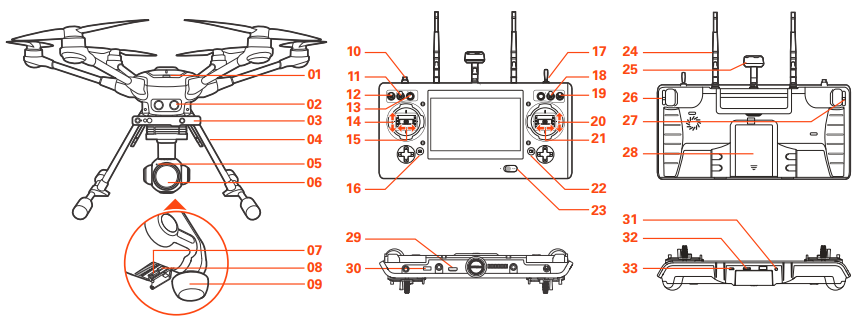
- Power Switch
- Sonar
- RealSense™
- Retractable Landing Gear
- Camera LED Status Indicator
- Camera Lens
- Micro SD Card Slot
- USB Port
- 5GHz Antenna
- Start/Stop Motor Button
- Gimbal Pan Mode Switch (Follow Mode/Follow Pan Controllable Mode/Global Mode)
- Gimbal Tilt Mode Switch (Angle Mode/Velocity Mode)
- Gimbal Pan Control Knob
- Throttle/Altitude Control (Mode 2) Elevator/Pitch Control (Mode 1)
- Rudder/Yaw Control (Mode 2 and Mode 1)
- Take Still Photo Button
- Landing Gear Switch
- Obstacle Avoidance Switch
- Flight Mode Selection Switch
- Elevator/Pitch Control (Mode2) / Throttle/Altitude Control (Mode 1)
- Aileron/Roll Control (Mode 2 and Mode 1)
- Start/Stop Video Recording Button
- Power Switch
- 2.4GHz Antenna
- 5GHz Antenna
- Proportional Control Rate Slider
- Gimbal Tilt Control Slider
- Battery
- HDMI
- USB Port
- Headset Port
- Micro SD Slot
- Micro USB Port
Aircraft
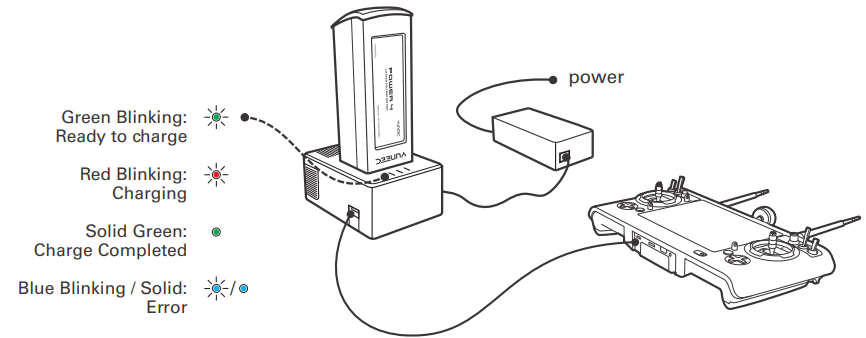
Charging
Power the desktop charger from a 100-240V AC outlet using the AC adapter/power supply, or from a 12V-17.4V DC accessory socket/cigarette lighter receptacle in an automobile using the included adapter. Plug the aircraft battery into the charger port as illustrated.
A green blinking LED indicates the charger is powered on and ready to charge, and a red blinking LED indicates the battery is charging. It will take approximately 2.5 hours to charge a fully discharged (not over-discharged) battery. A solid green LED indicates the battery is fully charged. Alternating blinking and solid blue LED lights indicate Error. Be certain to never completely drain a TYPHOON H PLUS battery. Batteries should be stored at 30-50% charge, and never stored at full charge.
Installing the Battery
Push the battery into the battery compartment until hearing a ‘click’.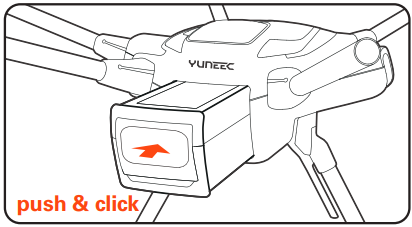
Unfolding the Arms
Once the TYPHOON H PLUS has been removed from the storage/transport case, lock the arms in place. Gently lift the arms until a click is heard. To unlock the arms, press the PRESS button on the base of the arms. On new systems, it may be necessary to release the arms while lifting up on the bottom of the motor with one hand and pressing the Press button with the other. Doing so relieves some of the pressure on the locking system.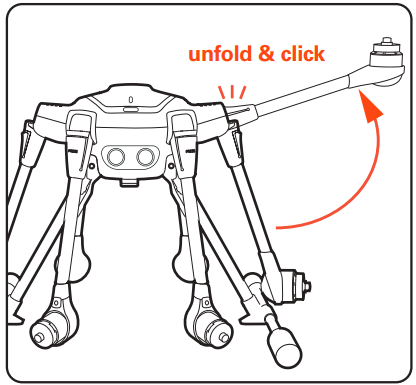
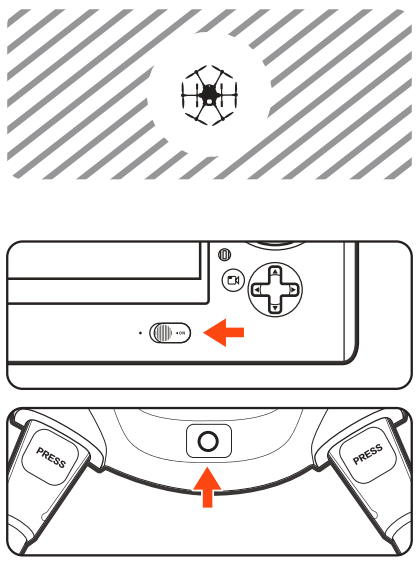
Compass Calibration
- STEP 1: Power on the ST16S Ground Station first and then the aircraft, and make sure they are connected correctly. If they are not connected correctly, the telemetry data will not display on the screen.
- STEP 2: Tap the System icon on the top right corner of the ST16S, and then enter the aircraft setting interface by tapping, select the Compass Calibration.
- STEP 3: Lift the TYPHOON H PLUS airframe straight and level. When the LEDs on two motors start to blink green as illustrated, turn it forward as shown by the red arrow until a tone is heard and the two LEDs turn off.
- STEP 4: Repeat this procedure for all six positions. If the calibration has been successful, all LED Status Indicators will blink green and then come back to the previous status. The users will recognize this when hearing the acknowledgement tone.

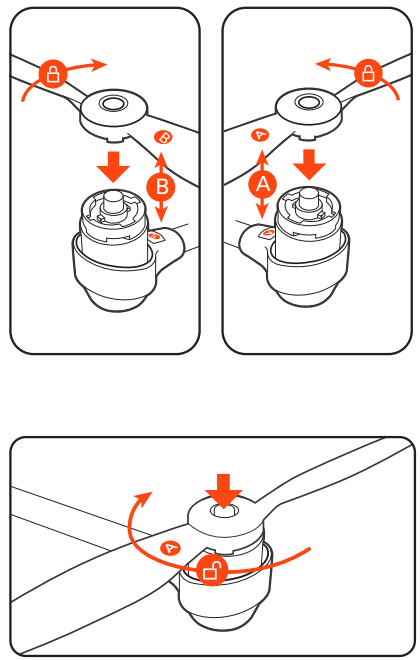
Installing the Propellers
Each arm of the TYPHOON H PLUS has a letter A or letter B labeled on it. There is a black button at the center of the motor on each “A” arm. There is a white button at the center of the motor on each “B” arm. Each propeller has an A or B label etched into the blade. “A” propellers cannot be attached to “B” motors, nor can “B” motors be mounted to an “A” motor.
Match the A propellers with the A arms (black center button) and the B propellers with the B arms (white center button). Place the propeller on the motor and lightly press down while holding the motor, turning the propeller in the lock direction as shown. A click will be heard, and the center button will slightly pop up. Hold the motor and test the propeller security to ensure a locked propeller.
Disassembling the propellers
Press and hold the center button into the mounting plate, and then rotate the propeller in the direction the arrow points to.
- Always check the props for damage and rough edges.
- Damaged props may cause in-flight vibrations, causing unwanted flight characteristics.
- Propellers should be replaced every 20 flight hours.
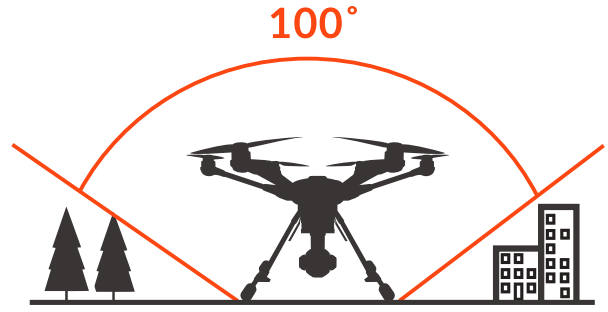
Placement before Takeoff
- When flying outdoors, always operate the TYPHOON H PLUS in open areas (approximately 10000 square feet/930 square meters or more) that are free from people, vehicles, trees, and other obstructions. Never fly near or above crowds, airports, or buildings.
- Never attempt to operate TYPHOON H PLUS near tall buildings/obstructions that do not offer a clear view of the sky (a minimum clearance of 100°). Be sure to place the TYPHOON H PLUS on a level and stable surface before powering ON the TYPHOON H PLUS Aircraft and the ST16S Ground Station.
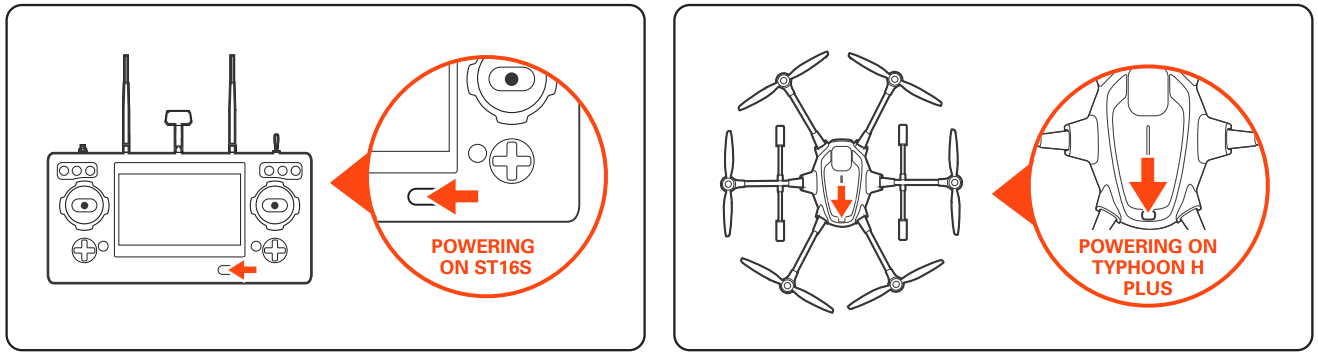
Powering ON/OFF
- The quick start guide does not replace the user manual. Turn on the ST16S, and then press the power button on TYPHOON H Plus.
- Release the button when the aircraft emits a rising tone. Power on the ST16S before powering on the UAS. To power off the aircraft, press and hold the power button until the aircraft emits a falling tone.
Binding
- STEP 1: Power on the TYPHOON H PLUS. After initialization completes, the two LEDs on the rear arms will blink blue.
- STEP 2: Lift the aircraft upside down until all LEDs blink yellow quickly, and then turn the aircraft back on straight and level ground.
- STEP 3: Switch on the ST16S Ground Station. Wait a few seconds for the ST16S system initialization to be completed.
- STEP 4: Tap the settings icon ( ) on the top right corner of the ST16S. Select the icon ( ) and choose the Drone.
- STEP 5: Tap the refresh icon ( ), and then tap OK to unbind the RC link. Select the corresponding receiver listed in the column. Wait until a tip pops up to indicate the binding is completed.
Binding the aircraft and C23
- Step 1. Switch on the ST16S followed by the TYPHOON H PLUS aircraft.
- Step 2. Tap the[ ]on the top right corner of the main interface of ST16S, then tap the[ ]on the switching interface.
- Step 3. Tap the serial number of the C23 when the following window pops up. (If multiple Yuneec UAS are used, check the ID number on the side of each camera to ensure correct camera selection/binding).
- Step 4. Using the password “1234567890”, authorize the camera and tap “OK” to confirm.

Takeoff
Option 1: Press and hold the START/STOP button until the aircraft boots up. Step back approximately 26 feet (8 meters) behind TYPHOON H PLUS. When there is a suitable GPS signal for both the ST16S Ground Station and TYPHOON H plus, slowly raise the left-hand stick to slightly above the center position. The aircraft will take off and climb slowly (or raise the stick further until it does). Allow the stick to return to the center position when the aircraft reaches the desired altitude.
Option: Press the icon ( ), then slide the sliding block, and the aircraft will take off. Then the icon ( ) will turn Point-to-Land icon ( ).
Retracting the Landing Gear
Raise the landing gear control using the landing gear control switch on the ST16S.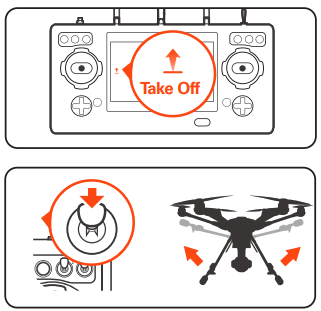
Flight Modes
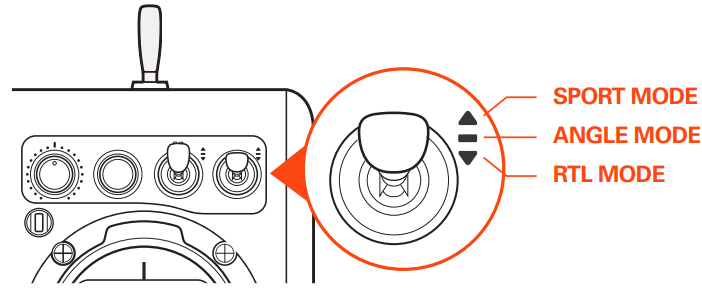
Angle Mode
If the Flight Mode selection switch is in the center position, then the aircraft is in Angle Mode. In this mode, the aircraft moves in line with the joystick, in the direction in which the nose is pointed. So, if you move the right stick to the left, the TYPHOON H PLUS will tilt to the left and thus move to the left. That is assuming that the nose is pointing away from you. If the nose is pointing towards you, the aircraft will move to the right from your point of view.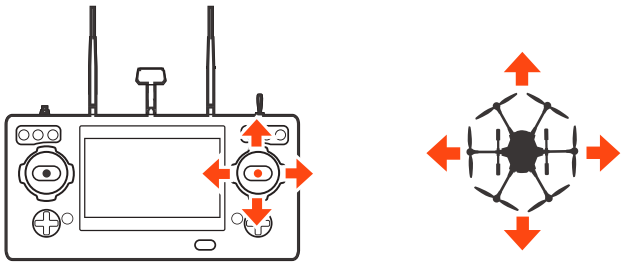
Obstacle Avoidance Switch
With sustainable GPS locked, the RealSense can be activated in Angle Mode, RTL Mode, and Follow/Watch Me Mode. When the RealSense is activated, the front motor LEDs will blink white, and the ST16S screen will display a[ ]. When the OBSTACLE AVOID is switched on, the screen will pop up ‘OBS activated’.
Sport Mode
The task mode is disabled in Sport Mode. The TYPHOON H PLUS has high reaction sensitivity in Sport Mode. The maximum flight speed of the aircraft is increased to 45 mph (20m/s).
IPS Mode
The TYPHOON H PLUS will automatically activate the IPS or not. When GPS can’t be locked, if the flight control activates the IPS, the remote controller will remind you that the IPS is activated, which indicates the IPS is activated automatically. At the same time, the aircraft can’t be switched to Sport Mode, RTLMode and Task Mode, ONLY remain in IPS Mode even if switching the mode switch. When using IPS to lock the position of the aircraft, TYPHOON H PLUS can also hover at its current altitude automatically. The IPS is most suitable for indoor flight or without GPS locked. The maximum flight speed is 8.9mph (4m/s)
RTL Mode
When the Flight Mode selection switch is in the bottom position, TYPHOON H PLUS will be in RTL (also known as Return to Land) Mode. In RTL Mode, the GPS connectivity will fly back TYPHOON H PLUS in a straight line in the direction of the pilot’s current location, and automatically land within 13-26ft (4-8m) of the pilot.
It can be helpful for pilots who lose orientation during flight. Simply activate RTL Mode until TYPHOON H PLUS automatically moves toward the home position, and once you’ve confirmed orientation, switch back to Angle Mode. If the TYPHOON H PLUS ever loses the link with the ST16S Ground Station, it will automatically enter RTL Mode.
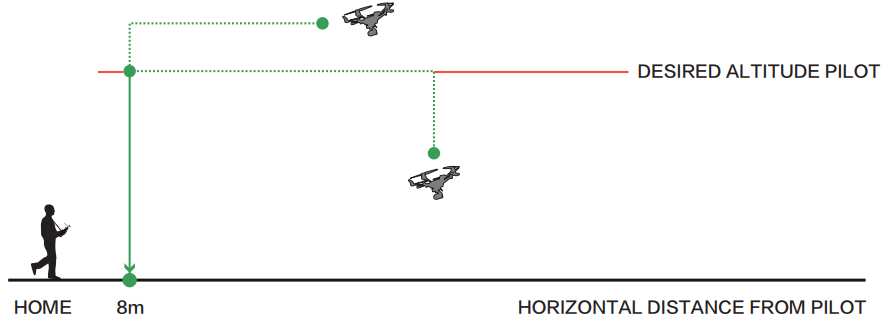
Before switching to RTL Mode, press the Setting Calibration button on the top right corner of the screen. Select the Aircraft setting icon[ ]and set a height as the desired altitude, and then RTL Mode can be activated. The flight path is as follows:
RealSense Turned Off
- When the flight height of the aircraft is lower than the desired altitude, it will climb to the desired altitude vertically first, then fly back at the current height and descend vertically within 13-26ft (4-8m) of the Home point until it lands automatically.
- When the flight height of the aircraft is higher than the desired altitude, it will fly back at the current height, and then descend vertically within 13-26ft (4-8m) of the Home point until it lands automatically.
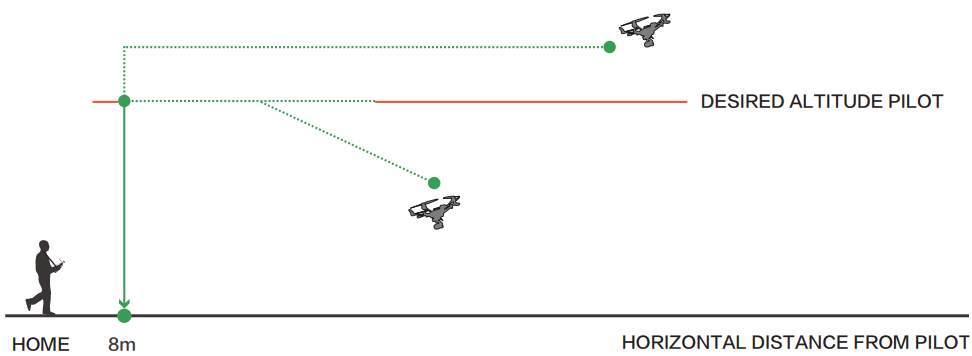
Turned On
- When the flight height of the aircraft is lower than the desired altitude, the aircraft will climb to the desired altitude. Meanwhile, it will fly back to the home point and then descend vertically within 13-26ft (4-8m) of the Home point until it lands automatically.
- When the flight height of the aircraft is higher than the desired altitude, the aircraft will descend to the desired altitude. Meanwhile, it will fly back to the home point, and then descend vertically within 13-26ft (4-8m) of the Home point until it lands automatically.
Task Mode
Tap the icon on the bottom left of the screen, and then you will enter task modes: CCC, Follow Me, Watch Me, Journey, POI, and Orbit.
CCC (Curve Cable Cam)
Curve Cable Cam allows you to create an invisible route for TYPHOON H PLUS to fly along. Once the pilot sets the points, TYPHOON H PLUS will fly the set coordinates while remembering the heading.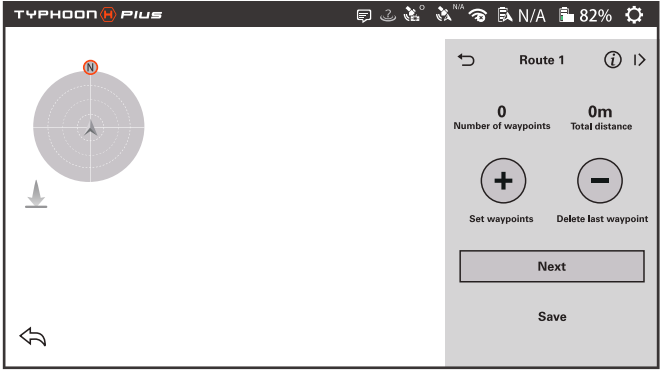
- Tap ‘+’ to create a new point recording the current flying position.
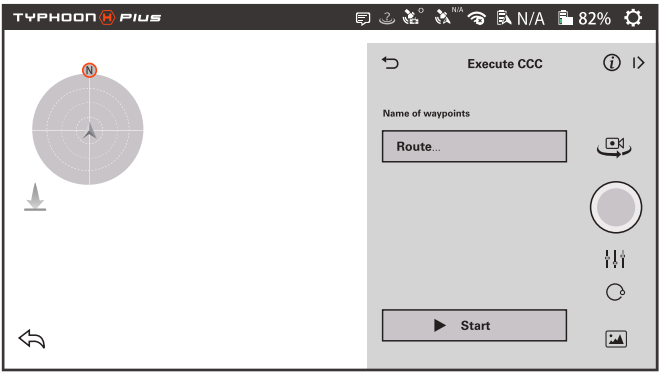
- NEXT: Tap the NEXT icon, and the CCC interface will be executed.
- Save: Tap Save, and the current route will be saved. The names of waypoints can be defined by the pilot.
- Start: Tap Start. TYPHOON H PLUS will fly back to waypoint 1 automatically.
Follow Me
The Follow Me function allows TYPHOON H PLUS to follow the pilot, adjusting its location to the location of the ST16S Ground Station. This function is enabled when ST16S’s GPS positioning has been acquired, and TYPHOON H PLUS is using the shared GPS signal with the ST16S Ground Station.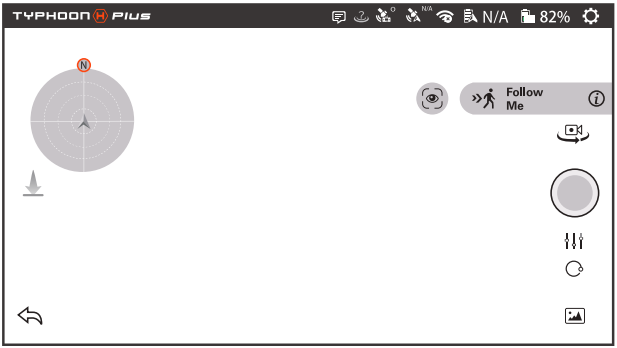
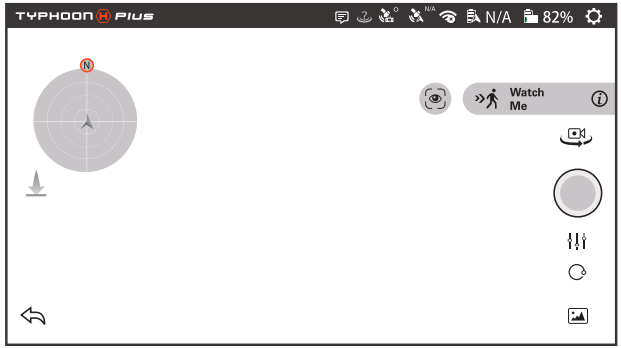
Watch me
Watch me enables the camera to keep tracking the remote controller, no matter where and how it moves, as the camera can automatically tilt its angle according to the controller. Press the Icon in the Follow Me function, and it will turn green. Follow me displayed in the right bar will display ‘Watch Me’.
Journey
Journey function enables TYPHOON H PLUS to capture the perfect aerial selfie or any scenic shot and record videos much more easily and quickly. Depending on the pilot’s desired setting, TYPHOON H PLUS will go up, out, and return.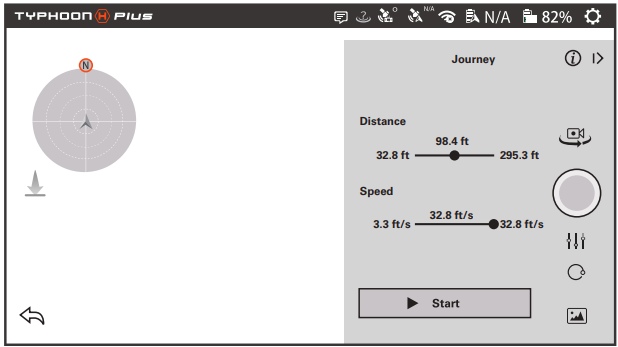 Orbit
Orbit
When Orbit Me is enabled, TYPHOON H PLUS flies a circular path around the pilot. Press ORBIT to enter the Orbit me function. The center point will be the position where the ST16S is by default. Set an ideal radius by controlling the joystick. The height and radius data will be calculated automatically and indicated. Press the Start icon and push the Aileron/Roll control stick; the aircraft will begin to execute POI. The Start icon will become the Pause icon. The pilot can pause the task by tapping it.
Landing
There are three ways to land the aircraft:
- Position the TYPHOON H PLUS above the area where you would like to land. Lower the retractable landing gear, and then slowly lower the left-hand stick to below the center position. TYPHOON H PLUS will descend slowly and land. Activate Home Mode, and TYPHOON H PLUS will automatically fly itself back to the home point and land.
- Press the icon ( ), then slide the sliding block, and the aircraft will land automatically. Always land as soon as possible after the first low-level voltage battery warning, or land immediately after the second level low voltage battery warning by the Motor LED Status Indicators flashing rapidly.
- After Landing ALWAYS turn off TYPHOON H PLUS BEFORE turning off the ST16S Ground Station. Then remove the battery from TYPHOON H PLUS and allow it to cool to ambient/room temperature before recharging.
ST16S Charging
Charge the ST16S battery by using the supplied USB cable and inserting it into the Micro USB port on the charger. It will take approximately five hours to charge a fully discharged battery.
Flight Control
The default flight control is known as Mode 2. The left stick controls the aircraft’s altitude and heading, while the right one controls its directional movements.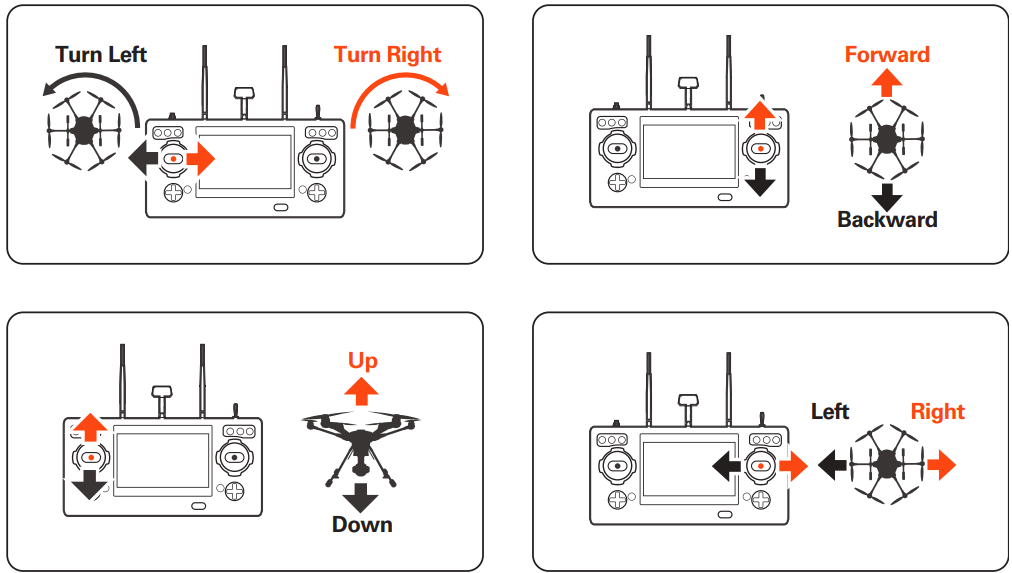
Proportional Control Rate Slider
The Proportional Control Rate Slider located on the right side of the ST16S Ground Station allows you to set the overall climb/descend and directional control rates. Fly low and slow initially. Slow (Low Speed) position, the lowest control rates, is ideal for precision flight. High-speed (High Speed) position is used when transiting broad areas.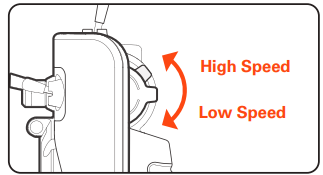
Gimbal Camera Tilt Control
There is a gimbal tilt mode switch on ST16S labeled “S1.” When the switch is in the up/middle position, the C23 (or other gimbal system) gimbal camera is in Angle Mode. Use the slider (C) on the under-left side of the ST16S to set the tilt position of the gimbal camera. The distance between the slider (C) and the middle position determines the tilt speed; the further the distance, the faster the tilt speed.
Gimbal Camera Pan Control
The gimbal pan mode switch on ST16S (S2) enables the Follow Mode. When the switch position is UP, the gimbal camera is in Follow Mode. The pan control of the gimbal camera is disabled when the switch position is UP. The gimbal camera will adjust its pan direction per the aircraft’s movements. When the switch is in the middle position, the gimbal camera is in Follow Pan Controllable Mode, and the gimbal camera will adjust its pan direction per the aircraft’s movements. Use the Pan Control Knob to set the pan position of the gimbal camera. When the switch position is down, the gimbal camera is in Global Mode. The pan direction of the gimbal camera will be fixed regardless of the aircraft’s movements. Use the Pan Control Knob to set the pan position of the gimbal camera.
Upgrading the Firmware
- STEP 1: Tap the system settings icon[ ] on the right top of the screen, and then select the icon ( ). Scroll down and tap Check for updates.
- STEP 2: Choose an available WiFi, input the password, and tap OK.
- STEP 3: When the Available Updates are displayed on the screen, tap the Download icon. Wait for a few minutes till a 100% completed circle is displayed, which means the download completes.
- STEP 4: Switch on the aircraft first, and then return to the main interface of the screen. Find the system settings icon [ ], tap the icon [ ], and then choose the C23 gimbal camera.
- STEP 5: Return to the main interface, repeat step 1 (tap the system settings icon[ ]on the right top of the screen, and then select the icon ( ). Scroll down and tap Check for updates.) and tap the Update icon to upgrade the gimbal camera.

After the above steps, wait for a few minutes until the aircraft, the gimbal, the camera and the remote control give the following hints in turn: you will hear the aircraft emit the acknowledgement tone, the same one you hear when you switch the system on; the gimbal completes its initialization; the LED indicator status of C23 camera changes from blinking purple slowly to being solid green; the remote control restarts and automatically returns to its main interface, which indicates that the updating process is completed and successful.
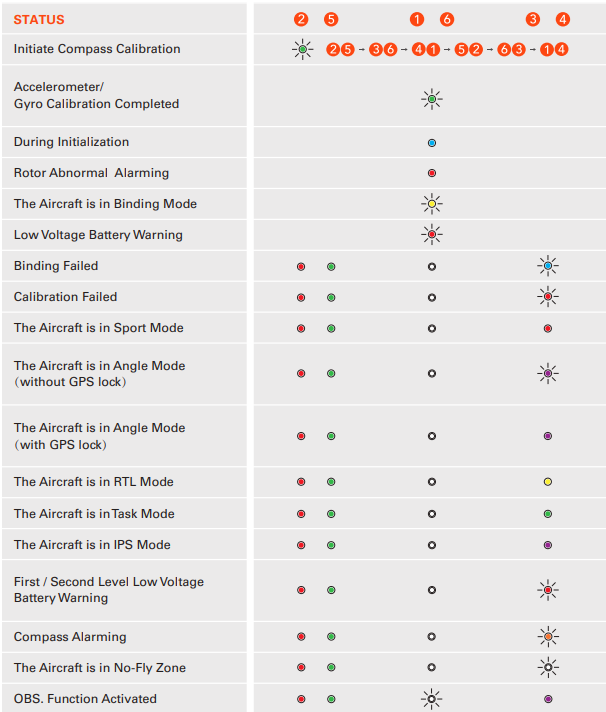
LED Status Indication
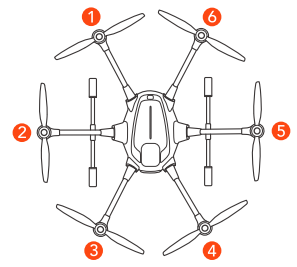
All the LEDs mentioned are numbered as shown. The color of the icon indicates the color of the LED.
- indicates the LED flashing.
- indicates
FCC Statement
This equipment generates, uses, and can radiate radio frequency energy and, if not installed and used in accordance with the instructions, may cause harmful interference to radio communications. However, there is no guarantee that interference will not occur in a particular installation.
- Increase the separation between the equipment and receiver.
- Consult the dealer or an experienced radio/TV technician for help. This device complies with part 15 of the FCC rules. Operation is subject to the following two conditions: This device may not cause harmful interference, and (2) this device must accept interferencereceivedd, including interference that may cause undesired operation.
RF Exposure Warning
This equipment must be installed and operated in accordance with the provided instructions, and the antenna(s) used for this transmitter must be installed to provide a separation distance of at least 20 cm from all persons and must not be co-located or operating in conjunction with any other antenna or transmitter. End-users and installers must be provided with antenna installation instructions and transmitter operating conditions to satisfy RF exposure compliance.
IC Radiation Exposure Statement for Canada
This device complies with Industry Canada license-exempt RSS standard (s). Operation is subject to the following two conditions:
- This device may not cause interference, and
- This device must accept any interference, including interference that may cause undesired operation of the device.
EU Compliance Statement
Hereby, Yuneec International (China) Co., Ltd. declares that this device is in compliance with the essential requirements and other relevant provisions of the RED Directive 2014/53/EU. The full text of the EU Declaration of Conformity is available at the following internet address: http://yuneec/de-downloads. Please visit the address above and enter the corresponding product page.
Customer Service
- Website: www.yuneec.com.
- Telephone: 0208 449 4321