Milwaukee M18 BLSWP Stick Water Pump

GENERAL PUMP SAFETY WARNINGS
Read all safety warnings, instructions, illustrations, and specifications provided with this pump. Failure to follow all instructions listed below may result in electric shock, fire, and/or serious injury. Save all warnings and instructions for future reference.
WORK AREA SAFETY
- Keep the work area clean and well-lit. Cluttered or dark areas invite accidents.
- Do not operate the pump in explosive atmospheres, such as in the presence of flammable liquids, gases, or dust. Motors create sparks, which will ignite the dust or fumes.
- Keep children and bystanders away while operating a pump. Distractions can cause you to lose control.
PERSONAL SAFETY
- Stay alert, watch what you are doing, and use common sense when operating the pump. Do not use the pump while you are tired or under the influence of drugs, alcohol, or medication. A moment of inattention while operating power tools may result in serious personal injury.
- Use personal protective equipment. Always wear eye protection. Protective equipment, such as a dust mask, non-skid safety shoes, a hard hat, or hearing protection, used for appropriate conditions, will reduce personal injuries.
- Prevent unintentional starting. Ensure the switch is in the off-position before connecting to the portable pump power base and/or battery pack, picking up or carrying the pump. Carrying pumps with your finger on the switch or energising power tools that have the switch on invites accidents.
- Do not overreach. Keep proper footing and balance at all times. This enables better control of the power tool in unexpected situations.
- Dress properly. Do not wear loose clothing or jewellery. Keep your hair and clothing away from moving parts. Loose clothes, jewellery, or long hair can be caught in moving parts.
- Do not let familiarity gained from frequent use of the pump allow you to become complacent and ignore tool safety principles. A careless action can cause severe injury within a fraction of a second.
PUMP USE AND CARE
- Do not force the pump. Use the correct pump for your application. The correct pump will do the job better and safer at the rate for which it was designed.
- Do not use the pump if the switch does not turn it on and off. Any pump that cannot be controlled with the switch is dangerous and must be repaired.
- Remove the battery pack from the pump before making any adjustments, changing accessories, or storing it. Such preventive safety measures reduce the risk of starting the pump accidentally.
- Store the idle pump out of the reach of children and do not allow persons unfamiliar with the pump or these instructions to operate the pump. Pumps are dangerous in the hands of untrained users.
- Maintain the pump and accessories. Check for misalignment or binding of moving parts, breakage of parts, and any other condition that may affect the pump’s operation. If damaged, have the pump repaired before use. Many accidents are caused by poorly maintained pumps.
- Use the pump, accessories, etc. to these instructions, taking into account the working conditions and the work to be performed. Use of the pump for operations different from those intended could result in a hazardous situation.
- Keep handles and grasping surfaces dry, clean, and free from oil and grease. Slippery handles and grasping surfaces do not allow for safe handling and control of the pump in unexpected situations.
BATTERY TOOL USE AND CARE
- Recharge only with the charger specified by the manufacturer. A charger that is suitable for one type of battery pack may create a risk of fire when used with another battery pack.
- Use power tools only with specifically designated battery packs. Use of any other battery packs may create a risk of injury and fire.
- When the battery pack is not in use, keep it away from other metal objects, like paper clips, coins, keys, nails, screws, or other small metal objects, that can make a connection from one terminal to another. Shorting the battery terminals together may cause burns or a fire.
- Under abusive conditions, liquid may be ejected from the battery; avoid contact. If contact accidentally occurs, flush with water. If liquid contacts the eyes, additionally seek medical help. Liquid ejected from the battery may cause irritation or burns.
- Do not use a battery pack or tool that is damaged or modified. Damaged or modified batteries may exhibit unpredictable behaviour resulting in fire, explosion, or risk of injury.
- Do not expose a battery pack or tool to fire or excessive temperature. Exposure to fire or temperature above 130°C (265°F) may cause an explosion.
- Follow all charging instructions and do not charge the battery pack or tool outside the temperature range specified in the instructions. Charging improperly or at temperatures outside the specified range may damage the battery and increase the risk of fire.
SERVICE
- Have your power tool serviced by a qualified repair person using only identical replacement parts. This will ensure that the safety of the power tool is maintained.
- Never service damaged battery packs. Service of battery packs should only be performed by the manufacturer or authorized service providers.
SPECIFIC SAFETY RULES FOR PUMPS
This pump has been evaluated for use with water only.
- Do NOT use in a flammable or explosive atmosphere. Do NOT pump brine, laundry discharge, or any other application that may contain caustic chemicals and/or foreign material. Do NOT pump fluids such as petrol, fuel oil, or kerosene.
- WATER ONLY – Do not pump gasoline or other flammable liquids.
- Not for potable water
- Acceptable for indoor or outdoor use.
- Do not submerge the handle or battery
- Always use common sense and be cautious when using tools. It is not possible to anticipate every situation that could result in a dangerous outcome. Do not use this tool if you do not understand these operating instructions or if you feel the work is beyond your capability; contact MILWAUKEE® Tool or a trained professional for additional information or training.
- Maintain labels and nameplates. These carry important information. If unreadable or missing, contact a MILWAUKEE® service facility for a replacement.
SPECIFICATIONS
- Cat. No: M18 BLSWP
- Volts: 18 V DC
- Battery Type: M18™
- Charger Type: M18™
- Max Head Height: 5 m
- Max Flow Rate: 94 LPM
- Outlet size: 32 mm (1 ¼”) BSP Threaded
- Hose fitting size: 18 mm (3/4”) x 2
- HydroPass Filter Cat. No: 22-06-0604
Application
- Recommended Ambient Operating Temperature: -17°C to 51°C
- Max Water Temperature: 60°C (140°F)
- Max Air Temperature: 60°C (140°F)
FUNCTIONAL DESCRIPTION
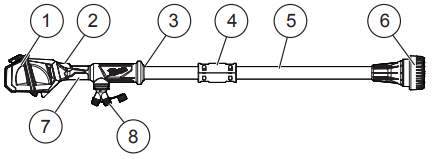
- Battery door
- On/Off button
- Submersion line
- Coupler
- Lift tube
- HydroPass filter
- Handle support
ASSEMBLY
Recharge only with the charger specified for the battery. For specific charging instructions, read the operator’s manual supplied with your charger and battery.
Inserting/Removing the Battery
To insert the battery, slide the pack into the body of the tool. Make sure it latches securely into place.Only use accessories specifically recommended for this tool. Others may be hazardous. To remove the battery, push in the release buttons and pull the battery pack away from the tool. Always remove the battery pack anytime the tool is not in use.
Installing the Coupler
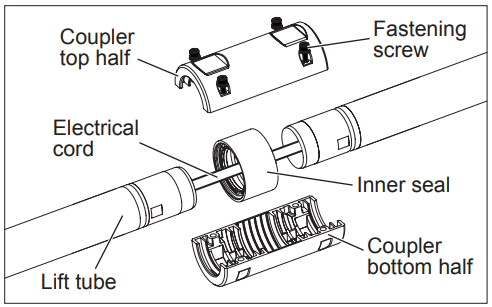
The coupler must be secured to connect the two halves before use. After initial assembly, keep the coupler secured at all times.
- Remove battery to avoid starting the tool.
- Remove the shipping oil fill cap.
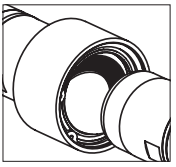
- Insert the end of each lift tube into the inner seal of the coupler. Adjust the electrical cord so that it curves to fit within the inner seal.
- Align the connection point of the lift tubes with the guide ridges on the bottom half of the coupler.
- Use a size H5 (5 mm) hex key to securely tighten the four screws.
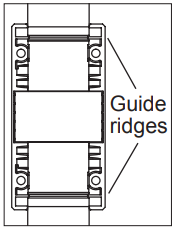
- Line up the screws on the top half of the coupler with the bottom half of the coupler. Enclose the connection point.
Removing/Installing the Hose Fitting
- Remove battery to avoid starting the tool.
- To remove the hose fitting, twist the fitting anticlockwise and pull it away from the rest of the tool.
- To install the hose fitting, hand twists the fitting clockwise until it is fully connected with the rest of the tool. Do not overtighten.
Connecting the Outlet Hose
- Use a hose with a 3/4″-11.5 BSPT fitting. To prevent leaking, ensure the hose has a properly working O-ring in its fitting.
- For best results, a heavy-duty hose should be used to prevent the hose from collapsing. Use a short length, large diameter hose, such as a 1.8 m long, 18 mm inner diameter garden hose. Longer or thinner hoses may reduce performance and flow rate.
- A regular garden hose may be used as an outlet hose.
- Hand thread the outlet hose onto the pump’s hose fitting. Do not overtighten, or the threads may be damaged on the fitting or hose.
Removing/Installing the HydroPass Filter
- Remove battery to avoid starting the tool.
- To remove the HydroPass™ filter (Cat. No. 22-06-0604), use a T20 screwdriver to loosen the fastening screw. Twist the filter anticlockwise and pull it away from the rest of the tool.
- To install the HydroPass™ filter, line the filter up at the end of the lift tube and hand twist the filter clockwise until it is fully connected with the rest of the tool. Do not overtighten. Use a T20 screwdriver to securely tighten the fastening screw.
The HydroPass™ filter must be installed to use the pump.
OPERATION
To reduce the risk of injury, always wear proper eye protection marked to comply with AS/NZS 1337.1.
Operating the Pump
Do NOT use in a flammable or explosive atmosphere. Do NOT pump brine, laundry discharge, or any other application that may contain caustic chemicals and/or foreign material. Do NOT pump fluids such as petrol, fuel oil, or kerosene. This pump is designed for outdoor applications where water and organic debris (sticks, leaves, sand, gravel, and soil) might be present. It can also be used with clean and salt water but must be flushed out afterwards to avoid damaging the tool.
- Remove the battery to avoid starting the tool.
- . Ensure the HydroPass filter is properly installed. Do not operate without a filter installed. Inspect the filter and keep it clean and free of all foreign objects.
- Connect the hose to the pump.
- Lay out the hose to ensure there are no blockages, kinks, or bends. Take appropriate safety precautions to ensure the hose is secure for the worksite.
- Place the HydroPass filter and lift tube below the water surface, aiming as near as possible to the middle of the water source. Do not submerge the tool past the handle . The pump will achieve its best performance with the HydroPass filter as flat as possible and fully submerged in the water. The pump is not designed to sustain working in dry conditions. The pump will shut down if working in dry conditions for a long period.
- Insert battery pack.
- Press and hold the power button to turn on the tool.
- As soon as the pump begins to take in air or pumping is complete, turn off the pump. To prevent backflow, remove the pump from the water before turning off.
- Allow the liquid inside the pump to drain out. If anything but clear water is accidentally pumped, flush with clear water for at least 30 seconds immediately after use.
- Flush the pump with clear water immediately after use to prevent any damage to the tool.
- Remove the battery and hose from the pump. Let the pump and hose drain before storing.
Troubleshooting
| Problem | Cause | Correction |
| The pump will not run. | HydroPass™ filter is not attached. | See
“Removing/Installing the HydroPass”. |
| The flow rate is too low. | The hose is clogged or damaged.
HydroPass filter is clogged with debris. |
Flush the hose, or replace the hose if damaged.
Clean the HydroPass filter. |
| Pump shutdown. | Dry pump shutdown. | Correct the situation, then turn the pump off, then back on to reset. |
| Over-temperature shutdown | Blocked hose line.
Hose line too high. Hose line too long. Pump ON for too long. |
Correct the situation, then turn the pump off, then back on to reset.
Allow the pump to cool. |
MAINTENANCE
To reduce the risk of injury, always unplug the charger and remove the battery pack from the charger or tool before performing any maintenance. Never disassemble the battery pack, charger, or tool, except as provided in these instructions. Contact a MILWAUKEE® service facility for ALL repairs.
Maintaining Tool
Keep your tool, battery pack, and charger in good repair by adopting a regular maintenance program. Inspect your tool for issues such as undue noise, misalignment, or binding of moving parts, breakage of parts, or any other condition that may affect the tool’s operation. Return the tool, battery pack, and charger to a MILWAUKEE® service facility for repair. After six months to one year, depending on use, return the tool, battery pack, and charger to a MILWAUKEE® service facility for inspection. If the tool does not start or operate at full power with a fully charged battery pack, clean the contacts on the battery pack. If the tool still does not work properly, return the tool, charger, and battery pack to a MILWAUKEE® service facility for repairs.
Accidental Submersion
If the tool gets submerged past the handle
- Retrieve the tool out of the water and immediately remove the battery pack.
- Lay the pump on a flat surface and allow it to self-drain for 24 hours before using it again.
Storage
Never store with liquid inside the pump. To store the tool:
- Flush the HydroPass filter and lift tube with clear water after use to prevent any damage to the tool.
- Remove the hose and battery pack.
To reduce the risk of personal injury and damage, never immerse a tool, battery pack, or charger in liquid or allow a liquid to flow inside them.
Cleaning
Clean dust and debris from vents. Keep handles clean, dry, and free of oil or grease. Use only mild soap and a damp cloth to clean, since certain cleaning agents and solvents are harmful to plastics and other insulated parts. Some of these include petrol, turpentine, lacquer thinner, paint thinner, chlorinated cleaning solvents, ammonia, and household detergents containing ammonia. Never use flammable or combustible solvents around tools.
Repairs
For repairs, return the tool, battery pack, and charger to the nearest authorised service center.
ACCESSORIES
Use only recommended accessories. Others may be hazardous. For a complete listing of accessories, go online to http://milwaukeetool.com.au / http://milwaukeetool.co.nz contact a distributor.
WARRANTY – AUSTRALIA and NEW ZEALAND
Please refer to the Australian and New Zealand warranty supplied with the tool. This warranty applies only to products sold by authorised dealers in Australia and New Zealand.
SERVICE – AUSTRALIA and NEW ZEALAND
MILWAUKEE® prides itself in producing a premium quality product that is Nothing But Heavy DutyTM. Your satisfaction with our products is very important to us! If you encounter any problems with the operation of this tool, please contact your authorised MILWAUKEE® dealer. For a list of MILWAUKEE® dealers, guarantee or service agents, please contact MILWAUKEE.
Customer Service
- Visit our website: http://milwaukeetool.com.au/milwaukeetool.co.nz
- Australia Toll Free Telephone Number: 1300 645 928
- New Zealand Toll-Free Telephone Number: 0800 645 928
Milwaukee Electric Tool Corporation
- 13135 West Lisbon Road, Brookfield, Wisconsin, U.S.A. 53005
- Milwaukee Tool (Australia)
26 – 40 Nina Link, Dandenong South, Victoria, 3175, Australia - Milwaukee Tool (New Zealand)
274 Church Street, Penrose, Auckland, 1061, New Zealand


