
Blaupunkt WS20WH Multi-functional Weather station

Safety Instructions
- Installation – Install in accordance with the manufacturer’s instructions.
- Power sources – This product should be operated only from the type of power source indicated by the marking adjacent to the power cord entry. If you are not sure of the type of power supply to your home, consult your product dealer or local power company.
- Grounding or polarization – the product is not required to be grounded. Ensure that the plug is fully inserted into the wall outlet or extension cord receptacle to prevent blade or pin exposure. Some versions of the product are equipped with a power cord fitted with a polarized alternating line plug (a plug having one blade wider than the other).
- Power cord protection – Power-supply cords should be routed so that they are not likely to be walked on, kinked, or pinched by items placed on or against them, paying particular attention to cords from plugs, receptacles, and the point where they exit from the product.
- Overloading – Do not overload wall outlets, extension cords, or multiple sockets, as this can result in a risk of fire or electric shock.
- Ventilation – The product must be properly ventilated. Do not place the product on a bed, sofa, or other similar surface. Do not cover the product with any items such as tablecloths, newspapers, etc.
ERP2 (Energy Related Products)
This product with ecodesign complies with the stage 2 requirements of Commission Regulation (EC) NO. 1275/2008 implementing Directive 2009/125/EC regarding to standby and off-mode electric power consumption of electronic household and office equipment
Features
- Weather forecast.
- Indoor/outdoor temperature.
- Indoor & outdoor humidity.
- In/outdoor maximum & minimum temp. & humidity history memory.
- 12/24 hours clock time, calendar.
- Alarm with snooze function.
- Maximum support and work with 3 outdoor wireless transmitters in different channel (only one transmitter included).
- Outdoor low and high temperature alert.
- Freezing point indicator.
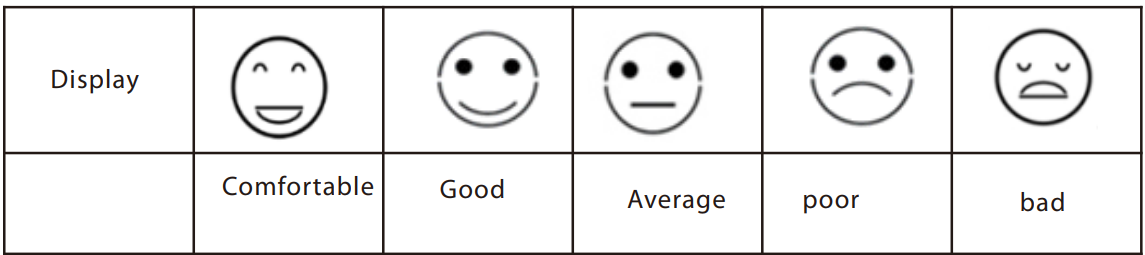
- Circumstance comfort level indicator.
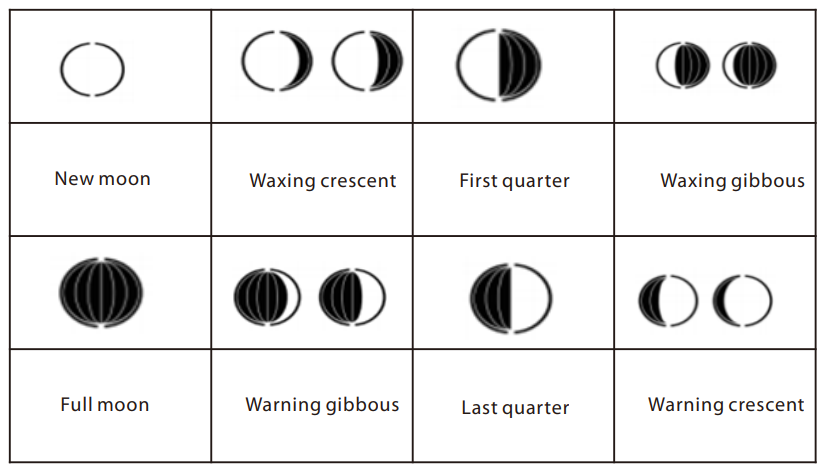
- 12 levels of moon phase.
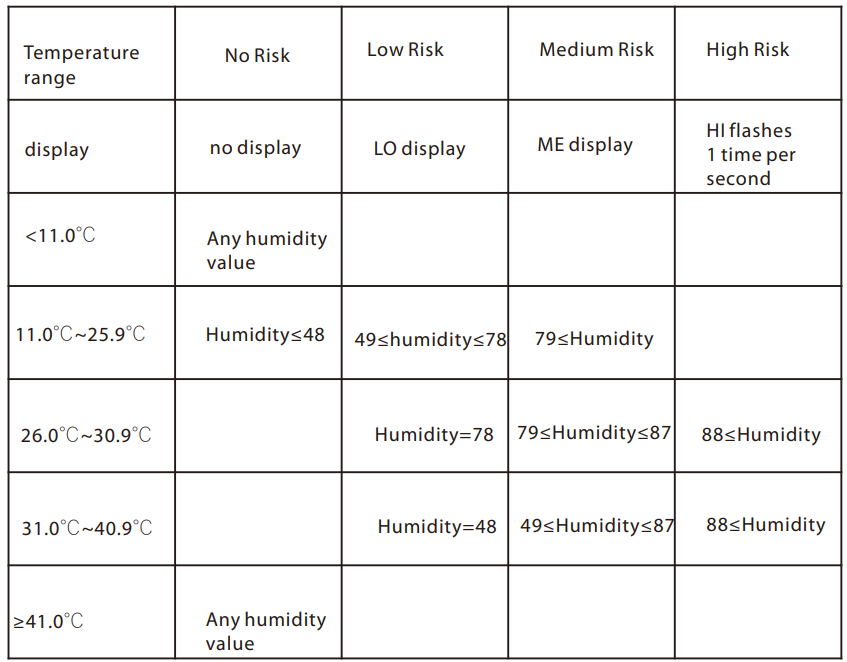
- 3 levels of mold risk warning display
Display & Controls
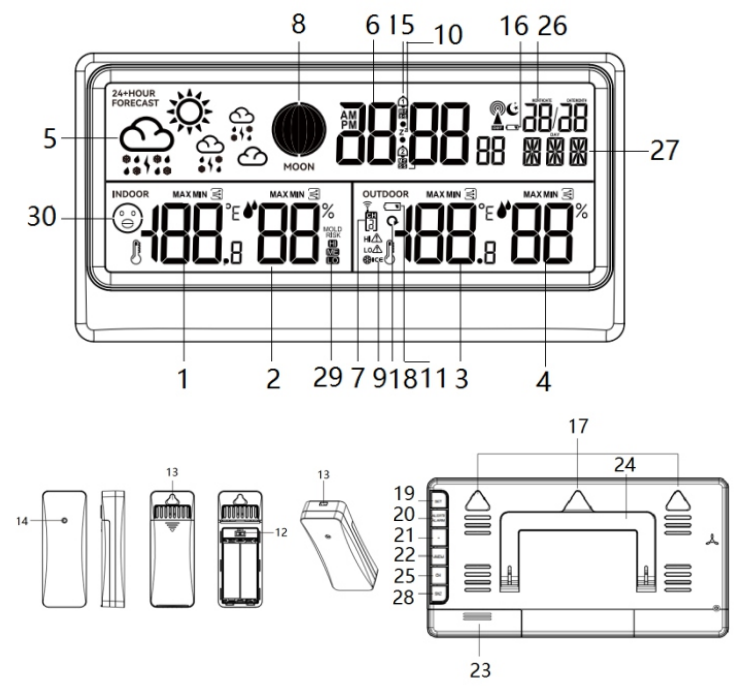
- Indoor temperature/trend
- Indoor humidity/trend
- Outdoor temperature/trend
- Outdoor humidity/trend
- Animated weather forecast
- Clock time
- Wireless transmitter channel
- Moon phase
- Frost icon
- Snooze icon
- Low battery power icon for wireless transmitter
- Channel selector
- Rope and hook hole
- Sensor
- Alarm icon
- Low battery power icon for the main unit
- Wall-mount hook hole
- Cycling icon to show the data between channels 1~3 repeatedly
- Set button
- Alert/alarm button
- + button
- – /memory button
- Battery compartment
- Foldable stand
- Channel button
- calendar
- Weekday
- Snooze button
- Mold risk warning
- comfort level
Power Setting
Push and open up the battery compartment door from the rear panel, and insert 3pcs x AA batteries(included) according to the engraved positive and negative polarity. The display will light up, then close the battery door. Open the battery compartment cover of the outdoor wireless transmitter, insert 2 x AA batteries into the compartment according to the correct polarity shown in the compartment. (Batteries are included) We recommend using high-quality alkaline or lithium batteries for the best product performance. Heavy-duty or rechargeable batteries are not recommended.
Receive signal from outdoor wireless transmitter
The main unit can detect and receive the outdoor temperature and humidity wireless signal from the transmitter automatically after the power is set to ready. It will take 3 minutes maximum for signal searching. The wireless symbol(nearby channel on display) will flash on display during searching, and becomes stable after getting the signal. The wireless symbol will disappear after 3 minutes if there is no available signal is received. And outdoor temperature and humidity data will show “ – – “ on display. In case you need to reconnect the wireless signal, please press and hold the channel button for 3 seconds.
Settings
Setting: Short-press the alarm/alert button repeatedly to enter preview mode, and check the alarm1/alarm2/high temperature alert/low temperature alert settings. In preview mode, short-press + button to turn on or off alarm1/alarm2/alert temperature in high/low function.
Press and hold 3seconds alarm button can activate alarm setting mode, press + or -button to adjust the hour digits, press alarm button to confirm and skip to minute setting which is same = operation as hour’s setup; Short press alarm button skip to alarm wake up mode by daily (M-S, Monday to Sunday)/weekend (S-S, Saturday to Sunday)/working day( M-F, Monday to Friday).
Snooze: When the alarm rings up due to the setting time being, press any button (except the snooze button) to cancel the alarming voice, and it will wake up again at the same time in coming of next day.
Press the snooze button to activate the snooze function, which will wake up again after the snooze setting time. Pressing any other button (except snooze) can cancel the snooze. The buzz alarm voice will last for 2 minutes if there is no further operation.
Outdoor temperature alert: When the high temperature alert is turned on and the detected temperature exceeds the high limit, the beep sound will tone three times, and at the same time, the symbol ” ” on the corresponding channel will flash.
After the temperature data updating, if it still exceeds its limit, another beep sound will be issued. And it is the same when the unit detects exceeding the low temperature alert limit, but shows the symbol “ “. Press any button to cancel the beep tone, but the alert symbol will keep flashing on the display.
Temperature and humidity
- Indoor temperature range: -9.9 ~+50 ℃
- Outdoor temperature range: -40°C~70°C
Remarks: LL.L℃ or HH.H℃ will show on the display when out of the above range - Indoor and outdoor humidity range: 20%-95% 20% or 95% will display when out of range
- Temperature accuracy: ±1,0℃ between 0℃~ +50℃/ 32℉~104℉. ±2℃ outside this measuring range
- Humidity accuracy: (40-80%) ± 5%, others ±8%
- Press the memory button repeatedly to check the maximum and minimum temperature and humidity history data for indoor and outdoor. In the maximum and minimum data interface, press and hold the memory button to manually clear the relevant record. Blaupunkt WS20WH Multi-functional Weather station (Remarks: Historical record will be updated automatically at 00:00 on the day.)
Temperature trend
The temperature trend arrow (nearby temperature data) points in different directions depending on whether the latest temperature reading is higher or lower than previous readings. Arrow angled upwards=Temperature rose 1℃ in the past 1 hour. Arrow angled downwards=Temperature fell off 1℃ in the past 1 hour.
Humidity trend
The humidity trend arrow points in different directions depending on whether the latest humidity reading is higher or lower than previous readings. Arrow angled upwards=Temperature rose 5% in the past 1 hour. Arrow angled downwards=Temperature fell off 5% in the past 1 hour..
Weather forecast
The weather icon displays are based on the hourly calculation Blaupunkt WS20WH Multi-functional Weather station of indoor/ outdoor temperature and humidity. The forecast is for the next 12 hours with 70%-75% accuracy. The main unit will calibrate the weather report in 1-2 weeks based on the temperature and humidity data changes. The wireless transmitter should be placed outside in order to get more accurate data, and it helps with the calculation for the weather forecast. The weather forecast will appear in one of the following combinations (reference only, total 6 types: Sunny, Partly Cloudy, Cloudy, Rainy, Snowy. The default display weather is partly cloudy,

Please note that the device forecasts the weather based on limited parameters and may differ from official weather forecasts, which are calculated on the basis of advanced algorithms.
Frost indicator
After the outside temperature falls between -1~2.9 9°C, the symbol will flash on the display. When the outside temperature has fallen below 0°C, the symbol will Blaupunkt WS20WH Multi-functional Weather station show on the display ininable. Only when the temperature detection value is out of the temperature range, the signal disappear.
Comfort level indicator
Low battery power indicator
About the outdoor sensor: When the battery indicator shows next to the outdoor temperature, replace batteries in your outdoor sensor. About the battery in the Main Unit: When the battery indicator shows next to the calendar, replace the battery power
Mold risk warning
There are 3 levels of mold risk warning: LO/ME/HI. When Blaupunkt WS20WH Multi-functional Weather station the level of mold risk warning is in LO or ME, the symbol will show on display all the time, and when the level is in HI, the HI symbol will flash.
Moon phase
It can show the moon phase level, and is divided into 12 levels as below.
Specifications
- Indoor/outdoor temperature display
- Indoor/outdoor humidity display
- Temperature/humidity trend indication
- Comfort indicator
- Frost-point warning indication
- Outdoor temperature alert (adjustable)
- Max/min record of indoor/outdoor temperature & humidity
- Mold risk warning and moon phase
- LCD size 171×73 mm
- Clock (12/24 hour format) and calendar
- Weekdays in 15 languages
- Alarm with snooze function
- Outdoor sensor included (1 pc)
- Support for up to 3 sensors
- Low battery indicator for both indoor and outdoor sensors
- Wall hanger / Table stand
- Power supply: battery power(3 x1.5V, AA size, included)
- Outdoor wireless transmitter power source: 2 x 1.5 V (AA size, included)
- IP54 waterproofless transmitter)
- Wireless transmitter working frequency: 433.92MHz
- Power consumption: 0.135W (main unit), 24 mW (wireless transmitter)
- Device dimensions: 215 x 112 x 19 mm
- Net weight: 0.23 kg
- Sensor dimensions: 38 x 19 x 100 mm
- Sensor Net weight: 0.032 kg
- Standby power consumption<18mW
Troubleshooting
| Doesn’t display anything. | ² Check if the battery posts were installed properly in the unit. |
| The temperature from the outdoor sensor is not displayed. | ² Check that the distance between the thermometer and sensor doesn’t exceed 30m(recommended). ² Avoid using electronic devices such as loudspeakers which operate at the same frequency (433.92MHz), close to the devices. ² Remove the batteries, wait awhileee,, and then reinsert them. |
| Displayed temperature is incorrect. | ² Remove the batteries, wait a while, and then re-insert them. |
Customer Support
- WhatsApp: 9156910994
- Toll Free: 1800 209 6820
- Email: support@blaupunktcar.in
FAQs
Can I switch between Celsius and Fahrenheit?
Indeed. Toggle between temperature units using the C°/F° button on the back of the device or in the settings menu.
How often does the sensor update?
Depending on the type and battery condition, the outside sensor sends data every 30 to 60 seconds.
Does it store historical data?
No, the WS20WH does not track or keep historical temperature/humidity records; instead, it shows real-time and trend data.
Can I connect it to Wi-Fi or a smartphone app?
No, the WS20WH is a stand-alone weather station that isn’t compatible with Bluetooth, Wi-Fi, or mobile apps.
Can I mount the main unit on the wall?
Indeed. For wall mounting, the main unit usually features a keyhole slot on the rear.
How do I switch between displaying indoor and outdoor humidity/temperature?
Every few seconds, the majority of WS20WH models automatically switch between indoor and outdoor readings.
Does the WS20WH support multiple channels for outdoor sensors?
Certain models do, enabling you to switch between channels (CH1, CH2, CH3) and watch several exterior areas.
What should I do if parts are missing from the box?
With your purchase information and product serial number, get in touch with the shop or Blaupunkt customer support right away.