
Labnet Enduro Gel XL Electrophoresis System
Introduction
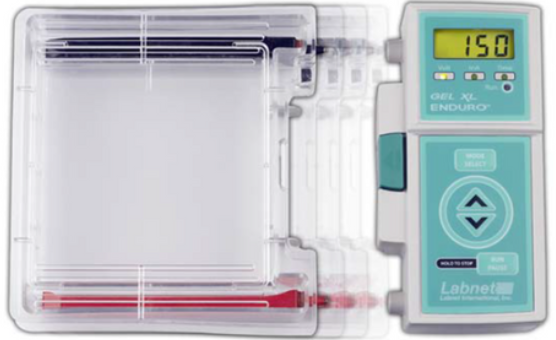
Labnet Enduro™ Gel XL is a gel electrophoresis solution with a compact design that redefines simplicity and efficiency. With its direct-connect power supply, quick gel casting, and user-friendly operation, the system ensures seamless performance for high-throughput applications.
Safety Information
- Do not expose the unit or its accessories to temperatures above 60°C.
- Do not expose the unit to organic solvents.
- Do not clean the unit with abrasive cleaners or cleaning aids.
In most cases, rinsing with deionized water will sufficiently clean the unit. \ - For heavier dirt, use a mild cleansing solution such as dish soap (alkaline cleansers are not recommended).
- Hand wash and dry with a soft cloth. To remove residual ethidium bromide, occasionally soak the unit in 1% commercial bleach solution for 16 hours. Rinse well.
- Do not apply any of the following solvents: benzene, xylene, toluene, chloroform, carbon tetrachloride, alcohols, phenols, ketones, or esters.
- Do not expose the ABS combs supplied with this unit to formaldehyde for extended periods.
- When casting gels containing formaldehyde, remove the combs promptly upon hardening of the gel and rinse completely with deionized water.
- A pinch hazard exists between the plastic enclosure and the shaking head.
- Not for use with flammable liquids.
Elimination of RNase Contamination
Should treatment of the unit to eliminate RNase contamination be desired, clean the unit with a mild detergent as described abovefollowed by soaking for 10 minutes in a solution of 3% hydrogen peroxide, and then for 1 hour in 0.1% DEPC (diethyl pyrocarbonate). Pour out the final rinse, and air dry.
Alternatively, soak the unit and accessories in freshly made 2.2 mM acetic anhydride-treated water.
(200 µL/liter) for at least five minutes. Solutions for RNA work (electrophoresis buffers, etc.) may be made from the same acetic anhydride-treated water as well.
Package Contents
- Labnet Enduro Gel XL
- UV Transmittant casting tray (1), 12.5 x 12 cm (Cat. No. E0161)
- UV Transmittant casting trays (2), 12.5 x 6 cm (Cat. No. E0162)
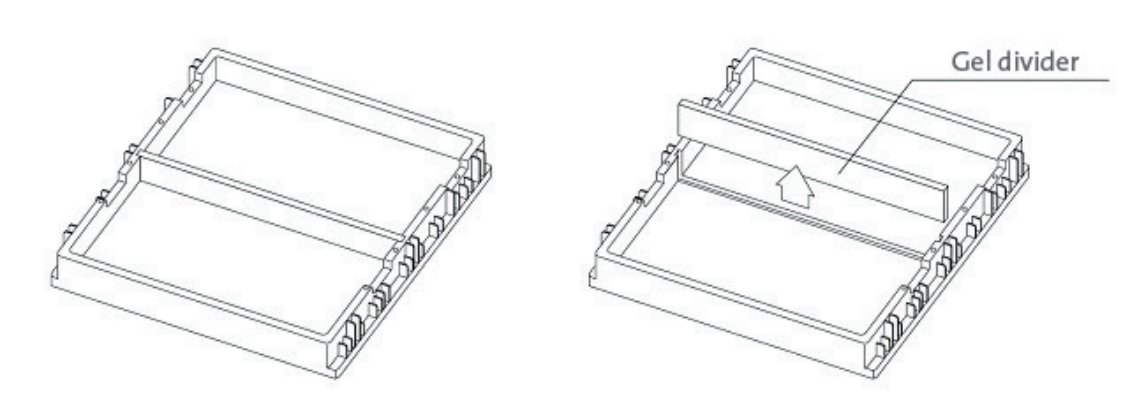
- Casting stand with divider (Cat. No. E0167)
- Reversible tooth combs (4), 1 mm thick 14/28 (Cat. No. E0164)
- Power cord
- Instruction
- manual
Accessories (sold separately
Cat. No./Description/Qty/Pk
| E0161 | UV Transmittant casting tray, 12.5 x 12 cm | 1 |
| E0162 | UV Transmittant casting tray, 12.5 x 6 cm | 2 |
| E0163 | UV Transmittant casting tray, 6 x 6 cm | 4 |
| E0164 | Reversible tooth combs, 1 mm thick, 14/28 | 2 |
| E0165 | Reversible tooth combs, 1 mm thick, 5/8 | 2 |
| E0166 | Micro casting set:
| 1 |
| E0167 | Casting stand with divider | 1 |
| E0168 | Standard casting set:
| 1 |
| R1000-100BP | Molecular weight marker, 100 bp | 1 |
| R1000-1KB | Molecular weight marker, 1 Kb | 1 |
Specifications
| Unit Dimensions (W x D x H) | 9.7 x 3.0 x 2.5 in. (24.5 x 17.0 x 6.2 cm) |
| Gel Dimensions (W x D) | 5.0 x 4.7 in. (12.5 x 12.0 cm) |
| Maximum Sample Capacity | 112 samples (4 combs, 26 samples each) |
| Buffer Capacity | 300 mL |
| Distance Between Electrodes | 5.3 in (13.5 cm) |
| Electrophoresis Tank Overall Dimensions (W x D x H) Material Characteristic | 7.2 x 6.5 x 2.2 in. (18.3 x 16.4 x 5.6 cm) UV transmitting (50% at 254 nm, 80% at 312 nm) |
| Solution Volume | 300 mL (includes buffer and gels) |
| Safety Lid Overall Dimensions (W x D x H) Material Characteristic | 7.8 x 6.7 x 1.5 in. (19.7 x 16.9 x 3.8 cm) UV non-transmitting polycarbonate |
| Power Supply Overall Dimension (W x D x H) Weight | 3.0 x 6.7 x 2.5 in. (7.5 × 17.0 × 6.2 cm) 0.9 lb. (410 g) |
| Input Voltage | AC100 – 240V, 50/60Hz |
| Output Voltage | 10 to 150V, constant peak voltage of 150V |
| Output Amperage | 10 to 400 mA |
| Maximum Wattage | 45 W |
| Timer | 99 hours 59 min. and continuous model |
| Safety Switch | Micro-sensor (hall) in the power supply. No output without a safety lid. |
| Memory Function | Automatic memory (the last used V and T) |
| Temperature Range | 5°C to 40°C (up to 80% RH at 31°C, decreasing linearly to 50% RH at 40°C) |
| Protection Class | IP21 |
Operating Instructions
Preparation of the Agarose Gel and Electrophoresis Buffer – DNA
- Select the percentage gel necessary to effectively resolve your sample.
0.3% 5-60 0.6% 1-20 0.7% 0.8-10 0.9% 0.5-7 1.2% 0.4-6 1.5% 0.2-3 2.0% 0.1-2 - Sambrook J, Fritsch EF, and Maniatis T (1989). Molecular Cloning, A Laboratory Manual, 1, 6.8 613.
- Weigh an appropriate quantity of agarose (0.3% means 0.3 g of agarose per 100 mL of gel volume) and place it into a 250 mL flask.
- Electrophoresis Buffers The two most commonly used buffers for horizontal electrophoresis of double-stranded DNA in agarose gels are Tris-Acetate-EDTA (TAE) and Tris-Borate-EDTA (TBE).
- Potential advantages of using TAE buffer over TBE buffer include superior resolution of supercoiled DNA and approximately 10% migration of double-stranded linear DNA fragments1
- Add ethidium bromide to the diluted electrophoresis buffer to a final concentration of 0.5µg/mL.
- Add 6.6 mL of the 1X electrophoresis buffer containing ethidium made in Step 4 per millimeter of gel thickness desired, up to a maximum of 100 mL, to the flask containing the agarose.
- A 100 mL gel solution will make a 7.6 mm-thick gel.
Comb Description Well Width (mm) Sample Volume 1 mm (µL) 1 mm, 14-tooth 5 5 1 mm, 28-tooth 2.5 2.5 1 mm, 5-tooth 8 8 1 mm, 8-tooth 4 4 - Heat the agarose slurry in a microwave oven for 90 seconds.
- Swirl the flask to make sure any grains sticking to the walls enterinto the solution.
- Undissolved agarose appears as small “lenses” floating in the solution.
- Heat for an additional 30 to 60 seconds.
- Proceed to Section 7.3 Casting the Gel.
Agarose Gel and Electrophoresis Buffer – RNA
Agarose gels containing formaldehyde1-3 are commonly used for RNA electrophoresis. Presented below is a general protocol for electrophoresis of RNA using formaldehyde gels.
- Weigh out 0.5 g of agarose and place it into a 125 mL flask.
- Add 43.5 mL of DEPC (or acetic anhydride) treated water.
- Heat the agarose slurry in a microwave oven for 60 seconds. Swirl the flask to make sure any grains sticking to the walls enter the solution. Undissolved agarose appears as small “lenses” floating in the solution.
- Heat for an additional 30-60 seconds.
- Allow the solution to cool to 60°C. Place the flask in a hood, and add 5 mL of 10X MAE buffer (see Appendix for recipe) and 1.5 mL of 37% formaldehyde.
- Proceed to Section 7.3 Casting the Gel.
Casting the Gel
- Place the gel casting stand on a lab bench.
- Insert the gel casting tray into the casting stand. If you are using the 12 x 6 cm gels, place the spacer in the center of the casting stand, then insert the two 12 x 6 cm landscape gel trays.

- When the gel solution has cooled to approximately 55°C to 60°C, slowly pour it into the gel tray. If hotter gel solutions are routinely poured, the tray may warp over time.
- If bubbles form on the surface of the gel upon pouring, use the comb to either pop them or lightly brush them to the sides of the gel.
- Insert one or more combs by placing them into the slots in the casting stand. For best results, place the comb in the slot nearest the end of the casting fixture.
- Allow the gel to harden undisturbed for at least 30 minutes.

Removing the Comb
When the gel is solidified and fully opaque, carefully remove the comb with a gentle wiggling, upward motion. Check the wells to ensure their bases are intact.
Loading the Samples onto the Gel
- Remove the casting tray containing the hardened agarose gel from the casting stand by lifting the ends. Place the tray and gel into the main unit assembly such that the sample wells are on the same end as the negative (black) electrode.
- Fill the unit with the remaining 1X electrophoresis buffer containing ethidium bromide made previously (or 1X MAE buffer for RNA gels), covering the gel to a depth of 1 to 5 mm.
- Pre-run RNA gels at 100V for five minutes before loading the samples.
- Load the samples into the wells with a micropipette or similar device, taking care not to puncture the bottom of the wells or load the sample onto the top of the gel.
Electrical Connections to the Safety Lid
- Plug the male ends of the black (-) and red (+) electrodes into the jacks on the side of the power supply.
- Set the lid straight down so that the lid rests squarely on the tank. The connection is inside the end of the lid, which engages the power supply.
- Plug the power supply into a wall outlet. A transformer is not necessary in Europe or any other region where the standard voltage is higher than 100V.
- Set the timer. Increase or decrease the value with the Up and Down buttons.
- Select the required output voltage up to 150V or 400 mA.
- Press the Run/Pause button to start the run.
To pause a run and change parameters
- To pause the run, press the Run/Pause button once.
- To stop the run, press the Run/Pause button for 3 seconds. The stop will appear on the display.
Sample Electrophoresis
The maximum suggested applied voltage for the electrophoresis of DNA in agarose gels using the Enduro Gel XL is 150V. In a 1% TBE gel, this translates into a run time of approximately 1 hour.
Documentation of Separated Fragments
- Remove the lid and the gel tray. Alternatively, the entire tank can be placed on a Transilluminator.
- To stain RNA gels containing formaldehyde post-electrophoresis, soak the gel in 1 L of DEPC-treated water overnight at room temperature. Transfer the gel to a solution of 20X SSC containing 0.5 µg/mL of ethidium bromide, and stain for 5-10 minutes.
- Place the gel casting tray containing the gel on the filter surface of a UV Transilluminator for convenient viewing.
Troubleshooting
Do not send in a unit for service without first calling to obtain a repair authorization number. Any damage resulting from improper packaging shall be the responsibility of the user.
Problems, Causes & Solutions
| The LCD screen is blank | The AC power cord is not connected. | Check AC power cord connections at both ends. Use the correct cords. |
| The power switch is not on. | Toggle the power switch. | |
| Operation stops with alarm: The screen displays LOAD | The electrophoresis tank is not connected to the power supply, or there is a broken circuit in the electrophoresis cell. |
|
| Buffer concentration is incorrect. | Replace buffer. | |
| Operation stops with alarm: The screen displays Lid | The lid was removed during a run. |
|
| Other error | Turn off the power, disconnect the power cord from the outlet, and contact Customer Service. |
Limited Warranty
Corning Incorporated (Corning) warrants that this product will be free from defects in material and workmanship for a period of one (1) year from the date of purchase. Corning’s sole obligation shall be to repair or replace, at its option, any product or part thereof that proves defective in material or workmanship within the warranty period, provided the purchaser notifies Corning of any such defect. Corning is not liable for any incidental or consequential damages, Labnet Enduro Gel XL Electrophoresis System commercial loss, or any other damages from the use of this product.
This warranty does not cover damage caused by Labnet Enduro Gel XL Electrophoresis System accident, neglect, misuse, improper service, natural forces, or other causes not arising from defects in original material or workmanship. This warranty does not cover motor brushes, fuses, light bulbs, batteries, or damage to paint or finish.
In the event this product fails within the specified period of time because of a defect in material or workmanship, contact Corning
Corning’s Customer Service team will help arrange local service where available or coordinate a return authorization number and shipping instructions. Corning may elect for on-site service for larger equipment.
Some states do not allow limitations on the length of implied warranties or the exclusion or limitation of incidental or consequential damages. This warranty gives you specific legal rights. You may have other rights that vary from state to state.
No individual may accept for, or on behalf of Corning, any other obligation of liability, or extend the period of this warranty.
For your reference, make a note of the serial and Labnet Enduro Gel XL Electrophoresis System model number, date of purchase, and supplier here.
Equipment Disposal
Consequently, the buyer shall follow the instructions Labnet Enduro Gel XL Electrophoresis System for reuse and recycling of waste electronic and electrical equipment (WEEE) provided with the products and available at www.corning.com/weee.
Appendix
Buffers for Electrophoresis
- Tris Acetate EDTA Buffer (TAE) 1X Working Concentration 10X Stock Solution
- 40mM Tris base
- 20mM Glacial Acetic Acid
- 2.0mM EDTA, pH 8.3
- 48.4g Tris base
- 11.42mL Glacial Acetic Acid
- 7.4g EDTA or 20 mL 0.5M
- EDTA, pH 8.0
- H2 to 1L Tris Borate EDTA Buffer (TBE) 1X Working Concentration 10X Stock Solution
- 89mM Tris base
- 89mM Boric Acid
- 2.0mM EDTA, pH 8.0
- 108g Tris base
- 55g Boric Acid
6.72g EDTA or 40mL 0.5M EDTA, pH 8.0 - H2O to 1L
MOPS Acetate EDTA (MAE)
- 1X Working Concentration
- 10X Stock Solution
- 20mM MOPS, pH 7.0
- 8mM Glacial Acetic Acid
- 1mM EDTA, pH 8.0
- 41.8g MOPS
- 800mL DDEPC-treated H2O
- Adjust pH to 7.0 with NAOH and add:
- 16.6mL 3M DEPC-treated Glacial Acetic Acid
- 20.0mL 0.5M DEPC-treated EDTA, pH 8.0
- Bring to 1L and filter
- Sample Loading Buffer, DNA 10X Stock Solution
- Sample Loading Buffer, RNA 5X Stock Solution
- 50% Glycerol
- 100mM Na3 EDTA
- 1% SDS
- 0.1% Bromophenol blue, pH 8.0
- 1mM EDTA, pH 8.0
- 0.25% Bromophenol blue
- 0.25% Xylene Cyanol
- 50% Glycerol3
Physical Properties of Electrophoretic Plastics
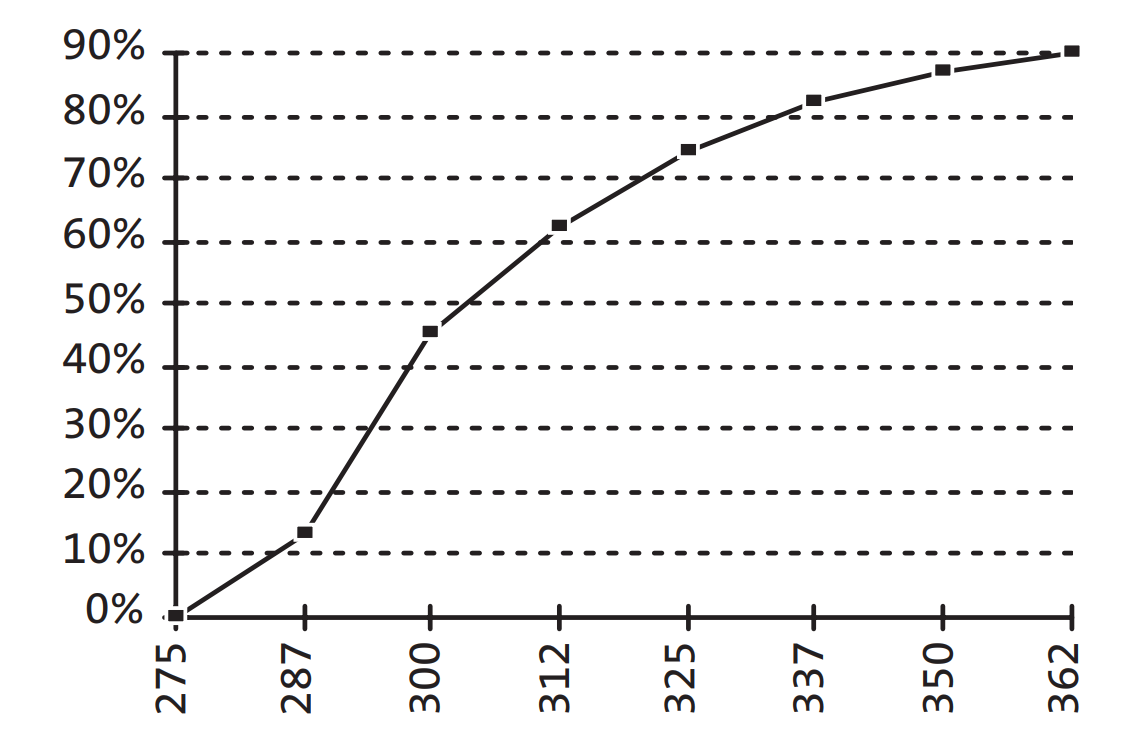
The UV transmittant tray is ideal for monitoring the progress of electrophoresis without removing the gel from the tray. Figure A above delineates the absorption specifications of the UV transmittant plastic gel tray.
References
- Lehrach H, et al. (1977), RNA Molecular Labnet Enduro Gel XL Electrophoresis System Weight Determinations by Gel Electrophoresis Under Denaturing Conditions, a Critical Reexamination, Biochemistry 16:4743.
- Sambrook J, Fritsch EF, and Maniatis T (1989), Molecular Cloning, A Laboratory Manual, vol 1. Cold Spring Harbor Press, New York.
- Selden RF (1988), Analysis of RNA by Northern Hybridization, in Current Protocols in Molecular Biology, Ausubel FM et al., editors, volume 1, p.4.9.1. Green Publishing Associates and Wiley-Interscience.
Warranty/Disclaimer: Unless otherwise specified, all products are for research use or general laboratory use only.* Not intended for use in diagnostic or therapeutic procedures. Not for use in humans. Corning Life Sciences makes no claims regarding the performance of these products for clinical or diagnostic applications. Customers may use these products to support their claims.
Customer Service
- Website: www.labnetlink.com.
- Visit: www.corning.com/lifesciencs
- Visit: www.corning.com/resources
- USA/Canada: 1.800.492.1110
- Others: +1.978.442.2200
- North America: 978.442.2200
- Australia/New Zealand: 61 427286832
FAQs
What types of gels can I run on the Enduro Gel XL system?
The technology is appropriate for large-scale applications because it can handle gels up to 20 x 25 cm in size.
Can I use the Enduro Gel XL with any power supply?
To guarantee safe and ideal voltage/current delivery, only use the suggested Labnet power supply modules made for the Enduro Gel XL. Using incompatible power supplies can harm the system or create dangerous situations.
Can the Enduro Gel XL be used for pulse-field electrophoresis?
No, standard horizontal gel electrophoresis is the intended use for the Enduro Gel XL. This system does not come with the specialised equipment needed for pulse-field electrophoresis.
Can I run multiple gels simultaneously?
Indeed, the big gel tray increases throughput by enabling the loading of many gels side by side.
Is the Enduro Gel XL compatible with gel imaging systems?
Indeed. Gels can be moved to appropriate gel documentation or imaging devices, such as UV transilluminators or blue-light systems, for visualisation following electrophoresis.