
Labnet 222DS Benchtop Shaking Incubator
Introduction
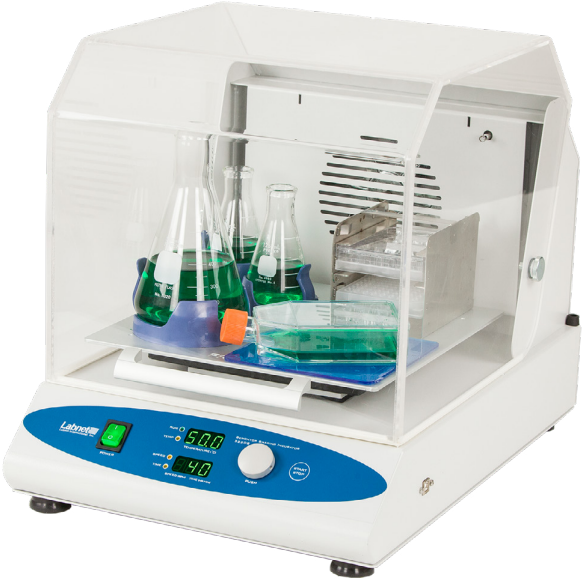
The 222DS Benchtop Shaking Incubator is a combination product of a shaker and a temperature chamber, designed for shaking and heat treatment of sensitive samples. It replaces two devices, reducing the time and space needed. It is very suitable for biochemistry, microbiology, and medicine laboratories in which thermal and shaking treatment of samples is a daily routine.
Unpacking
The 222DS Benchtop Shaking Incubator includes the following components:
- 222DS Benchtop Shaking Incubator
- Instruction Manual
Safety Information
- Before cleaning, disconnect the device from the mains power supply. The device could be cleaned with a soft, lightly wet cloth. Don’t use cleaners or liquids on an aerosol basis.
- Do not use the device near water sources. Take care that water does not drop into the device, especially during cleaning procedures.
- Do not use the device in an aggressive atmosphere.
- Do not shake flammable or explosive samples.
- When closing the lid, do not put your hands between the lid and housing, because they can get crushed.
- When the lid is open, do not put your fingers in the area between the housing and the rotating platform. Danger of mechanical injury.
- The lid may be hot when the device is working at higher temperatures. Take care not to burn your hands.
- The back side of the housing may be hot when the device is working at higher temperatures.
Take care not to burn your hands. - Power supply cord shall have a nominal cross-sectional area of at least 18 AWG.
Installation
Device Placement
- When selecting the right place for the device, please consider the following:
- Put the device on a smooth, horizontal, and stable surface.
- Leave enough space beyond the device for normal air circulation, min. 15 cm.
- Leave enough space around the device, min. 15 cm, for easy access and maintenance.
- Avoid locations subject to shocks and vibrations.
- Don’t use the device in surroundings where there are fast temperature and humidity changes. Please
also avoid such places, which are under direct access to sunlight or places near heat-producing devices.
Attaching the Power Cord
First, connect the main power cord to the shake, then connect the plug end of the cord to a grounded wall socket. Avoid lines on which powerful electric motors, refrigerators, and similar devices are connected.
- Be careful when you plug the cord into a grounded wall socket.
- Do not touch the plug with wet hands.
- Do not pull the plug by the cord.
Attaching Shaking Platforms
The Shaking Incubator has a variety of platforms available to meet most of the shaking needs. These platforms mount to the shakers via four mounting platforms, which easily plug into four rubber mounting points on the top of the shaking incubator.
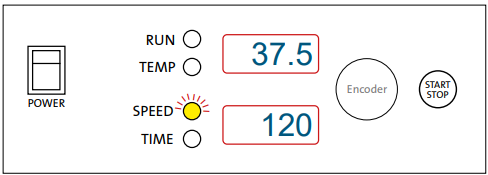
Control Panel
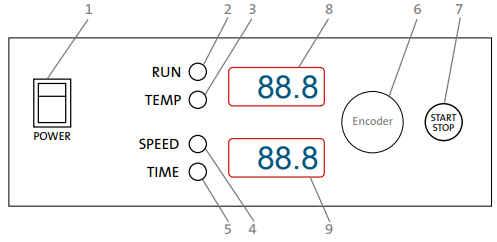
- POWER key – switch ON (illuminates when on) or OFF.
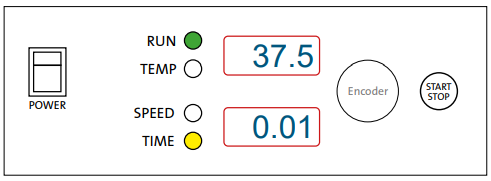
- RUN – green signal light illuminated when the shaking incubator is running.
- TEMPERATURE – yellow signal light illuminated when the shaking incubator is set to the temperature.
- SPEED – the yellow signal light illuminates when the shaking incubator is set on speed.
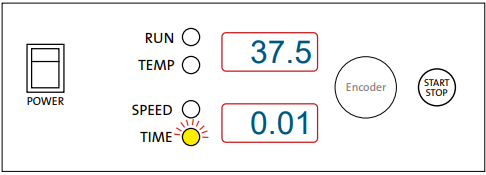
- TIME – the yellow signal light illuminates when the shaking incubator is set to time.
- ENCODER – By rotating the encoder clockwise (+) or counterclockwise (-), you can change the Time,
- START/STOP key – START or STOP operating.
- TEMPERATURE display.
- SPEED/TIME display.
Basic Operation
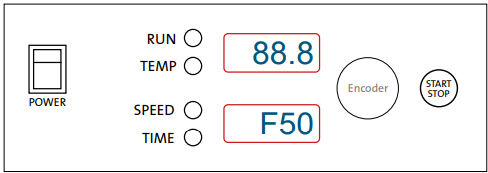
- Press the POWER switch on the control panel. The shaking incubator automatically detects the power supply frequency F50 or F60 and shows it on the display.
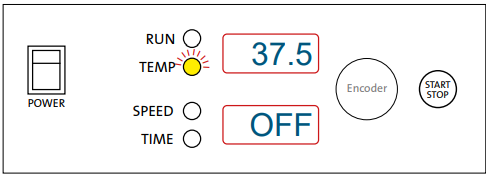
- Press and hold the encoder knob for more than 2 seconds. The temperature signal light blinks. With rotating encoder clockwise (+) or counter-clockwise (-), set temperature to desired value: 37.5 = 37.5°C
- If you want to use the shaking incubator without temperature regulation, set OFF on display. You get the OFF function displayed when you rotate the encoder under 0.0°C or above 70.0°C.
- Press the encoder knob. The speed signal light blinks. With rotating encoder clockwise (+) or counter-clockwise (-), set rotating speed to desired value: 34 = 34 rpm 120 = 120 rpm
- If you want to use the shaking incubator without shaking, set OFF on display. You get the OFF function on display when you rotate the encoder under 20 RPM or above 300 RPM.
- Press the encoder knob. The time signal light blinks. With rotating encoder clockwise (+) or counter-clockwise (-), set time to desired value from 1 min to 99 h: 70.3 = 70h 30 min 1.55 = 1h 55 min 0.01 = 1 min
- If you want to set the Time to hold (continued operation), rotate the ncoder under 0.01 min or above 99.0 h to get “HLd” on the display.
- Press the START/STOP key once to exit the changing of parameters. You are now in starting mode. Only the signal light of the last changed parameter shines.
- Press the START/STOP key to start the operation.
- The run signal light shines. The shaking incubator counts down the time from the set value.
- You can move between the values of time and speed during the operation by pressing the encoder.

Changing Parameters During Operation
Temperature
- Press and hold the encoder knob for more than 2 seconds. The temperature signal light blinks. Rotate the encoder clockwise (+) or counter-clockwise (-) to set the desired value.
- In the meantime, the temperature signal lights pulses. When you set the new value, press the START/STOP key only once. The shaking incubator goes back to working parameters.
Speed
- Press and hold the encoder knob for more than 2 seconds. If the shaking incubator is not set on speed (the speed signal light is not blinking), press the encoder – speed signal light must blink. Rotate the encoder clockwise (+) or counterclockwise (-) to set the desired value.
- When time elapses or you press the START/STOP key again, the message End appears on display and the Run signal light pulses. When the shaking incubator completely stops, it returns to the last used values for Time, Speed, and Temperature.
Shaking Without Heating
- If you want to shake the samples without heating them, set Temperature to OFF.
Heating Without Shaking
- If you want to heat the samples without shaking them, set Speed to OFF.
Temperature Calibration
The shaking incubator has software for temperature re-adjustment. First, you have to measure the temperature in the middle of the chamber, or even better, in the sample, for a minimum of 2 hours. You have to measure the temperature with a calibrated digital temperature thermometer, with a precision of 0.1°C or more. After 2 hours or more, read the temperature on the thermometer and compare it with the temperature on the display of the shaking incubator. The difference between the temperatures on the thermometer and the display is the value, which you enter in the software.
- Example 1: The Temperature on the thermometer is 37.9°C, the temperature on the display is 37°C. The difference is 37.9 – 37 = 0.9. This value, 0.9, is the value (which you will enter into the software).
- Example 2: Temperature on the thermometer is 36.2°C, temperature on display is 37°C. The difference is 36.2 – 37 = -0.8. This value -0.8 is the value (which you will enter into the software).
Procedure for temperature calibration
- Press and hold the encoder knob for more than 5 seconds. Message “Cor” (Correction) appears on display.
- Press the encoder knob once to enter the value setting procedure and set the value by rotating the encoder counter-clockwise or clockwise (see Example 1 or Example 2). Pay attention to the sign of the value (plus or minus). When you set the value, press the encoder knob again.
- Press the START/STOP key to finish the temperature re-adjustment.
Maintenance and Cleaning
Cleaning of the Working Chamber (Painted Steel)
The chamber should be cleaned regularly. Any samples that spill inside or outside the chamber must be immediately wiped. You can only use mild cleaning solutions. Use only warm water. Usage of aggressive or abrasive cleaners is not allowed. For decontamination, use cleaners with neutral pH. The stainless steel platform can be decontaminated with an autoclave (120°C).
Maintenance
Acrylic glass is sensitive to scratching. For cleaning, use only non-aggressive liquid detergents and non-solids. Do not use the hard sponge, but only a soft cloth. Grease and oil can be cleaned with hexane, petroleum, or other chemicals with an aromatic base.
Cleaning
- benzene, paint thinner, carbon tetrachloride, or other aggressive liquids, because they can damage the surface of the acrylic lid.
- Do not use detergents containing ketones, esters, and aromatics.
- Do not use cleaners with solid and abrasive particles.
- Do not use polishes.
- Never clean the surface with detergent for cleaning nail polish (containing acetone or other solvents) or with cleaning products for chemical cleaning, paint thinner, gasoline, or similar. Avoid any contact with these chemicals.
- Do not use detergents with high levels of Labnet 222DS Benchtop Shaking Incubator alcohol.
- It is best to use 2% aqueous solution of non-aggressive cleaning products (dishwashing detergent).
- Wipe the surface with a lightly damp soft cloth.
- Remove dust and dirt with a dry soft cloth.
Before using any other cleaning or decontamination methods, except those recommended by the manufacturer, you should check with the manufacturer that the proposed method would not damage the equipment.
Technical Description
The casing of the Benchtop Shaking Incubator is made of a steel plate, varnished with high-resistant polyurethane lacquer. The temperature chamber lid is made of PMMA, which is resistant to temperatures up to 90°C.
Basic equipment consists of an independent shaking device and a temperature chamber. Both sections are driven and regulated via microcontroller-driven electronics, which also control all necessary sensors for motor speed, temperature, lid, temperature safety fuse, time, and self-diagnostics error levels in a variety of margin situations.
Specifications
| Heater Power | 700W |
| Fan Power | 17W |
| Shaking Motor Power | 35W |
| Fuse | 2 x 5A 250V 2 x 10A 115V |
| Environmental Temperature | 5°C to 40°C |
| Relative Humidity | Up to 85% non-condensing |
| Speed RPM Regulation | Digital load independent, from 20 to 300 rpm in 1 rpm steps |
| Shaking Orbit | 19 mm |
| Temperature Operating Range | 5°C above room temperature to 70°C |
| Temperature Sensor | PT100 |
| Temperature Accuracy | ±0.5°C |
| Temperature Stability | ±0.5°C |
| Timer | 1 min to 99 hours, timer HOLD function |
| Capacity | 16 x 125 mL , 9 x 250 mL, 5 x 500 mL, 4 x 1,000 mL |
| Dimensions (W x D x H) | 15 x 21 x 16 in. (37 x 53 x 40 cm) |
| Weight | 45 lbs. (20.2 kg) |
| Overvoltage Category | Installation category 1 |
Troubleshooting
The 222DS Shaking Incubator features built-in self-diagnostic procedures that constantly check the operating parameters and performance, as well as functions that are necessary for safe and reliable operation. An error code is shown on the LCD if an error occurs. Sample of Error display:
| E11 | This error message appears when something is wrong with motor regulation (PWM regulator, pulse generator, motor). The shaking incubator is automatically stopped. Call for service. |
| E12 | This error appears when the motor does not reach the set RPM in 30 seconds. The shaking incubator is automatically stopped. Call for service. |
| E13 | This error appears when the set speed oscillates more than 100 rpm in 2 seconds. The shaking incubator is automatically stopped. Call for service. |
| E21 | The temperature sensor is not working properly with regard to the heater. The shaking incubator is automatically stopped. Call for service. |
| E22 | The temperature sensor notices a 5°C higher temperature than the set temperature. The shaking incubator is automatically stopped. Call for service. |
| E23 | The set temperature is not reached in 2 hours. The shaking incubator is automatically stopped. Call for service. |
Should you have a question about the Labnet 222DS Shaking Incubator or require service for the unit, contact Corning Customer Service at 800.492.1110 or 978.442.2200. Do not send a unit for service without first calling to obtain a repair authorization (RA) number. The unit should be properly packed to avoid damage. Any damage resulting from improper packaging shall be the responsibility of the user.
Positioning of Attachments on Shaking Platform
You can mount different attachments on the shaking Labnet 222DS Benchtop Shaking Incubator platform. Follow the diagram below as a guideline for positioning different flasks and accessories.
Accessories
| Product | Cat. No. | Qty/Pk |
| Universal platform 11.8 x 11.8 in. (30 x 30 cm) | I-5230-DS | 1 |
| Petri dish shelf | I-5220 | 1 |
| Sticky mat 5.9 x 5.9 in. (15 x 15 cm) | I-5240 | 2 |
| Microtiter hotel – 3 x microplates stacked individually | I-5250 | 1 |
| Combi tube holder 6 x 15/50 mL tubes | I-5260 | 1 |
| Plastic flask clamp 1,000 mL | I-2041-1000 | 1 |
| Plastic flask clamp 500 mL | I-2041-500 | 1 |
| Plastic flask clamp 250 mL | I-2041-250 | 1 |
| Plastic flask clamp 125 mL | I-2041-125 | 1 |
Limited Warranty
Corning Incorporated (Corning) warrants that this product will be free from defects in material and workmanship for a period of one (1) year from the date of purchase. Corning’s sole obligation shall be to repair or replace, at its option, any product or part thereof that Labnet 222DS Benchtop Shaking Incubator proves defective in material or workmanship within the warranty period, provided the purchaser notifies Labnet 222DS Benchtop Shaking Incubator Corning of any such defect. Corning is not liable for any incidental or consequential damages, commercial loss, or any other damages from the use of this product.
Corning’s Customer Service team will help arrange local service where available or coordinate a return authorization number and shipping instructions. Corning may elect for on-site service for larger equipment. Some states do not alllimitationsion on the length of implied warranties or the exclusion or limitation of incidental or consequential damages. This warranty gives you specific legal rights. You may have other rights that vary from state to state. No individual may accept for, or on behalf of Corning, any other obligation of liability, or extend the period of this warranty.
Warranty/Disclaimer
Unless otherwise specified, all products are for research use or general laboratory use only.* Not intended for use in diagnostic or therapeutic procedures. Not for use in humans. Corning Life Sciences makes no claims regarding the performance of these products for clinical or diagnostic applications. *For a listing of US medical devices, regulatory classifications, or specific information on claims, visit www.corning.com/resources.
Equipment Disposal
According to Directive 2012/19/EU of the European Parliament and of the Council of 4 July 2012 on waste electrical and electronic equipment (WEEE), this product is marked with the crossed-out wheeled bin and must not be disposed of with domestic waste. Consequently Labnet 222DS Benchtop Shaking Incubator, the buyer shall follow the instructions for reuse and recycling of waste electronic and electrical equipment (WEEE) provided with the products and available at www.corning.com/weee.
Customer Service
- Website: www.labnetlink.com.
- Visit: www.corning.com/lifesciencs
- Visit: www.corning.com/resources
- USA/Canada: 1.800.492.1110
- Others: +1.978.442.2200
- North America: 978.442.2200
- Australia/New Zealand: 61 427286832
FAQs
What is the temperature range of the 222DS incubator?
It provides versatility for a range of chemical and biological processes by operating from ambient +5°C to 60°C.
What type of shaking motion does it use?
The device’s 19 mm diameter orbital shaking ensures that samples are mixed and aerated uniformly.
What is the speed range of the shaker?
With shaking speeds ranging from 20 to 300 RPM, agitation intensity may be precisely controlled.
Can the shaking incubator be used continuously?
Indeed. With configurable timing options up to 99 hours and 59 minutes or indefinite runs, it can operate continuously.
Does the incubator have a digital control panel?
Indeed. Temperature, speed, and timing settings can be easily programmed with its digital LED control panel.
Is the interior chamber corrosion-resistant?
Indeed. The chamber’s corrosion-resistant stainless steel construction makes it appropriate for humid and incubated settings.