
Bosch KIF81H Series Built-In Refrigerator
Safety Instructions
- Read this instruction manual carefully.
- Keep the instruction manual and the product information safe for future reference or for the next owner.
- Connect and operate the appliance only in accordance with the specifications on the rating plate.
- Connect the appliance to a power supply with alternating current only via a properly installed socket with earthing.
- Never equip the appliance with an external switching device, e.g., a timer or remote control.
- Never let the power cord come into contact with heat sources.
Preventing Material Damage
- Transport the appliance using a sack truck.
- Use floor protection when moving the appliance, and do not move it in a zigzag fashion.
- Using the appliance, base, runners, or doors as a seat or climbing surface may damage the appliance.
- Do not stand or lean on the appliance, base, runners, or doors.
- Contamination with oil or fat may cause plastic parts and door seals to become porous.
- Keep plastic parts and door seals free of oil and grease.
- Metal or metal-style parts in the appliance may contain aluminium.
- When aluminium comes into contact with acidic foods, it corrodes and discolours.
- Only store packaged food in the appliance.
- Never clean fittings and accessories in the dishwasher.
Environmental protection and saving energy
Disposing of packaging
- The packaging materials are environmentally compatible and can be recycled.
- Sort the individual components by type and dispose of them separately.
Saving energy
- If you follow these instructions, your appliance will use less power.
Selecting the installation location
- Keep the appliance out of direct sunlight.
- Install the appliance as far away as possible from heating elements, cookers, and other heat sources:
- Maintain a 30 mm clearance to electric or gas cookers.
- Maintain a 300 mm clearance to oil or solid-fuel cookers.
- Make sure there is a small gap between the side wall and the appliance.
- Never cover or block the external ventilation openings.
Saving energy during use
- Open the appliance only briefly and then close it carefully.
- Never cover or block the interior ventilation openings or the exterior ventilation openings.
- Transport purchased food in a cool bag and place it in the appliance quickly.
- Allow warm food and drinks to cool down before storing them.
- Thaw frozen food in the refrigerator compartment to utilise the low temperature of the food.
- Always leave some space between the food and the back panel.
Installation and connection
Scope of delivery
After unpacking all parts, check for any transport damage and for completeness of delivery. If you have any complaints, contact your dealer or our after-sales service on Page 24.
The delivery consists of the following:
- Free-standing appliance
- Equipment and accessories 1
- Installation material
- Installation instructions
- User manual
- Customer service directory
- Warranty enclosure 2
- Energy label
- Information on energy consumption and noise
Criteria for the Installation Location
If the appliance is in a space that is too small, a leak in the refrigeration circuit may result in a flammable mixture of gas and air. Only install the appliance in a space with a volume of at least 1 m3 per 8 g of refrigerant. “Appliance”, Fig. 1 / Page 12. The weight of the appliance ex works may be up to 70 kg, depending on the model.
Installing the Appliance
Install the appliance in accordance with the enclosed installation instructions.
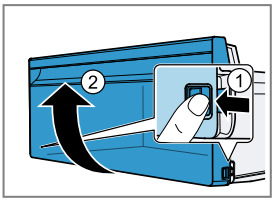
- Remove the informative material.
- Remove the protective foil and transit bolts, e.g., remove the adhesive strips and carton.
- Clean the appliance for the first time.
- Insert the mains plug of the appliance’s power cable into a socket nearby.
- The application is now ready for use.
Familiarising
Appliance
You can find an overview of the parts of your appliance here
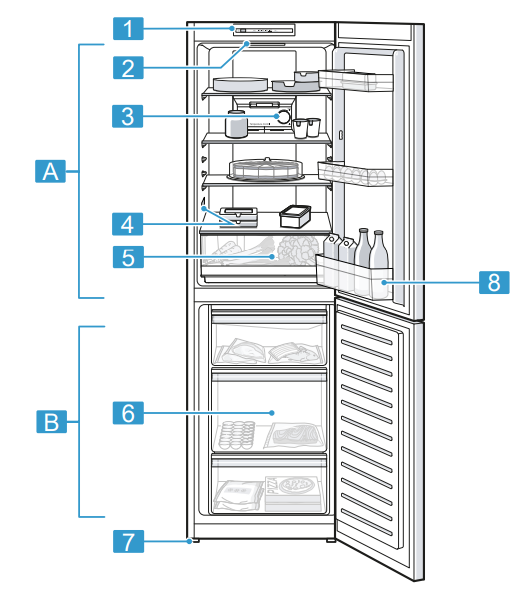
Deviations between your appliance and the diagrams may differ with regard to their features and size.
- Control panel
- Lighting
- Temperature controller (refrigerator compartment)
- Rating plate
- Fruit and vegetable container
- Frozen food container
- Screw foot
- Door tray for large bottles
Control panel
You can use the control panel to configure all functions of your appliance and to obtain information about the operating status.
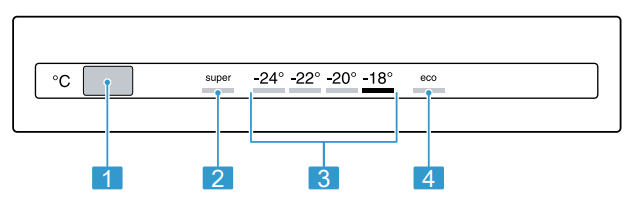
- °C sets the temperature of the freezer compartment.
- Super lights up when Super Freezing is switched on.
- Displays the set temperature for the freezer compartment in °C.
- eco lights up when the energy-saving mode in the freezer compartment is switched on.
Basic operation
Switching on the appliance
- Electrically connect the appliance. Page 10 The appliance begins to cool.
- The temperature display flashes because the freezer compartment is still too warm.
- Switch off the warning signal using °C. 3. Set the required temperature.
Operating tips
- How often the appliance is opened
- Load capacity
- Temperature of newly stored food
- Ambient temperature
- Direct sunlight
Switching off the appliance
- Disconnect the appliance from the power supply.
- Unplug the appliance from the mains or switch off the circuit breaker in the fuse box.
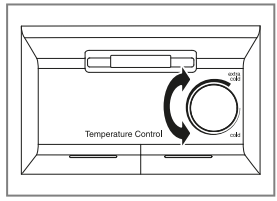
Setting the temperature
- To reduce the temperature, turn the temperature controller to the right towards “extra cold”. Select a very cold setting only temporarily, if the door is opened frequently or before placing large quantities of food in the refrigerator compartment.
- To increase the temperature, turn the temperature controller to the right towards “cold”.
Press °C repeatedly until the temperature display shows the required temperature setting. The recommended temperature in the freezer compartment is −18 °C.
Additional functions
Find out which additional functions can be used for your appliance.
Super freezing
With Super Freezing, the freezer compartment cools as cold as possible. Switch on Super Freezing four to six hours before placing food weighing 2 kg or more into the freezer compartment. In order to utilise the freezer capacity, use Super freezing. “Prerequisites for freezing capacity”, Page 16
Energy-saving mode
You can set the appliance to save energy with the energy-saving mode. The appliance automatically sets the temperatures.
- Refrigerator compartment Temperature remains unchanged
Freezer compartment −16 °C - Switching on energy- Saving mode
Alarm
Door alarm
If the appliance door is open for a while, the door alarm switches on. A warning tone sounds. Switch off the door alarm. Close the appliance door. The warning tone is switched off. 9.2 Temperature alarm If the freezer compartment becomes too warm, the temperature alarm is switched on. A warning tone sounds and the temperature display flashes.
During the thawing process, bacteria may multiply and spoil the frozen food.
- Do not refreeze food after it has been defrosted or started to defrost.
- Refreeze food only after cooking.
- These items should no longer be stored for the maximum storage period.
- The appliance is switched on.
- Do not store any food until the appliance has reached the set temperature.
- Large quantities of fresh food are being placed inside.
- Switching off the temperature alarm
- Press °C. The warning tone is switched off. Refrigerator compartment
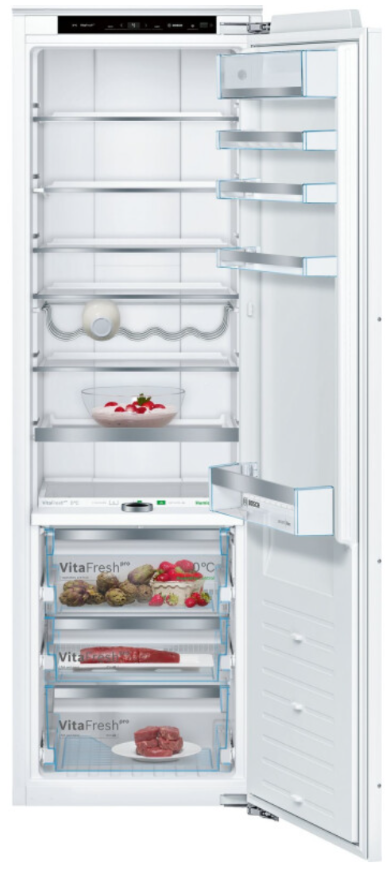
Refrigerator compartment
You can keep meat, sausage, fish, dairy products, eggs, prepared meals, and pastries in the refrigerator compartment. The temperature can be set from “cold” to “extra cold”. The refrigerator compartment can also be used to store highly perishable foods in the short to medium term. The lower the selected temperature, the longer the food remains fresh.
Tips for storing food in the refrigerator compartment
- Only store food when fresh and undamaged.
- Store food covered or in air-tight packaging.
- To avoid impeding the circulation of air and to prevent food from freezing, do not place food in front of the inner ventilation openings or in direct contact with the back wall.
- Allow hot food and drinks to cool down first before placing in the appliance.
Freezer compartment
You can store frozen food, freeze food, and make ice cubes in the freezer compartment. The temperature can be set from −16 °C to −24 °C. Long-term storage of food should be at –18 °C or lower. The freezer compartment can be used to store perishable food long-term. The low temperatures slow down or stop the spoilage.
Freezing capacity
The freezing capacity indicates the quantity of food that can be frozen right through to the centre within a specific period of time. Information on freezing capacity can be found on the rating plate. “Appliance”, Fig. 1 / Page 12
Packing Frozen Food
If you select suitable packaging material and the correct type of packaging, you can determine the product
quality and prevent freezer burn.
- Place the food in the packaging.
- Squeeze out the air.
- Pack food airtight to prevent it from losing flavour and drying out.
- Label the packaging with the contents and the date of freezing.
Food Storage Time
- Fish, sausages, prepared meals, and baked goods up to 6 months
- Poultry, meat up to 8 months
- Vegetables, fruit up to 12 months
The imprinted freezer calendar indicates the maximum storage duration in months at a constant temperature of –18 °C.
Defrosting
- The refrigerator compartment in your appliance defrosts automatically
- The fully automatic NoFrost system ensures that the freezer compartment remains frost-free. Defrosting is not required.
Cleaning and servicing
To keep your appliance working efficiently for a long time, it is important to clean and maintain it carefully. Customer Service must clean inaccessible points. Cleaning by customer service can give rise to costs.
Preparing the appliance for cleaning
- Disconnect the appliance from the power supply.
- Unplug the appliance from the mains or switch off the circuit breaker in the fuse box.
- Take out all of the food and store it in a cool place. Place ice packs (if available) onto the food.
- Remove all fittings and accessories from the appliance. Page 18
Cleaning the appliance
Do not use steam- or high-pressure cleaners to clean the appliance. Liquid in the lighting, controls, or inner ventilation openings can be dangerous. The rinsing water must not drip into the lighting, control,s or inner ventilation openings.
- Prepare the appliance for cleaning. Page 18
- Clean the appliance, the fittings, the accessories, and the door seals with a dishcloth, lukewarm water, and a little pH-neutral washing-up liquid.
- Dry thoroughly with a soft, dry cloth.
- Insert the fittings.
- Electrically connect the appliance. Page 10
- Putting the food into the appliance.
Removing the shelf
Lift the shelf at the front, pull it out, and remove it.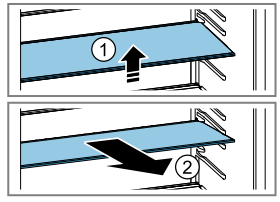
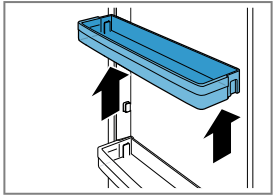
Removing door tray
Lift the door tray and remove it.
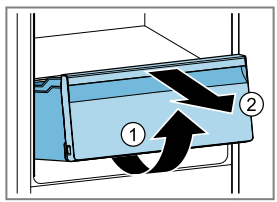
Removing the fruit and vegetable container
- Pull out the fruit and vegetable container as far as it will go.
- Lift the fruit and vegetable container at the front and remove it
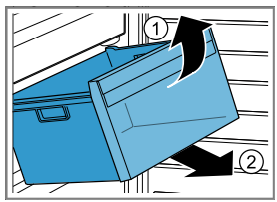
Frozen Food
- Take out the frozen food container as far as it will go.
- Lift the frozen food container at the front and remove it.
Removing the front of the container
You can remove the front of the fruit and vegetable container to facilitate cleaning. Press in the snap-in hooks on the side of the container and remove the front from the container in a turning motion.
Technical data
Refrigerant, cubic capacity, and further technical specifications can be found on the rating plate. “Appliance”, Fig. 1 / Page 1.2. This product contains a light source from an energy efficiency class G. The light source is available as a spare part and should only be replaced by trained specialist staff.
Troubleshooting
| Fault | Cause and troubleshooting |
| The appliance is not cooling, and the displays and lighting are lit. | Showroom mode is switched on. 1. Press and hold °C for 5 seconds until an audible signal sounds. 2. Switch the appliance off and on again, and check whether it is cooling. |
Power failure
During a power failure, the temperature in the appliance rises; this reduces the storage time and the quality of the frozen food. On the website for your appliance, the technical data provides you with the storage times for frozen food in the event of a fault. Check the quality of the food immediately after a power failure.
- Dispose of any frozen food that has defrosted and is hotter than 5 °C.
- Cook or fry slightly thawed frozen food, and then either consume it or freeze it again.
Storage and Disposal
Taking the appliance out of operation
- Disconnect the appliance from the power supply.
- Unplug the appliance from the mains or switch off the circuit breaker in the fuse box.
- Remove all of the food.
- Clean the appliance. Page 18
- To guarantee the ventilation inside the appliance, leave the appliance open.
- Unplug the appliance from the mains.
- Cut through the power cord.
- Dispose of the appliance in an environmentally friendly manner.
Customer Service
- Website: www.bosch-home.com/welcome
- Timings: Monday to Friday 8 am to 8 pm,
- Ph: +49 (0)89 69 339 339
Thank you for buying a Bosch Home Appliance!
Register your new device on MyBosch now and profit directly from:
- Expert tips & tricks for your appliance
- Warranty extension options
- Discounts for accessories & spare parts
- Digital manual and all appliance data at hand
FAQs
Q: What type of refrigerator is the Bosch KIF81H Series?
The Bosch KIF81H Series is a built-in, completely integrated refrigerator with effective cooling, frost-free operation, and energy-saving capabilities that blend in seamlessly with kitchen cabinets.
Q: How long is the warranty for this refrigerator?
Usually, Bosch provides a two-year guarantee that covers both labour and parts. The length of the warranty may differ depending on the country; for specifics, refer to the purchase documentation.
Q: Can the refrigerator be repaired at home?
To prevent safety risks and warranty voiding, Bosch-certified technicians should handle electrical, cooling, or compressor problems.
Q: What should I do if the door seal is damaged?
To guarantee adequate cooling and energy efficiency, swap out for authentic Bosch seals. Steer clear of makeshift solutions and tape, since these could result in spoiling and increased energy costs.
Q: How do I contact Bosch service for installation, maintenance, or repairs?
Use the service hotline or go to the official Bosch website. Give your serial number, issue specifics, and model number (KIF81H Series). Authorised experts, replacement parts, and warranty assistance are all available through Bosch service.