
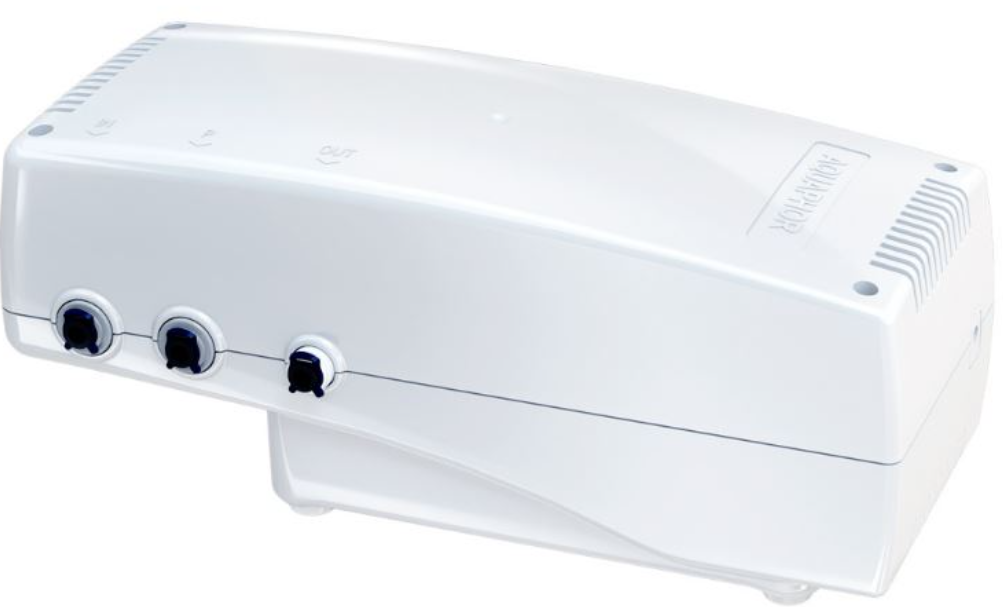
AQUAPHOR 100 GPD Pressure Boosting Unit
Unpacking
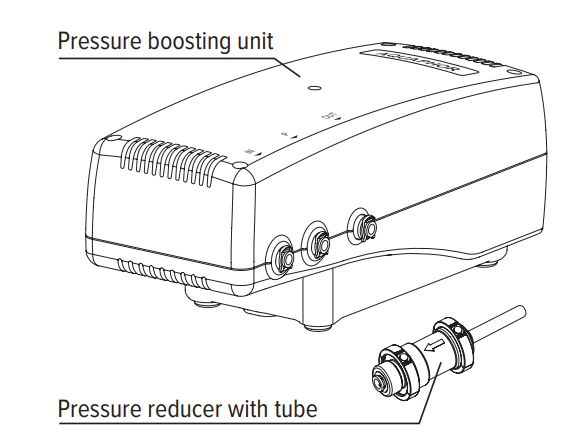
- Pressure boosting unit assembled 1pc.
- Set of tubes and fittings:
- Tube 1/4 “ (1.2 meters), blue colour 1 pc.
- Pressure reducer with tube 1 pc.
- Three-way valve with tube 1 pc.
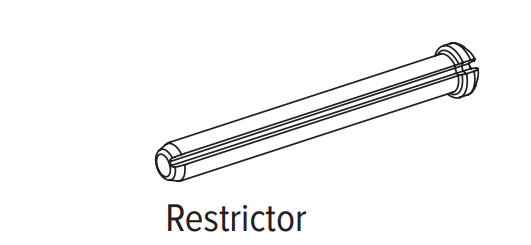
- Restrictor 50-gallon 1 pc.
- Power supply unit* 1 pc..
Operation
The pressure boosting unit is designed to increase the water pressure and filtration rate in the water purifier. It operates from the main power supply connected by a power supply unit. The pressure-boosting unit automatically turns off
- when the storage tank (or jug) is full
- When the main water supply is disconnected.
- A pressure reducer with a tube is required to be installed and is designed for safe operation of the water purifier in the event of a sharp pressure increase in the main water supply.
Technical Specifications
| Size (length × width × height) | 230 × 121 × 76 mm |
| Minimum pressure in the water supply network | 0.05 MPa (0.5 at) |
| Maximum pressure in the water supply network, no more than | 0.63 MPa (6.5 at) |
| Water temperature | from +5 to +38 °C |
| Pressure boosting unit power supply | 24 V ± 5%, at least 1.5 A DC |
| Weight, not more than | 1.7 kg |
Main characteristics of the power supply unit
| Input voltage | 100–240 V AC | |||
| Input plug mounted in the CEE | 7/16 unit | |||
| Output voltage | 24 V DC | |||
| Output current | 1.5 A | |||
| The output connector is coaxial, | Ø 2.5 × Ø 5.5 mm | |||
| Wire length, not less than | 1.0 m |
Electrical Power Supply
Before connecting the Pressure boosting unit to the power supply, check that the power supply voltage
corresponds to the parameters specified in the Pressure boosting unit Manual. Use only a power supply with the output characteristics specified in this manual (24 V ± 5%, at least 1.5 A DC).
Before installing the Pressure boosting unit, make sure that it will be protected from freezing, water ingress, direct sunlight, contact with hot objects, including hot water pipes, radiators, and heating devices. Protect from shocks and falls.
The cord of the power supply connected to the Pressure boosting unit must not be stretched. Make sure that the power cord does not touch surfaces that can damage it.
Do not immerse the Pressure boosting unit, its power supply, the power cord, or the plug in water or other liquid. Do not wash them under running water or in the dishwasher.
To avoid electric shock, do not touch the Pressure boosting unit connected to the power supply, the power supply unit, its power cord, or plug with wet hands. Do not allow contamination of the Pressure boosting unit housing. If necessary, wipe it with a dry cloth after disconnecting the Pressure boosting unit from the power supply.
Dissambeling the Unit
Do not use the Pressure boosting unit and the power supply if problems or damage to the wire are detected.
Do not attempt to repair the device yourself. If any malfunction is detected, first disconnect the power supply from the mains, then disconnect it from the Pressure boosting unit. Contact customer service.
Installation
Attention! It is not recommended to connect the Pressure boosting unit to the water purifier yourself. To
Connect the Pressure boosting unit. It is recommended to contact Aquaphor customer service or Aquaphor regional dealers.
The manufacturer is not responsible for the improper quality of the work on connecting the Pressure boosting unit to the water filter, as well as for the result of this work. Responsibility for the shortcomings of this work, as well as for causing harm to the health or property of the customer or other people as a result of these shortcomings, is borne by the party performing the installation. Select an appropriate location for the Pressure boosting unit.
Note that the connecting tubes should be loose and not bent. The free sections of the tubes should be fixed so that they cannot be damaged by other objects. The water filter must be placed at a distance or isolated from any heat sources (kitchen ovens, boilers, hot water supply pipes, dishwashers or washing machines, etc.) and placed in a place that prevents water from entering the housing of the Pressure boosting unit and the power supply unit.
Connecting the Tubes
Remove the stopping clip from under the plastic sleeve, insert the pre-wetted end of the tube into the sleeve of the fitting until it stops at a depth of about 15 mm, and insert the clip. Check the strength of the fastening of the tube: at a force of 8-10 kgf, the tube should not be pulled out.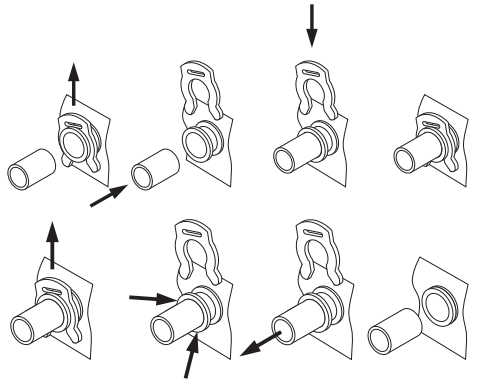
Disconnecting the Tubes
To disconnect the tube, pull out the stopping clip from under the plastic sleeve and, pressing the end of the plastic sleeve, pull out the tube.
- Turn off the water supply to the water purifier (close the tap of the connection node).
- Relieve the pressure in the RO according to the manual for your RO.
- Remove the RO cover.
- Remove the plug from the fitting (11).
- Disconnect the tube included in the RO kit from the connections (2) and (6).
- Disconnect the tube (9) from the fitting (8).
- Connect the assembled Pressure reducer with a pipe (1), supplied with the Pressure boosting unit, to the nozzle (2).
- Then connect the white tube JG (in) (3A) to the free outlet of the reducer (1) after passing it through the process hole (4) in the console.
- Connect the white tube JG (out) (3B) to the fitting (6) after passing it through the process hole (4) in the console.
- Then connect the JG tube (9), which is part of the RO circuit and exits the storage tank, to the tee (7).
- Connect one end of the blue JG tube (3C), included in the Pressure boosting unit kit, to the free outlet of the tee (7) after passing it through the process hole (10) in the console.
- Put the RO cover back on.

COMMISSIONING
- Connect the power supply to the Pressure boosting unit
- Plug the power supply into an outlet
- Turn on the water supply to the water purifier (open the tap of the connection node).
- After passing the Pressure boosting unit and water purifying system, water will begin to flow into the storage tank (or jug).
- The Pressure boosting unit will switch off when the storage tank (or jug) is full.
Operation
The manufacturer is not responsible for changing the Pressure boosting unit settings. ATTENTION! The service life of the Pressure boosting unit directly depends on the operability of the water purifier cartridge. It is very important to replace the filtering cartridges in time.
The operating temperature is from +5 to +38 °C. If the characteristics of the source water significantly exceed the requirements of national standards for drinking water, we recommend that you install additional water treatment systems (mechanical cleaning systems, etc.).
Use a water purifier with the Pressure boosting unit only for cleaning water from the cold water supply system. Disposal in accordance with environmental, sanitary, and other requirements established by national standards in the field of environmental protection, and ensuring the sanitary and epidemiological well-being of the population.
Troubleshooting
| Fault | Problem | Solution |
| The pump does not turn on | Insufficient water pressure in the main water supply | Contact the plumbing service |
| Not detected | Contact customer service | |
| The pump does not turn off | The drinking water tap is open | Close the drinking water tap |
| Not detected | Contact customer service | |
| The water tank is not filling quickly enough | Water purifier cartridges are clogged | Replace water purifier cartridges |
| Not detected | Contact customer service |
In case of any other faults, contact the customer service!
- Regardless of the operation’s starting date.
- Manufacturing date is the date in the format DD.MM.YYYY is shown by the manufacturer on the label placed on the housing.
- Using the Pressure boosting unit beyond its service life may result in harm to the health or property of the consumer or other persons and must be discontinued.
- The period during which the manufacturer must satisfy the customer’s claims in case of faults in the product.
Figure 1. Connection diagram of the Pressure Boosting Unit to the Aquaphor Morion RO-101S and RO-101 drinking water machines
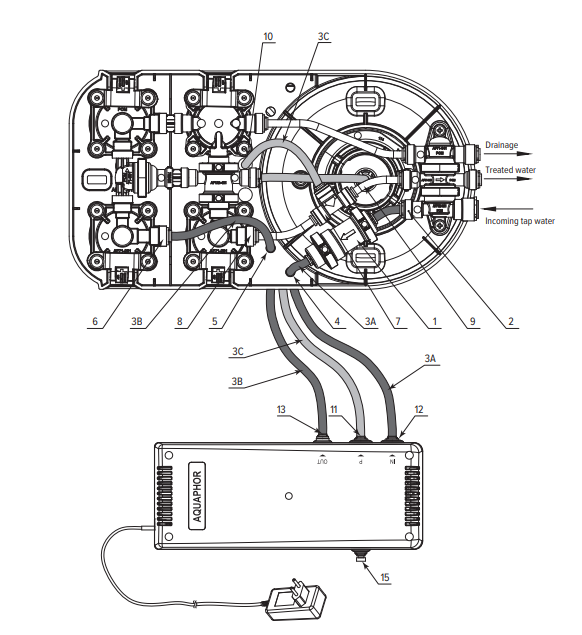
Figure 2. Connection diagram of the Pressure Boosting AQUAPHOR 100 GPD Pressure Boosting Unit to the Aquaphor Morion RO-70S and RO-70 drinking water machines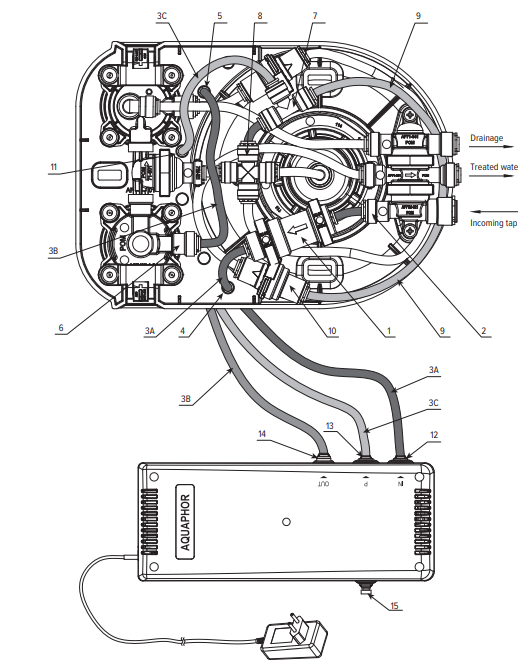
Warranty
- Service life of the Pressure boosting unit is 5 years* from the manufacturing date.
- The Pressure boosting unit shall be replaced upon expiration of the service life.
- The shelf life of the Pressure boosting unit before operation is a maximum of 3 years at temperatures from +5 to +38 °C, without removing packaging. AQUAPHOR 100 GPD Pressure Boosting Unit Warranty period.
- The pressure boosting unit is 1 year from the purchase date.
- The purchase date of the Pressure boosting unit is the date of the retailer’s stamp in this manual or the date of the sales receipt.
- Please contact the retailer or the manufacturer in case of any claims regarding the operation of the
- Pressure boosting unit. The manufacturer shall bear no responsibility in any of the following cases:
- The consumer does not follow the installation instructions described in this manual for the Pressure boosting unit and connecting it to the water purifier of a certain model;
- The consumer does not follow the water purifier installation instructions described in the manual for the water
purifier used with the Pressure boosting unit;
Customer Service
- Tel: +372 600 2255
- Website: www.aquaphor.com
- Address: Katusepapi 44, Estonia, 11412, Tallinn, Europe
FAQs
Q: What is the AQUAPHOR 100 GPD Pressure Boosting Unit?
This pump system ensures steady flow and the best possible filtration performance by raising the water pressure for reverse osmosis (RO) and other filtration systems.
Q: What does “100 GPD” mean?
Gallons Per Day is what GPD stands for. With the right flow and pressure, this unit can sustain a RO system that produces up to 100 gallons of filtered water daily.
Q: Does the unit protect my RO membrane?
Indeed, the pressure booster keeps the water pressure steady, which lessens the strain on the RO membrane and increases the effectiveness of water production.
Q: Is the unit safe for drinking water?
Indeed. Every substance that comes into contact with water has FDA approval and is safe for drinking.
Q: How do I contact AQUAPHOR support?
Visit the official AQUAPHOR website or contact the customer service number included in the instruction manual for technical support, replacement parts, and troubleshooting.
Q: What is the maximum operating pressure for the unit?
A maximum pressure of 60 PSI (4.1 bar) is intended for the booster pump. Operating over this could harm the linked RO system components or the unit itself.