


POWERTEC 71850 Router Table Insert Plate
Safety Instructions
- Keep children and visitors at a safe distance from the work area.
- Keep the work area clean. Cluttered work areas invite accidents. The work area should be properly lit.
- Do not use power tools in dangerous environments. Do not use power tools in damp locations.
- Do not expose power tools to rain.
- Be alert and think clearly. Never operate power tools when tired, intoxicated, or when taking medications that cause drowsiness.
- Wear proper apparel. Do not wear loose clothing, gloves, neckties, rings, bracelets, or other jewelry that may get caught in the moving parts of the tool.
- Wear a protective hair covering to contain long hair.
- Wear safety shoes with non‑slip soles.
- Wear safety glasses complying with the United States ANSI Z87.1.
- Everyday glasses have only impact-resistant lenses. They are NOT safety glasses.
- Wear a face mask or a dust mask if the operation is dusty.
- A guard or any other part that is damaged should be properly repaired or replaced. Do not perform makeshift repairs.
- Use safety equipment such as featherboards, push sticks, and push blocks etc., when appropriate.
- POWERTEC 71850 Router Table Insert Plate Maintain proper footing at all times and do not overreach.
- Do not force woodworking tools.
Instructions for Future
UNPACKING
Check for shipping damage. Check immediately whether all parts and accessories are included.


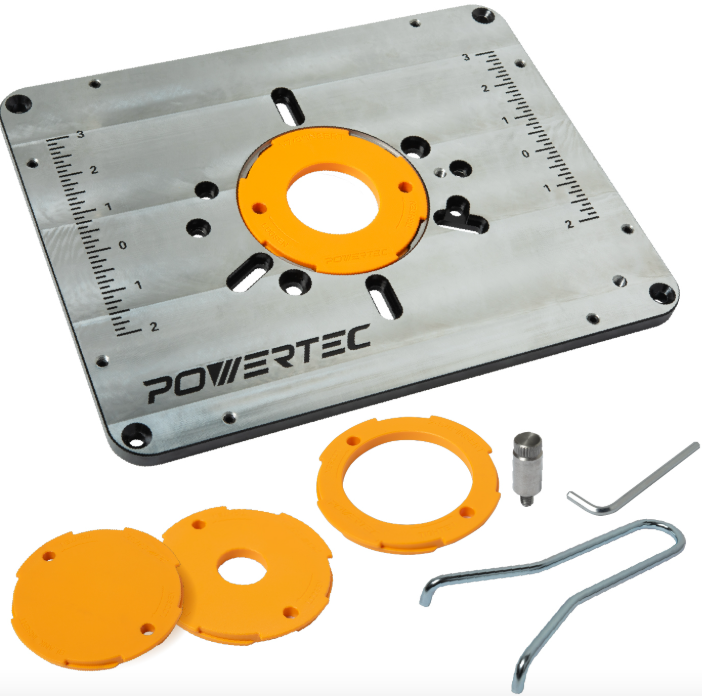
Dimensions
The dimensions of the router plate are 11-47/64″ (298mm) x 9-17/64″ (235.5mm). In most cases, the leveling hardware that comes with your router table can be adjusted to fit the location of the locking screws.

Router Hole Pattern
On the chart, find the model and the corresponding letter for your router.
- Find the corresponding letters for your router in Figure 2.
- Place the insert onto the router base and line up the first letter with the appropriate hole, and then rotate the plate until all holes for the pattern line up. Install and tighten the machine screws.

| PORTER CABLE* | A | 690 Series | A | 8529 / 7529 | |||
| H | 7518 / 7519 / 7538 / 7539 | ||||||
| DEWALT* | F | DW621 | A | DW616 Series | |||
| F | DW625 | A | DW618 Series | ||||
| Craftsman* | C | 315 275 000 | A | 315 175 060 | |||
| A | 315 175 040 | A | 315 175 070 | ||||
| A | 315 175 050 | ||||||
| Bosch* | A | 1617 (fixed base) | A | 1618 | |||
| A | 1617 (plunge base) | A | MR23 Series | ||||
| Makita* | A | RF1101 | |||||
| Ryobi* | C | R1631K | |||||
| Milwaukee* | A | 5615 | A | 5616 | A | 5619 | |
| H | 5625-20 | ||||||
| Fein* | F | FT 1800 | |||||
| Elu* | F | 177 | |||||
| Hitachi* | A | M-12VC | |||||
| Triton* | H | TRA001 | H | MOF001 | |||
Changing Reducing Rings
There are four Reducing Rings (CC) for flexibility in matching the size of the insert opening to the diameter of the router bit in use:
- A solid insert, to be bored for any custom size
- An insert with a 1″ opening
- An insert with a 1-7/8″ opening
- An insert with a 2-5/8″ opening.

Adjusting the Router
Please note: The depth of router table insert openings varies, and two different lengths of leveling screws are provided. Depending on your table’s insert opening depth, use the set that best fits your application (EE or FF).
If your router table comes with levelers in the insert opening, level your new Powertec router plate following the instructions that came with your table. Once level, use the included 3mm hex wrench to fine-tune the fit by adjusting the 8 levelling screws on the side. When level, fasten the plate using the 4 locking screws (BB).

Centerline Scale
The router plate features an accurately engraved center scale, in 1/8″ increments. The centerline allows the fence to be quickly positioned on the center of the bit, and the fence can be moved 3″ past center and 2″ in front of center, providing 5″ of precise fence movement.

Starting Pin
To use the Starting Pin (GG), begin with your workpiece touching the pin, but not in contact with the router bit. Slowly pivot the workpiece into the bit until the workpiece makes contact with the bit guide bearing. Always feed the workpiece so the router bit rotates against (not with) the feed direction. With the workpiece in solid contact with the guide bearing, ease the workpiece off the starting pin and feed the workpiece against the guide bearing.

When cutting begins, start the router motor, place the workpiece in contact with the Starting Pin (GG), then slowly rotate and move it until it comes into contact with the bearing.

Maintenance
When servicing, use only identical replacement parts. Use of any other parts may create a hazard or cause product damage. To ensure safety and reliability, all repairs should be performed by a qualified service technician.
Keep the Insert Plate dry, clean, and free from oil and grease. Always use a clean cloth when cleaning. Never use brake fluids, gasoline, petroleum-based products, or any strong solvent to clean the Insert Plate. Chemicals can damage, weaken, or destroy plplasticwhich may result in serious personal injury.
Customer Service
- Distributed by: Electus Distribution Pty Ltd 46 Eastern Creek Dr, Eastern Creek NSW 2766 Australia
- Ph: 1300 738 555
- Website: www.electusdistribution.com.au