


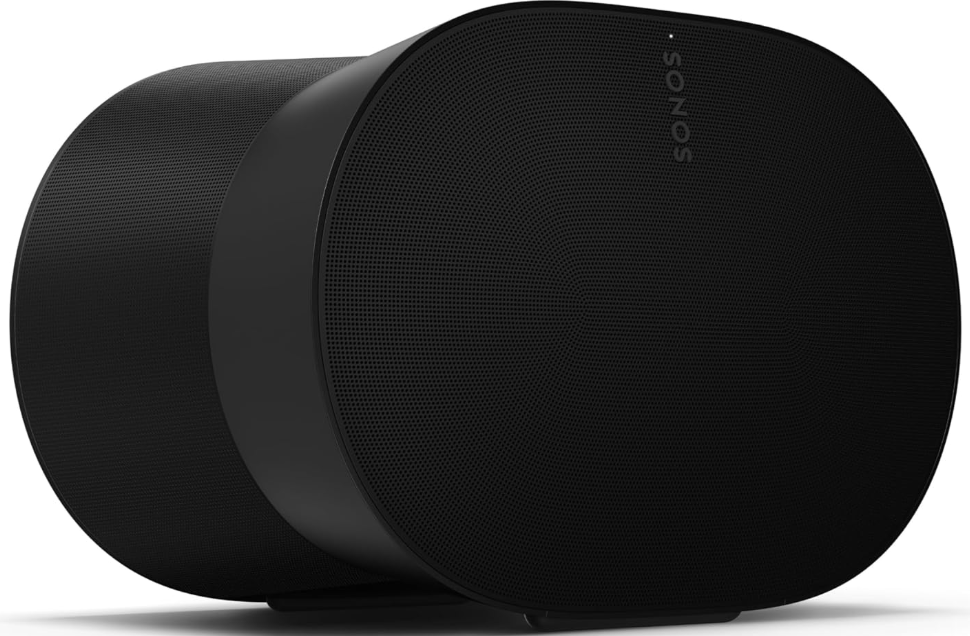
 Sonos Era 300 Alexa-Enabled Smart Speaker
Overview

The premium smart speaker is designed for spatial audio listening
- Stream content over WiFi, Bluetooth®, or using USB-C line-in (requires adapter).
- Supports spatial audio with Dolby Atmos Music.
- Easy control using the Sonos app, your voice, or the intuitive touch controls.
- Two separate microphone controls for convenience and privacy.
- Pair two Era 300 speakers with Sonos Arc or Beam (Gen 2) for multichannel surround sound.
- Compatible with your other Sonos S2 speakers for multiroom listening.
- See Setup when you’re ready to add a Sonos Era 300 to your system.
Safety Instructions
- Do not use this apparatus near water.
- Clean only with a dry soft cloth.
- Household cleaners or solvents can damage the finish on your Sonos products.
- Do not block any ventilation openings. Install in accordance with the manufacturer’s instructions.
- Only use attachments/accessories specified by the manufacturer.
- Unplug this apparatus during lightning storms or when unused for long periods of time.
- This product does not have any user-serviceable parts.
- Do not open or disassemble, or attempt to repair it or replace any components.
- Refer all servicing to Sonos qualified service personnel.
- The Mains plug should be readily available to disconnect the equipment.
- To reduce the risk of fire or electric shock, do not expose this apparatus to rain or moisture.
- Connections between this device and external equipment must be made using a shielded cable to maintain compliance with FCC radio frequency emission limits.
Controls and Lights
- Volume control

- Volume up (slide right, or tap + )
- Volume down (slide left, or tap – )
- To quickly change the volume, press and hold + or -.
- Play/Pause

- Press once to play or pause audio.
- Press and hold to add the audio that’s playing in another room.
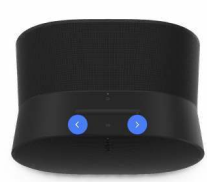
- Next/Previous

- Press > to skip to the next song.
- Press < to go to the previous song.
- You can’t skip forward or go back when listening to a radio station
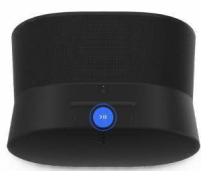
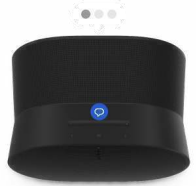
- Voice services on/off

- Press the microphone icon to turn voice services on or off.
- When the indicator light is on, voice control is available.
- When the indicator light is off, voice control is off.
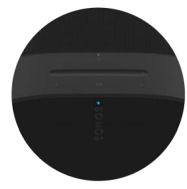
- Status light

- Displays the product’s connection to WiFi, indicates when the volume is muted, and signals errors.
Connector Panel
- AC power (mains) input
- Use only the supplied power cord (using a third-party power cord will void your warranty).
- Bluetooth button
- Press and hold to pair a new device.
- Press once to reconnect.
- Universal microphone switch
- Toggle to turn all product microphones on or off.
- When the switch is on (up), microphone-enabled features like Trueplay are available.
- To use voice services, both the microphone switch and the voice services indicator light must be on.
- USB-C port
- The USB-C port is designed for line-in and Ethernet connections using the Sonos Line-In Adapter or Combo Adapter (sold separately). It’s not a power source for the speaker and shouldn’t be used to charge other devices.
- Ethernet: Use the Sonos Combo Adapter and an Ethernet cable to connect Era 300 directly to your router if you want to hardwire your speaker (helpful if your WiFi is unstable).
- Line-in Use either the Sonos Line-In Adapter or Combo Adapter to connect your turntable, CD player, projector, or other device.
Select a Location
Trueplay tuning will balance the sound for wherever you place Era 300, but for the speaker to project sound most effectively, here are a few guidelines.
- Era 300 should be placed indoors and have approximately two feet (.61 m) of overhead clearance for optimal sound quality. Placement in an enclosed space like a bookshelf is not recommended, as this could impact dispersion and playback clarity.
- If you are mounting Era 300 within 2 ft (.61 m) of a ceiling, place it upside down for the best sound.
- When Era 300 is placed next to a wall or on a shelf, leave at least 1″ (2.5 cm) clearance in back and 8” (20.32 cm) on each side of the speaker.
- When using Era 300 speakers as surrounds, leave at least 8″ (20.32 cm) clearance around the sides of each speaker.
- Traditional stereo setups often have an ideal place to sit in a room for the best listening experience, but with Era 300, the sound is sent in all directions, so you’ll experience rich detail no matter where you’re seated.
- Don’t position Era 300 vertically or at a steep angle, or the audio will stop.
Bluetooth Pairing
- Turn Bluetooth on in your device settings.
- Press and hold the Bluetooth button on the back of the speaker until you hear a tone, then release.
- The status light blinks blue when the speaker is ready to pair.
- Choose Sonos Era 300 from the list of available devices in your Bluetooth settings.
- Your mobile device will automatically connect next time.
Microphone on/off
There are two ways to control the microphones on the Era 300
A universal microphone switch on the back turns all microphones on and off. A voice services button on top turns voice services on and off without affecting the microphones needed for Trueplay and other microphone-enabled features.
- When both are on, voice control and all microphone-enabled features are available.
- When both are off, voice control and all microphone-enabled features are unavailable.
- When the universal microphone switch is on, and the voice services light is off,
- Trueplay and other microphone-enabled features are available, but voice control is off.
Trueplay
- Trueplay tuning measures how sound reflects off walls, furnishings, and other surfaces in a room, then fine-tunes your Sonos speaker to make sure it sounds great no matter where you place it.
- During setup, choose the Trueplay option that works best for you and your space.
- To retune later, go to Settings > System, choose a room, and select Trueplay.
- If VoiceOver is enabled on your iOS device, Trueplay tuning isn’t available.
- Turn it off in your device settings before tuning your speakers.
Advanced Tuning
Advanced tuning is custom and precise. It takes about 5 minutes and uses the microphone on an iOS device (running iOS 8 or later), so you’ll move around the room while the sound is fine-tuned for your space. Advanced tuning is the best choice for large rooms (open concept spaces may experience less precise tuning).
Quick Tuning
Quick tuning is fast, effortless, and accessible. It takes about a minute and uses the microphone on your Sonos product to detect the environment, so there’s no need to move around the room during tuning. Quick Tuning is available for both iOS and Android, and is a good choice for smaller rooms or spaces where it’s difficult to move easily.
Auto Trueplay
Portable Sonos products like Sonos Roam and Move can tune themselves automatically. Auto Trueplay uses your speaker’s microphone to detect the environment and make periodic tuning adjustments so you get great sound wherever your speaker is and whatever you’re listening to. Go to > System, and select your portable speaker to turn on auto Trueplay.
Set Up Tereo Pair
- Pair two Sonos speakers in the same room for an even wider, stereo experience.
- One speaker serves as the left channel, and one serves as the right channel.
- The Sonos speakers in a stereo pair must be the same type.
- Place the speakers 8 to 10 feet apart. Your favorite listening position should be 8 to 12 feet from the paired speakers—less distance increases bass, more distance improves stereo imaging.
- Go to > System. Select one of the speakers you want to use in the stereo pair, then choose Set Up Stereo Pair to get started.
Set Up the Surrounds
It’s easy to turn two Sonos speakers (same model), or a Sonos Amp and your favorite non-Sonos speakers, into separate right and left channels for your home theater.
- Place each surround speaker about 10 ft from your favorite listening position, angling
them toward the seating area. - Go to > System. Select a room with a soundbar and choose Add Surrounds to get started.
- If you group the rooms or create a stereo pair instead, you won’t have surround sound.
Surround Audio Settings
During setup, surround sound is optimized for your room. These settings are adjustable.
| Surrounds | Turn surround sound on or off. |
| TV Level | Adjust the surround volume for TV audio. |
| Music Level | Adjust the surround volume for music. |
Voice services
Use your voice to control your Sonos system with any voice-enabled Sonos product—play and control content, turn the volume up or down, and more.
Sonos Voice Control
-
- Control your whole Sonos system with hands-free ease and unmatched privacy. Sonos Voice Control comes ready to use—it only takes a few seconds to add when you set up your speakers.
Amazon Alexa
-
- You’ll need the Sonos app and the Alexa app with the Sonos skill enabled. You’ll make some changes in both apps during setup.
Siri
-
- You’ll need the Apple Home app. Add your AirPlay2-compatible Sonos speakers to the Apple Home app and then use an iPhone, iPad, or Apple TV to ask Siri to play music (currently limited to Apple Music).
Line-in
Connect an audio device, like a projector, CD player, or turntable (with a built-in phono preamp), to any Sonos product that has a line-in port (Era 300, Era 100, Amp, Port, or Five). Then go to > Line-In to select the source and start playback. Era 300 and Era 100 require a Sonos Line-In or Combo Adapter (sold separately). Other products may require a different type of line-in adapter depending on your audio source.
Product Settings
You can customize Sonos products for your surroundings. Go to > System and select a product.
| Room Name | If you move your speaker to a new room, you can change its name in Settings. |
| Turn off WiFi (not available for Era 100, Era 300, or portable products) | You can turn off your speaker’s WiFi when it’s connected to your network with an Ethernet cable. |
| EQ | Sonos products ship with preset equalization settings. |
| Trueplay | Trueplay adapts the sound for your surroundings and content. |
| Volume Limit | You can set a maximum volume for each room. |
| Status Light | Displays the speaker’s connection to WiFi, indicates when the volume is muted, and signals errors. |
| Touch Controls | You can disable the touch control on your speaker. |
| Battery Saver (for portable products only) | To save battery life, you can set your portable speaker to power off automatically instead of going to sleep. |
Line-In
(for Sonos products with line-in capability)
When a projector, turntable, stereo, or other audio device is connected to a Sonos product, you can adjust these line-in settings.
- Source name
- Choose a name for the line-in device.
- Source level
- Adjust the line-in source level if you find the default volume setting is too quiet or distorted.
- Audio Delay
- Add a delay between the line-in source and Sonos to reduce the chance of audio issues occurring when you’re playing line-in audio on grouped speakers.
- Autoplay
- Choose a room if you want line-in audio to start playing automatically when Sonos detects a signal on the line-in port. (Autoplay is disabled by default.)
Accessories
Find the perfect accessory for your Sonos system—tailored to perfectly fit your Sonos products. For a full selection of Sonos-compatible stands, wall mounts, chargers, and cables, see Accessories on our website.
Era 300
- Custom-designed stand for Sonos Era 300 holds the speaker securely in place.
- Fixed height, optimal for home theater surrounds.
- Easy assembly.
- The channel in the pole hides the speaker’s power cable for simple cable management.
What’s in the box?
Each Sonos Era 300 Stand assembly includes
- 1 stand base
- 1 stand pole
- 1 speaker platform
- 1 stand pole cap
- Mounting kit with 4 screws (2 long, 2 short), 1 washer
Set it up
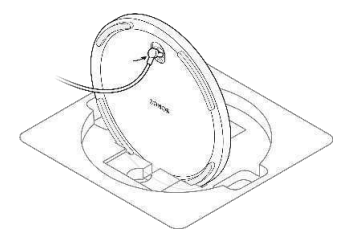
- Take everything out of the box and place the base in the packaging slot to stabilize it for the next few steps.

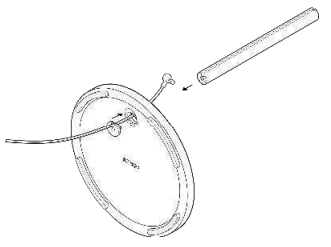
- Position the washer with the alignment pins facing in. Then align the stand pole with the base, using the alignment pins to guide you.

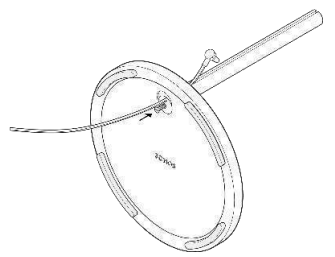
- Fasten the base (with the washer) to the stand pole using 1 long screw (included) and a Phillips-head screwdriver. Make sure the cord can still slide freely.

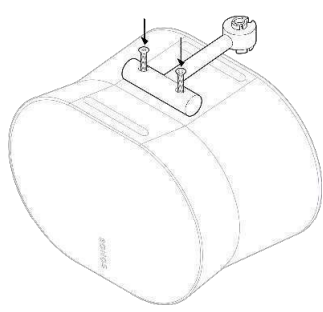
- Attach the speaker platform to the bottom of the speaker using 2 short screws (included).

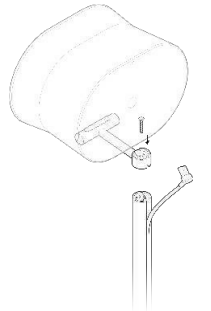
- Attach the speaker platform to the stand pole using the other long screw (included).

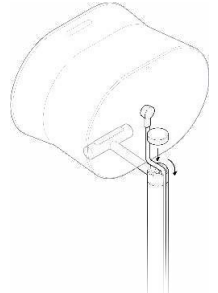
- Snap the pole cap onto the top of the pole to hide the power cord. Be careful not to pinch the cable.

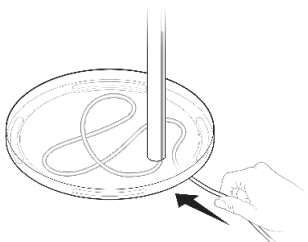
- Place the stand where you want it. Plug the speaker into a power outlet, then tuck the excess cord under the stand base.

Wall Mount
- The easy-to-install mount for Sonos Era 300.
- Supports the weight of your speaker and secures it in place.
- Allows access to ports, buttons, and touch controls, and cleanly routes your speaker’s cable.
- Flexibility to position your speaker for the best sound.
What’s in the box?
Each custom-designed Sonos Era 300 Wall Mount assembly includes
- 1 wall mount
- 1 wall bracket
- Mounting kit with 4 screws
What you’ll need
- Pencil
- Level
- Stud finder
- Phillips-head screwdriver
- Power drill
Choose the Orientation
Upright wall mounting
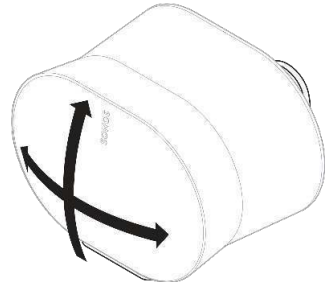
- Mounting the speaker upright is suitable for most locations.
- The speaker can swivel left or right, or tilt up and down.
Inverted wall mounting (upside down)
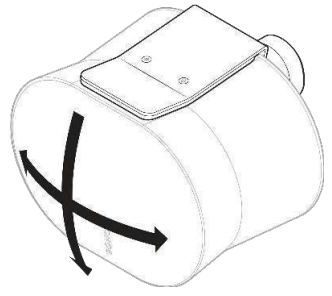
- Mounting the speaker upside down is recommended if the speaker is installed within 2 feet of a ceiling to optimize downfiring sound.
- The speaker can swivel left and right, or tilt up and down.
- When wall-mounted upside down, the power cable can be routed from above or below.
Mount UIpright
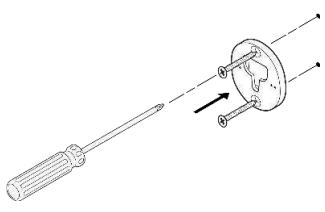
- Locate a wall stud. Place the bracket against the wall using a level to make sure it’s aligned, and mark the screw holes. Remove the bracket.

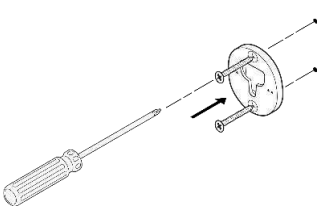
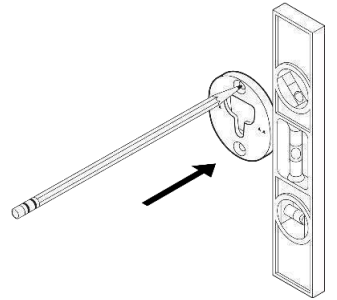
- Pre-drill pilot holes into a stud using a 9/64” drill bit. Place the bracket against the wall with the small arrows pointing up, and secure it to the wall with 2 long wall bracket screws (included) and a power drill or Phillips-head screwdriver.

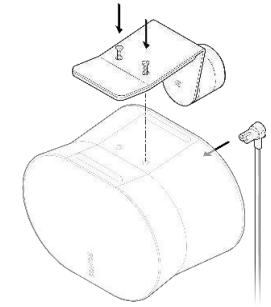
- Thread the power cord through the opening at the back of the mount and plug it into the speaker.

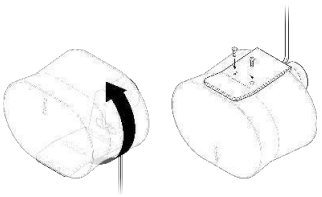
- Rotate the speaker 180° so the screw holes are facing up. Attach the speaker platform to the speaker using 2 short speaker mount screws (included).

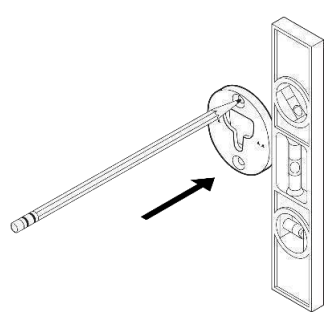
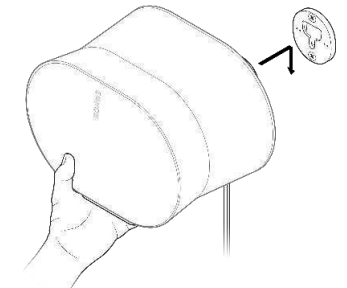
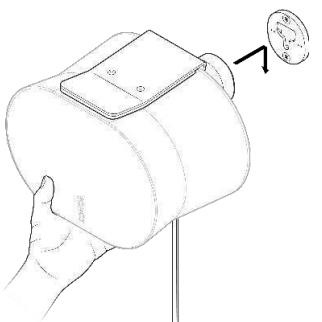
- Align the mount with the bracket keyhole, slide the mount down, and lock it into place. Make sure the wall mount and speaker are securely seated before removing your hands from the speaker.

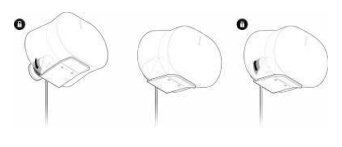
- To adjust for optimal sound, unlock the speaker by rotating the collar on the mount 90° counterclockwise.

- The mount is restricted to certain angles to give you the best possible sound quality. Do not force an adjustment beyond what is easily allowed.

Mount Inverted
- Locate a wall stud. Place the bracket against the wall using a level to make sure it’s aligned, and mark the screw holes. Remove the bracket.

- Pre-drill pilot holes into a stud using a 9/64” drill bit.

- Remove the screw from the mount assembly. Rotate the mount 180 degrees so the screw holes are facing up, then reattach the screw to the mount assembly.

- Plug the power cord into the speaker. Next, attach the speaker to the mount using the 2 short speaker mount screws (included).

- Align the mount with the bracket keyhole, slide the mount down, and lock it into place. Make sure the wall mount and speaker are securely seated before removing your hands from the speaker.

- To adjust for optimal sound, unlock the speaker by rotating the collar on the mount 90° counterclockwise. Reposition the speaker, then rotate the collar 90° clockwise to lock.

- The mount is restricted to certain angles to give you the best possible sound quality. Do not force an adjustment beyond what is easily allowed.


Specifications
| Feature | Description |
| AUDIO | |
| Amplifier | Six Class-D digital amplifiers are precision-tuned for the speaker’s unique acoustic architecture. |
| Tweeters | Four tweeters ensure faithful playback of high and mid-range frequencies. |
| Woofers | Two woofers maximize low-end output and are angled left and right to support stereo playback. |
| Microphones | All microphones, including voice control, can be turned off using the microphone switch on the back of the speaker. |
| Adjustable EQ | Use the Sonos app to adjust bass, treble, and loudness. |
| Trueplay™ | This software measures the acoustics of the room and then fine-tunes the EQ. Compatible with iOS and Android devices. (Microphone switch must be on.) |
| Stereo pair | Turn two speakers into separate left and right channel speakers to create wider, deeper sound. |
| Dolby Atmos® | Spatial audio technologies, such as Dolby Atmos, allow creators to place individual sounds all around you in 3D space for a more immersive and realistic listening experience. |
| Home theater | Add two Era 300 speakers as surrounds for an immersive surround sound experience. |
Features
| Feature | Description |
| Bluetooth | Bluetooth 5.0 supports audio streaming from any Bluetooth-enabled device.
Press the Bluetooth button to pair with a Bluetooth device. |
| Power supply | Auto-switching 100 – 240VAC, ~ 50/60 Hz 2.3A universal input. |
| CPU | Quad Core
4xA55 1.9GHz |
| Memory | 8 GB DDR4
8 Gb NAND |
| Sonos S2 | Set up and control Era 300 with the latest generation of the Sonos app. |
| Line-In | With a Sonos Line-In Adapter, you can connect your devices through a 3.5 mm audio line-in connection (adapter sold separately). |
| Voice control | Integrated voice control. When the voice control LED is off, voice assistants are not listening, but other microphone-dependent features (e.g., Trueplay) are still active. |
| Apple AirPlay 2 | Works with AirPlay 2 on Apple devicdevicesOS 11.4 and higher. |
USB Port
| USB-C port | One USB-C port.
Connect an audio source using an auxiliary cable and the Sonos Line-In Adapter. Connect your router with an Ethernet cable and the Sonos Combo Adapter. |
| Bluetooth | Bluetooth 5.0 supports audio streaming from any Bluetooth-enabled device.
Press the Bluetooth button to pair with a Bluetooth device. |
| Power supply | Auto-switching 100 – 240VAC, ~ 50/60 Hz 2.3A universal input. |
| Sonos S2 | Set up and control Era 300 with the latest generation of the Sonos app. |
| Memory | 8 GB DDR4
8 Gb NAND |
Dimensions
| Dimensions (H x W x D) | 6.3 x 10.24 x 7.28 in / 160 x 260 x 185 mm |
| Weight | 9.75 lb / 4.42 kg |
| Operating temperature | 32° to 104°F / 0° to 40°C |
| Storage temperature | -4° to 158° F / -20° to 70° C |
| Colors / Finish | Colors: white, black
Finish: matte |
| Package contents | Sonos Era 300, 6 ft (2 m) power cable,
quickstart guide |
Customer Service
- Website: https://support.sonos.com/
- Ph: (800) 680-2345
7 Comments
Your article helped me a lot, is there any more related content? Thanks!
I don’t think the title of your article matches the content lol. Just kidding, mainly because I had some doubts after reading the article. https://www.binance.info/vi/register?ref=MFN0EVO1
I don’t think the title of your article matches the content lol. Just kidding, mainly because I had some doubts after reading the article.
Thank you for your sharing. I am worried that I lack creative ideas. It is your article that makes me full of hope. Thank you. But, I have a question, can you help me? https://accounts.binance.com/register-person?ref=IXBIAFVY
Your article helped me a lot, is there any more related content? Thanks!
Thank you for your sharing. I am worried that I lack creative ideas. It is your article that makes me full of hope. Thank you. But, I have a question, can you help me? https://www.binance.info/register?ref=QCGZMHR6
Can you be more specific about the content of your article? After reading it, I still have some doubts. Hope you can help me. https://www.binance.info/register?ref=IXBIAFVY