


Makita HS013G Cordless Circular Saw
Safety Instructions
Safety Instructions for the Makita UH4261 420mm Electric Hedge Trimmer
- If foam/liquid comes out, switch off immediately.
- Clean the water level limiting device regularly and examine it for signs of damage.
- Do not use the cleaner without filters in place.
- Be sure the switch is OFF when installing battery(s).
- Never use the cleaner outdoors in the rain.
- Do not block the suction inlet/outlet/cooling vents. These vents permit cooling of the motor.
- Recharge only with the charger specified by the manufacturer.
- Use power tools only with specifically designated battery packs.
- Use of any other battery packs may create a risk of injury and fire.
- If liquid contacts the eyes, additionally seek medical help.
- Liquid ejected from the battery may cause irritation or burns.
- Do not expose a battery pack or tool to fire or excessive temperature.
- Exposure to fire or temperature above 130 °C may cause an explosion.
- Keep all parts of the body away from the cutter blade.
- Make sure the switch is off when clearing jammed material.
- A moment of inattention while operating the hedge trimmer may result in serious personal injury.
- Carry the hedge trimmer by the handle with the cutter blade stopped.
- When transporting or storing the hedge trimmer, always fit the cutting device cover.
- Proper handling of the hedge trimmer will reduce possible personal injury from the cutter blades.
- Do not use the hedge trimmer in the rain or in wet conditions. The electric motor is not waterproof.
- First-time users should have an experienced hedge trimmer user show them how to use the trimmer.
- Use the hedge trimmer only if you are in good physical condition.
- The user is responsible for all damages to third parties.
- Never use the trimmer when under the influence of alcohol, drugs, or medication.
- Make sure you have a secure footing before starting the operation.
Cutting procedures
- Keep your hands away from the cutting area and the blade.
- Keep your second hand on the auxiliary handleor mothe tor housing.
- If both hands are holding the saw, they cannot be cut by the blade.
- Do not reach underneath the workpiece.
- The guard cannot protect you from the blade below the workpiece.
- Adjust the cutting depth to the thickness of the workpiece.
- Less than a full tooth of the blade teeth should be visible below the workpiece.
- Never hold the workpiece in your hands or across your leg while cutting.

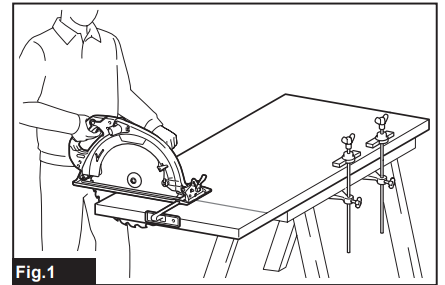
- When ripping, always use a rip fence or straight edge guide.
- This improves the accuracy of the cut and reduces the chance of blade binding.
- Always use blades with the correct size and shape (diamond versus round) of arbour holes.
- Blades that do not match the mounting hardware of the saw will run off-centre, causing loss of control.
Installation
To install the battery cartridge, align the tongue on the battery cartridge with the groove in the housing and slip it into place. Insert it all the way until it locks in place with a little click. If you can see the red indicator as shown in the figure, it is not locked completely. To remove the battery cartridge, slide it from the tool while pressing the button on the front of the cartridge. 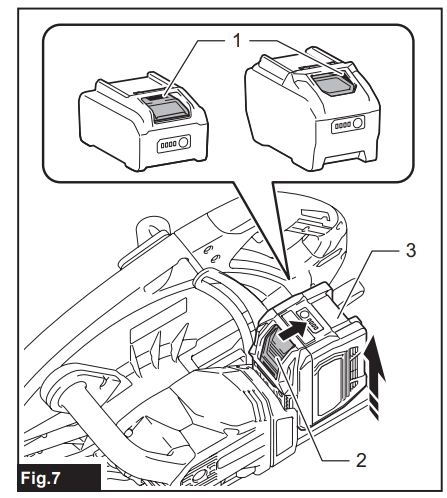
Indicating the Remaining Battery Capacity
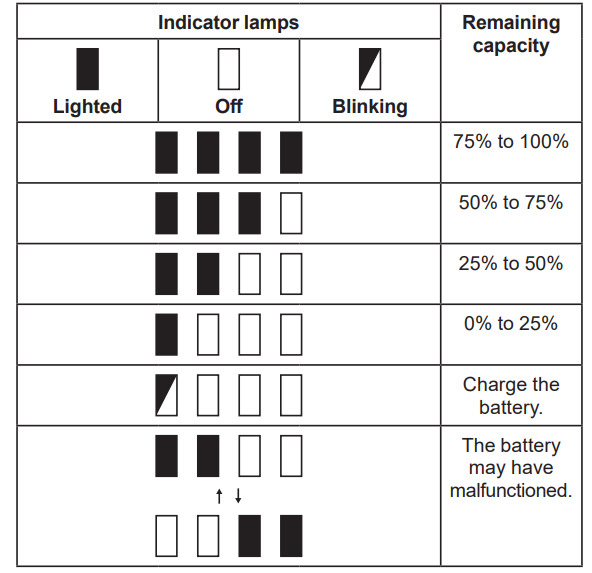
Press the check button on the battery cartridge to indicate the remaining battery capacity. The indicator lamps light up for a few seconds. 1. Indicator lamps 2. Check button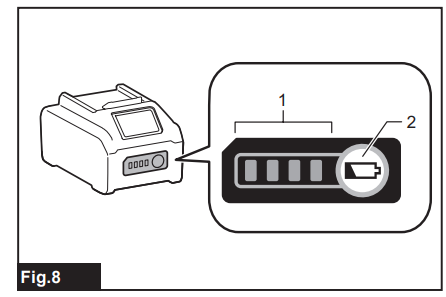
Tool/Battery Protection System
The tool is equipped with a tool/battery protection system. This system automatically cuts off power to the
motor to extend tool and battery life. The tool will automatically stop during operation if the tool or battery is
placed under one of the following conditions.
Overload Protection
When the tool/battery is operated in a manner that causes it to draw an abnormally high current, the tool automatically stops. In this situation, turn the tool off and stop the application that caused the tool to become overloaded. Then turn the tool on to restart.
Overheat Protection
When the tool/battery is overheated, the tool stops automatically. In this situation, let the tool cool down before turning the tool on again.
Overdischarge Protection
When the battery capacity becomes low, the tool stops automatically. If the product does not operate even when the switches are operated, remove the battery(ies) from the tool and charge the battery(ies).
Protections Against Other Causes
The protection system is also designed for other causes that could damage the tool, and allows the tool to stop automatically. Take all the following steps to clear the causeswhen the tool has been brought to a temporary halt or ststoppedn operation.
- Make sure that all switch(es) is/are in the off position, and then turn the tool on again to restart.
- Charge the battery(ies) or replace it/them with a recharged battery(ies).
- Let the tool and battery(s) cool down. If no improvement can be found by restoring the protection system, then contact your local Makita Service Centre.
To prevent the switch trigger from being accidentally pulled, a lock-off button is provided. To start the tool, depress the lock-off button and pull the switch trigger. Release the switch trigger to stop. 1. Switch trigger 2. Lock-off button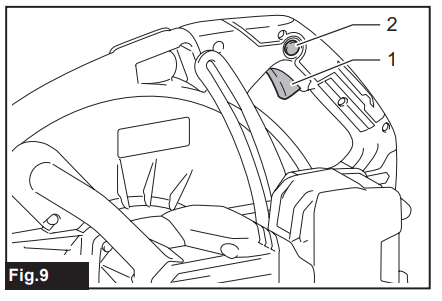
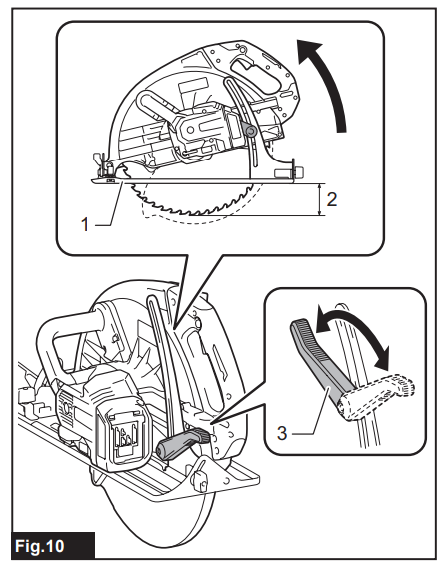
- Unlock the base by loosening the lever.
- Set the circular saw blade to your desired cutting depth.
- Lock the base by tightening the lever. 1. Base 2. Cutting depth 3. Lever

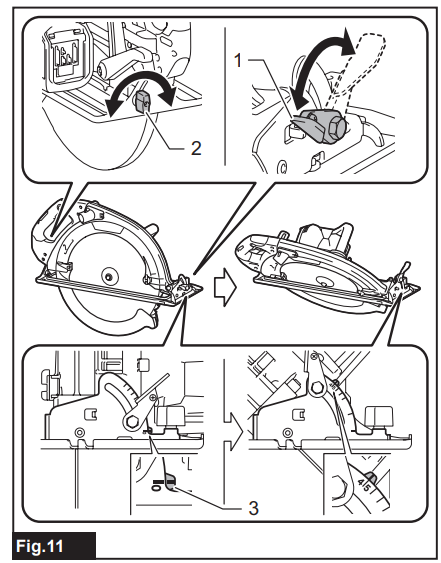
Bevel Cutting
- Loosen the lever and clamping screw.
- Align the pointer with your desired cutting angle by tilting the base.
- Tighten the lever and clamping screw securely.

Sighting
For straight cuts, align the 0° position on the front of the base with your cutting line. For 45° bevel cuts, align the 45° position with it. 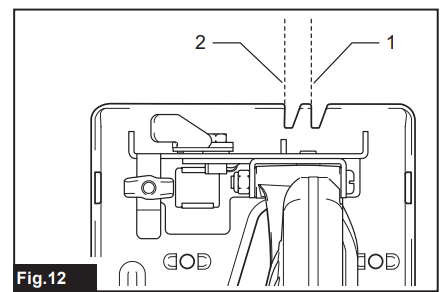
Blade Steady Device
In a general way, use the blade steady device by setting the lock lever in the locked position.\ To lock the lock lever, push it down and turn it 90° counterclockwise. To release the lock lever, turn it 90° clockwise. When you replace a circular saw blade, release the lock lever.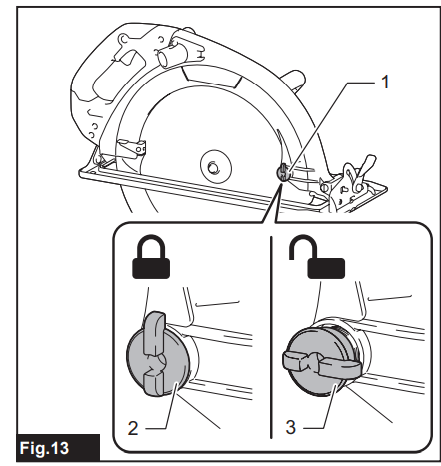
Electric Brake
This tool is equipped with an electric blade brake. If the tool consistently fails to quickly stop the circular saw blade after releasing the switch trigger, have the tool serviced at a Makita service centre.
Hex wrench storage
When not in use, store the hex wrench as shown in the figure to keep it from being lost.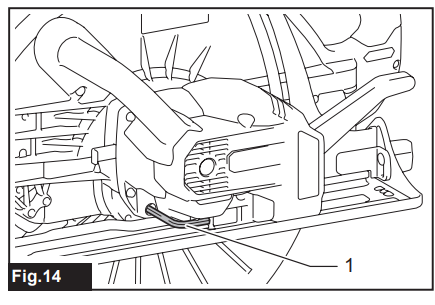
Installing a Circular Saw Blade
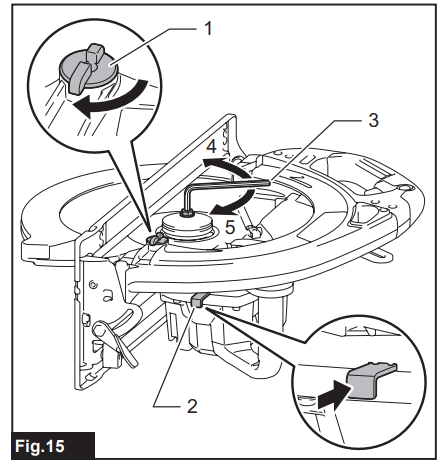
- Release the lock lever of the blade steady device.
- Press the shaft lock fully so that the mounting shaft cannot revolve, and use the hex wrench to loosen the hex bolt. Then remove the hex bolt and outer flange.

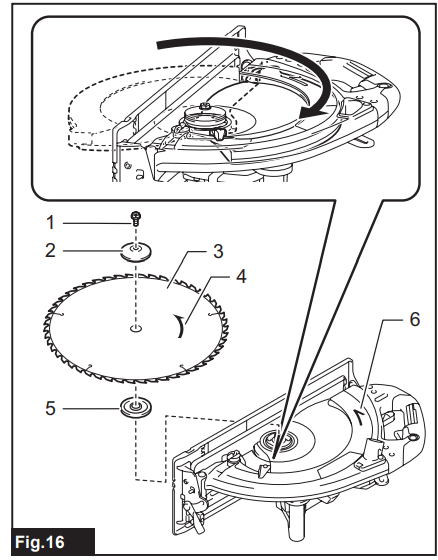
- Install the inner flange with its convex side facing outwards onto the mounting shaft, then install the circular saw blade, outer flange and hex bolt.
- At this time, align the direction of the arrow on the circular saw blade with the arrow on the tool.

- Inner flange 6. Arrow on the tool
- Press the shaft lock and tighten the hex bolt.
- Lock the lock lever of the blade steady device
Mounting Direction of the Inner Flange
The inner flange has a certain diameter protrusion onone side of it and a different diameter protrusion on the other side. Choose the correct side on which the protrusion fits into the saw blade hole perfectly. Mount the inner flange onto the mounting shaft so that the correct side of protrusion on the inner flange faces outward, and then place the circular saw blade and outer flange. 1. Mounting shaft 2. Inner flange 3. Circular saw blade 4. Outer flange 5. Hex bolt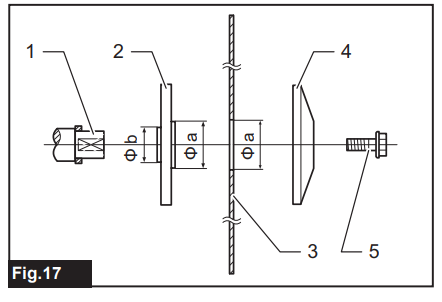
Blade Guard Cleaning
When changing the circular saw blade, make sure to also clean the upper and lower blade guards of accumulated sawdust as discussed in the Maintenance section. Such efforts do not replace the need to check the lower guard operation before each use.
Connection
When you wish to perform a clean cutting operation, connect a Makita vacuum cleaner to your tool. Install the dust nozzle on the tool using the screw. 1. Dust nozzle 2. Screw Connect a hose of the vacuum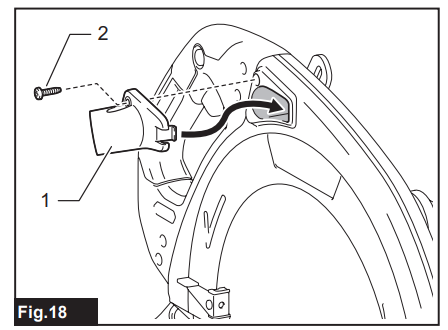 cleaner to the dust nozzle using the front cuff 24 as shown in the figure. 1. Dust nozzle 2. Front cuff 24 (optional accessory) 3. Hose of the vacuum cleaner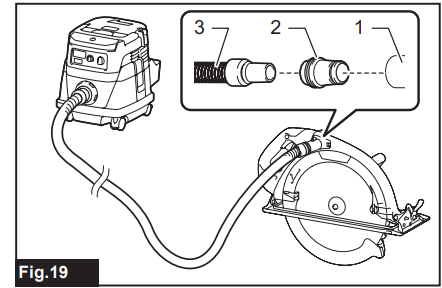
Operation
This tool is intended to cut wood products only.
Checking the blade guard function
Remove the battery cartridge. Set the bevel angle to 0°, and then retract the lower blade guard manually to the end and release it. The lower blade guard is properly functioning if;
- It is retracted above the base without any hindrance and
- It automatically returns and contacts the stopper.

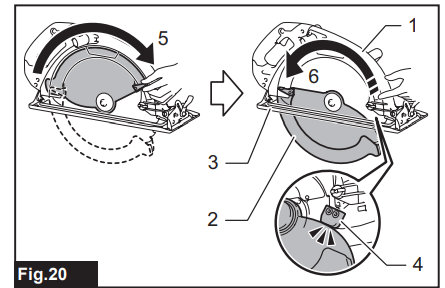
If the lower blade guard is not functioning properly, check if sawdustis accumulated inside the upper and lower blade guards. If the lower blade guard is not functioning properly, even after removing dust, have your tool serviced at a Makita servicecentrer.
Cutting Operation
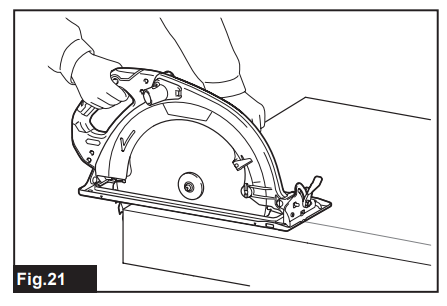
Hold the tool firmly. The tool is provided with both a front grip and a rear handle. Use both to best grasp the tool. If both hands are holding the tool, the hands cannot be cut by the circular saw blade. Set the base on the orkpiece to be cut without the circular saw blade makingany contact.
Realign the tool on the new cut line, and start cutting again. Attempt to avoid positioning which exposes the operator to chips and wood dust being ejected from the saw. Use eye protection to help avoid injury.
Rip Fence (Guide rule)
Optional accessory
The handy rip fence allows you to do extra-accurate straight cuts. Simply slide the rip fence up snugly against the side of the workpiece and secure it in position with the clamping screw on the front of the base. It also makes repeated cuts of uniform width possible. 1. Rip fence (Guide rule) 2. Clamping screw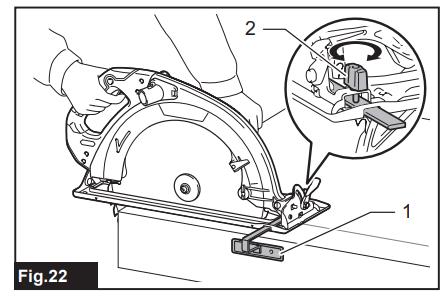
Placing the Tool Flat
To install the tool, push the tool into the protection stand from the top until it clicks. To remove the tool, while holding the protection stand with your foot, pull the tool upward as shown in thefigure. Protection stand 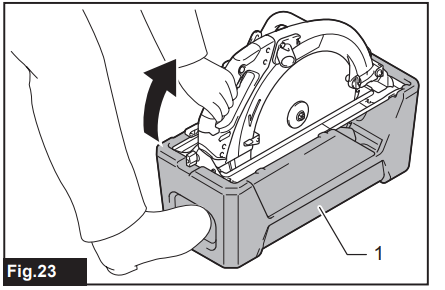
Tool Tilted
To install the tool, put the tool on the protection stand at an angle as shown in the figure. To remove the tool, pull the tool upward.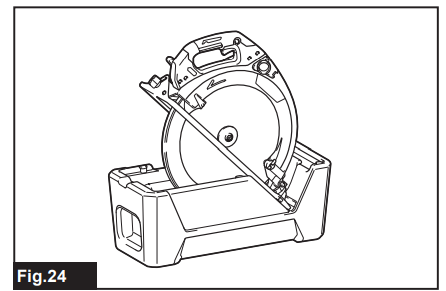
Wireless Action Function
What you can do with the wireless activation function. The wireless activation function enables clean and comfortable operation. By connecting a supported vacuum cleaner to the tool, you can run the vacuum cleaner automatically along with the switch operation of the tool. 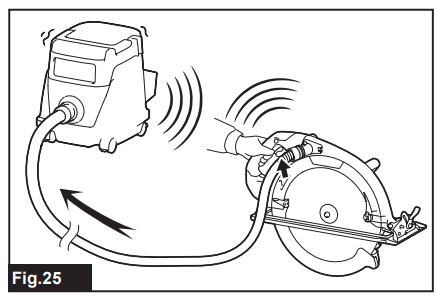
To use the wireless activation function, prepare the following items:
- A wireless unit (optional accessory)
- A vacuum cleaner which supports the wireless activation function
The overview of the wireless activation function setting is as follows. Refer to each section for detailed procedures.
- Installing the wireless unit
- Tool registration for the vacuum cleaner
- Starting the wireless activation function
Installing the Wireless Unit
- Open the lid on the tool.

- Insert the wireless unit into the slot and then close the lid. When inserting the wireless unit, align the projections with the recessed portions on the slot.

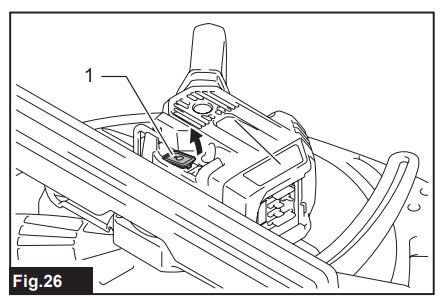
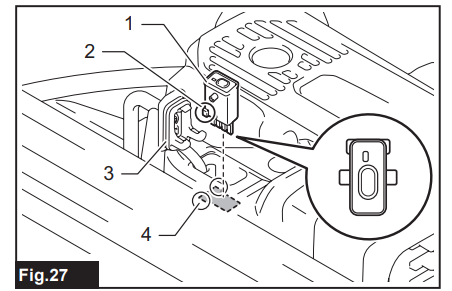
When removing the wireless unit, open the lid slowly. The hooks on the back of the lid will lift the wireless unit as you pull up the lid. 1. Wireless unit 2. Hook 3. Lid After removing the wireless unit, keep it in the supplied case or a static-free container.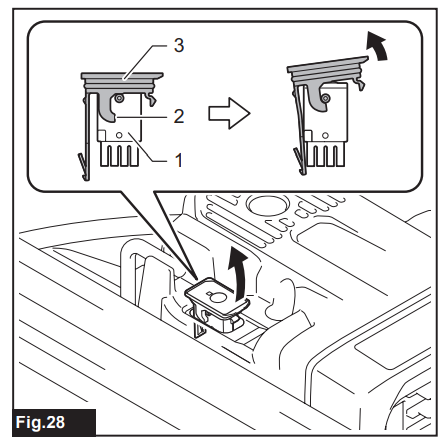
If you wish to activate the vacuum cleaner along with the switch operation of the tool, finish the tool registration beforehand.
- Install the batteries in the vacuum cleaner and the tool.
- Set the stand-by switch on the vacuum cleaner to “AUTO”.

- Wireless activation button. Wireless activation lamp

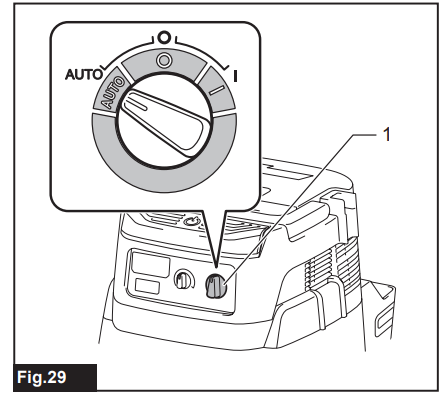
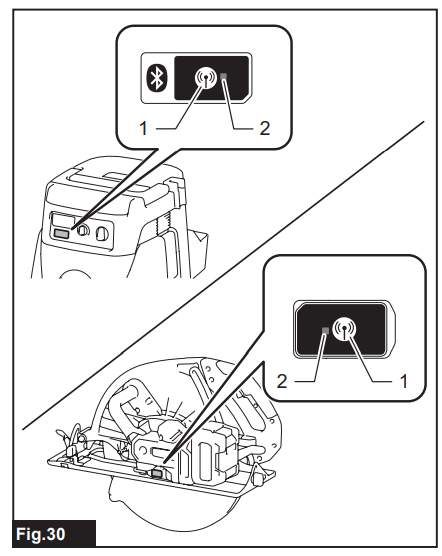
If the vacuum cleaner and the tool are linked successfully, the wireless activation lamps will light up in green for 2 seconds and start blinking in blue.
Starting the Device
After registering a tool to the vacuum cleaner, the vacuum cleaner will automatically run along with the switch operation of the tool.
- Install the wireless unit in the tool.
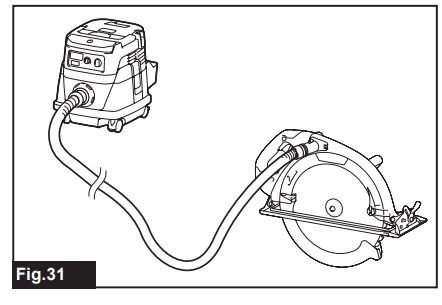
- Connect the hose of the vacuum cleaner to the tool.

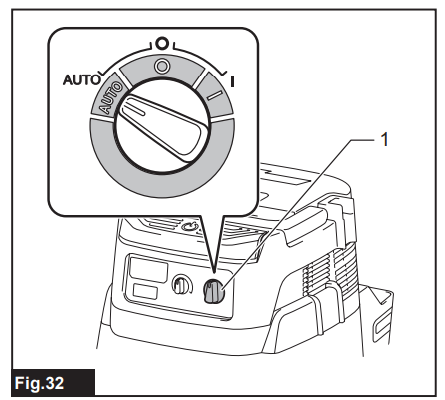
- Set the stand-by switch on the vacuum cleaner to “AUTO”.

- Push the wireless activation button on the tool briefly.
- The wireless activation lamp will blink in blue.

- Turn on the tool. Check if the vacuum cleaner runs while the tool is operating.
- To stop the wireless activation of the vacuum cleaner,\ push the wireless activation button on the tool.
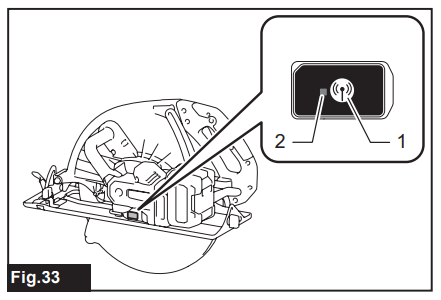
Description of the Wireless Activation Lamp Status
Wireless activation lamp: The wireless activation lamp shows the status of the wireless activation function. Refer to the table below for the meaning of the lamp status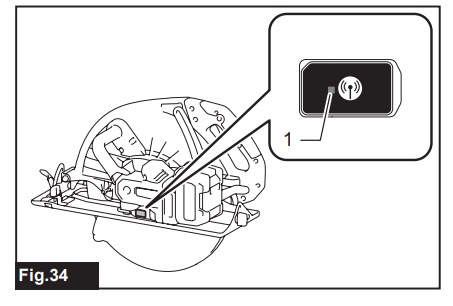
| Status | Wireless activation lamp | Description | |||
| Color | On | Blinking | Duration | ||
| Standby | Blue | 2 hours | The wireless activation of the vacuum cleaner is available. The lamp will automatically turn off when no operation is performed for 2 hours. | ||
| When the tool is running. | The wireless activation of the vacuum cleaner is available, and the tool is running. | ||||
| Tool registration | Green | 20 seconds | Ready for the tool registration. Waiting for the registration by the vacuum cleaner. | ||
| 2 seconds | The tool registration has been finished. The wireless activation lamp will start blinking in blue. | ||||
| Cancelling tool
registration |
Red | 20 seconds | Ready for the cancellation of the tool registration. Waiting for the cancellation of the vacuum cleaner. | ||
| 2 seconds | The cancellation of the tool registration has been completed. The wireless activation lamp will start blinking in blue. | ||||
| Others | Red | 3 seconds | The power is supplied to the wireless unit, and the wireless activation function is starting up. | ||
| Off | – | – | The wireless activation of the vacuum cleaner is stopped. | ||
Cancelling Tool Registration for the Vacuum Cleaner
Perform the following procedure when cancelling the tool registration for the vacuum cleaner.
- Install the batteries in the vacuum cleaner and the tool.
- Set the stand-by switch on the vacuum cleaner to “AUTO”. 1. Stand-by switch
- Press the wireless activation button on the vacuum cleaner for 6 seconds.

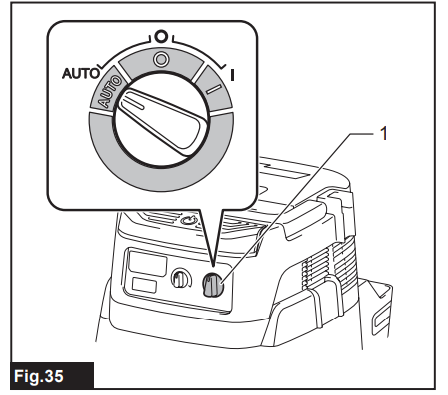
If the cancellation is performed successfully, the wireless activation lamps will light up in red for 2 seconds
and start blinking in blue
Specifications
| Model: | HS013G | |
| Blade diameter | 415 mm | |
| Max. Cutting depth | at 0° | 158 mm |
| at 45° bevel | 106 mm | |
| No load speed | 2,100 min-1 | |
| Rated voltage | D.C. 36 V – 40 V max | |
| Overall length | 606 mm | |
| Net weight | 11.0 – 12.0 kg |
Applicable battery cartridge and charger
| Battery cartridge | BL4040 / BL4040F* / BL4050F* / BL4080F: Recommended battery |
| Charger | DC40RA / DC40RB / DC40RC / DC40WA |
Troubleshooting
Before asking for repairs, conduct your own inspection first. Instead, ask Makita Authorised Service Centres, always using Makita replacement parts for repairs.
| State of abnormality | Probable cause (malfunction) | Remedy |
| The wireless activation lamp does not light/blink. | The wireless unit is not installed in the tool. The wireless unit is improperly installed in the tool. | Install the wireless unit correctly. |
| The terminal of the wireless unit and/or the slot is dirty. | Gently wipe off dust and dirt on the terminal of the wireless unit and clean the slot. | |
| The wireless activation button on the tool has not been pushed. | Push the wireless activation button on the tool briefly. | |
| Cannot finish tool registration / cancelling tool registration successfully. | The wireless unit is not installed in the tool. The wireless unit is improperly installed in the tool. | Install the wireless unit correctly. |
| The terminal of the wireless unit and/or the slot is dirty. | Gently wipe off dust and dirt on the terminal of the wireless unit and clean the slot. | |
| The stand-by switch on the vacuum cleaner is not set to “AUTO”. | Set the stand-by switch on the vacuum cleaner to “AUTO”. | |
| No power supply | Supply the power to the tool and the vacuum cleaner. | |
| Incorrect operation | Push the wireless activation button briefly and perform the tool registration/cancellation procedures again. | |
Adjustment
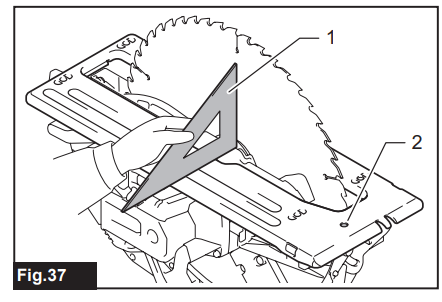
But if it is off, you can adjust it as the following procedure.
- Put a triangular rule or square rule onto the side of the circular saw blade and the base.
- Lock the bevel angle and make a test cut to check the verticality.

Optional Accessories
If you need any assistance for more details regarding these accessories, ask your local Makita Service Centre.
- Circular saw blade
- Rip fence (Guide rule)
- Dust nozzle
- Hex wrench
- Wireless unit
- Makita genuine battery and charger
Customer Service
- Website: https://www.makitauk.com
- Ph: 1-800-462-5482