


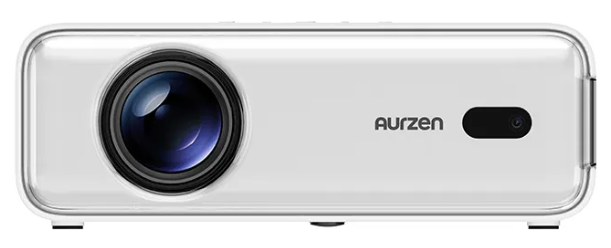
Aurzen EAZZE D1 MAX 1000 ANSI Lumens Projector
Introduction
For your safety and interests, please read the Product Instructions carefully before using the product. About the Product Instructions: The trademarks and names mentioned in the Product Instructions are the property of their respective owners. All Product Instructions shown are for illustration purposes only. The actual product may vary due to product enhancements. We shall not be liable for any personal injury, property damage, or other damages caused by the failure of the user to comply with the Product Instructions or precautions.
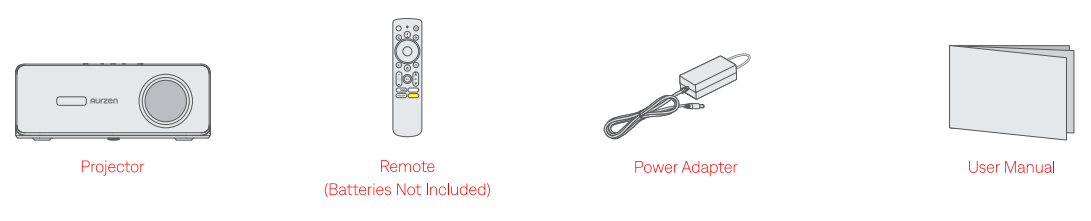
Content Package
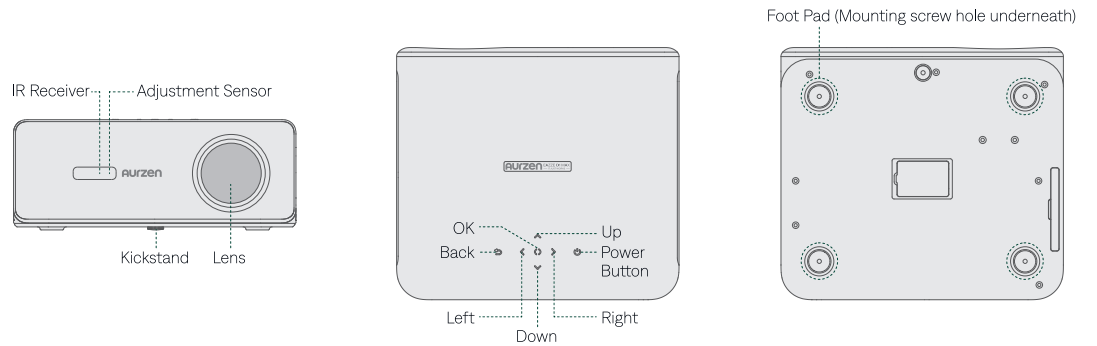
Overview
Projector
Remote Control
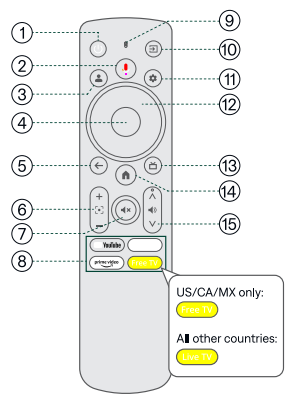
- Power Press to power on/switch to standby mode/ wake up/press and hold for 3s to power off
- Google Assistant: Press and hold, and talk
- User Profile Press to see the profile page
- ок Confirm a selection/pause/resume
- Back Return to previous page
- Focus Adjustment
- Mute
- Streaming Apps: Direct access to streaming apps.
- Depending on your region, the remote control will either have a “Free TV” or “Live TV” button.
- The button’s function varies by region.
- Indicator Light
- Press to choose from the input sources
- Settings Press to access the dashboard
- Navigation Control cursor on the screen
- HD Quick Switch Press to switch directly to the HD input signal
- Home
- Volume +/-
Quick Start
Projector Installation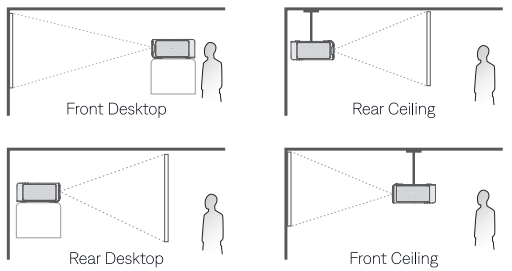
Power On/Off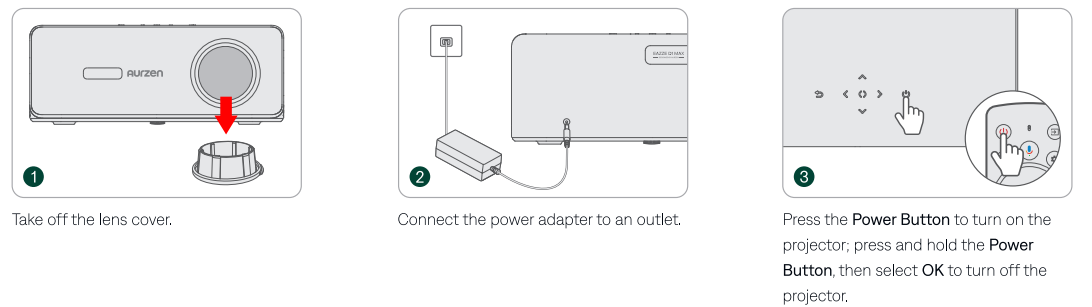
Remote Control Pairing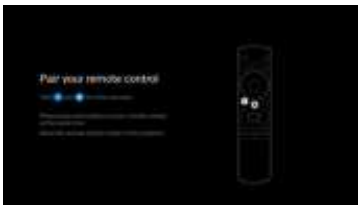

Setup Wizard
- Follow the setup wizard to choose your preferred language, select your region, and sign in with your Google Account (or use the basic TV mode).

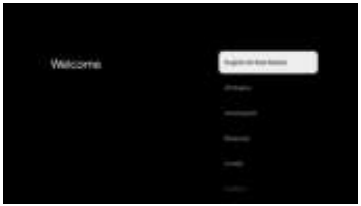
Image Adjustment
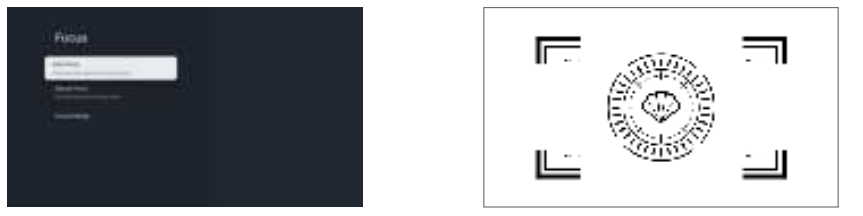
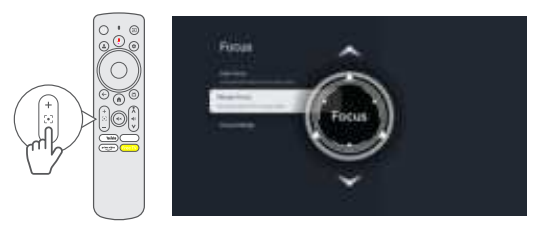
- Auto Focus: The projector automatically adjusts focus when moved to maintain a clear image. You can also trigger auto focus by going to Homepage > Dashboard @ > All settings ® > Projector > Focus > Auto Focus.

- Electric/Manual Focus: Press the Focus buttons on the remote or go to Homepage > Dashboard ® > All settings ® > Projector > Focus > Manual Focus to sharpen the image focus until the blurry image becomes clear.

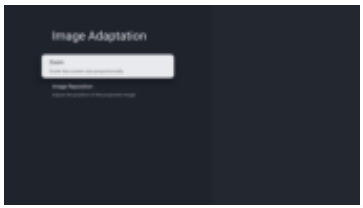
Auto Keystone Correction
The projector automatically corrects the keystone distortion when moved to maintain a rectangular image. You can also trigger auto keystone correction by going to Homepage > Dashboard (Q > All settings (Q) > Projector > Keystone Correction > Auto Keystone Correction> All settings.
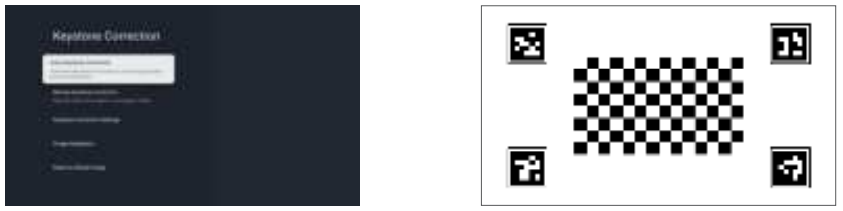
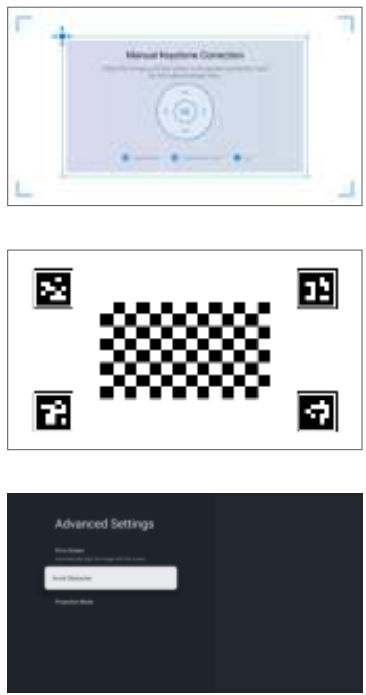
Manual Keystone Correction
Going to Homepage > Dashboard® > All settings ® > Projector > Keystone Correction > Manual Keystone Correction to manually correct the image shape by four points.
Intelligent Screen Fit
Go to Homepage > Dashboard® > All settings ® > Projector > Advanced Settings > Fit to Screen to enable the projector to adjust the projected image to fit the screen.
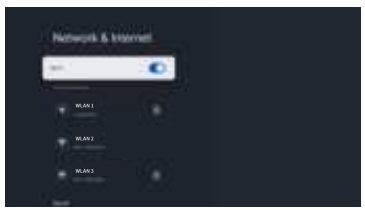
Intelligent Obstacle Avoidance
Go to Homepage > Dashboard@> All settings® › Projector > Advanced Settings > Avoid Obstacles to enable the function. The projector will automatically adjust the projected image to avoid any objects on the projection surface during the correction process.
Size & Position
Go to Homepage > Dashboard® > All settings® › Projector > Keystone Correction > Image Adaptation to adjust the image size and image position.
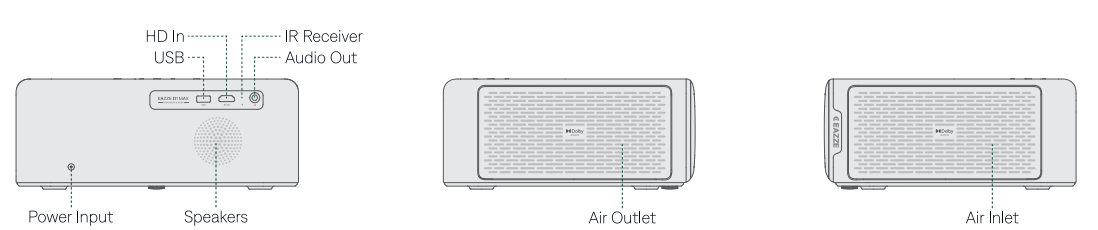
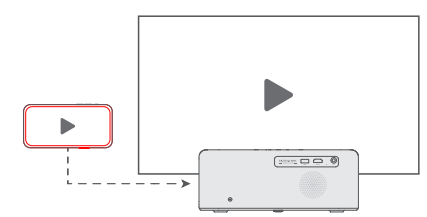
Connection & Input Source
Connect your device to the projector correctly, then select the right input source.

USB Connection: Insert the disk. Then go to Homepage > Apps and select IMPlayer under Your apps tab to locate and play the file. HD Connection: Connect the device with an HD cable (not provided). Then press the Input button on the remote or go to Homepage > Dashboard ®> Inputs and select HD Wired Speaker and Headphones Connection: Not required to select any input source.
WIFI Connection
Connect your projector to your router’s Wifi by going to Homepage > Dashboard ®> All settings ® > Network & Internet.
Google Assistant
Your TV is more helpful than ever. Use your voice to find movies, streaming apps, play music, and control the TV. Ask Google Assistant to find a specific title, search by genre, or get personalized recommendations. Gett answers on screen, control smart home devices, and more. Press the Google Assistant button on the remote to get started.
Google Cast
Google Cast is a platform that lets you stream your favorite entertainment from your phone, tablet, or laptop right to your projector. Easily control your TV with apps you already know and love from your iPhone, iPad, Android™ phone or tablet, Mac® or Windows® laptop, or Chromebook. To use Google Cast, please ensure you are using a Google Cast-enabled app and follow the instructions below.
- Connect your device and the projector to the same wireless network.
- Open the streaming app on your device.
- Play a video and tap the casting icon 5J on the video screen.
- Select EAZZE_D1 Max to connect. The projector will display the video from your device.
Screen Mirroring Using the Google Home App (Only for Android Devices)
You can mirror your entire Android device screen onto the projector screen.
- Ensure that you have installed the Google Home app on your device.
- Ensure that both your device and the projector are connected to the same wireless network,
- Open the Google Home app and go to the Devices tab.
- Find and select EAZZE_D Max (or the name of your projector if you have renamed it).
- On the device page, tap Cast my screen and confirm when prompted.
- Your device’s screen will be mirrored on the projector screen,
Screen Mirroring Using the Air Screen App
You can mirror the entire screen from your iOS/Android device onto the projector screen.
- Ensure that both your device and the projector are connected to the same wireless network.
- Search and install AirScreen on the Apps tab – AirPlay is available on your projector.
- Open the Aithe rScreen app and follow the on-screen instructions to complete the process.
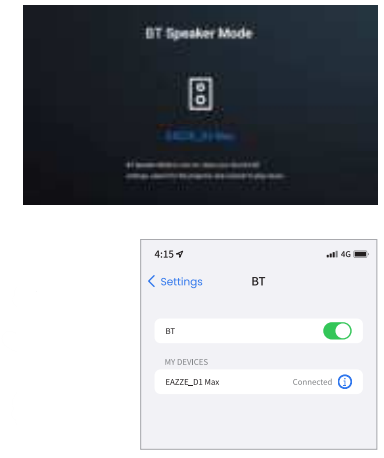
Bt Speaker Mode
This projector can function as a BT speaker by connecting your mobile device to it through a BT connection.
Step 1/2
- Go to Homepage > Dashboard> All settings make the projector ready for a BT connection. > Projector > BT Speaker Mode.
- Access your mobile device’s BT settings and activate BT. Search for EAZZE_D Max in the available devices list to pair your mobile device with the projector.
Settings
- Picture Mode: Go to Homepage > Dashboard Energy Saving. > All settings > Display & Sound > Display to select from User, Standard, Vivid, Sports, Movie, Game, and
- Color Temperature: Go to Homepage > Dashboard Standard, and Warm.
- Brightness Mode: Go to Homepage > Dashboard Performance.
- Reset: Go to Homepage > Dashboard
- System & Product Info: Go to Homepage > Dashboard > All settings > All settings › All settings › All settings > Display & Sound > Display > Expert Settings > Color Temperature to select from User, Cool, > Projector > Energy & Performance > Brightness Mode to select from Standard, ECO, and High > System > About > Reset to restore the projector to factory settings. > System > About to check system & product information.
Distance & Size
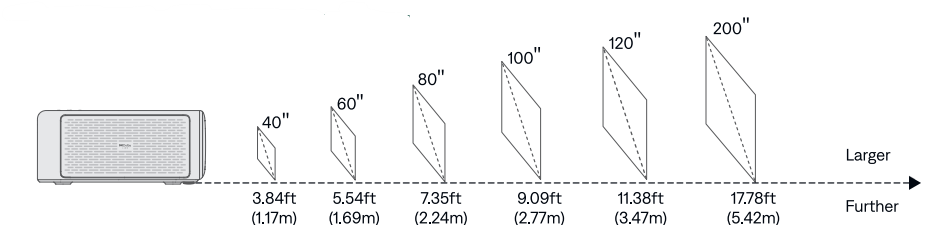
- For optimal image quality, we recommend a projection size of 120*. Position the projector 11.38ft (3.47m) away from the wall or screen.
- The recommended projection distance varies with different projection contents. Please adjust the distance between the wall/screen and the projector as needed.
- Ambient darkness will improve the clarity of the projected images.
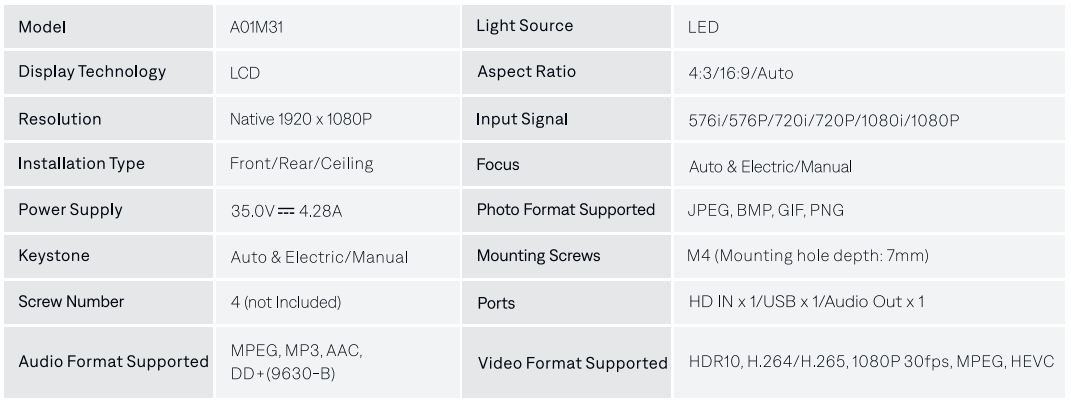
Specifications
The radio frequency below specifically applies to the EU and UK regions.


FCC Statements
This device complies with part 15 of the FCC Rules. Operation is subject to the following two conditions: (1) This device may not cause harmful interference, and (2) this device must accept any interference received, including interference that may cause undesired operation.
This equipment generates, us,e s and can radiate radio frequency energy and, if not installed and used in accordance with the instructions, may cause harmful interference to radio communications. However, there is no guarantee that interference will not occur in a particular installation.
- Reorient or relocate the receiving antenna.
- Increase the separation between the equipment and receiver.
- Connect the equipment into an outlet on a circuit different from that to which the receiver isconnected.
- Consult the dealer or an experienced radio/TV technician for help.
Canada compliance statement
This device complies with Innovation, Science and Economic Development Canada license-exempt RSS standard(s). Operation is subject to the following two conditions:
- This device may not cause interference, and (2) this device must accept any interference, including interference that may cause undesired operation of the device.
- Operation in the band 5150-5250 MHz is only for indoor use to reduce the potential for harmful interference to co-channel mobile satellite systems. Exposure to radio frequency energy:
- The radiated output power of this device meets the limits of IC radio frequency exposure limits.
Troubleshooting
- Fuzzy Image
- Adjust the focus of the projector.
- Ensure the projection distance falls within the effective focal range of the projector.
- Remove dust or dirt from the lens using a soft cloth or a soft-bristled brush.
- Non-rectangular Image
- Place the projector perpendicular to the screen/wall if the keystone correction function is not used.
- Use the keystone correction function to adjust the image shape.
- Automatic keystone correction failure
- Make sure the adjustment sensor on the front of the projector is not blocked or smudged.
- The projector supports +30° vertical and 15° horizontal keystone correction.
- Autofocus failure
- Make sure the adjustment sensor on the front of the projector is not blocked or smudged.
- Move the projector back and forth until it is in the recommended projection distance.
- Remote control unresponsive
- Make sure the batteries are installed correctly and not drained.
- Remove any obstructions between your projector and remote control.
- Ensure the remote control is successfully paired with the projector via BT,
- Connect the BT devices
- Go to Homepage > Dashboard. All settings
- Remotes & Accessories to check the BT device list, and connect the device.
- The power adapter is getting warm.
- It’s normal for the power adapter to generate heat during use. It’s been tested and meets safety standards. Rest assured.
- How to avoid audio lag when using BT
- The projector vents warm air as part of its normal cooling process to prevent overheating and maintain optimal performance. 11. Others
- Please feel free to contact us via email.
Customer Service
- Website: https://aurzen.com
- Tel: 1-667-218-4830
- Timings: Mon-Fri, 9 AM – 5 PM EST
FAQs
Q: What does 1000 ANSI lumens represent for viewing in the real world?
Measured brightness under regular testing settings is represented by 1000 ANSI lumens. This implies that the Aurzen EAZZE D1 MAX will give substantially superior clarity than non-ANSI-rated projectors and produce bright, crisp images that are appropriate for gloomy rooms and well-controlled lighting situations.
Q: Is the Aurzen EAZZE D1 MAX appropriate for use in a home theatre?
Indeed. The projector is designed to support immersive home entertainment, making it ideal for movies, TV shows, sports, and casual gaming when paired with a quality screen or flat wall.
Q: Is it possible for me to use the projector during the day?
The projector can be used throughout the day with curtains or less ambient light, although it works best in darker spaces. A projection screen and controlled lighting are advised for best results during the day.
Q: Which gadgets are compatible with the Aurzen EAZZE D1 MAX?
Common external devices like streaming sticks, computers, game consoles, video players, and USB storage devices are supported by the projector. The output parameters of the connected device and the available input ports determine compatibility.
Q: Is wireless screen sharing supported by the projector?
Wireless screen mirroring might be possible, depending on how your system and device are configured. Device compatibility and network stability can affect performance.
Q: What is the maximum size of the projection screen?
A variety of screen sizes can be projected using the Aurzen EAZZE D1 MAX. Users can adjust their viewing configuration according to the size of their room while maintaining good image clarity within the suggested projection distance.