


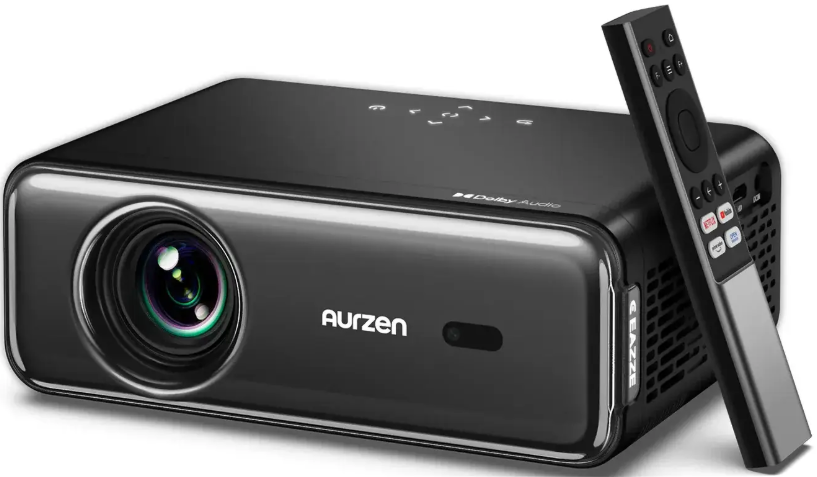
 Aurzen CEAZZE D1 PRO WiFi Bluetooth Projector
Content in the Box

Notice
Recommended
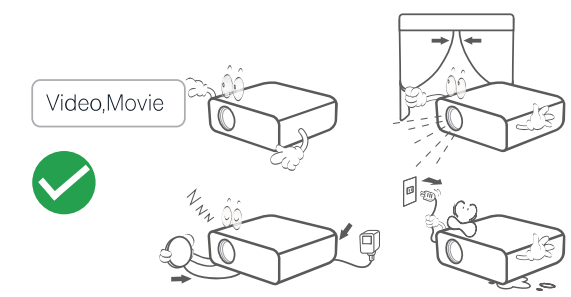
Not Recommended

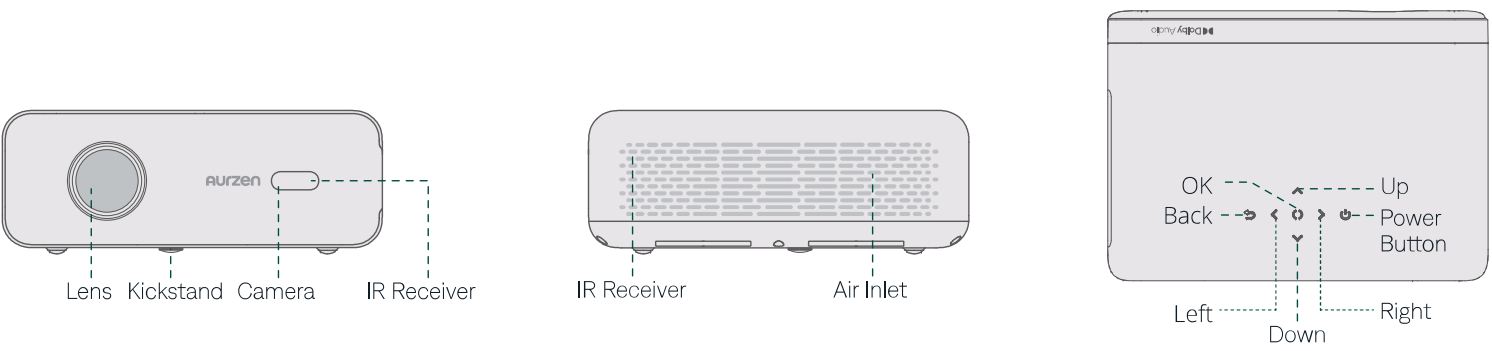
Overview
Projector Installation
Whichever installation option you select, please make sure.
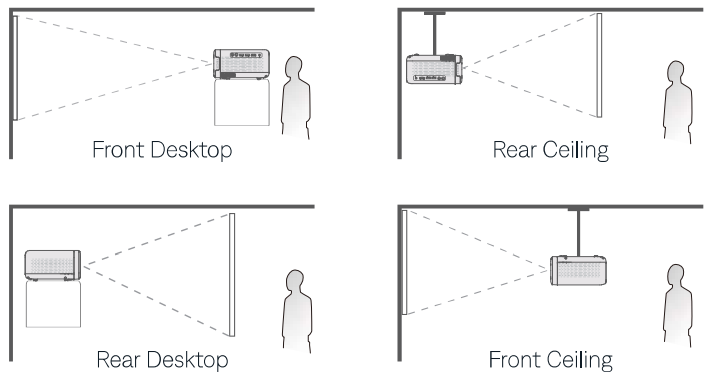
- To go to Homepage > Settings > Projection to select the corresponding projection mode, so the images can be projected correctly. Mounting Screw: 1/4″ (not included)
Power On/Off
- Take off the lens cover.

- Connect the power adapter to an outlet.

- Press the power button once to turn on the projector.

- Press the power button twice to turn off the projector.

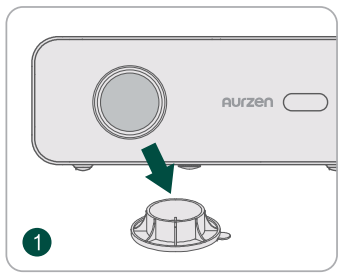
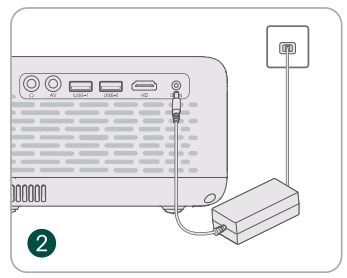
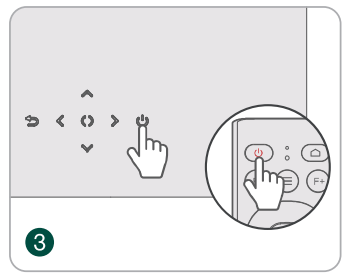
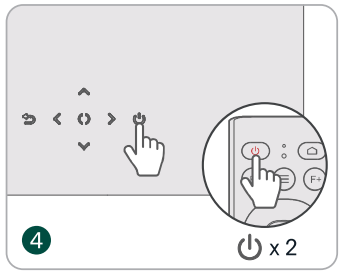
Image Adjustment
Auto Focus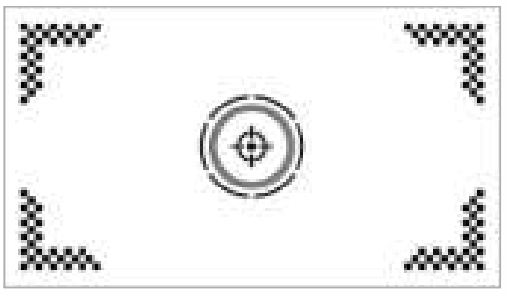
- When the projector detects shaking/rapid movement, it will automatically adjust the image quality.
- You can go to Homepage > Settings • > Focus to enable Auto Focus After Boot, allowing the projector to automatically adjust the focus after it is powered on.
Electric/Manual Focus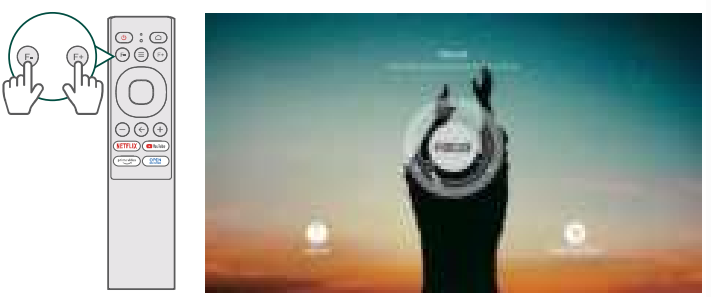
- You can also press the Focus buttons on the remote or go to Homepage > Settings © > Focus > Manual Focus to sharpen the image focus until the blurry image becomes clear.
Keystone Correction
Upon powering on the projector, it will automatically correct any keystone distortion within a range of vertical/horizontal + 45°. A side projection at 20 degrees has virtually no impact on the resolution, while between 20 and 45 degrees, there may be a slight impact.
Keystone Correction
- When the projector detects shaking/rapid movement, it will automatically correct the keystone distortion. You can enable more automatic features by going to Homepage > Settings O > Keystone.
Correction After Boot
- Automatically corrects vertical distortion after the projector is powered on.
Screen
- Automatically adjusts the projected image to match your screen.
Auto Avoid
- Automatically detects and avoids obstacles in specific areas. In case the Auto Avoid/Auto Screen is not performing optimally, you can achieve the desired effect by adjusting the keystone/focus.
Manual Keystone Correction
- Go to Homepage > Settings • > Keystone > Four Points Correction to manually correct the image shape by four points.
Image Scaling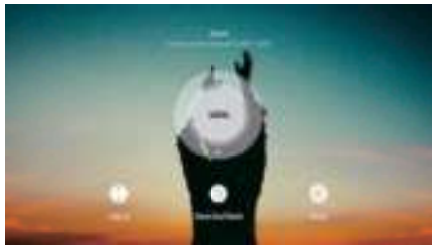
- Go to Homepage > Settings • > Zoom to reduce or enlarge the image size between 50% and 100%.
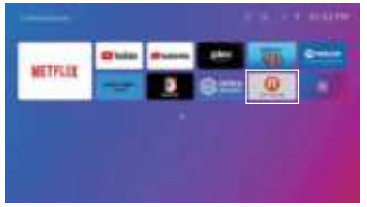
Play Content from Official Apps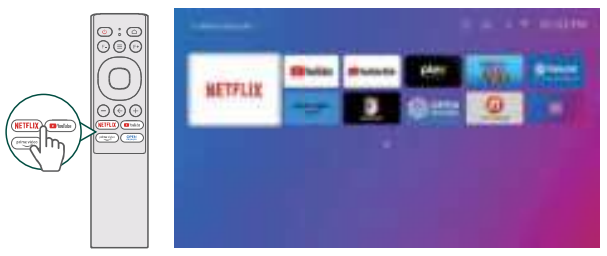
- Go to the Homepage and select your preferred platform via the shortcuts on the remote, then log in to your account to play the corresponding content.
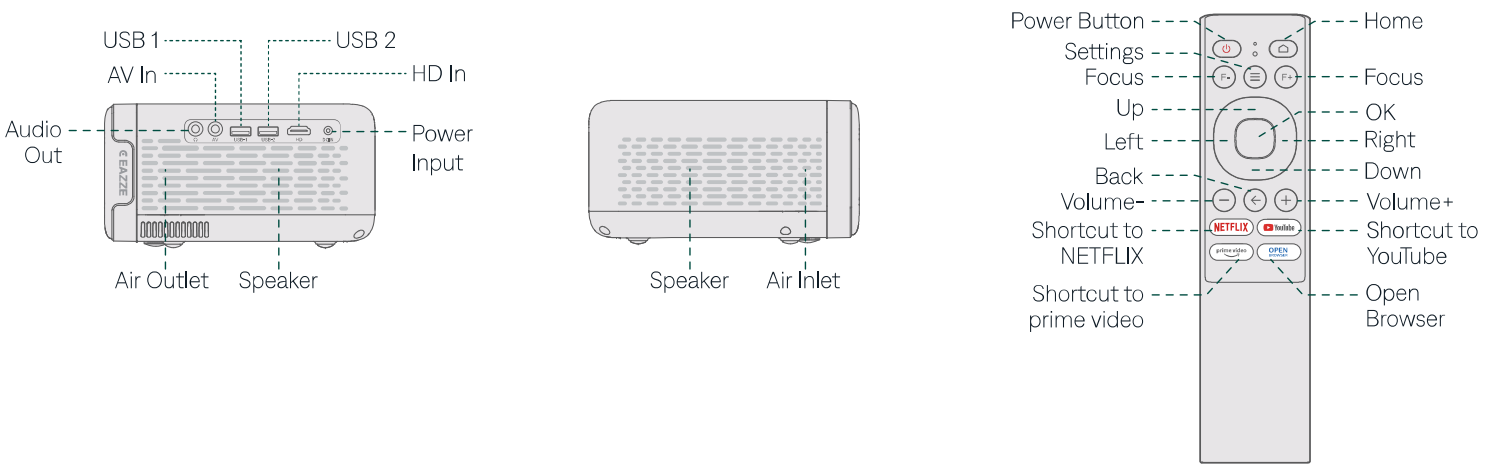
Connection & Input Sources
Connect your device to the projector correctly, then select the right input source.
USB Connection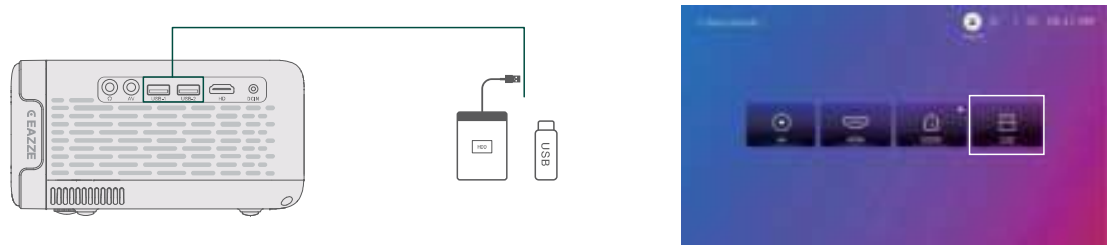
- To play files stored on a USB disk, insert the disk into the projector. Then go to Homepage > Inputs → and select USB to locate and play the desired file.
HD Connection
- To connect a device with an HD output port to the projector, use the provided HD cable to connect it to the projector’s HD input port. Then go to Homepage > Inputs → and select HDMI. D Connection.
- For gaming, a wired HD connection is recommended due to faster processing and reduced audio-visual delays compared to wireless screen mirroring.
AV Connection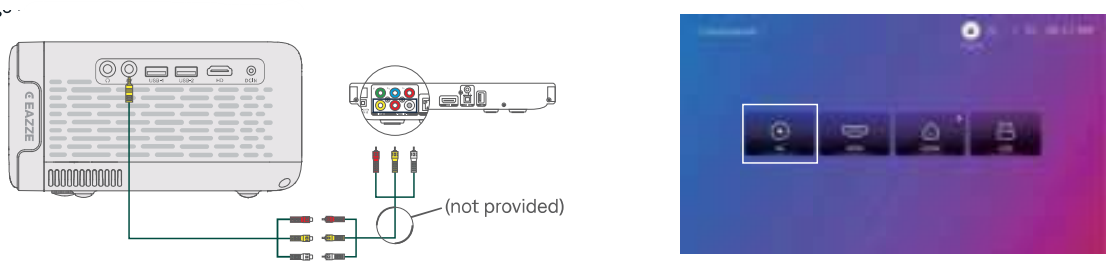
- To connect a device with an AV output port to the projector, use the AV cable (not included) to connect it to the projector’s AV input port. Then go to Homepage > Inputs → and select AV.
Wired Speaker and Headphones Connection
- This option is not required to select any input source.
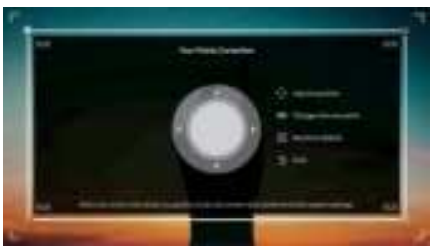
WiFi Connection

You can connect your projector to your router’s WiFi by going to Homepage > Settings @ > Network.
Screen Mirroring
Copyrighted content from Hulu, Disney+, or other similar streaming services CANNOT be wirelessly mirrored or cast due to copyright restrictions.
For Android System
To activate this function, please make sure your Android device supports Multi-screen/Smart View/Wireless Display. Names vary on different Android devices.
- Step 1
- Go to the WiFi settings of your Android device to switch on theWiFi option of WiFi.
- It is not necessary to have a successful Wifi connection, but it is important to ensure that the Wifi is turned on in your Android device.
- Step 2
- Go to Homepage > My Apps MН > Screencast to enter the interface below.
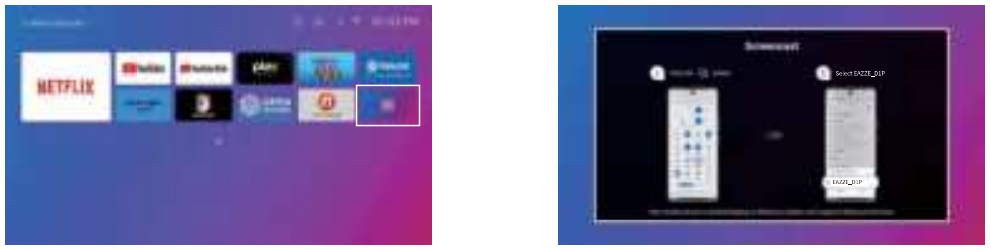
- Step 3
- Activate the Multi-screen/Smart View/Wireless Display function on your Android device and search for the projector.
- Step 4
- Choose EAZZE_D1P from the list, and once the connection is successful, the content on your Android device will be mirrored onto the projection screen or wall.
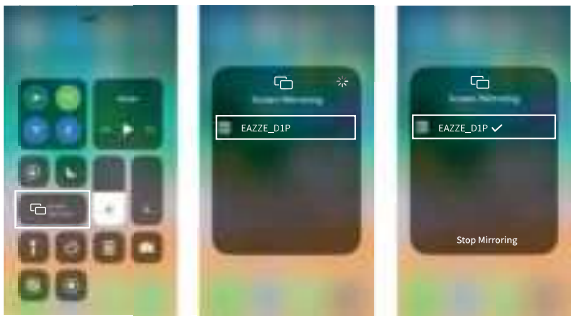
For iOS System
- Step 1
- Connect the projector and your mobile device to the same router’s WiFi or directly connect your projector to the mobile device’s hotspot. When you are using the mobile device’s hotspot, the content will be mirrored using cellular data.
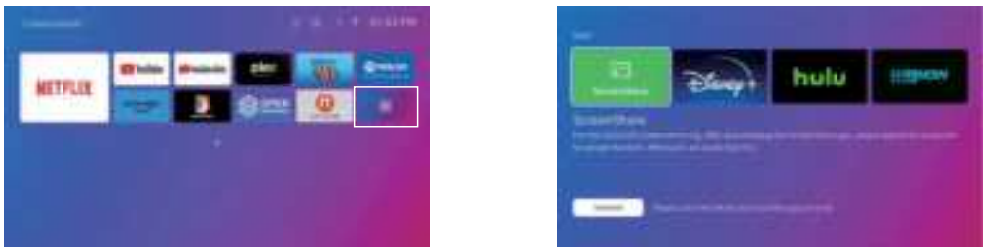
- Step 2
- Go to Homepage > My Apps 8B > APP assistant. Then, select ScreenShare and press OK on the remote to download and install the ScreenShare app.
- You will need to download the ScreenShare app for the initial setup. Afterward, you can skip this step. After downloading the ScreenShare app, please reboot the projector to ensure the proper functioning of the app.
- Step 3: Go back to the My Apps page, and then launch the ScreenShare app to enter the following page.

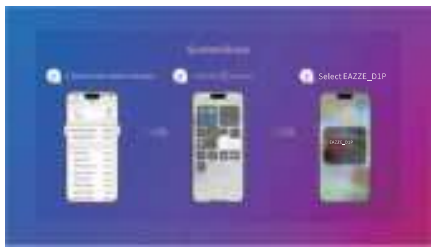
- Step 4: Go to the Control Center of your iOS device, then tap Screen Mirroring/AirPlay to search for the projector.

- Step 5: Choose EAZZE_D1P from the list, and once the connection is successful, the content on your iOS device will be mirrored onto the projection screen or wall.
Home Share
- Step 1
- Connect the projector and your mobile device to the same router’s WiFi.
- Step 2

- Go to Homepage > My Apps E and then select HomeShare to access the following page. Ensure the toggle is switched to On.
- Step 3
- Launch a video player App on your mobile device and select a video to play.
- Step 4
- Tap J to search for the projector and select EAZZE_D1P to connect. The contents on your device will be cast to the wall/screen.
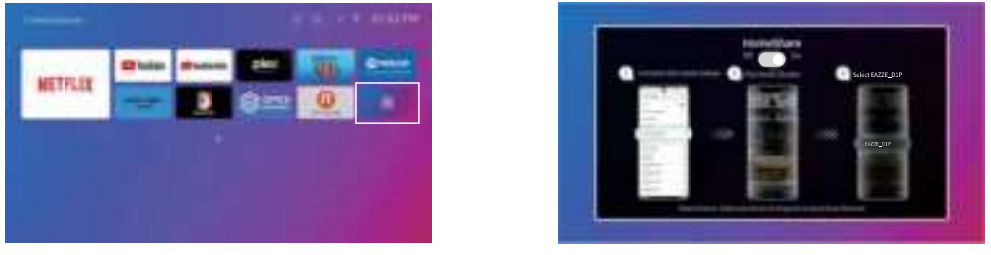
When you cast a video from your mobile device, the video will only be displayed on the projected screen, and you can still use your mobile device without interrupting the video or showing any of your other content.
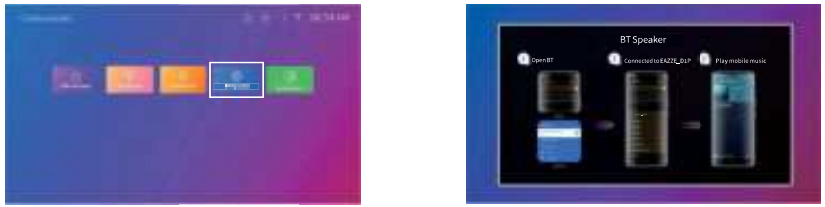
BT Connection
Use as A BT Speaker
It is possible to use this projector as a BT speaker by connecting your mobile device to it through a BT connection. Ensure the projector’s BT is enabled by going to Homepage > Settings> вт.
- Step 1

- Go to Homepage > My Apps B8 > BT Speaker to make the projector ready for a BT connection.
- Step 2

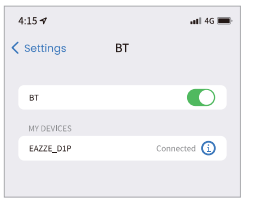
- Access your mobile device’s BT settings and activate BT. Search for EAZZE_D1P in the available devices list to pair your mobile device with the projector.
Connect to An External BT Speaker
In addition to using the wired 3.5mm audio output port, you can also connect BT speakers or BT Headphones to this projector via a BT connection.
- Step 1
- Turn on your BT device and make it ready for a BT connection.
- Step 2
- Go to Homepage > Settings • > BT to scan available BT devices, then select your BT device and pair it with the projector.

- Go to Homepage > Settings • > BT to scan available BT devices, then select your BT device and pair it with the projector.
- Move your BT device closer to the projector.
- Keep the projector and your BT device away from other BT devices to avoid interference.
- You may be able to adjust the latency (Lip Sync) on your device that is playing the video.
- The way to adjust the latency varies with different devices: please consult it from the device manufacturer.
- Due to the compatibility issue between BT speakers/headphones and the projector, a few BT devices may not be paired with the projector via BT wireless connection. Please contact us via email for further assistance.
Setup
- Set the projector’s language.
- Adjust the date and time settings.
- Set the screen to automatically activate the screensaver after a specific period of inactivity.
- Set the screen turn-off timer.
- Set the screen to automatically turn off after a specific period of inactivity.
- Update the software as needed.
- Restore the projector to the factory settings.
Picture Mode
Select the picture mode and adjust the image preferences such as color temperature, contrast, etc.
Audio (»
- Set your preferred sound style, such as vivid, movie, etc.
- Choose the correct digital output mode. And more.
BT
- Connect the projector to external BT speakers and headphones.
Network
- Connect the projector to a working WiFi network.
Projection
- Select the appropriate projection mode to ensure accurate image projection.
Keystone
- Enable the projector to automatically correct the keystone after it is powered on.
- Enable the projector to automatically correct the keystone after it is moved.
- Enable the projected image to automatically match the screen.
- Enable the projector to automatically avoid obstacles.
- Correct the keystone manually.
Zoom
- Modify the image size between 50% and 100%.
Focus
- Enable the projector to automatically adjust the focus after it is powered on.
- Enable the projector to automatically adjust the focus after it is moved.
- Adjust the focus manually.
About
- Check version info, license info, and device temperature.
- Rename the projector.
Distance & Size
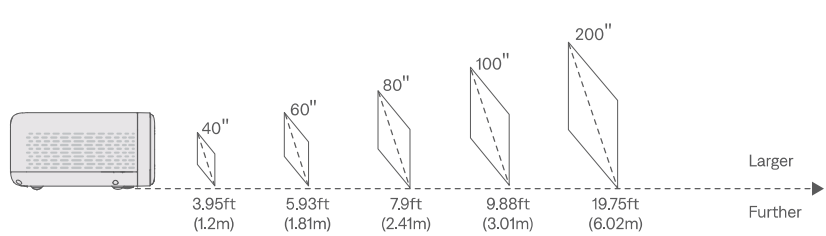
- The recommended projection distance varies with different projection contents.
- Please adjust the distance between the wall/screen and the projector as needed.
- Ambient darkness will improve the clarity of the projected images.
- For optimal image quality, we recommend a projection size of 80 to 100 inches.
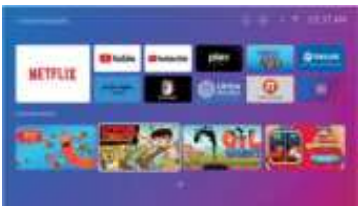
Explaination Of Apps
- You can’t download the apps on the APP STORE platform, but you can log in to your account to watch the content directly.

- You can download some apps in the APP assistant and login too your account to watch the content directly.

- After downloading the app, return to the homepage, navigate down to find the corresponding app, and open it to view its content.

Specification
- Display Technology: LCD
- Resolution: Native 1920 × 1080P
- Installation Type: Front/Rear/Ceiling
- Focus: Auto and Electric/Manual
- Light Source: LED
- Input Signal: 576i/576P/720i/720P/1080i/1080P/4K
- Aspect Ratio: 16:9
- Keystone: Auto and Electric/Manual
- Speaker: 10W x 2
- Unit Dimension: 9.84 * 7.01 * 3.74 inches (250*178*95mm)
- Photo Format Supported: JPG/PNG/BMP/GIF/ JPEG
- Video Format Supported: MKV/MP4/FLV/MOV/MPG/ 3GP/MPEG1
- Mounting Screw: 1/4″
- Power Supply: 29V == 3.8A
- Unit Net Weight: 4.4lbs (2kg)
- Audio Format Supported: OGG/AAC/MP3/FLAC/WAV
- Ports: HD In x 1/ USB x 2/ AV x 1/Audio Out x 1
- Screw Number: 1 (not included)|

Troubleshooting
- Netflix on the projector
- Yes, you can. The projector comes with preinstalled, officially licensed Netflix/YouTube/Prime Video apps. You have the convenience of watching your favorite videos directly on the projector without any hassle.
- The copyrighted contents
- Due to the copyright restrictions from Hulu, Disney+, and similar services, the content MAY NOT be mirrored or cast.
- Blurry image
- Adjust the focus/keystone.
- The projector and screen/wall must bewithinn the effective distance.
- Why doesn’t the remote control work?
- Make sure the remote points at the IR receiver directly.
- Please make sure you have installed two AAA batteries in the remote control.
- Upside-down images
- Go to Homepage > Settings • > Projection to flip the projection image.
- Factory reset
- Go to Homepage > Settings • > Setup > Reset Default to restore the projector to default settings.
- Sideload Android Apps
- Sorry, you cannot sideload Android apps onto the projector.
- Auto Focus/Auto Keystone
- Please restore the projector to factory settings and try again.
- If the issue still persists, please send a video to our service team by email for assistance.
- The picture is not bright
- To enjoy the best viewing experience, we suggest using it in a dark environment.
- The darker the room, the better the image.
FCC Statements
This equipment generates, uses, and can radiate radio frequency energy and, if not installed and used in accordance with the instructions, may cause harmful interference to radio communications. However, there is no guarantee that interference will not occur in a particular installation.
- Reorient or relocate the receiving antenna. Increase the separation between the equipment and receiver. Consult the dealer or an experienced radio/TV technician for help.
RF Exposure Information:
- The radiated output power of this device meets the limits of the FCC radio frequency exposure limits.
Canada Compliance Statement
This device complies with Innovation, Science and Economic Development Canada license-exempt RSS standard(s). Operation is subject to the following two conditions:
- This device may not cause interference, and (2) this device must accept any interference, including interference that may cause undesired operation of the device.
- Operation in the band 5150-5250 MHz is only for indoor use to reduce the potential for harmful interference to co-channel mobile satellite systems.
- The radiated output power of this device meets the limits of IC radio frequency exposure limits.
Customer Support
- Email: support@aurzen.com
- Mon-Fri, 9:00 to 17:00 EST
- Phone: +1-667-218-4830