
 TCL 40S5403A 40 Inch Full HD LED TV

Safety Information
- Check that the wall can support the weight of the TV set and wall mount assembly.
- The TV set must be installed on a vertical wall.
- Make sure to use only screws suitable for the material of the wall.
- Make sure that the TV set cables are placed so that there is no danger of tripping over them.
- Always use cabinets or mounting methods recommended by the manufacturer of the television set.
- Always use furniture that can safely support the television set.
- Always ensure the television set is not overhanging the edge of the supporting furniture.
- Always educate children about the dangers of climbing on furniture to reach the television set.
- Never place a television set in an unstable location.
- Always route cords and cables connected to your television so they cannot be tripped over, pulled or grabbed.
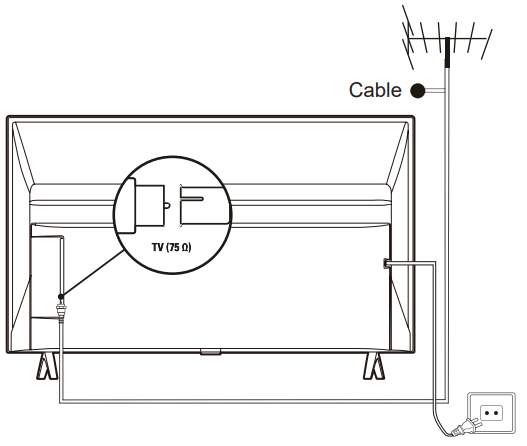
Connections
- To switch on the TV after connecting the power cord, press or POWER/.
- The position of the power socket varies according to the TV model.
- Disconnect the power cord before connecting devices.
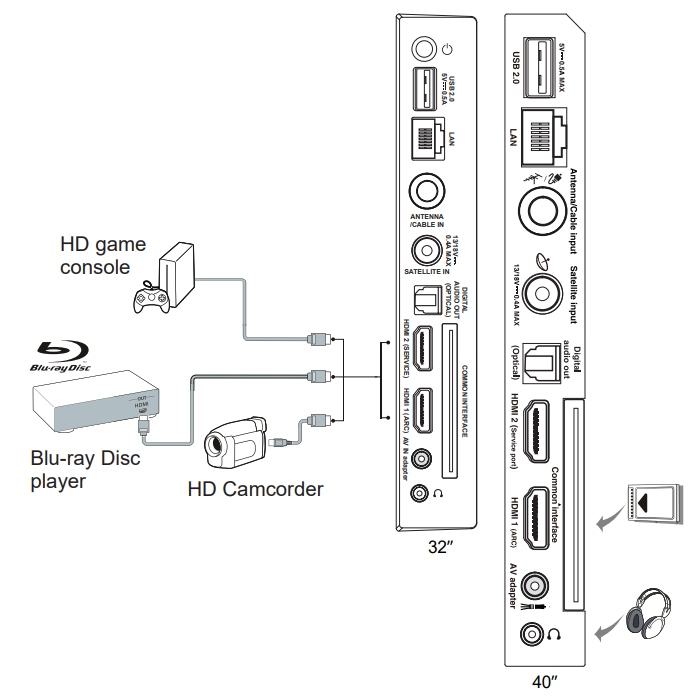
Connect Blu-ray Disc player, HD game console, HD camcorder, headphones, CI module.
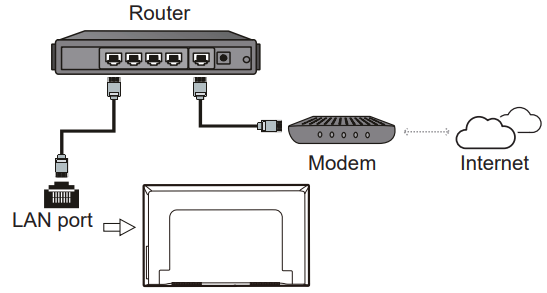
Connect to the Internet
The following instructions are just the usual ways to connect your TV to the wired or wireless network. The connection method may be different depending on your actual network configuration. If you have any questions about your home network, please refer to your Internet service provider.
Wired Connection
Wireless Connection

Network Settings
- Press the remote control to display the Android TV homepage. Press ▲/▼/◄/► to move the cursor to the top right of the screen and press OK to enter the Settings menu.
- Press ▲/▼ to select Network & Internet, press OK to enter the submenu and follow the on-screen guidance to set up your network.
-
- Your TV might not have all the connectors visible on the diagram above. The number of USB and HDMI ports may vary according to the TV model. Button and connector locations may vary according to the TV model.
- USB connectors are for data input from USB drives and for connecting other relevant USB devices where applicable.
- All USB devices have to be directly connected to the TV set without cable extenders. In case an extender is required, a maximum of 50cm is recommended. Longer extenders should have ferrite beads.
- The ARC (Audio Return Channel) function is only supported on the HDMI port identified with ARC. To use the ARC function, please turn on the CEC function first, as described in the CEC section.
- It is recommended to use high-quality and well-shielded HDMI cables to avoid possible interferences. Please use headphones with a 3.5m m TRS connector. Excessive sound pressure from headphones can cause hearing loss.
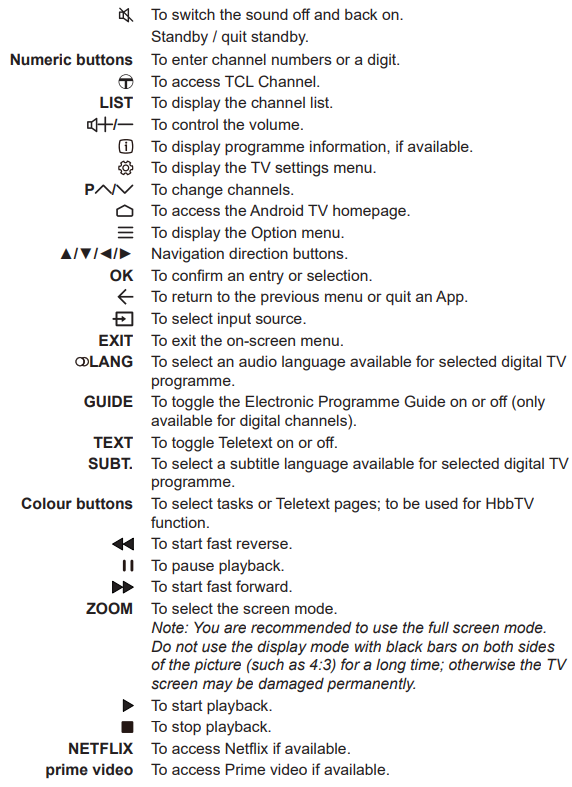
Remote Control Functions
Most of your television’s functions are available via the menus that appear on the screen. The remote control supplied with your set can be used to navigate through the menus and to configure all the general settings.
Installing Batteries
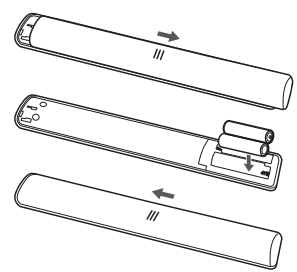
- Push to open the back cover as illustrated.
- Insert two AAA batteries according to the polarities marked on the battery case.
- Replace the back cover as illustrated.
- Batteries shall not be exposed to excessive heat such as sunshine, fire or the like.
- Remove batteries when the remote control is not to be used for a long time.
- To protect the environment, use local recycling facilities for battery disposal.
- Dispose of used batteries according to the instructions.
- You can turn on the TV from standby mode by pressing the button on your TV set.
- While the TV is on, the multi-function menu appears when pressing the button on your TV set.
- For more information about how to use the multi-function menu, please refer to the figure below

- Press the button to move the highlight to the next function selection.
- Press and hold the button for more than 2 seconds to confirm your selection.
Switch the TV On and Off
- When the power cord is connected, the TV will be turned on directly or be in standby mode.
- If the TV is in standby mode, press the POWER/ button on the remote control to turn it on.
- To put the TV into standby mode, press the button on the remote control.
- The TV set remains powered up, but with low energy consumption.
- To switch the TV off, unplug the mains plug from the mains outlet.
Initial Setup
The first time you switch the set on, the Welcome screen appears, which guides you through the initial setup process. Follow the on-screen instructions to finish the initial setup process, such as selecting the language, connecting to the network, scanning channels, and more. During each step, either make a choice or skip the step. If you skip a step, you can perform the setup later from the settings menu.
If the channel search retrieved only the analogue channels, it could be caused by poor broadcasting and therefore is not covered by the manufacturer’s warranty. Manufacturers cannot be held responsible for a lack of or poor broadcasting in some areas.
Accessing Channels
Using the numeric buttons
- Press the corresponding numeric buttons on the remote control to access the channels.
Using the P / buttons
- Press the P / buttons on the remote control to scroll through the channels.
- Using the LIST button: press the LIST button on the remote control to display the channel list and press ▲/▼/◄/► and OK to select channels.
Watching connected devices
- Press the remote control to display the source list.
- Press ▲/▼ to select TV or other input sources and press OK to confirm.
- You can also press on the remote control to display the homepage, press ▲/▼/◄/► to move the cursor to the area on the right top of the screen, and press OK to enter. Then press ▲/▼ and OK to select the input source.
Adjusting Volume
Volume control
- Press the / buttons on the remote control to increase or decrease the volume.
Sound mute
- Press the button to temporarily mute the sound. Press this button again or the button to restore the sound.
Accessing the Android TV homepage
Allows you to enjoy Internet Applications (Apps) and specially adapted Internet websites, and perform system settings for your TV. You can make controlling with the TV remote control.
- Press the remote control to display the Android TV homepage.
- Press ▲/▼/◄/► and OK to enter the desired Apps, functions or settings.
Installing Channels
This section describes how to search and store channels automatically. This may be done in any of the cases below:
- You have skipped the channel installation step in the initial setup.
- You are prompted that there are no channels in TV mode.
- You want to update your channels.
- In TV mode, press the remote control and select Channel > Channel scan. Press OK/► to enter.
- The TV installs and arranges channels according to your country or region.
- Press ▲/▼ to select Country/Region, and press OK/► to enter.
- Press ▲/▼ to select your country or region and press OK to confirm.
- Press ▲/▼ to select Automatic search and press OK/► to enter.
- Press ▲/▼ to select Tuner mode and press ◄/► to select Cable, Antenna or Satellite.
- Press ▲/▼ to select other options to configure.
- After configuration is completed, press ▼ to select Search and press OK to start scanning channels.
- The channel search may take a few minutes. After the automatic search, channels are arranged in a preset order. If you wish to hide or move channels, press on the remote control, select Channel > Channel organizer and press OK/► to enter.
Common interface
Encrypted digital TV channels can be decoded with a common interface module and a card provided by a digital TV service operator. The common interface module may enable several digital services, depending on the operator and services you choose (for example, pay TV). Contact your digital TV service operator for more information about services and terms.
- Following the directions printed on the common interface module, gently insert the module into the common interface slot on the TV.
- Push the module in as far as it will go.
- Turn on the TV and wait for the common interface function to be activated.
- This may take several minutes.
- Do not remove the common interface module from the slot.
- Removing the module will deactivate the digital services.
Accessing common interface services
- After inserting and activating the common interface module, press on the remote control, select Channel > Common interface and press OK/► to enter.
- This menu option is only available if the common interface module is correctly inserted and activated. On-screen applications and content are provided by your digital TV service operator.
Using Subtitles
You can enable subtitles for each TV channel. Subtitles are broadcast via Teletext or DVB-T/DVB-C/ DVB-S/DVB-T2/DVB-S2 digital broadcasts. With digital broadcasts, you have the additional option of selecting a preferred subtitle language.
Turning on/off subtitles
- Press on the remote control, select Channel > Subtitle and press OK/► to enter.
- Select the Subtitle option, and press OK to toggle between on and off.
- Press EXIT or to close the menu.
Enabling subtitle languages on digital TV channels
- Press on the remote control, select Channel > Subtitle > Digital subtitle language 1st and press OK/► to enter.
- Press ▲/▼ to select a subtitle language as your preferred language and press OK to confirm.
- Press ▲/▼ to select Digital subtitle language 2nd and press OK/► to enter.
- Press ▲/▼ to select a secondary subtitle language and press OK to confirm.
- Press EXIT or to close the menu. Shortcut operation: Press SUBT. On the remote control, to directly select a subtitle language available for the selected digital TV programme.
Selecting a subtitle type on digital TV channels
- Press on the remote control, select Channel > Subtitle > Subtitle type and press OK/► to enter.
- Press ▲/▼ to select a subtitle type and press OK to confirm. You can select Hearing impaired to display the hearing-impaired subtitles with your selected language.
- Press EXIT or to close the menu.
Using Teletext
Selecting the decoding page language
- Press on the remote control, select Channel > Teletext > Decoding page language and press OK/► to enter.
- Press ▲/▼ to select a proper type of language in which Teletext will display, a nd press OK to confirm.
- Press EXIT or to close the menu.
Digital Teletext language
On digital TV channels, depending on the broadcaster, you may be able to enjoy a service with multiple initial Teletext pages in different languages. This function allows you to select an available language as the primary language, which relates to different initial Teletext pages.
- Press on the remote control, select Channel > Teletext > Digital teletext language and press OK/► to enter.
- Press ▲/▼ to select a language and press OK to confirm.
- Press EXIT or to close the menu.
Consumer Electronic Control (CEC)
Use this function to search for CEC devices connected to the HDMI sockets in your TV and enable one-touch play and one-touch standby between CEC devices.
Enabling or disabling CEC
- Press on the remote control, select System > Consumer Electronic Control (CEC) and press OK/► to enter.
- Select the HDMI Control option, and press OK to toggle between on and off
- Press EXIT or to close the menu.
Using Auto power on
Enables the TV to automatically power on when you power on a CEC device (e.g. DVD) with the device’s remote. Press OK to turn it on to enable this function.
Using Auto Standby
Enables all CEC devices to automatically go to the standby mode when you turn off the TV with the TV remote. Press OK to turn it on to enable this function.
Hbb TV
- HbbTV (Hybrid broadcast broadband TV) is a service offered by certain broadcasters and available only on some digital TV channels. HbbTV delivers interactive television over broadband Internet.
- These interactive features are added to and enrich the normal digital programmes, and include services such as digital teletext, electronic programme guide, games, voting, specific information related to the current programme, interactive advertising, information magazines, catch-upTV, etc.
- To use HbbTV, please ensure your TV is connected to the Internet, and HbbTV is switched on.
TV access
- Press on the remote control, select System > HbbTV settings and press OK/► to enter.
- Select the HbbTV option, and press OK to turn it on.
- Press the indicated colour button to open the interactive pages.
- Use ▲/▼/◄/► and the colour buttons to navigate through the HbbTV pages and press OK to confirm.
Hbb TV deactivation
To avoid disturbances that may be caused by HbbTV broadcasting tests, you can turn off the HbbTV function:
- Press on the remote control, select System > HbbTV settings and press OK/► to enter.
- Select the HbbTV option, and press OK to turn it off to disable it.
Using EPG (Electronic Programme Guide)
EPG is an on-screen guide that displays scheduled digital TV programmes. You can navigate, select and view programmes.
- Press GUIDE on the remote control, the Programme Guide menu will appear, which allows you to get information about the current or next programme playing on each channel. Navigate through the different programmes using the ▲/▼/◄/► buttons on the remote control.
- Use the related buttons shown at the bottom of the screen to view the EPG.
- Watch now or More: Press OK to watch the selected channel or view more information about the selected programme.
- Programme filter: Press to display the programme filter for digital TV programmes.
- Custom schedule: Press the red button to set a schedule.
- Select date: Press the green button to select a date.
- Schedule list: Press the yellow button to view your schedule list.
- Press GUIDE or EXIT to exit EPG.
Bluetooth Function
Bluetooth is a wireless technology standard for exchanging data over short distances between Bluetooth devices. You can connect a Bluetooth audio device, a mouse or a keyboard via the TV.
- Press on the remote control, press ▲/▼/◄/► to move the cursor to the top right of the screen and press OK to enter.
- Select Remotes & Accessories > Add accessory and press OK to enter.
- The TV will search nearby Bluetooth devices automatically.
- Select an available device, press OK and follow the guides on the screen to connect it.
The Bluetooth word mark and logos are registered trademarks owned by Bluetooth SIG, Inc., and any use of such marks by TTE Corporation is under license. Other trademarks and trade names are those of their respective owners.
Quick start function
It enables you to turn on your TV faster from standby mode than turning this function off, but it will also increase standby power consumption.
- Press the remote control, select > Device Preferences > Quick start > Enable quick start and press OK to toggle between on and off. Press to return to the previous menu.
Networked Waking Up
This function allows you to turn on your TV from standby mode via a network. To use this function, please make sure:
- Your TV is connected to an effective wireless home network.
- The desired controller, such as a smartphone, is connected to the same wireless network as your TV.
- When the TV is in networked standby mode, you can use the App to wake up the TV remotely.
- This function may not be available for certain models.
Software Update
Press on the remote control, select > Device Preferences > About > Software update and press OK to enter. You have three options to update the software: Network update, Local update and By channel. Follow the on-screen instructions to complete theprocesss.s
Reset to factory default settings
- Allows you to reset the TV to factory default settings. Press on the remote control, select > Device Preferences > Reset > Factory data reset > Erase everything and press OK to confirm.
- Use the numeric buttons on the remote control to enter the password 1234 or your own password, in case you have changed it. Select OK and press OK to confirm. The Welcome screen appears. Follow the instructions in the section Initial setup.
- Viewing pictures, playing music and watching videos from a USB storage device. Follow the on-screen instructions. You can also select the Media Player app via the Android TV homepage to enter.
Operating Conditions
- Temperature: 5°C–35°C (41°F–95°F)
- Humidity: 20–75% (non-condensing)
Storage Conditions
- Temperature :-15°C–45°C (5°F–113°F)
- Humidity: 10–90% (non-condensing)
Radio Information
- 2.4G Wi-Fi transmitter frequency range: 2400– 2483.5MHz
- 2.4G Wi-Fi transmitter power: 16dBm (+4/-5dB)
- Bluetooth® transmitter frequency range: 2402– 2480MHz
- Bluetooth® transmitter power: 3dBm (+5/-3dB)
- DVB-T/T2/C tuner frequency range: 50.5–858MHz
- DVB-S/S2 tuner frequency range: 950–2150MHz
OSS Notice
- This product uses the GPL (Version 2 and 3), LGPL (version 2.1, and MPL (version 1.1).
- To send inquiries and requests for questions regarding open source, contact the nearest TCL office.
- GPL software
- Linux Kernel, glib, libico, g, cc libgcc, gcc libstdc++, u-Boot loader, ffmepg, util-linux-ng, e2fsprogs, wget, iptables
- LGPL software
- DFB (DirectFB), gstreamer, gstplugins-base, gst-plugins-good, gst-plugins-bad, gstplugins-ugly, gst-ffmpeg, glibc, wpa_supplicant
- BSD software
- webp, mng, uriparser
- GNU software
- dosfstools
Supported File Formats
- Picture: JPEG, PNG, BMP
- Music/Audio Container
- MP3, AVI, AC3, AAC, FLV, MKV
- Codec: MPEG1 layer 3, MPEG2 layer 2/3, AC3, EAC3, AAC, LPCM
- Video Container
- AVI, MP4, TS, MKV, FLV
- Codec: MPEG1/2/4, H.263, H.264, H.265, VP8, VP9, AV1
- Password in Parental Control
- The default password is 1234. You can change it to a new one.
- The super password is 0423. If you forget your code, enter the super password to override any existing codes.
Troubleshooting
Please check the following list before requesting service.
There is no picture or sound.
- The TV may be receiving a signal other than from TV broadcasting stations.
The picture is too dark, too light or tinted.
- Check the colour adjustment.
- Check the brightness setting.
- Check the sharpness function.
The remote control does not work.
- Check the batteries of the remote control.
- Make sure the remote sensor window on the TV front is not under strong fluorescent lighting.
- Try to clean the remote sensor window on the TV front with a soft cloth.
Legal Statement
- Due to the various capabilities of products featuring the SmartTV – Services, as well as limitations in the available content, certain features, applications, and services may not be available on all devices or in all territories.
- The services and availability of content through SmartTV are subject to change from time to time without prior notice. Such content and services are provided solely for your personal, noncommercial use.
- Without limiting the foregoing, unless expressly authorised by the applicable content owner or service provider, you may not modify, copy, republish, upload, post, transmit, translate, sell, create derivative works, exploit, or distribute in any manner or medium any content or services displayed through this device.
Customer Support
- Website: www.tcl.com/au
- Ph: 1300 738 149.