


Acer P5630 3D DLP Beamer Projector
First things first
Usage Notes
Do:
- Turn off the product before cleaning.
- Use a soft cloth moistened with mild detergent to clean the display housing.
- Disconnect the power plug from the AC outlet if the product is not being used for a long period of time.
Don’t:
- Block the slots and openings on the unit provided for ventilation.
- Use abrasive cleaners, waxes, or solvents to clean the unit.
- Use under the following conditions:
- In extremely hot, cold, or humid environments.
- In areas susceptible to excessive dust and dirt.
- Near any appliance that generates a strong magnetic field.
- Place in direct sunlight.
Precautions
Follow all warnings, precautions, and maintenance as recommended in this user’s guide to maximize the life of your unit.
Introduction
Product Features
This product is a single-chip DLP® projector. Outstanding features include:
- DLP® technology
- Full/4:3/16:9/L.Box aspect ratio supported
- Enables projecting 3D content via DLP Link Technology: Blu-ray 3D supported
- Acer ColorBoost technology delivers nature’s true colors for vivid, life-like images
- High brightness and contrast ratio
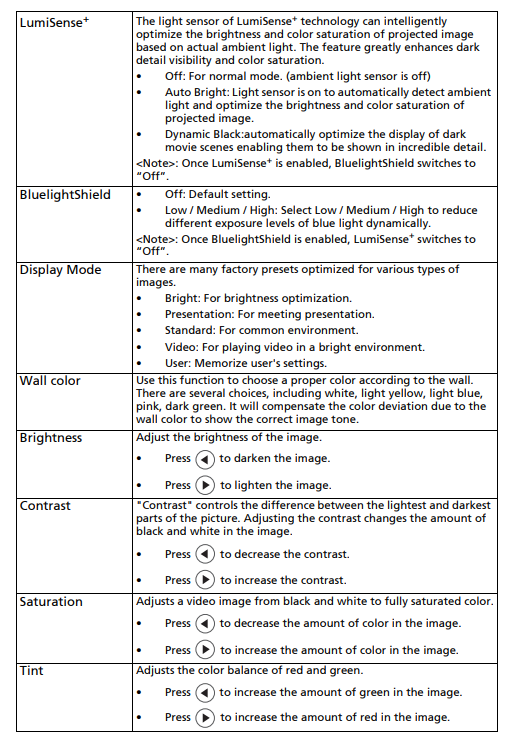
- Acer LumiSense+ technology can intelligently optimize the brightness and color saturation of the projected image based on actual ambient light
- Acer BluelightShield™ reduces the exposure ratio of blue light, which can potentially cause long-term eye damage, by adjusting color hue and brightness
- Versatile display modes (Bright, Presentation, Standard, Video, User) enable optimum performance in any situation
- NTSC / PAL / SECAM compatible and HDTV (480i/p, 576i/p, 720p, 1080i/p) supported
- Lower power consumption and economy (ECO) mode extends lamp life
- Acer EcoProjection Technology delivers an intelligent power management approach and physical efficiency improvement
- Equipped with HDMI™ & MHL connection supporting HDCP
- Smart detection delivers quick, intelligent source detection
- Multi-language onscreen display (OSD) menus
- Manual focus projection lens zooms up to 1.3x
- 2x digital zoom
- Microsoft® Windows® 2000, XP, Vista®, Windows 7, Windows 8.1, Windows 10, Macintosh® OS compliant
- Support MHL V2.1 signal display.
- Built-in one 16-watt speaker
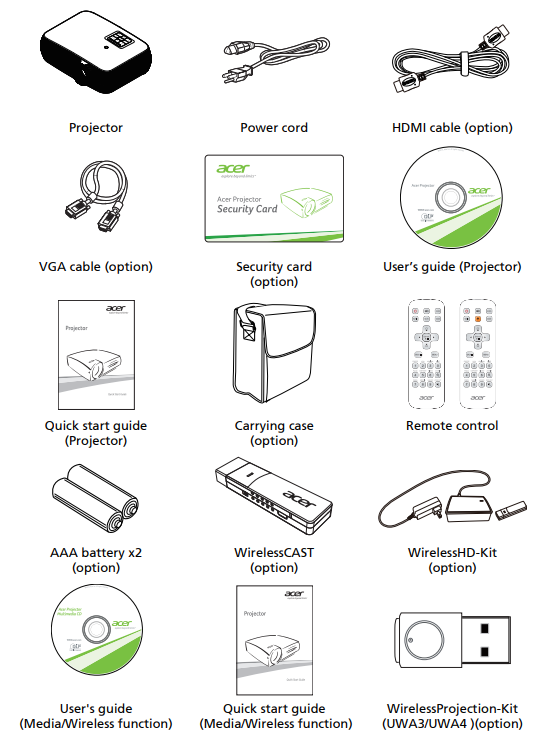
Package Overview
This projector comes with all the items shown below. Check to make sure your unit is complete. Contact your dealer immediately if anything is missing.
Projector Overview
Projector Outlook
Front / upper side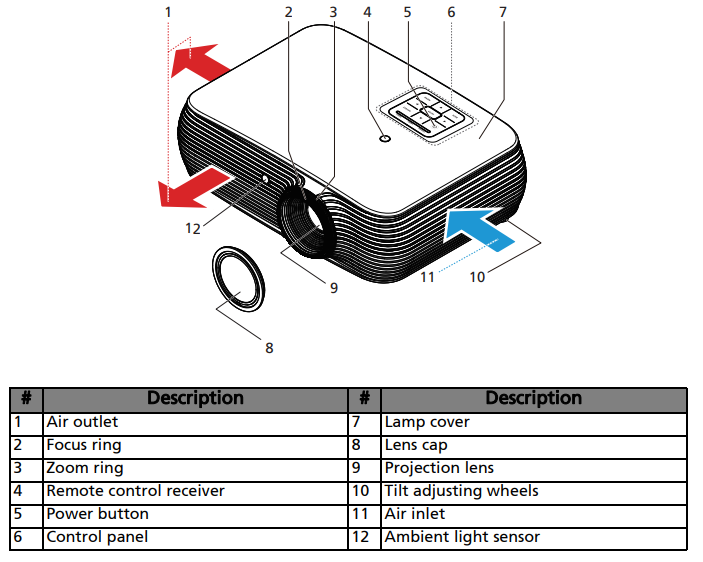
Rear side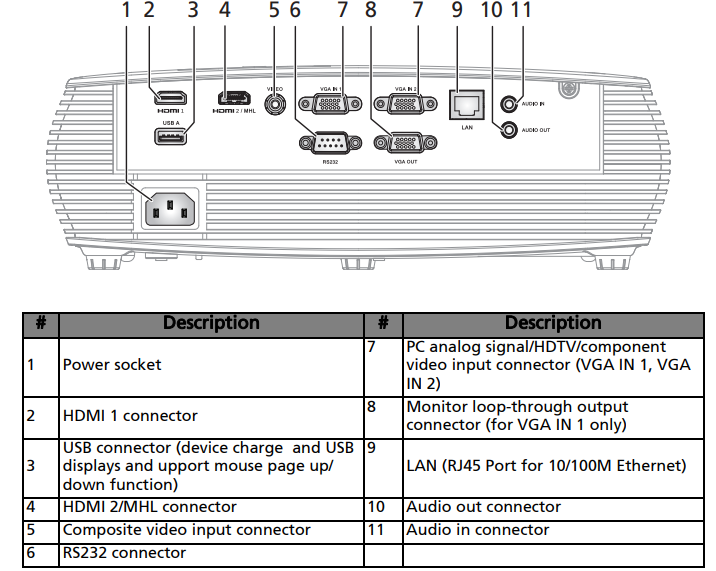
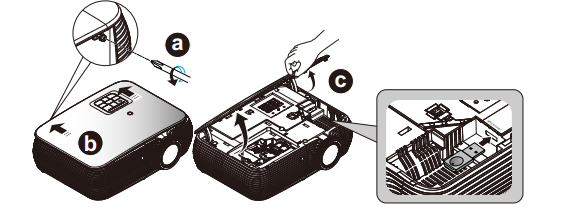
How to Install Acer Wireless Projection Kit (UWA3/UWA4 )
If you had purchased the Acer Wireless Projection Kit (UWA3/UWA4 ), please follow
The installation steps below:
- Use a screwdriver to remove the screw from the cover. (Illustration #a)
- Push the cover toward the rear side of the projector. (Illustration #b)
- Open the top cover. (Illustration #c)
- Install the dongle (Illustration #d)
Control Panel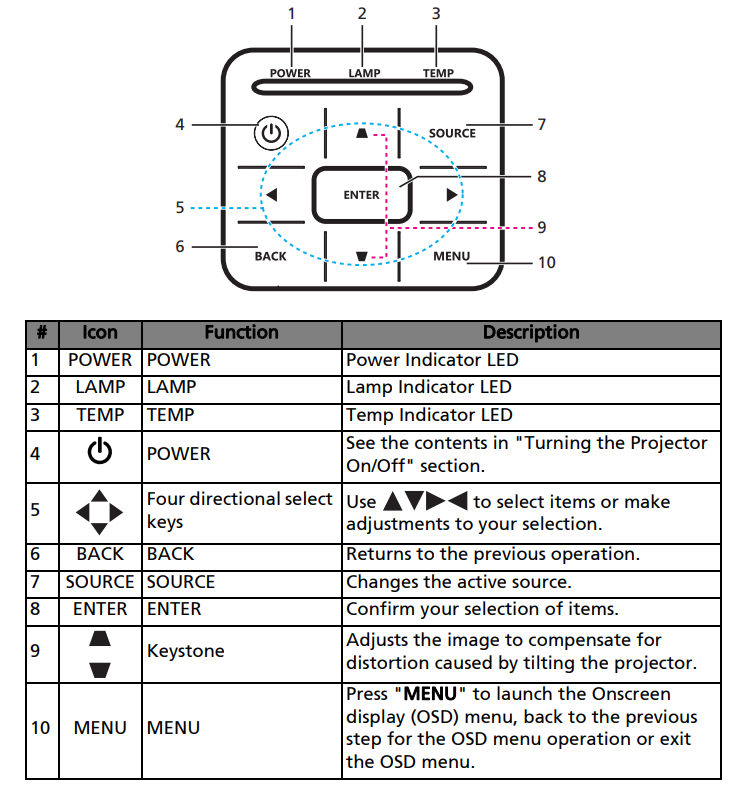
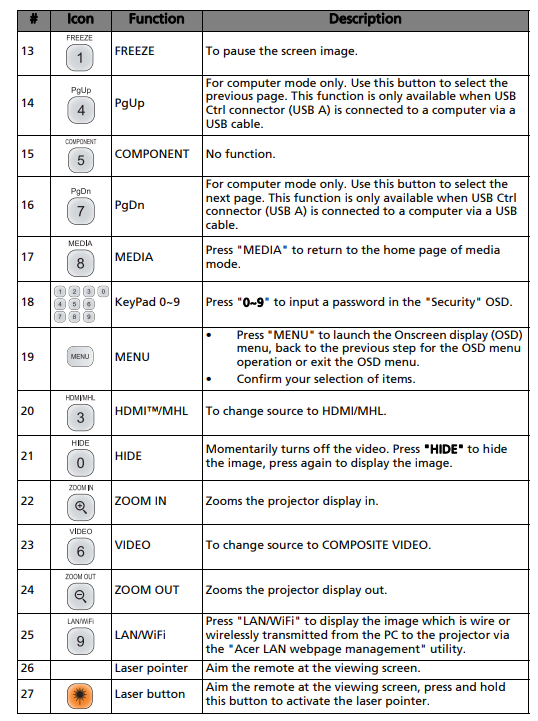
Remote Control Layout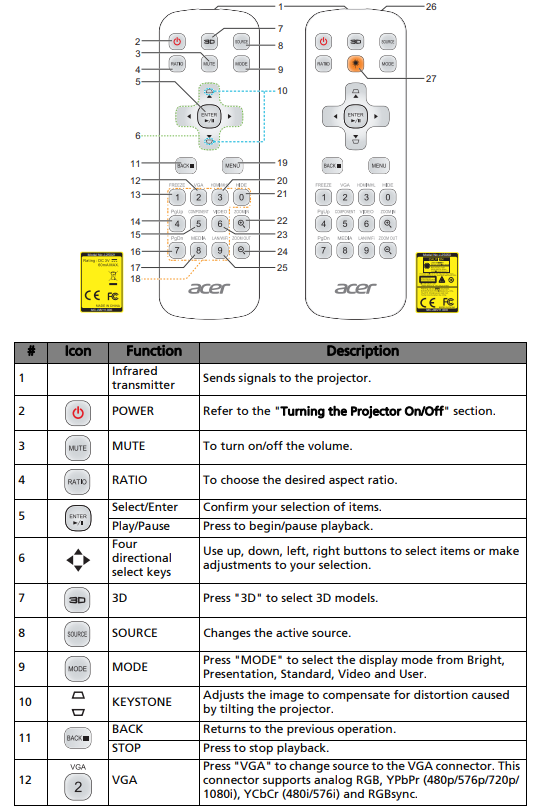
MHL (Mobile High-Definition Link) Control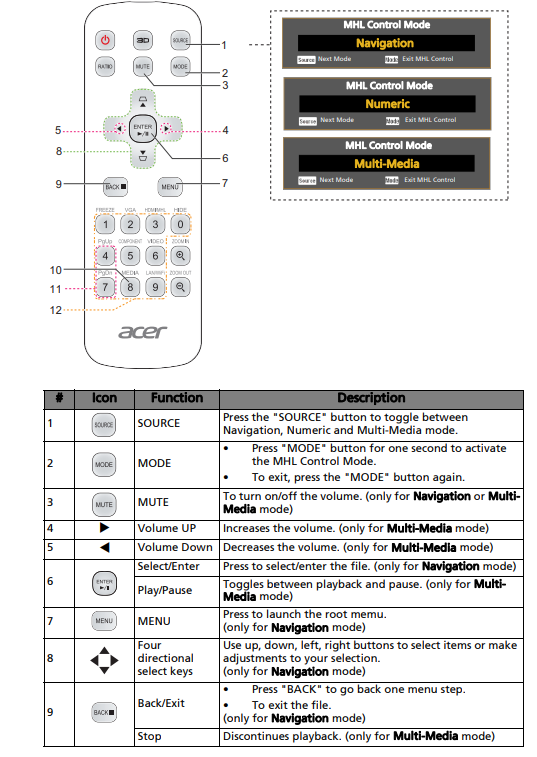

Getting Started
Connecting the Projector
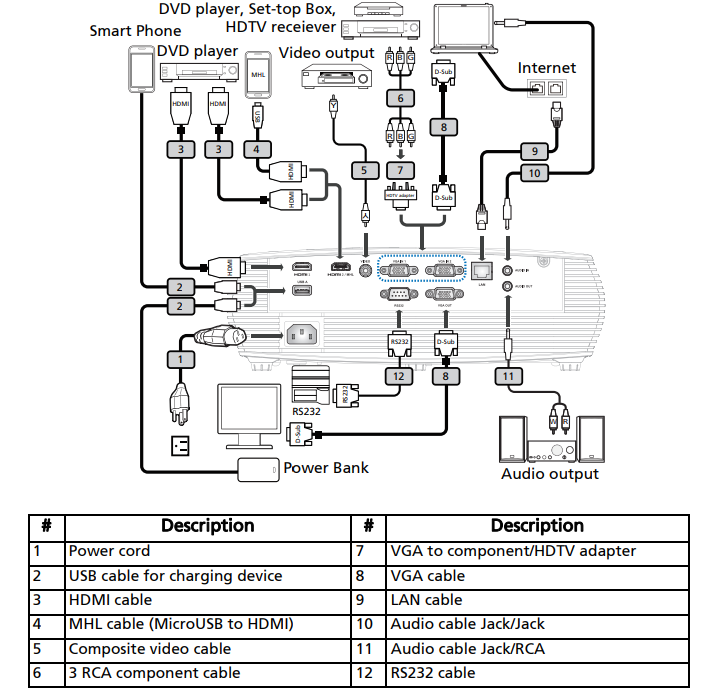
- Ensure that the power cord and signal cable are securely connected. The Power indicator LED will flash red.
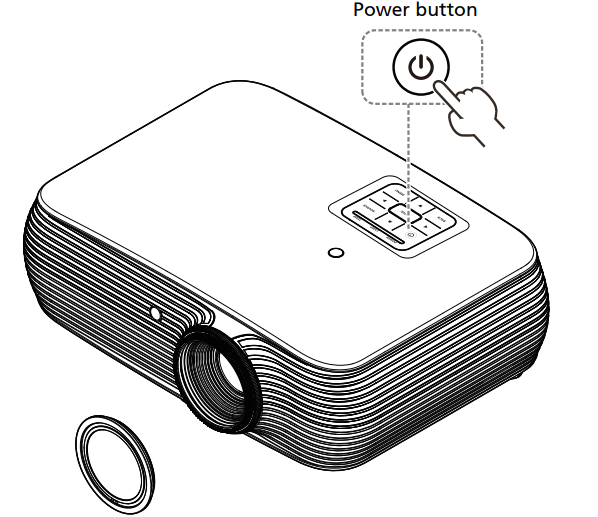
- Turn on the projector by pressing the “Power” button on the control panel or remote control, and the Power indicator LED will turn blue.
- Turn on your source (computer, notebook, video player, etc). The projector will detect your source automatically.
- If the screen displays “Lock” and “Source” icons, it means the projector is locked onto a specific source type, and there is no such type of input signal detected.
- If the screen displays “No Signal”, please make sure the signal cables are securely connected or press the source direct key.
- If you connect to multiple sources at the same time, use the “Source” button on either the control panel or the remote control, or the direct source key on the remote control to switch between inputs.
- To turn the projector off, press and hold the power button. This message appears: “Please press the power button again to complete the shutdown process.” Press the power button again.
- The LED power indicator will turn RED and blink rapidly after the projector is turned off, and the fan(s) will continue to operate for about 2 minutes to ensure that the system cools properly. (only supported under “Instant Resume” mode)
- It is now safe to unplug the power cord.
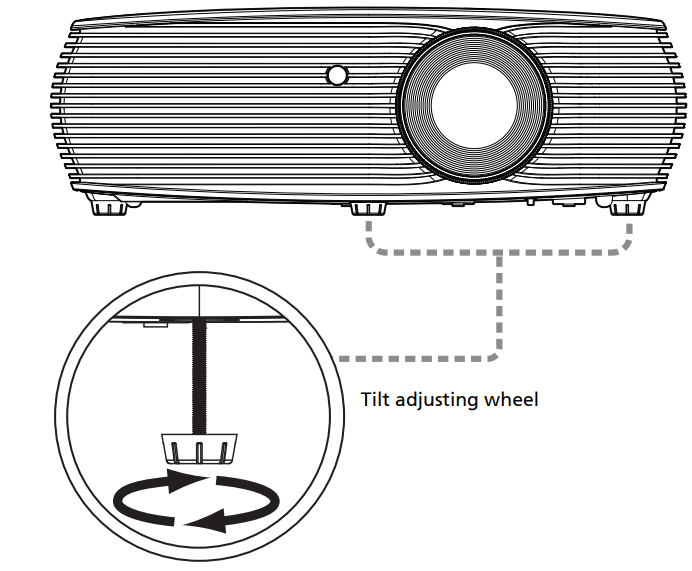
Adjusting the Projected Image
The projector is equipped with elevator feet for adjusting the height of the image.
To raise/lower the image:
Use the Tilt adjusting wheel to fine-tune the display angle.
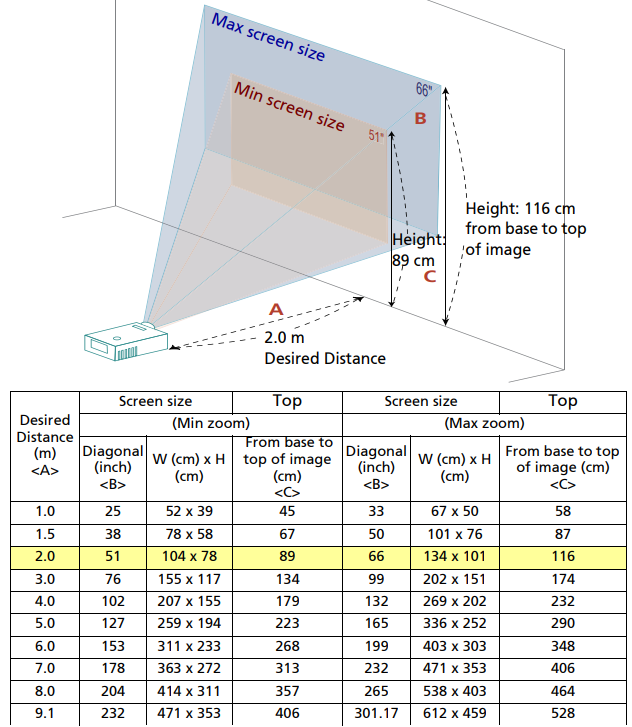
How to optimize image size and distance
Consult the table below to find the optimal image sizes achievable when the projector is positioned at a desired distance from the screen.
XGA series
If the projector is 2.0 m from the screen, good image quality is possible for image sizes between 51″ and 66.”
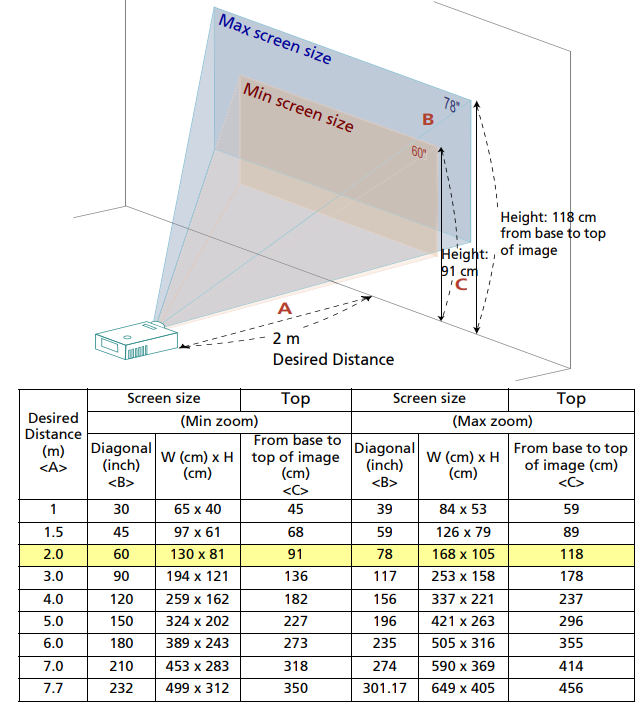
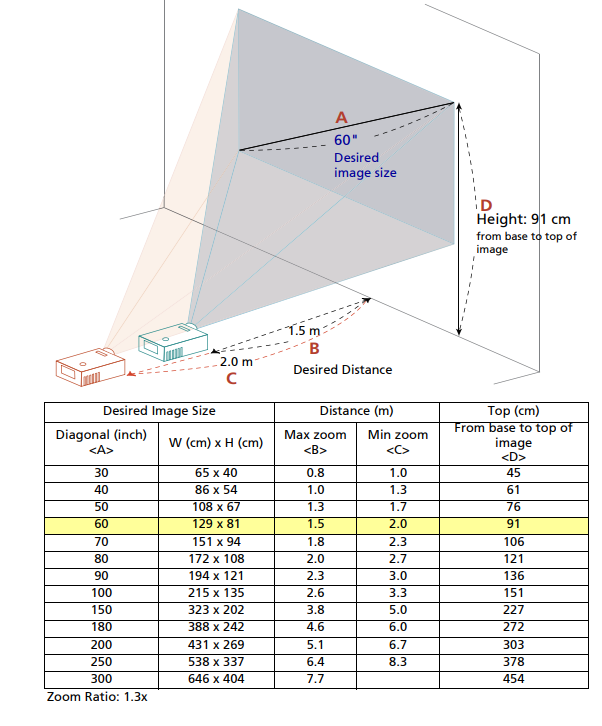
WXGA series
If the projector is 2 m from the screen, good image quality is possible for image sizes between 60″ and 78″.
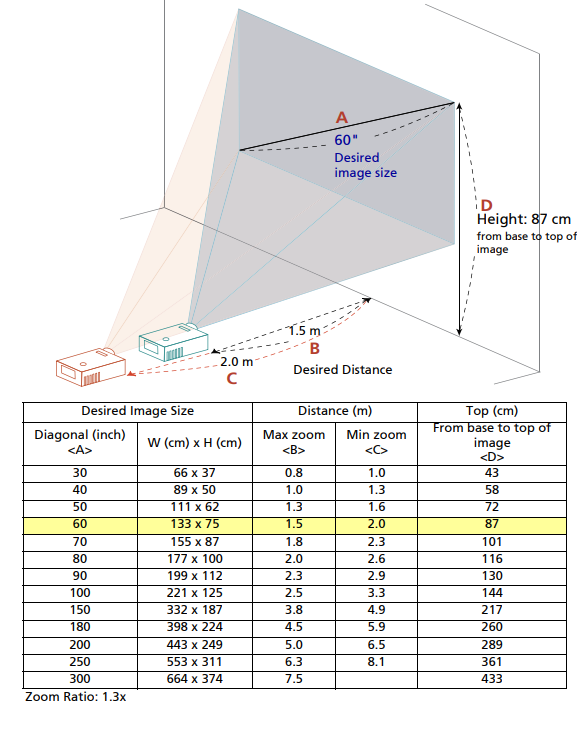
1080p series
If the projector is 2 m from the screen, good image quality is possible for image sizes between 61″ and 80″.

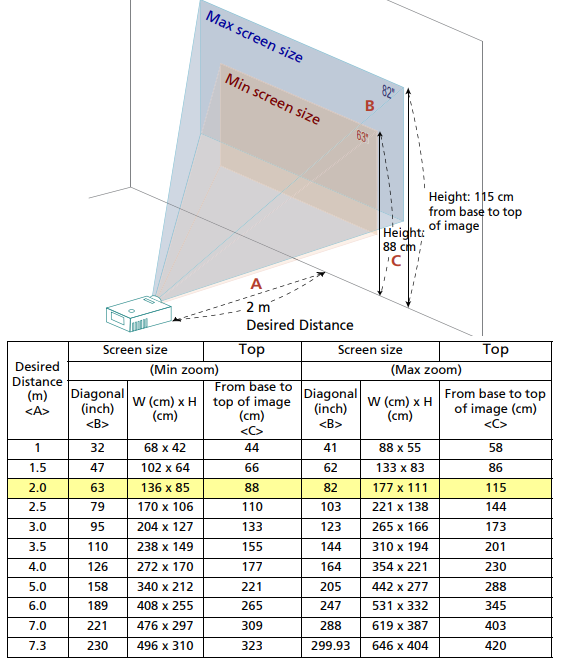
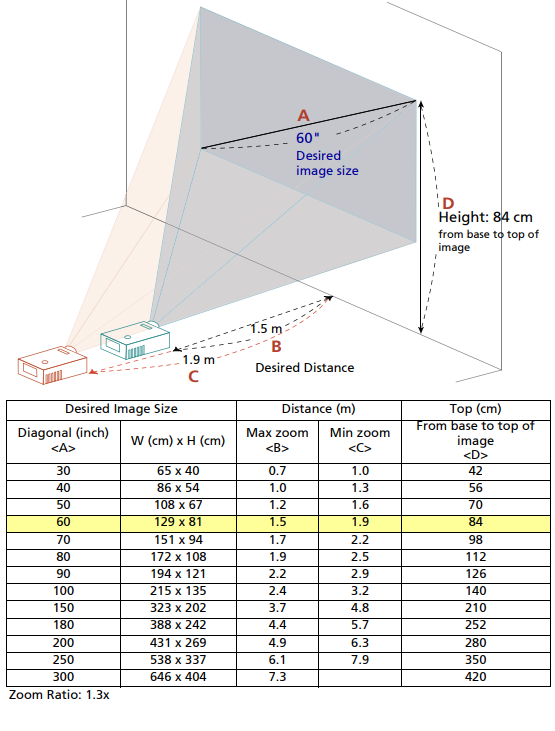
WUXGA series
If the projector is 2 m from the screen, good image quality is possible for image sizes between 63″ and 82″.
How to get a preferred image size by adjusting distance and zoom
The table below shows how to achieve a desired image size by adjusting either the position or the zoom ring.
XGA series
To obtain an image size of 60″, set the projector at a distance of 1.8 m or 2.4 m from the screen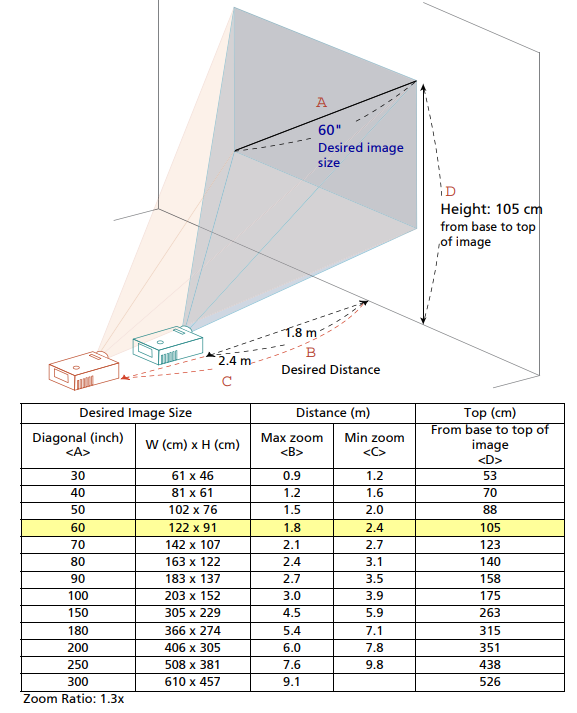
WXGA series
To obtain an image size of 60″, set the projector at a distance of 1.5 m or 2.0 m from the screen.
1080p series
To obtain an image size of 60″, set the projector at a distance of 1.5 m or 2.0 m from the screen.
WUXGA series
To obtain an image size of 60″, set the projector at a distance of 1.5 m or 1.9 m from the screen.
User Controls
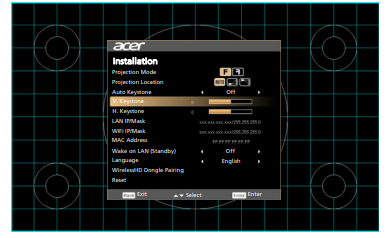
Installation menu
The installation menu provides an onscreen display (OSD) for projector installation and maintenance. Use the OSD only when the message “No signal input” is displayed on the screen.
The menu options include settings and adjustments for screen size and distance,
focus, keystone correction, and more.
- Turn on the projector by pressing the “Power” button on the control pad.
- Press the “MENU” button on the remote control to launch the OSD for projector installation and maintenance.

- The background pattern acts as a guide to adjusting the calibration and alignment settings, such as screen size and distance, focus, and more. The Installation menu includes the following options:
- Projection Mode
- Projection Location
- Auto Keystone settings
- Manual Keystone settings
- WirelessHD Dongle Pairing
- Language settings
- Push the “MENU” or “BACK” button anytime to exit the menu and return to the Acer welcome screen.
Onscreen Display (OSD) Menus
The projector has a multilingual OSD that allows you to make image adjustments and change a variety of settings.
Using the OSD menus
- To open the OSD menu, press “MENU” on the remote control or control panel.
- When the OSD is displayed, use the keys to select any item in the main menu. After selecting the desired main menu item, press “ENTER” to enter the submenu for feature setting.
- Use the keys to select the desired item and adjust the settings by using the keys.
- Select the next item to be adjusted in the submenu and adjust as described above.
- Press “BACK” on the remote control or control panel, and the screen will return to the main menu.
- To exit OSD, press “BACK” on the remote control or control panel. The OSD menu will close, and the projector will automatically save the new settings.
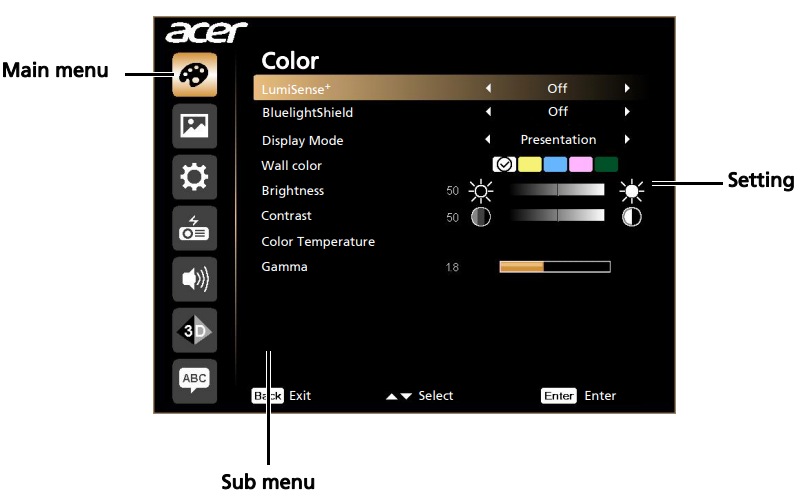
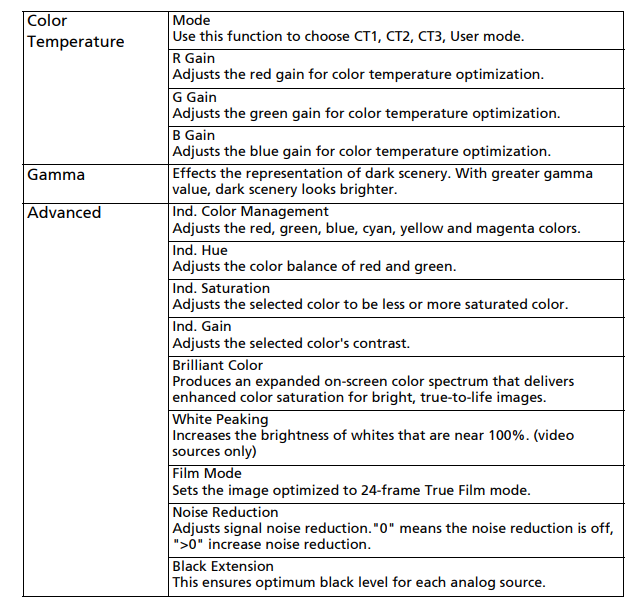
Color
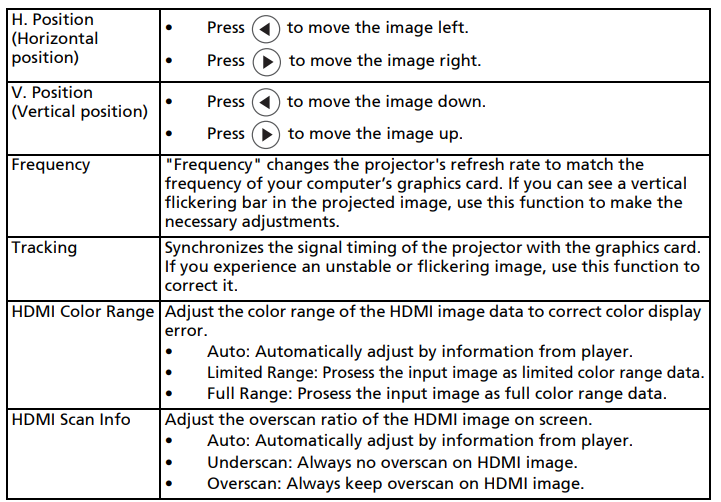
Image
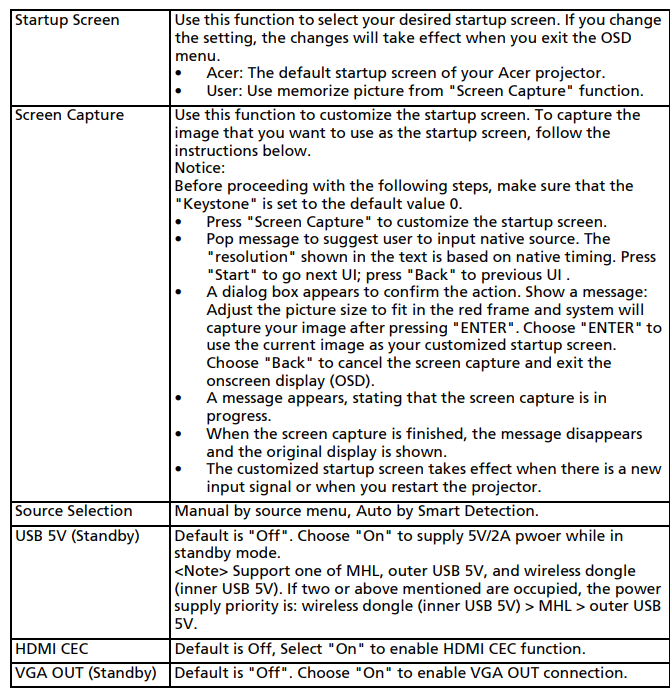
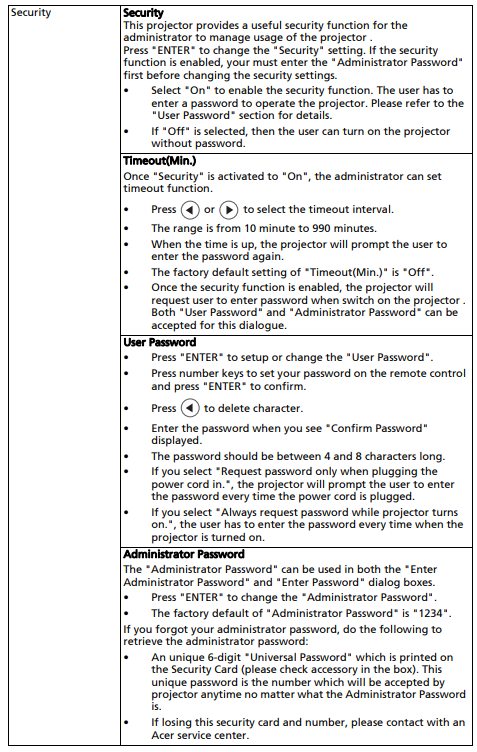
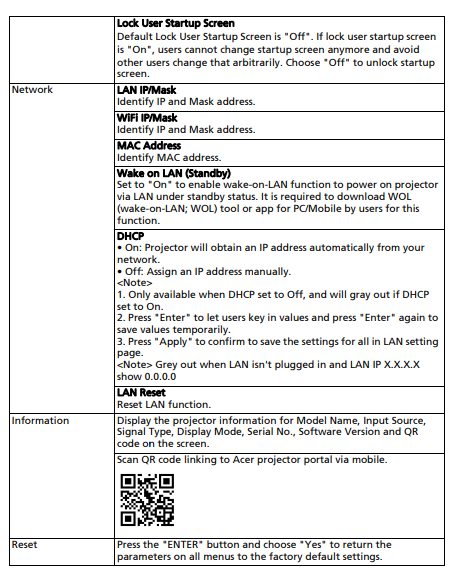
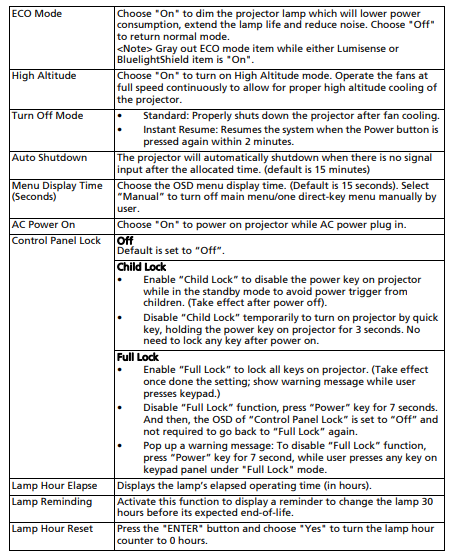
Setting


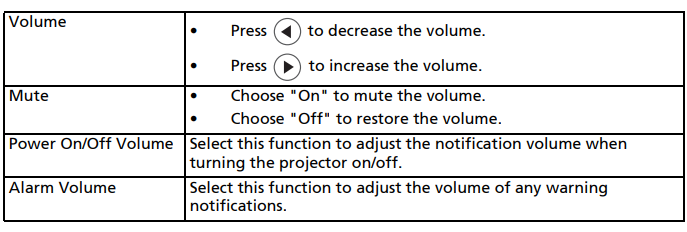
Management Audio.
3D
Language
Acer LAN webpage management
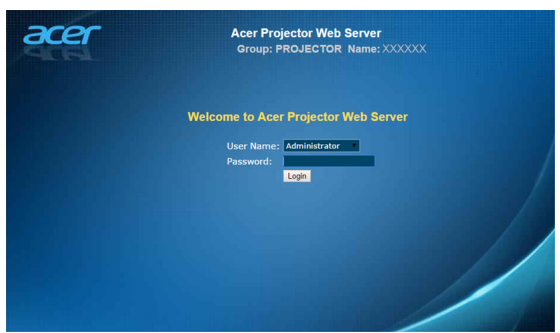
How to log in
Open a browser and enter the Server IP address 192.168.100.10 to find below homepage of acer LAN webpage management. A password is needed to log in before using. Select a user. Administrator is with high authority that can process more operations, such as network settings and alert settings. The default password of the administrator is “admin”. And the user is with normal authority with the default password for “user”. Click the Login button to enter the homepage with the correct password.
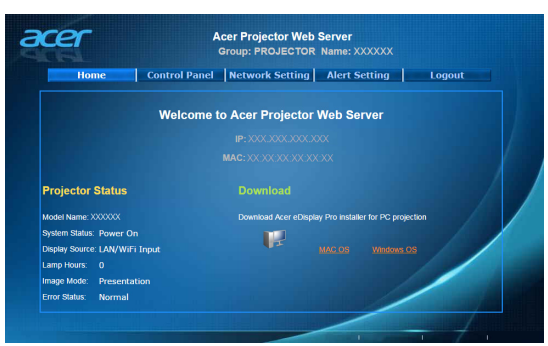
Home
The home page shows connection status, and you can find three main functions listed: Control Panel, Network Settings, and Alert Settings.
Control Panel
The end user can control and adjust the projector setting value via this page.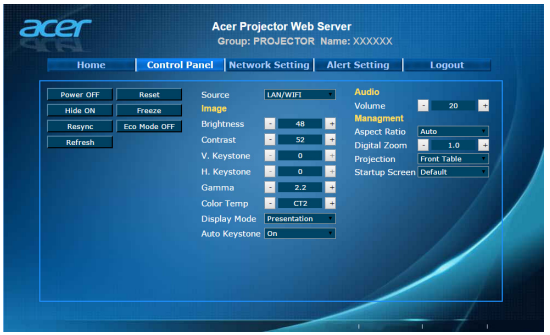
Network Setting
The end user can set the IP address, group name, and password as they wish. After changing network configurations or the password, the projector will reboot automatically after pressing “Apply”.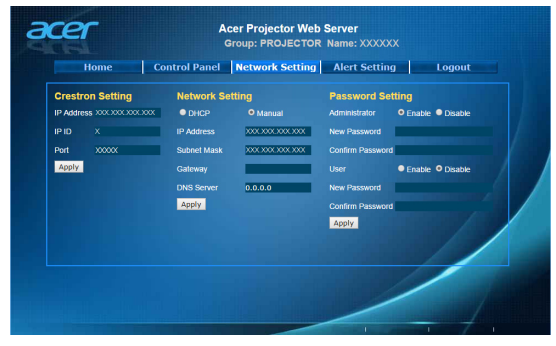
Alert Setting
The end user can send an email with an error message right away if the projector has a problem.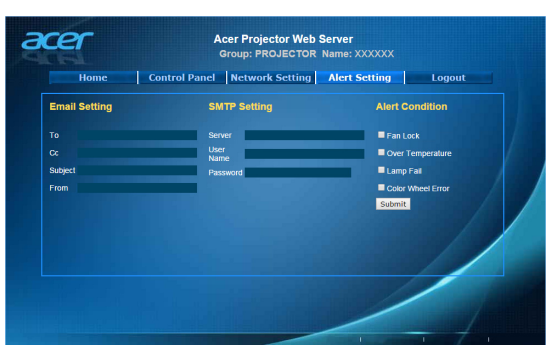
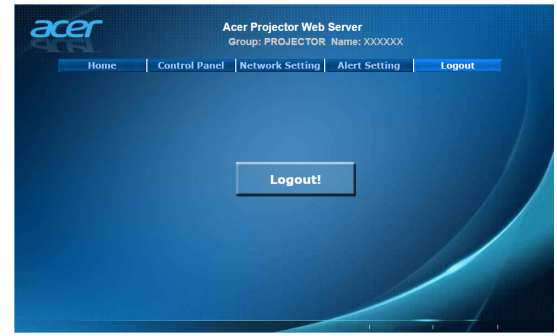
Logout
After tapping Logout, you will return to the login page within 5 seconds.
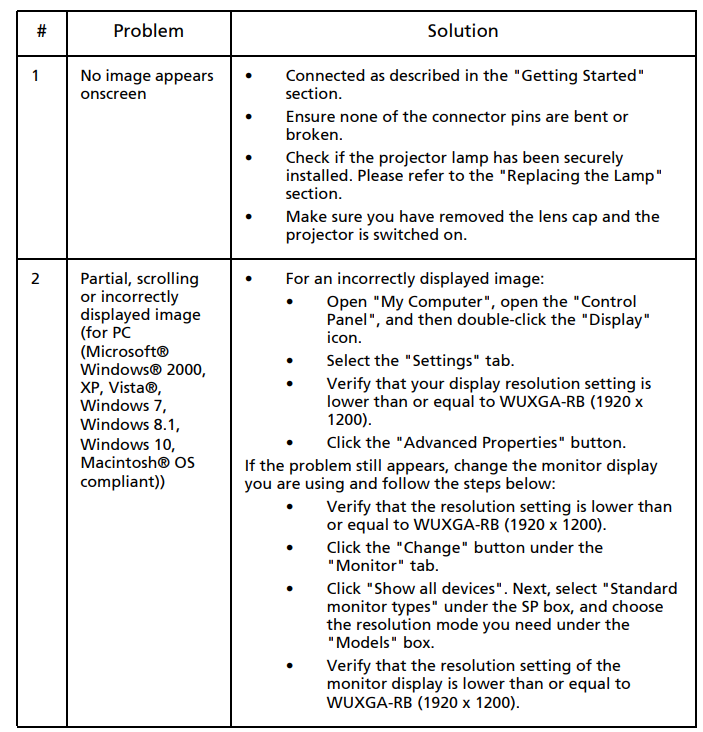
Troubleshooting
If you experience a problem with your Acer projector, refer to the following troubleshooting guide. If the problem persists, please contact your local reseller or service center.
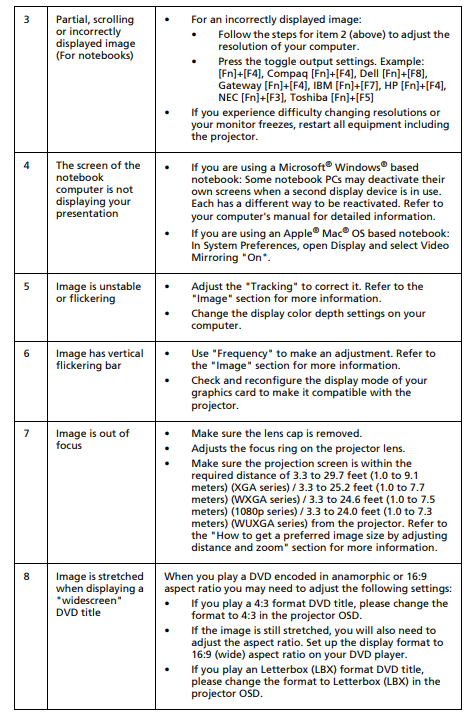
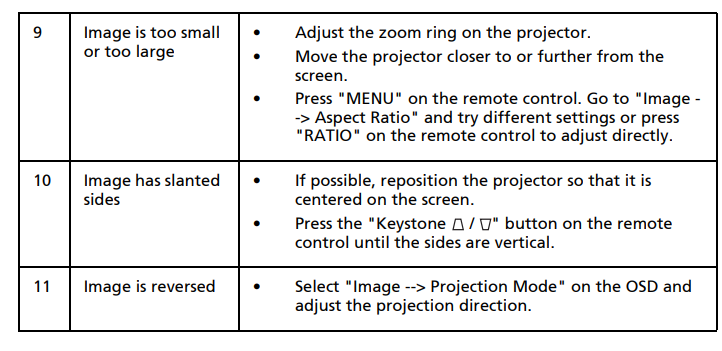
Image Problems and Solutions
OSD Messages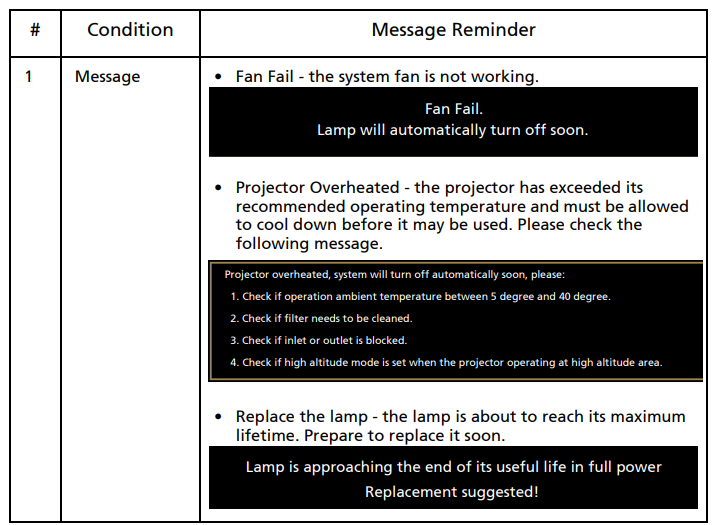
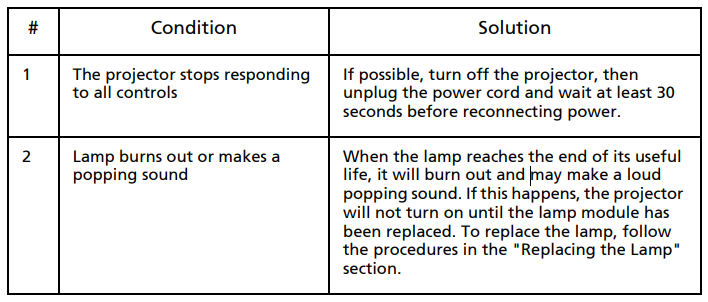
Problems with the Projector
LED & Alarm Definition Listing
LED Messages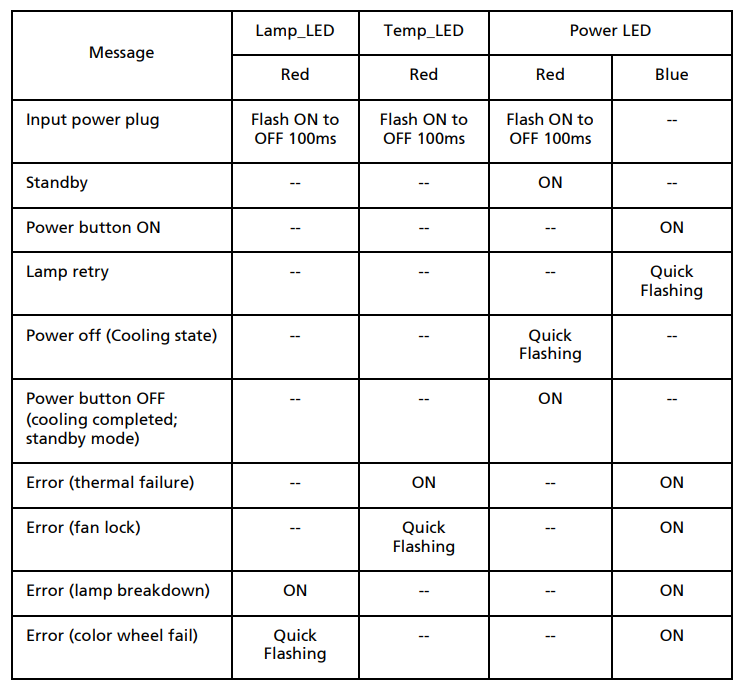
Replacing the Lamp
Use a screwdriver to remove the screw(s) from the cover, and then pull out the lamp. The projector will detect the lamp life. You will be shown a warning message, “Lamp is approaching the end of its useful life in full power operation. Replacement suggested! When you see this message, change the lamp as soon as possible. Make sure the projector has been cooling down for at least 30 minutes before changing the lamp.
To Change the Lamp
Turn off the projector by pressing the Power button. Allow the projector at least 30 minutes to cool down. Disconnect the power cord.
- Use a screwdriver to remove the screw from the cover. (Illustration #1) Push in the direction of the arrow. (Illustration #2) Push up the cover. (Illustration #3)
- Remove the screw that secures the lamp module. (Illustration #4) Pull out the lamp plug. (Illustration #5) Lift the handle so that it stands up. (Illustration #6)
- Lift the handle so that it stands up. Pull out the lamp module by force. (Illustration #7) To replace the lamp module, use a new lamp and reverse the above steps.
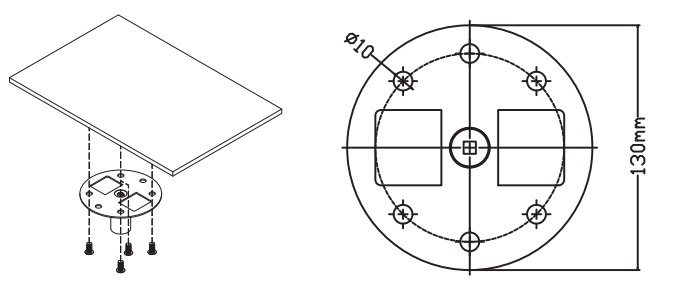
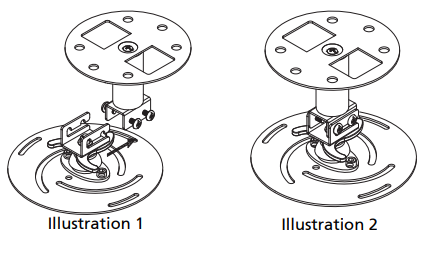
Ceiling Mount Installation
- If you wish to install the projector using a ceiling mount, please refer to the steps below:
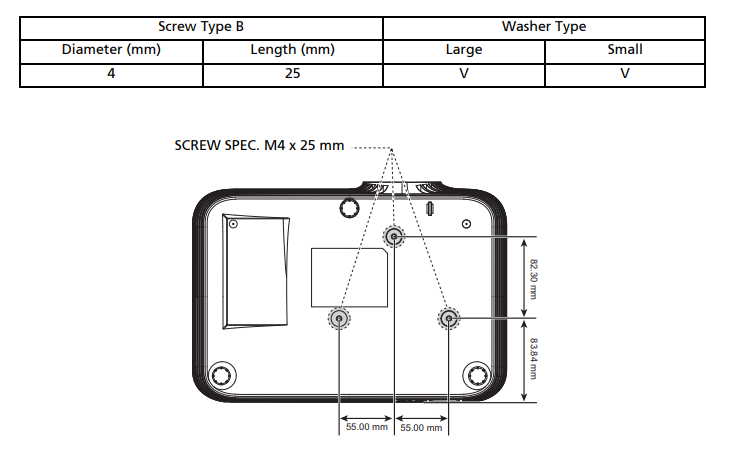
- Drill four holes into a solid, structural ceiling member, and secure the ceiling mount base to the ceiling.

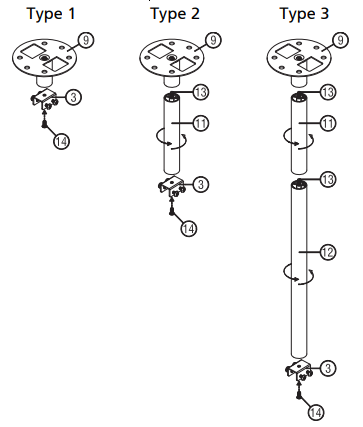
- Choose the length combination based on the actual environment. (CM-01S doesn’t include Type 2 and Type 3.)

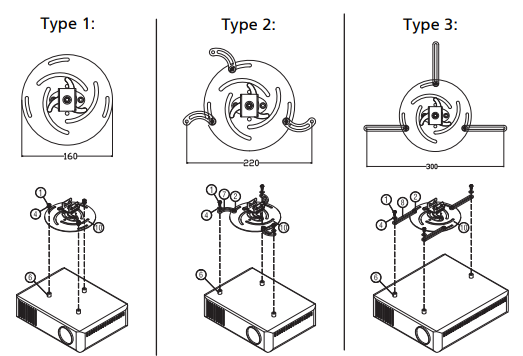
- Type 1: English. For the standard size, use three bracket screws to mount the projector to the ceiling mount bracket. Type 2 and Type 3: Alternatively, for the larger size, use the sliding extensions for more supports.

- Connect the main body connector to the projector bracket (illustration 1), and then screw in four screws (illustration 2).

- Adjust the angle and positioning as necessary.


- Drill four holes into a solid, structural ceiling member, and secure the ceiling mount base to the ceiling.

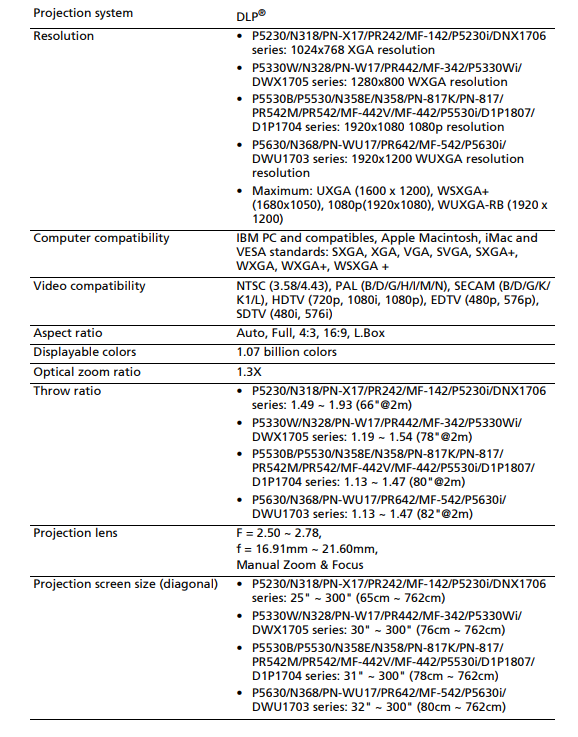
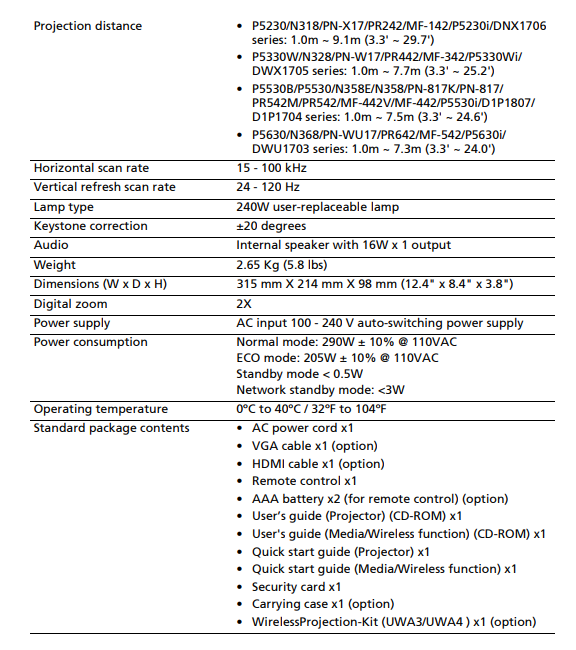
Specifications
The specifications listed below are subject to change without notice. For final specs, please refer to Acer’s published marketing specifications.
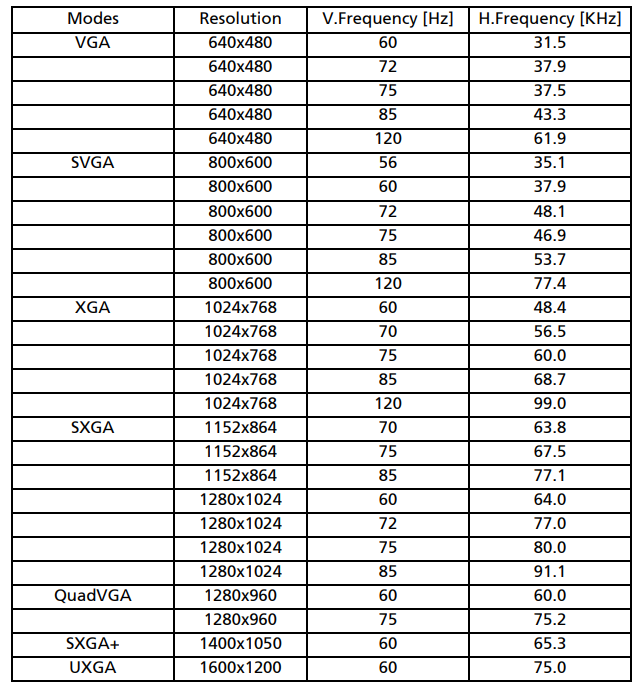
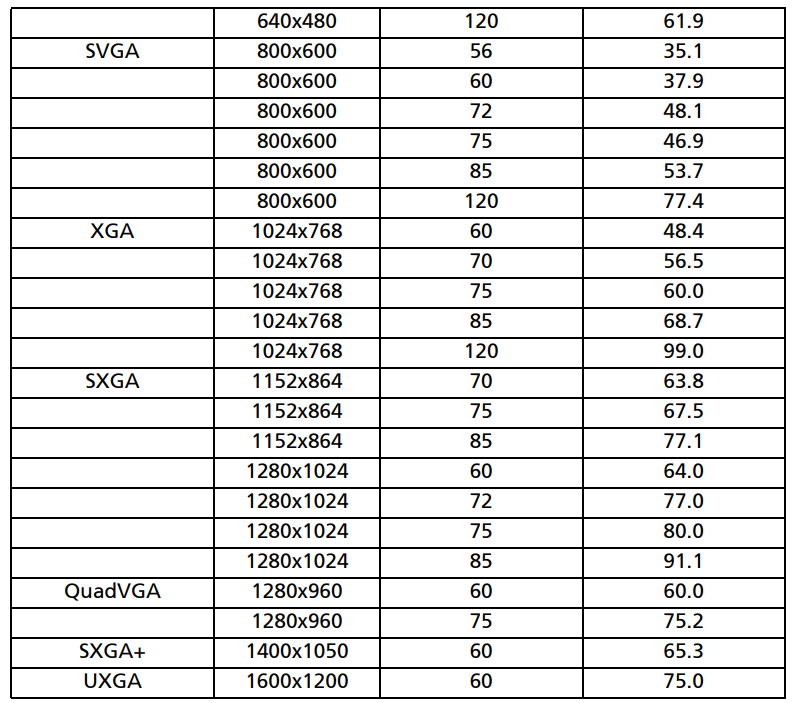
Compatibility modes
A. VGA Analog
- VGA Analog – PC Signal

- VGA Analog – Extended Wide timing

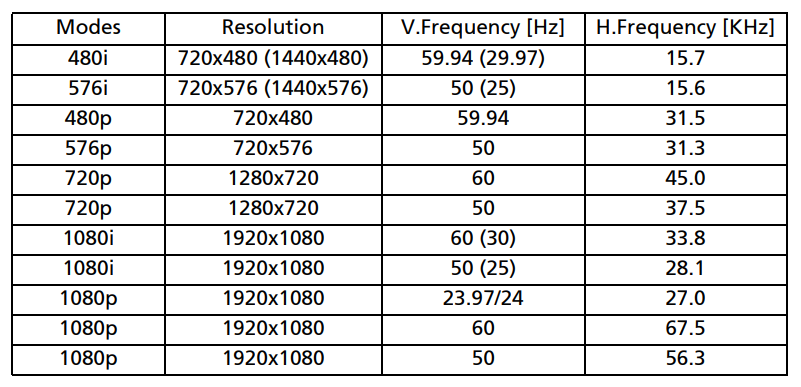
- VGA Analog -Component Signal

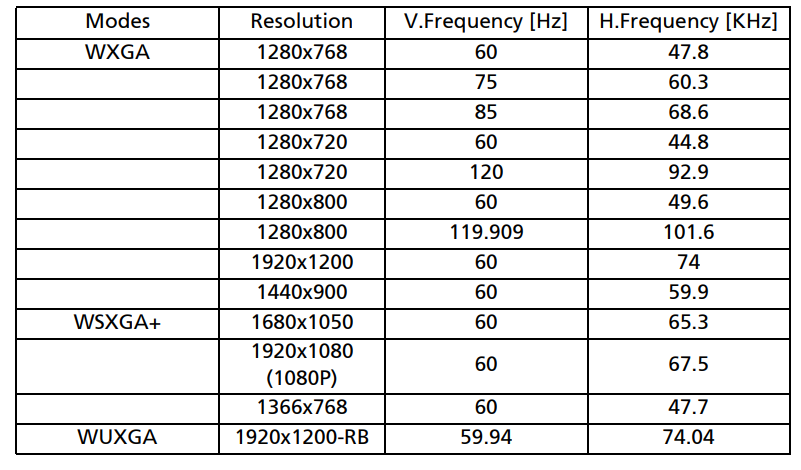
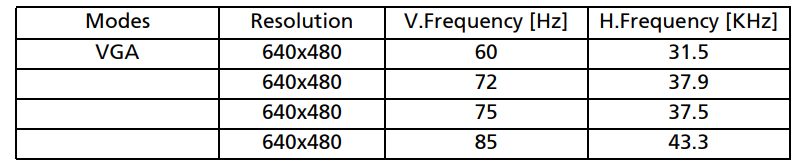
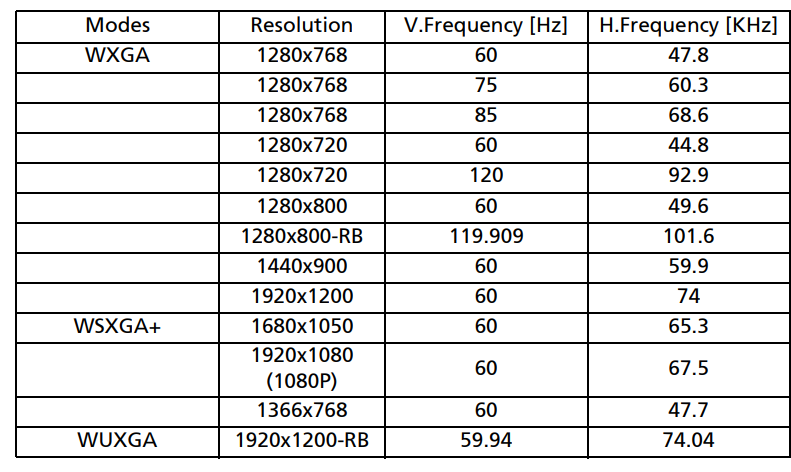
B. HDMI Digital
- HDMI – PC Signal


- HDMI – Extended Wide timing

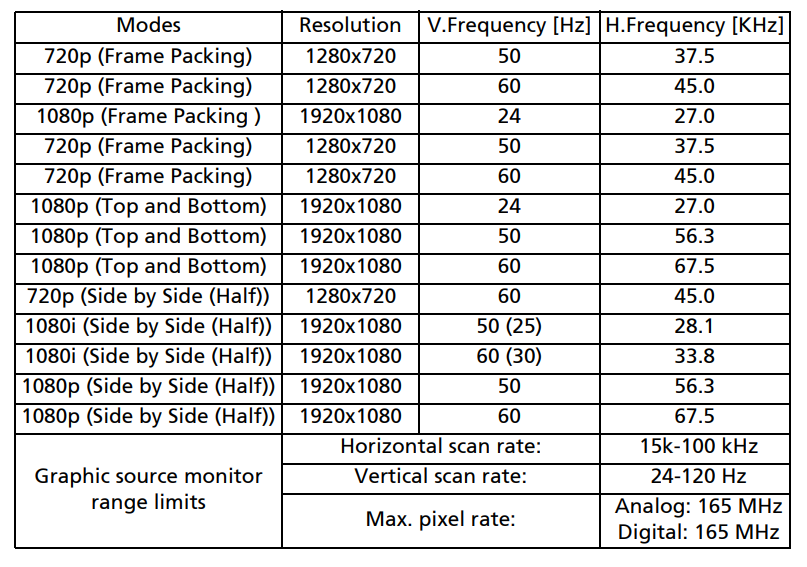
- HDMI – Video Signal

- HDMI – 1.4a 3D Timing


FCC
This device has been tested and found to comply with the limits for a Class B digital device pursuant to Part 15 of the FCC rules. These limits are designed to provide reasonable protection against harmful interference in a residential installation. This device generates, uses, and can radiate radio frequency energy and, if not installed and used in accordance with the instructions, may cause harmful interference to radio communications. However, there is no guarantee that interference will not occur in a particular installation. If this device does cause harmful interference to radio or television reception, which can be determined by turning the device off and on, the user is encouraged to try to correct the interference by one or more of the following measures:
- Reorient or relocate the receiving antenna.
- Increase the separation between the device and receiver.
- Connect the device into an outlet on a circuit different from that to which the receiver is connected.
- Consult the dealer or an experienced radio/television technician for help.
Remarque à l’intention des utilisateurs canadiens
Cet appareil numérique de la classe B est conforme à la norme NMB-003 du Canada. Compliant with Russian regulatory certification
General
This product complies with the radio frequency and safety standards of any country or region in which it has been approved for wireless use. Depending on configurations, this product may or may not contain wireless radio devices (such as wireless LAN and/or Bluetooth modules). Canada — Low-power license-exempt radio communication devices (RSS-247). A common information Operation is subject to the following two conditions:
- This device may not cause interference, and
- This device must accept any interference, including interference that may cause undesired operation of the device. Operation in the 2.4 GHz band. To prevent radio interference to the licensed service, this device is intended to be operated indoors, and installation outdoors is subject to licensing.
List of applicable countries
This device must be used in strict accordance with the regulations and constraints in the country of use. For further information, please contact the local office in the country of use. Please see http://ec.europa.eu/enterprise/rtte/implem.htm for the latest country list.
Federal Communications Commission
Declaration of Conformity
This device complies with Part 15 of the FCC Rules. Operation is subject to the following two conditions: (1) this device may not cause harmful interference, and (2) this device must accept any interference received, including interference that may cause undesired operation.
The following local Manufacturer / Importer is responsible for this declaration:
Customer Support
- Product: DLP Projector
- Model Number: DWU1703/D1P1807/D1P1704/DWX1705/DNX1706
- Machine Type: P5630/P5530B/P5530/P5330W/P5230/N368/N358E/N358/N328/N318/PN-WU17/PN-817K/PN-817/
- PN-W17/PN-X17/PR642/PR542M/PR542/PR442/
- PR242/MF-542/MF-442V/MF-442/MF-342/MF-142/ P5630i/P5530i/P5330Wi/P5230i
- Name of Responsible Party: Acer America Corporation
- Address of Responsible Party: 333 West San Carlos St.
- Suite 1500 San Jose, CA 95110
- U. S. A.
- Contact Person: Acer Representative
- Phone No.: 254-298-4000
- Fax No.: 254-298-4147
2 Comments
Pingback: InFocus LitePro 610 Projector Manual & Setup Guide
Pingback: Valerion VisionMaster Max Triple Laser Projector Manual