


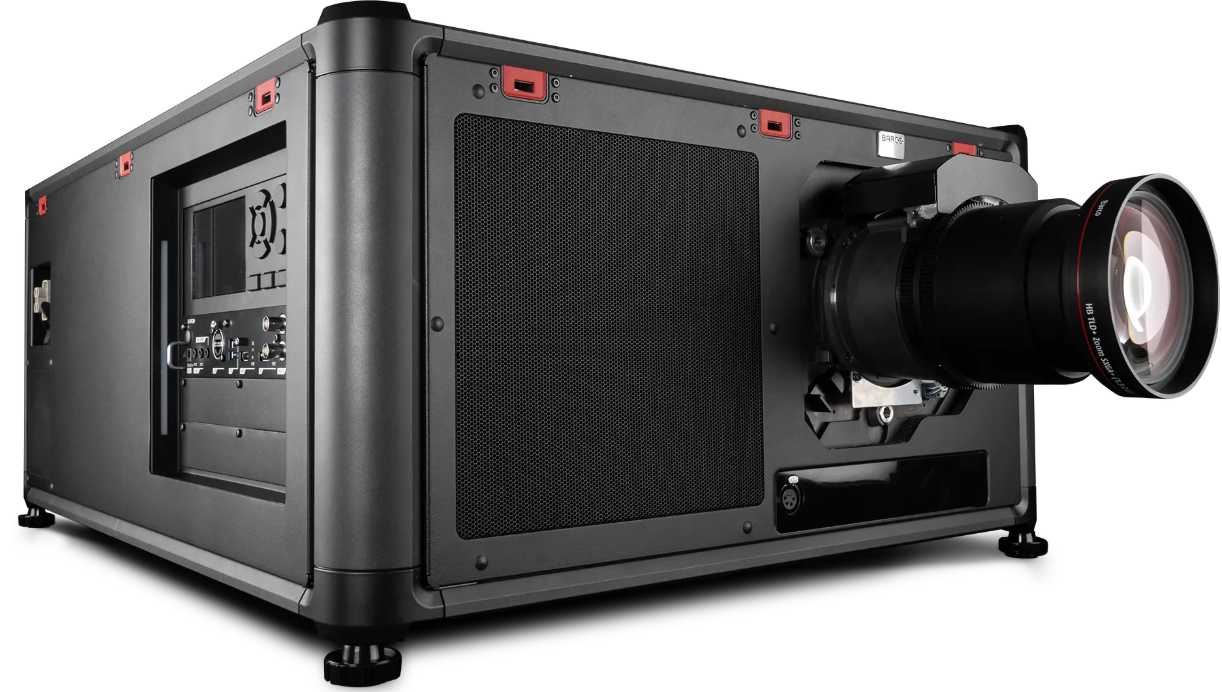
BARCO QDX Rental Laser Projectors
Quick Start Guide
Environment conditions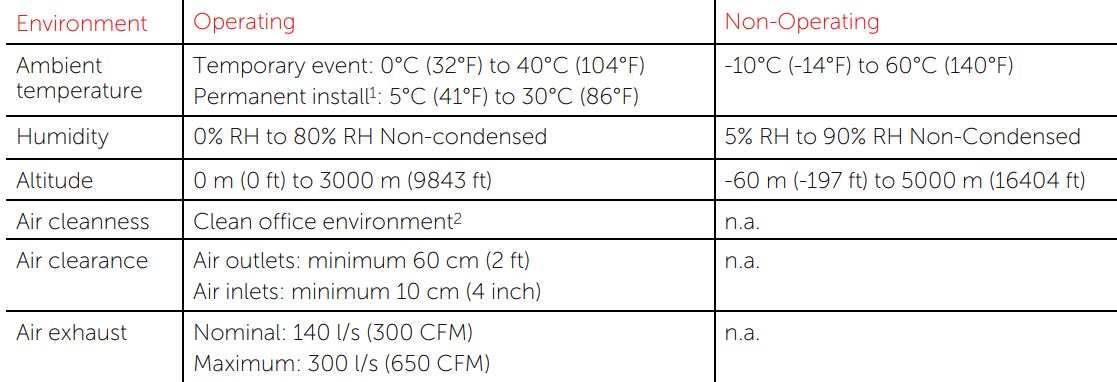
Main Power Requirements
- The projector operates from a nominal mono-phase power net with a separate earth ground PE.
- Power requirements: 100-160 V (reduced power) / 200-240 V~, 22 A, 50/60 Hz.
- The projector must be grounded.
- The power cord delivered with the projector must be used.
Local keypad overview
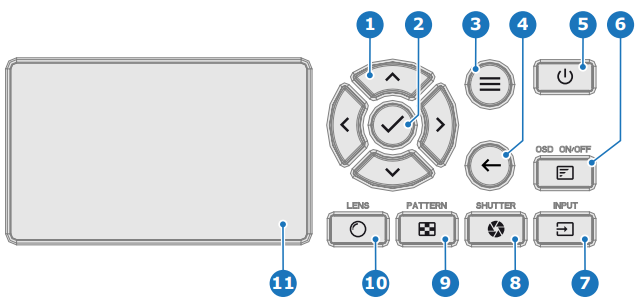
- Navigation
- Confirmation
- Menu enter/exit
- Menu back
- Power On/Off
- OSD On/Off
- Input selection
- Shutter open/close
- Test patterns
- Lens menu
- LCD touch panel
Pulse Remote Control Unit
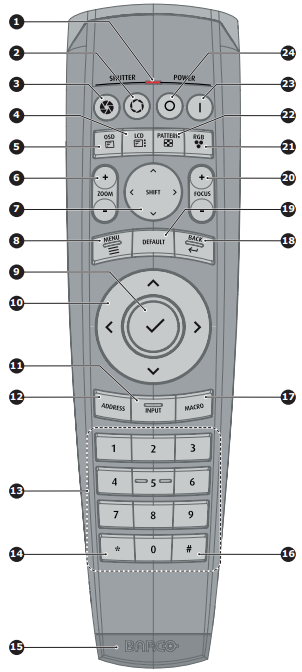
- Button indicator
- Shutter open
- Shutter close
- LCD panel on / off
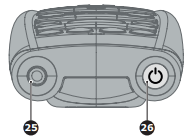
- Project OSD on / off
- Lens zoom
- Lens shift
- Menu open/close
- Menu selection, OK button
- Menu navigation
- Input selection
- Address button
- Numeric buttons
- Backspace
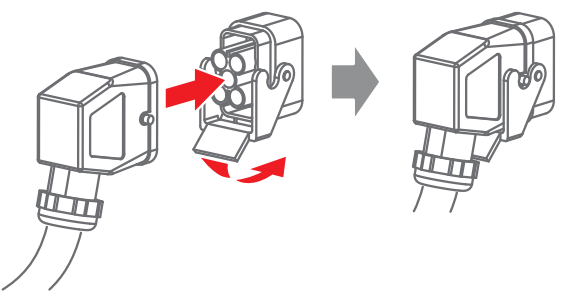
- XLR connector
- Decimal mark
- Macro button
- Menu back
- Default value button
- Lens focus
- RGB filter
- Test patterns
- Power on
- Power off
- 3.5 mm jack
- RCU on / off
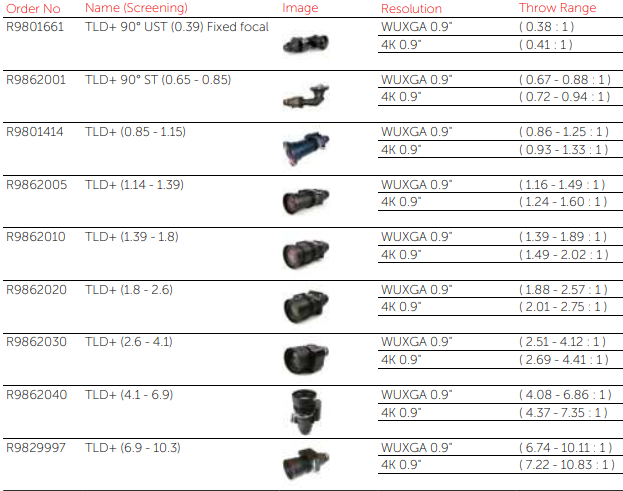
Available Lenses for the QDX Projector
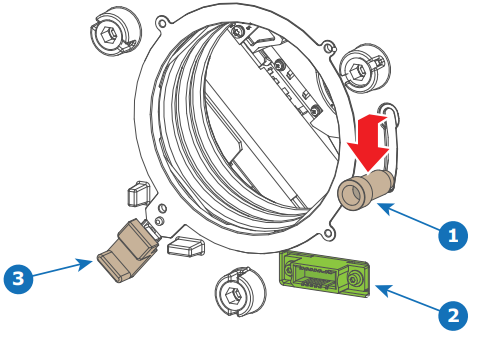
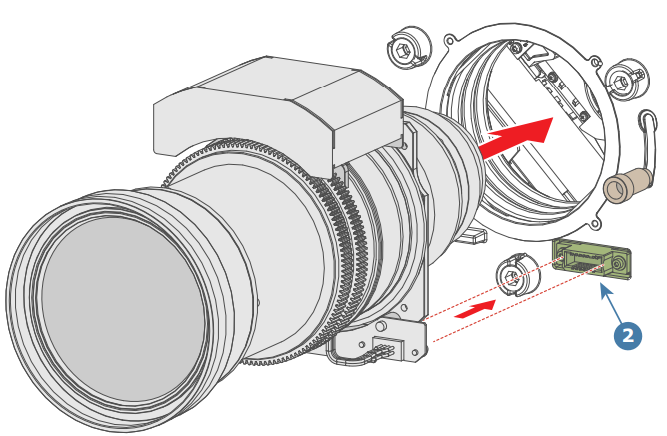
Install the projection lens.
- Place the lens holder in the “unlocked” position as follows:
- Pull the primary lens lock handle (reference 1) outward and then towards the electrical socket (reference 2).
- Pull the secondary lens lock (reference 3) slightly outwards until you hear an audible clicking sound.

- Gently insert the projection lens in the lens holder while aligning the lens connector with the electrical socket (reference 2) until a click is heard.

- Secure the lens by sliding the primary lens lock handle to the “locked” position.

- Check if the projection lens is secured by trying to pull the projection lens out of the lens holder.
Power up the projector
- Connect the power cord to the power inlet of the projector.

- Turn the mains switch to on ( I ). The projector will perform the startup sequence. When ready, the power button on the local keypad will illuminate white, meaning that the projector is in READY mode.
- Press the Power On/Off button on the local keypad, or the Power On button on the remote control. The power button will, after some seconds, illuminate solid blue, meaning that the projector is ON.


Button backlight status
The Power and Shutter buttons are equipped with white, blue, and red backlit LEDs. The other keys are only equipped with white and blue backlit LEDs. The LEDs are controlled according to the features available.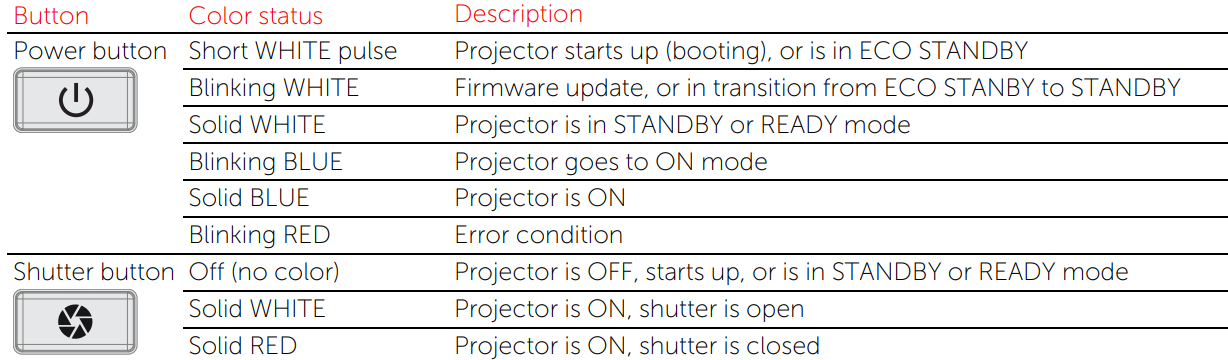 Connecting with Pulse Prospector
Make sure both the connected device (e.g., laptop) and the projector operate within the same network (or have full access to the projector network).
- Open a browser and enter the IP address of the projector (the default projector IP address is 192.168.1.101). Tip: The projector IP address is visible on the Dashboard of the projector LCD touch panel.
- Log in using your username and password. See the following table for default user names and passwords.


Front panel Control & Communication module
- 12V DC
- TRIGGER
- WIRED REMOTE
- LAN
- USB
- HDMI™
- DP
- SYNC I/O
- Projector status LEDs
- IR receiver
Panel Quad Combo Input Mk

- HDMI™ input4
- Quad SDI channel A: 3G/12G input
- Quad SDI channel B: 3G/12G input
- Quad SDI channel C: 3G/12G input/output
- Quad SDI channel D: 3G/12G input/output
- DMX interface input
- DMX interface output
- XLR for wired projector control
- HDBaseT input
Quad DP 1.2 input
- Quad DisplayPort channel A input
- Quad DisplayPort channel B input
- Quad DisplayPort channel C input
- Quad DisplayPort channel D input


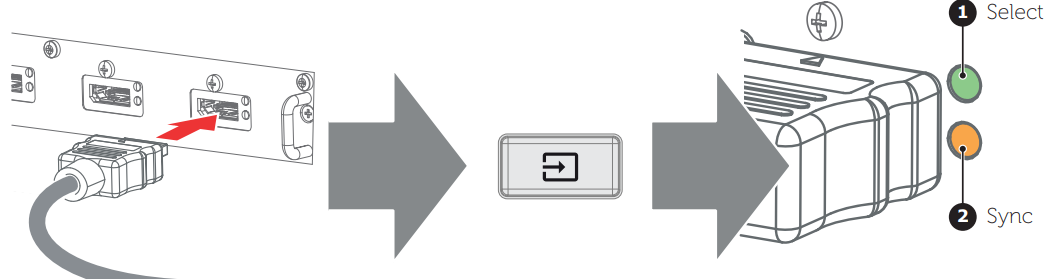
Connect and select the source
- Connect available sources to the appropriate input ports.
- Select a connected source. (See Pulse OSD user guide for detailed menu navigation steps.
- Select LED (reference 1)
- GREEN: port configured as input. The image appears on the screen.
- Blinking GREEN: bidirectional port configured as output / loop-through.
- Sync LED (reference 2)
- YELLOW: sync/signal is present.
- Blinking YELLOW: Sync/signal is present, but does not conform to the input port standard.

Adjust
- Adjust the lens settings by pressing the lens menu button on the keypad or via the zoom, shift, and focus buttons on the keypad.
- Orientation of the unit is set as standard in table front projection mode. Change the projector setup in the Installation > Position > Orientation menu.
- For Advanced adjustments like Warping, Light management, etc.,s ee the Pulse OSD user guide.
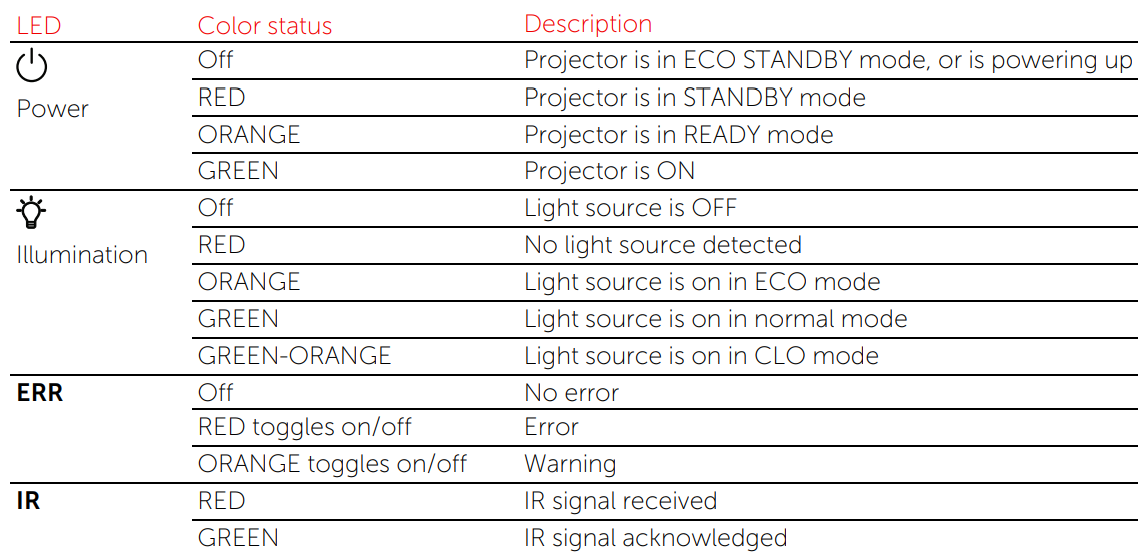
Projector status indicator LEDs
The Control & Communication module contains four status LEDs on the right side of the front panel. These LEDs allow a quick status analysis of the projector. For explanatory see the table hereunder.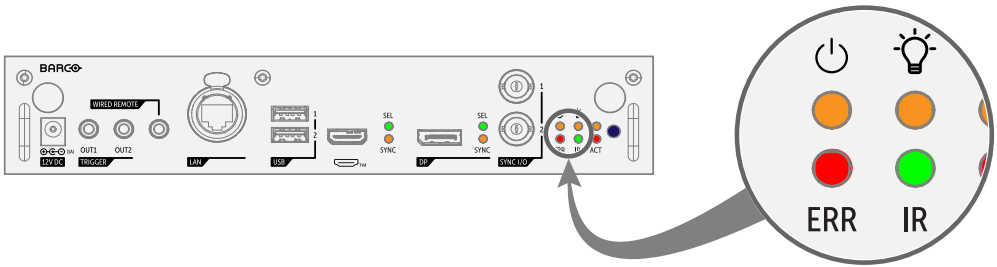
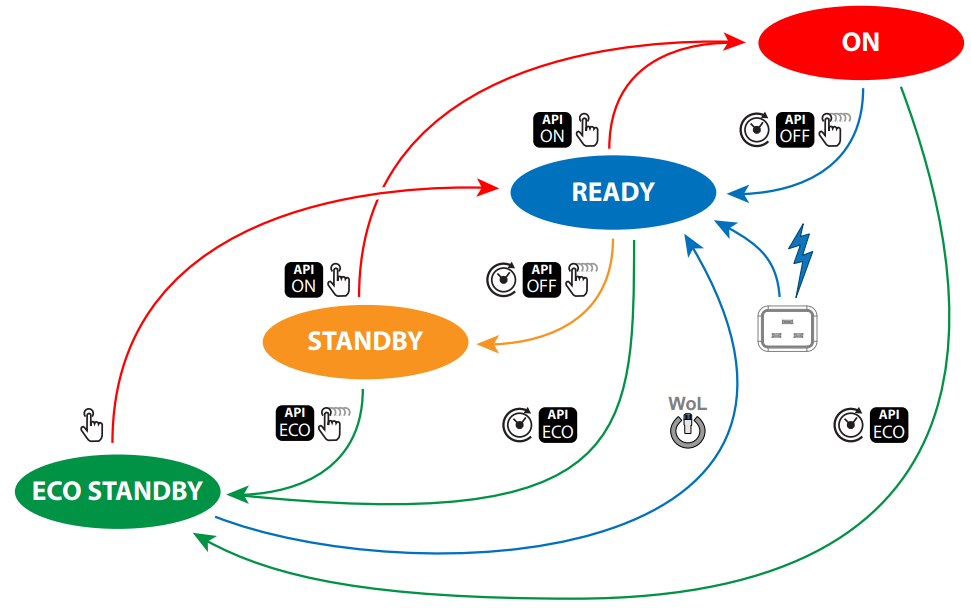
Power down the projector
- While the projector is in ON mode, press and hold the Power On/Off button on the local keypad, or the Power Off button on the remote control, to shut down the light source of the projector. The power button illumination will become white, and the projector will enter the cool-down mode for approximately 30 seconds.

- While the projector is in READY mode, press and hold the Power On/Off button on the local keypad, or the Power Off button on the remote control, to bring the projector into STANDBY mode.
- While the projector is in STANDBY mode, press and hold the Power On/Off button on the local keypad, or the Power Off button on the remote control, to bring the projector into the ECO STANDBY mode.

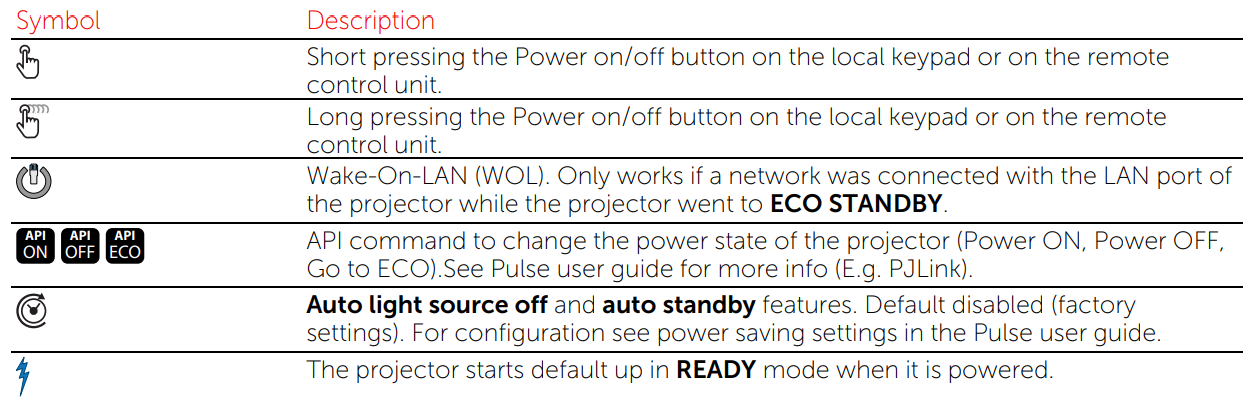
Power transition diagram
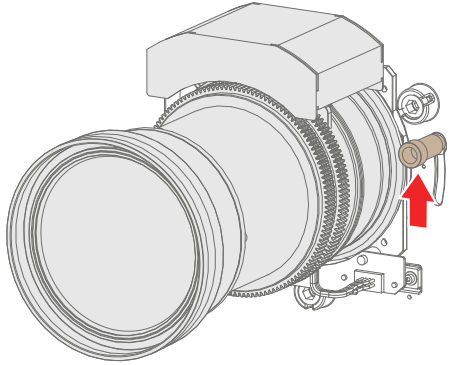
Remove the Projection Lens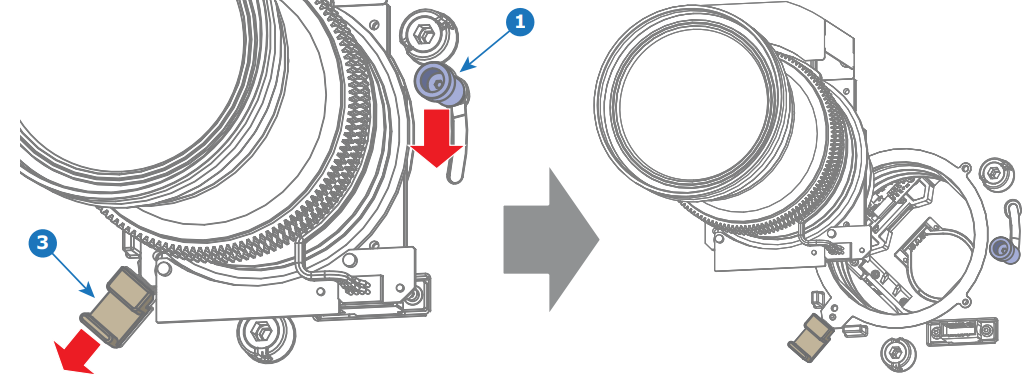
- Support the projection lens with one hand while unlocking the lens holder as follows:
- Place the primary lens lock handle (reference 1) in the “unlocked” position.
- Pull the secondary lens lock (reference 3) outwards.
- Gently pull the projection lens out of the lens holder.
Customer Service
- Website: https://www.barco.com/
- Tel: +61 3 7065 4412