


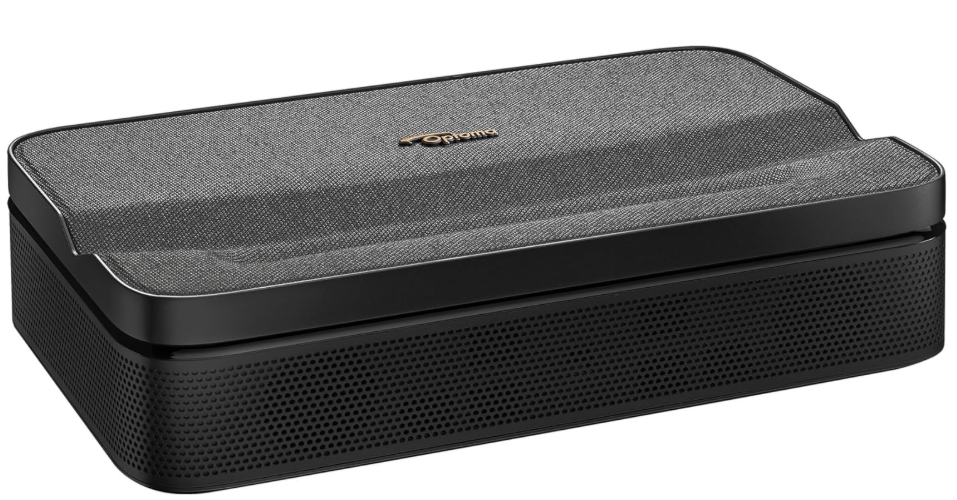
Optoma ML1080UST Home Theater Projector
Safety Instruction
- To ensure reliable operation of the projector and to protect it from overheating, it is recommended to install the projector in a location that does not block ventilation.
- As an example, do not place the projector on a crowded coffee table, sofa, bed, etc.
- Do not put the projector in an enclosure such as a bookcase or a cabinet that restricts air flow.
- To reduce the risk of fire and/or electric shock, do not expose the projector to rain or moisture.
- Storage and transportation ambient temperature: -10°C ~ 50°C
- Altitude is not higher than 5000m (air pressure not less than 80kPa)
- The projector may fall over, resulting in injury, or the projector may become damaged.
- Do not block the light coming out of the projector lens when in operation.
- Please do not open or disassemble the projector, as this may cause electric shock.
- Opening or removing covers may expose you to dangerous voltages or other hazards.
Laser Radiation Safety Information
- Notice is given to supervise children and to never allow them to stare into the projector beam at any distance from the projector.
- This projector has a built-in Class module. Disassembly or modification is very dangerous and should never be attempted.
- Any operation or adjustment not specifically instructed by the user’s guide creates the risk of hazardous laser radiation exposure. Notice is given to use caution when using the remote control for starting the projector while in front of the projection lens.
- When turning on the projector, make sure no one within projection range is looking at the lens.
Disclaimer
The information in this document is subject to change without notice. The manufacturer makes no representations or warranties with respect to the contents hereof and specifically disclaims any implied warranties of merchantability or fitness for any particular purpose. The manufacturer reserves the right to revise this publication and to make changes from time to time in the content hereof without the manufacturer’s obligation to notify any person of such revision or changes.
Operation Conditions
This device complies with Part 15 of the FCC Rules. Operation is subject to the following two conditions:
- This device may not cause harmful interference and
- This device must accept any interference received, including interference that may cause undesired operation.
Declaration of Conformity for EU Countries
- EMC Directive 2014/30/EU (including amendments)
- Low Voltage Directive 2014/35/EU
- RED 2014/53/EU (if product has RF function)
RF Frequency Range
- Bluetooth: 2402MHz – 2480MHz
- 2.4GHz Wi-Fi: 2412MHz – 2472MHz
- 5GHz Wi-Fi: 5150MHz-5250MHz, 5250MHz-5350MHz, 5470MHz-5725MHz,5725MHz-5850MHz
RF EIRP
Bluetooth: EIRP <20dBm 2.4GHz Wi-Fi: EIRP <20dBm 5GHz Wi-Fi:
- 5150-5250MHz: EIRP <23dBm
- 5250-5350MHz: EIRP <20dBm
- 5470-5725MHz: EIRP <20dBm
- 5725-5850MHz: EIRP <13.98dBm
WLAN Function Restriction
This device complies with relevant RF radiation exposure limits when positioned at least 20cm away from your body.
Cleaning the Lens
- Before cleaning the lens, be sure to turn off the projector and unplug the power cord to allow it to completely cool down.
- Use a compressed air tank to remove the dust.
- Use a special cloth for cleaning the lens and gently wipe the lens. Do not touch the lens with your fingers.
Do not use alkaline/acid detergents or volatile solvents such as alcohol for cleaning the lens. If the lens is damaged due to the cleaning process, it is not covered by the warranty.
Introduction
Thank you for purchasing an Optoma laser projector. For the full list of features, please visit the product page on our website, where you will also find additional information and documentation, such as FAQs.
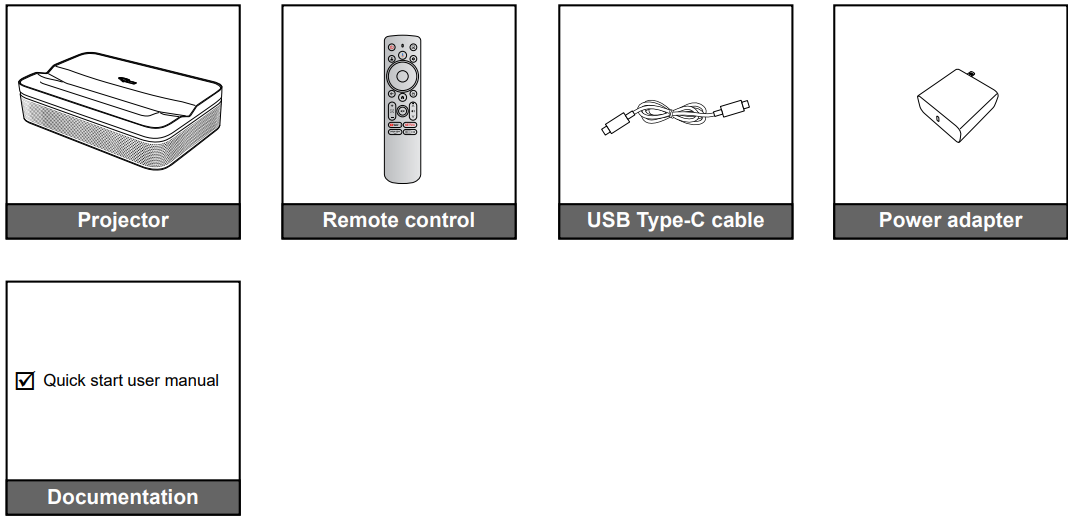
Package Overview
Carefully unpack and verify that you have the items listed below under standard accessories. Some of the items under optional accessories may not be available depending on the model, specification, and your region of purchase. Please check with your place of purchase. Some accessories may vary from region to region. The warranty card is only supplied in some specific regions. Please consult your dealer for detailed information.
Standard accessories
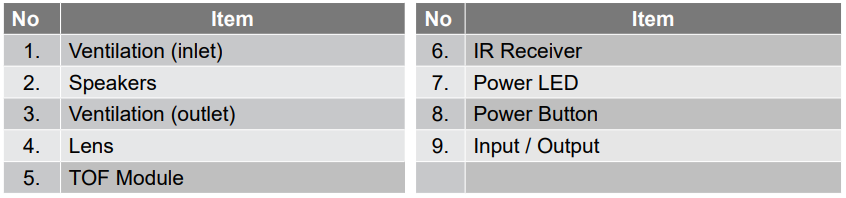
Product Overview

- Do not block the projector intake and exhaust vents.
- When operating the projector in an enclosed space, allow at least 15 cm clearance around the intake and exhaust vents.

Connections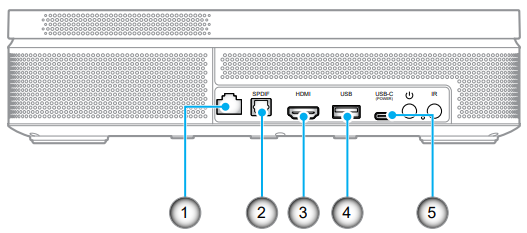

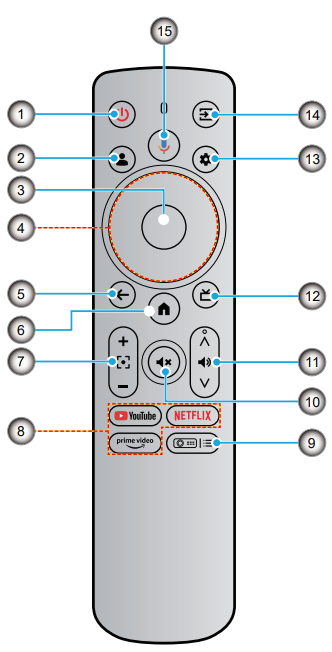
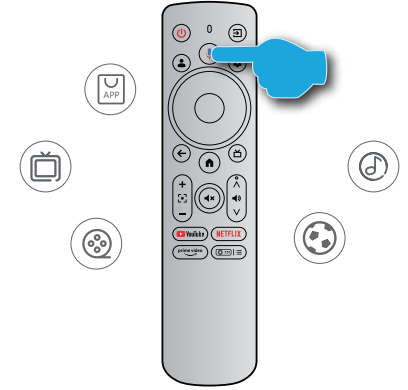
Remote Control

Setup and Installation
Installing the Projector
Your room layout or personal preference will dictate which installation location you select. Take into consideration the size and position of your screen, the location of a suitable power outlet, as well as the location and distance.
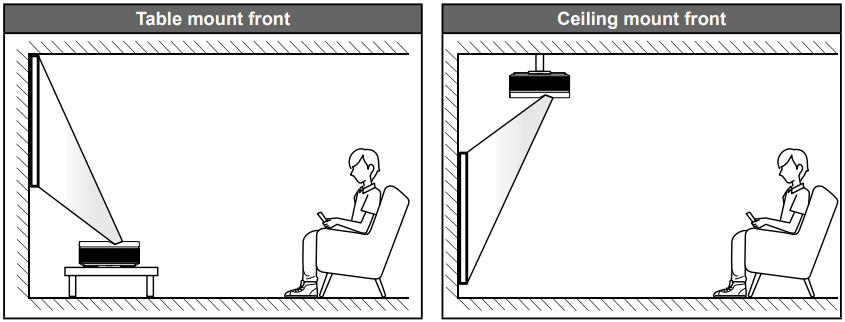
The projector should be placed flat on a surface and 90 degrees/perpendicular to the screen.
- To determine projector location for a given screen size, please refer to the distance table on page 54.
- To determine screen size for a given distance, please refer to the distance table on page 54.
Setup and Installation
- Allow at least 15 cm clearance around the exhaust vent.

- Ensure that the intake vents do not recycle hot air from the exhaust vent.
- When operating the projector in an enclosed space, ensure that the surrounding air temperature within the enclosure does not exceed the operating temperature while the projector is running, and the air intake and exhaust vents are unobstructed.
- All enclosures should pass a certified thermal evaluation to ensure that the projector does not recycle exhaust air, as this may cause the device to shut down even if the enclosure temperature is within the acceptable operation temperature range.
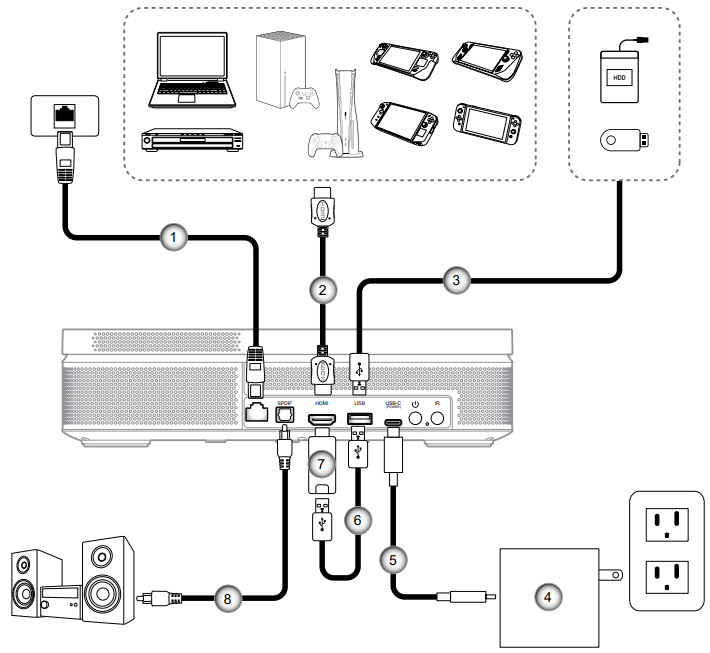
Connecting Sources to the Projector

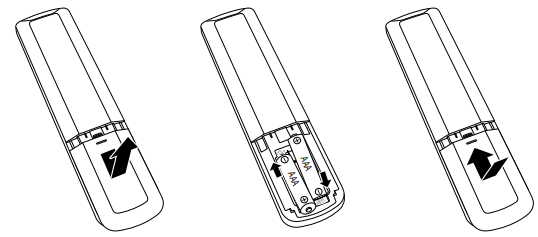
Installing/replacing the batteries
Two AAA-size batteries are supplied for the remote control.
- Remove the battery cover on the back of the remote control.
- Insert AAA batteries in the battery compartment as illustrated.
- Replace cover on the remote control.
Effective range
The infra-red (IR) remote control sensor is located on the front and rear sides of the projector. The distance between the remote control and the sensor should not be longer than 6 meters (19.7 feet). Make sure that there are no obstacles between the remote control and the IR sensor on the projector that might obstruct the infrared beam.
- Please keep the remote controller at least 2m away from fluorescent lamps, or it may malfunction. If the remote control is close to Inverter-Type fluorescent lamps, it might become ineffective from time to time.
- If the remote control and the projector are within a very short distance of one another, the remote control might become ineffective.

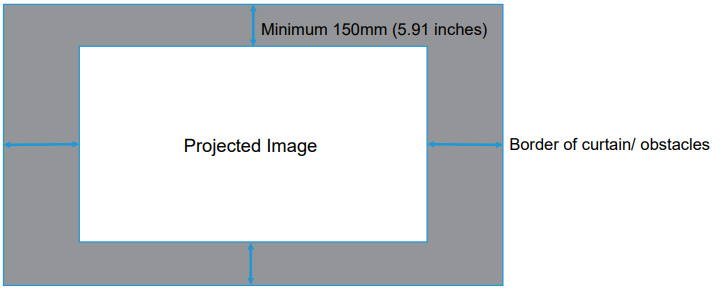
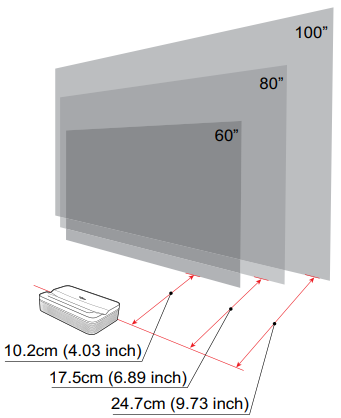
Placement
Place the projector on a stable, flat surface in front of the projection surface. It is recommended to use a flat and white projection surface. Refer to the table below to determine the distance between the projector and the projection surface, and the corresponding projection size:

Charge Your Projector
- Connect one end of the USB Type-C cable to the power adapter. Then connect the other end of the cable to the USB Type-C connector of the projector.
- Plug the power adapter into the power outlet. The Power LED will light up (red), indicating the battery is being charged.
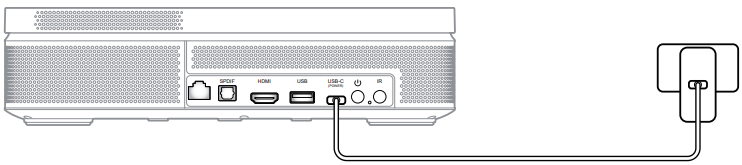
When the Power LED turns green, this indicates the battery is fully charged.
Power On
Press the button on the projector or the button on the remote control to turn on the projector.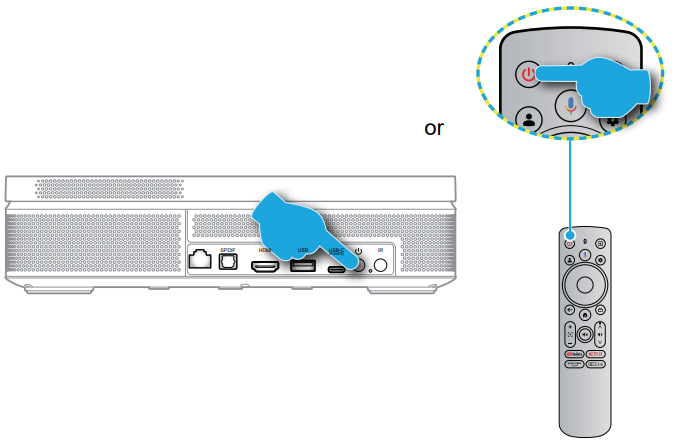
A start-up screen will display in approximately 10 seconds.
- You will be prompted to select the preferred language, pair the remote control via Bluetooth, and set other settings.
- Although your remote has some functionality via IR, Bluetooth pairing is required for full functionality.

USING THE PROJECTOR
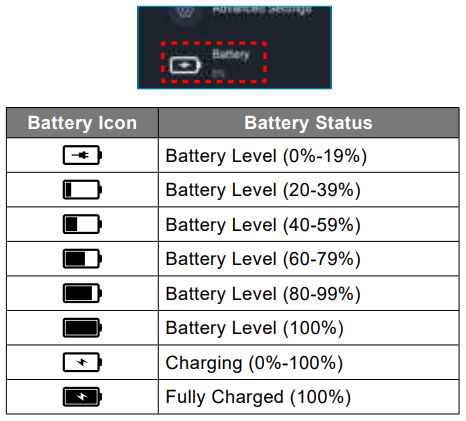
- To view the current battery status, simply press the button on the remote control and check the [Battery] option.
Using the Projector
Standby Mode / Power Off
- Press the U button on the projector or the ® button on the remote control to enter Standby mode.
- Press and hold the U button on the projector or the ® button on the remote control for 3 seconds to turn off the projector.
Remote Control Bluetooth Pairing
When using the projector for the first time, follow the on-screen instructions to pair the remote control via Bluetooth.
- Wait for the Bluetooth pairing prompt on the screen. Then bring the remote control within 10 cm (0.33 ft) from the projector.
- Press and hold the and buttons on the remote control simultaneously until the indicator light starts flashing. Then release both buttons.
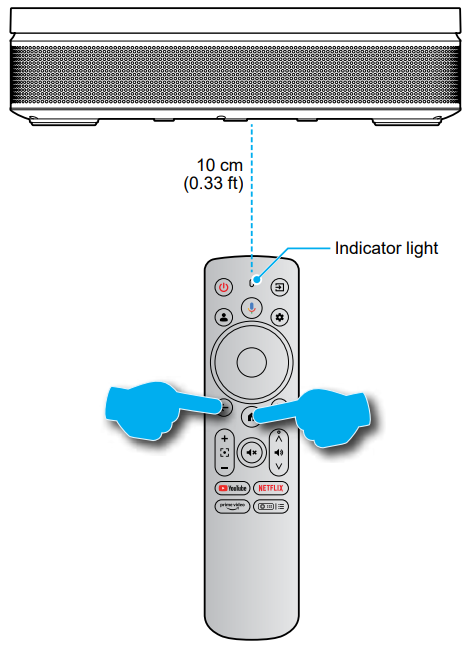
- When you see a successful pairing message on the screen, this indicates the remote control is successfully paired.
Network Settings
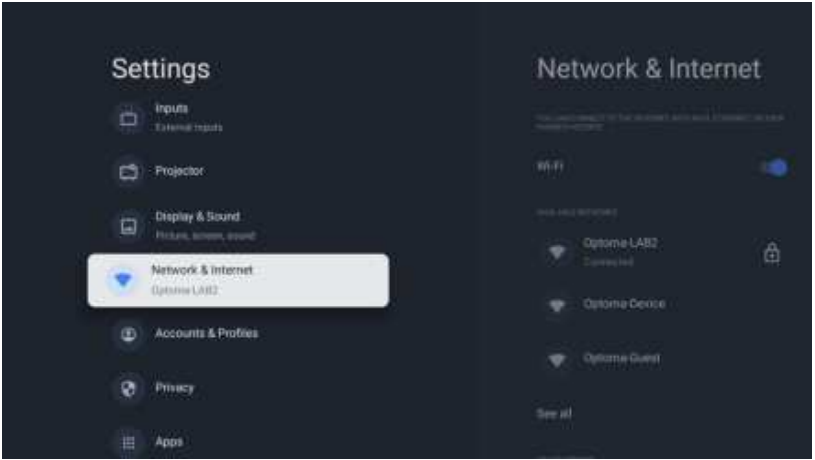
- Press the button on the remote control. Then select [All settings ] > [Network & Internet].
- Turn on the Wi-Fi function.
- Choose your network to connect. Then enter the correct password.
Focus Settings
Press the button on the remote control. Then select [Focus] and choose the focus adjustment type.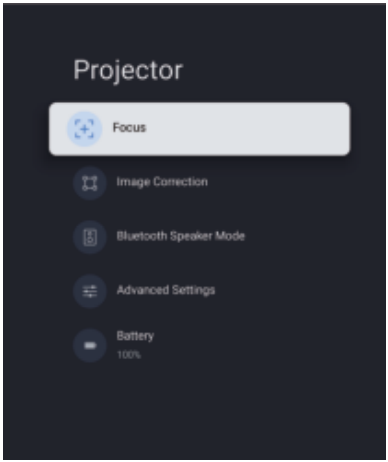
Auto focus
Select [Auto focus] to trigger the autofocus function. The projector will adjust focus automatically.
Manual focus
Select [Manual Focus] and use the button on the remote control to adjust the focus until the image is clear and sharp.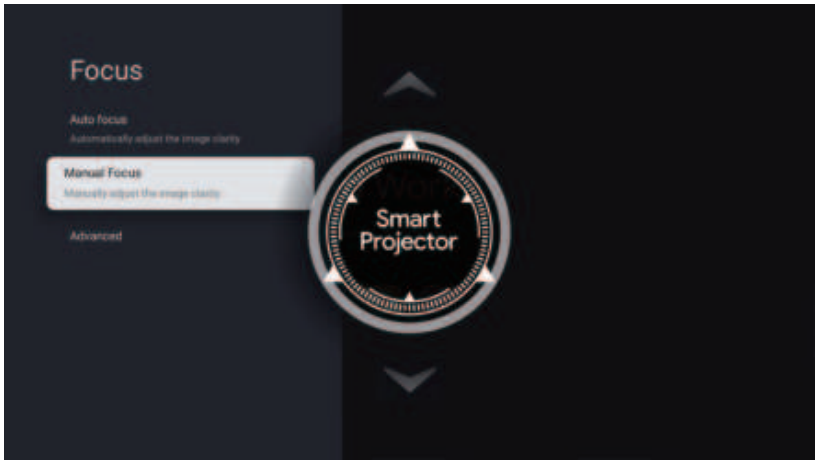
Image Correction Settings
Keystone Correction
Press the button on the remote control. Then select [Image Correction] and choose the keystone correction type.
Auto Keystone Correction
Select [Auto Keystone Correction] to trigger the auto keystone function. The screen will automatically be corrected.
Manual Keystone Correction
Select [Manual Keystone Correction] and use the ⌤⌃⍽⇪ button to adjust the four points and the image shape.
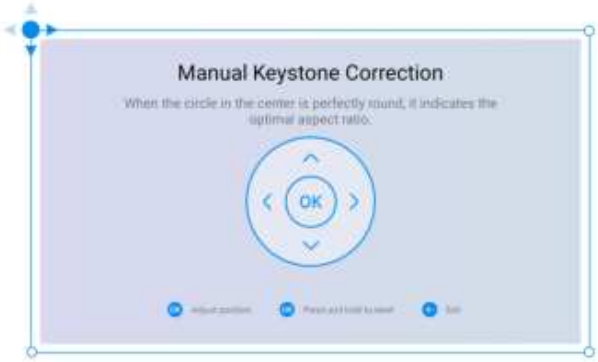
Auto Keystone Correction is an assist feature designed to improve image alignment when projecting on various projection surfaces. Optimal performance when using this feature depends on a few factors, such as projection angle, projector placement, and projection surface conditions.
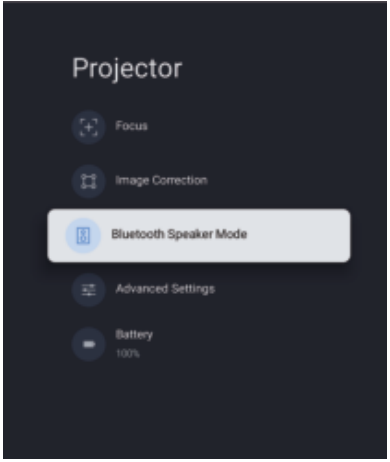
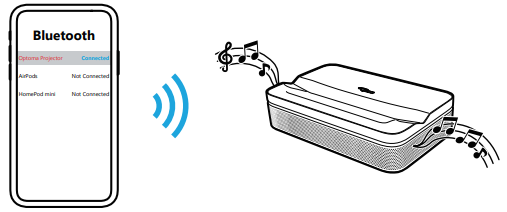
Bluetooth Speaker Mode
- Press the button on the remote control. Then select [Bluetooth Speaker Mode].

- Pair your mobile device with the projector using the Bluetooth function.

- When you hear “Bluetooth connection successful”, the projector can play music from your mobile phone.


Google Assistant
With the Google Assistant feature, you can use your voice command to find movies, streaming apps, play music, and control the projector. Ask Google Assistant to find a specific title, search by genre, or get personalized recommendations. Get answers on screen, control smart home devices, and more. Press the button on the remote control to get started.
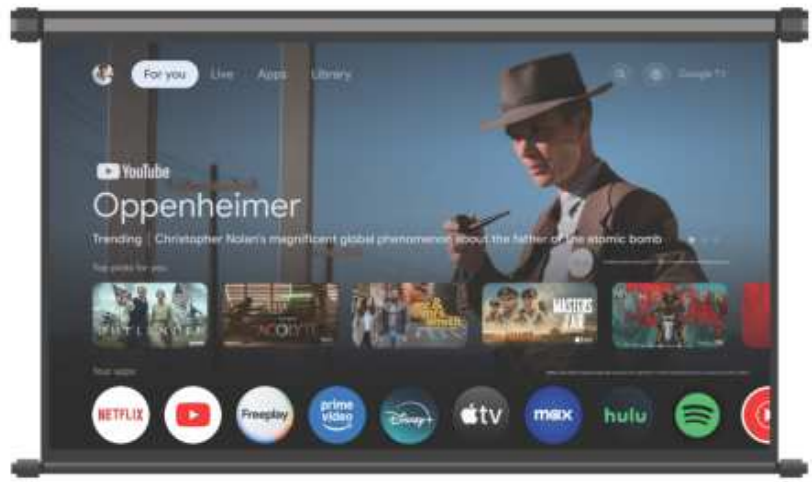
Screen mirroring with Google Cast.
With Google Cast, you can stream entertainment from your favorite apps on your phone, tablet, or laptop to your projector.
- Connect your device and the projector to the same wireless network.
- Open a Google Cast-enabled app on your device. Select the content you would like to cast, then tap the Cast icon (5]).
- Select [Optoma_LDPGSGH] to connect. The projector will display the video from your device.
Overview
To navigate the home screen, simply use the buttons on the remote control. You can return to the home screen at any time by pressing the © button on the remote control, regardless of your position in the user interface.
Shortcut Settings
To access the shortcut Settings, press the (~H=) on the remote control.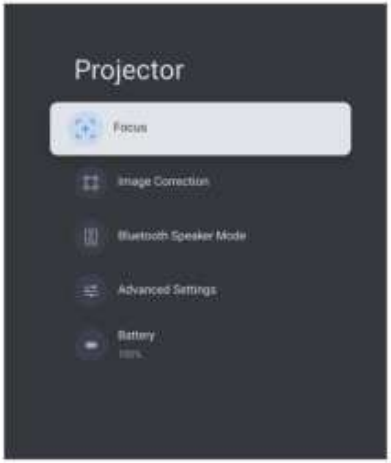
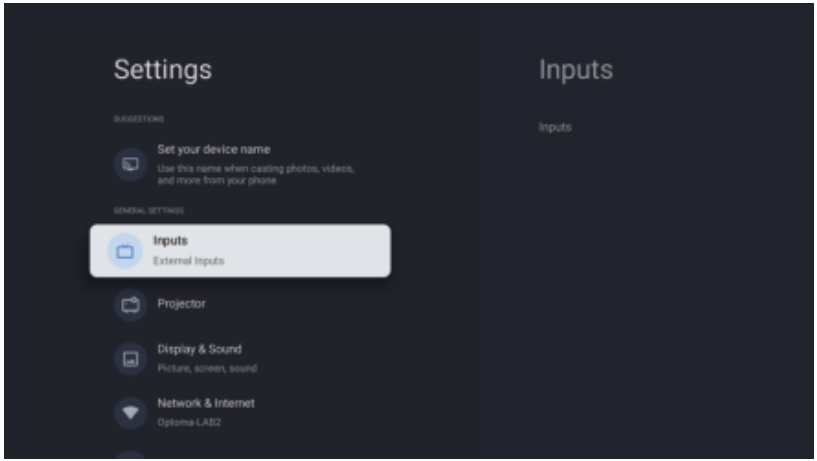
Settings Menu
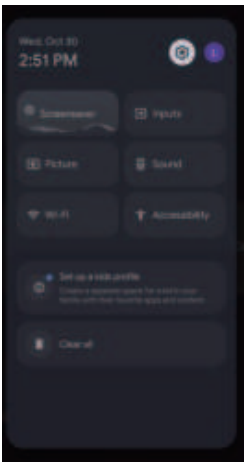
- Press the button on the remote control. The dashboard appears on the screen.

- Select and press the OK button to enter the All settings menu.

- Press the button to select menu options. Then press the OK button to enter the option list or the corresponding submenu.
- Press the button to return to the previous menu.
OSD Menu tree
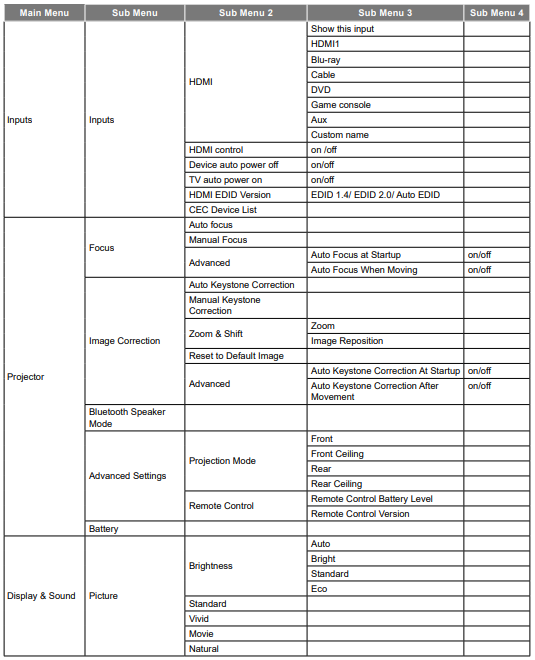
Using the Projector
Inputs menu
Inputs
Configure the input source to the related settings.
HDMI
Specify the HDMI device type connected to the HDMI port.
HDMI control
Enable this function to allow the projector to control the HDMI devices.
Device auto powers off
Enable this function to power off the HDMI device when the projector turns off.
IV auto power on
Enable this function to power on the HDMI device when the projector turns on.
HDMI EDID Version
Select the HDMI EDID version.
CEC Device List
Display the CEC device list.
Focus
Before adjusting, ensure that the projector is positioned at the following specifications:
- The projector is placed on a flat surface and parallel to the ground.
- The projected surface is flat and perpendicular to the ground.
Advanced
Configure the advanced focus adjustment settings.
- Auto Focus at Startup: Enable this function to automatically adjust the focus when the projector powers on.
- Auto Focus When Moving: Enable this function to automatically adjust the focus when you move the projector.
Auto Keystone Correction
Automatically perform the keystone correction. For more information, see page 27.
Advanced
Configure the advanced auto keystone correction settings.
- Auto Keystone Correction at Startup: Enable this function to automatically perform the keystone correction when the projector powers on.
- Auto Keystone Correction After Movement: Enable this function to automatically perform the keystone correction when you move the projector.
Bluetooth Speaker Mode
Configure the Bluetooth speaker mode by pairing your mobile device with the projector using the Bluetooth function. For more information, see page 28.
Advanced Settings
Configure the projection mode and view the remote control information.
- Projection Mode: Select the preferred projection mode. For more information, see page 15.
- Remote Control: View the battery level and version of the remote control.
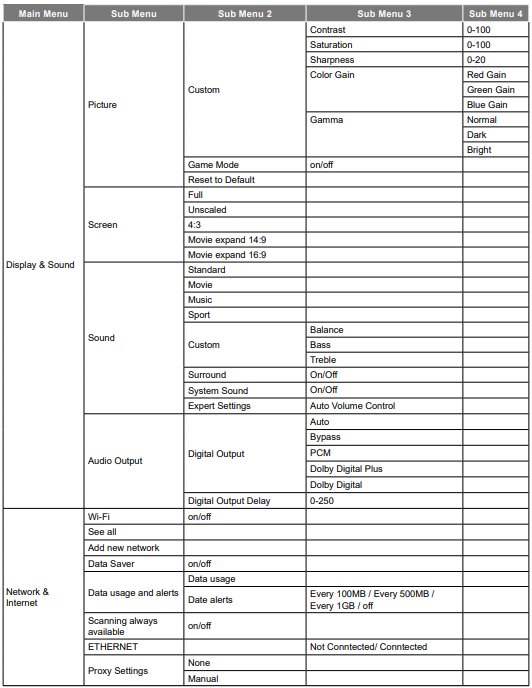
Display & Sound menu
Brightness
Set the brightness mode based on the ambient brightness.
Picture Mode
There are many factory presets optimized for various types of images.
- Standard: Select this mode for optimizing the balance between brightness and color reproduction.
- Vivid: Select this mode for emphasizing color.
- Movie: Select this mode for home theater.
- Natural: Select this mode for natural-looking colors. Custom: Manually configure the picture settings such as contrast, saturation, sharpness, color gain, and gamma.
Reset to Default
Return the factory default setting for picture settings.
Screen
Select the aspect ratio of the displayed image.
- Full: This format fills the screen, regardless of aspect ratio. Unscaled: This format displays the original image without any scaling.
- 4:3: This format is for 4:3 input sources. Movie expand 14:9: This format is for Movie expand 14:9 input sources, like HDTV and DVD, enhanced for wide-screen TV.
- Movie expand 16:9: This format is for Movie expand 16:9 input sources.
Scalina table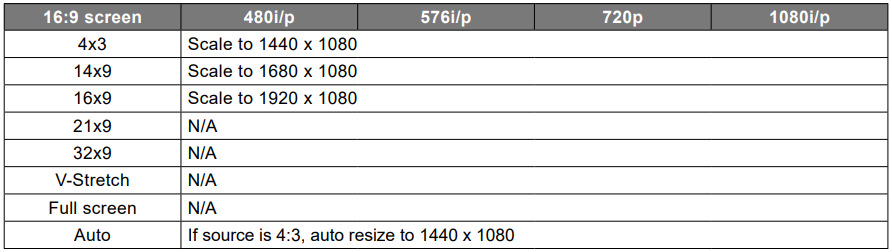
Auto mapping rule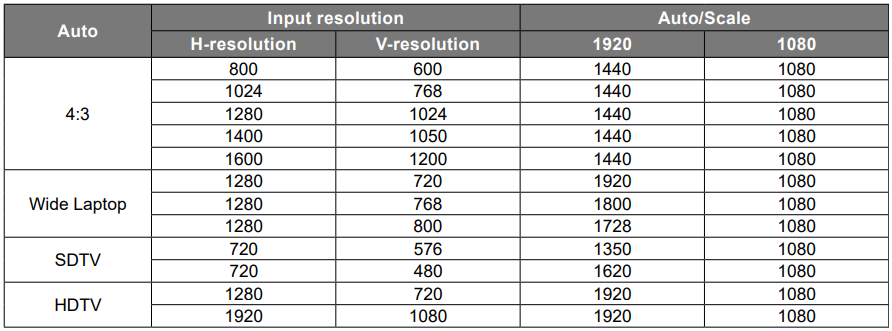
Sound
Select the appropriate sound mode.
- Standard: Select this mode for music playback.
- Movie: Select this mode for watching a movie playback.
- Music: Select this mode for regular music playback.
- Sport: Select this mode for watching sports events.
- Custom: Manually configure the audio settings, such as balance, bass, and treble
Surround
Select to enable surround sound audio.
System Sound
Enable this function to turn on the system sound notifications.
Settings
Enable the [Auto Volume Control] function to control volume automatically.
Digital Output
Set the audio output format.
Digital Output Delay
Adjust the delay of the digital audio output to synchronize the sound with the video.
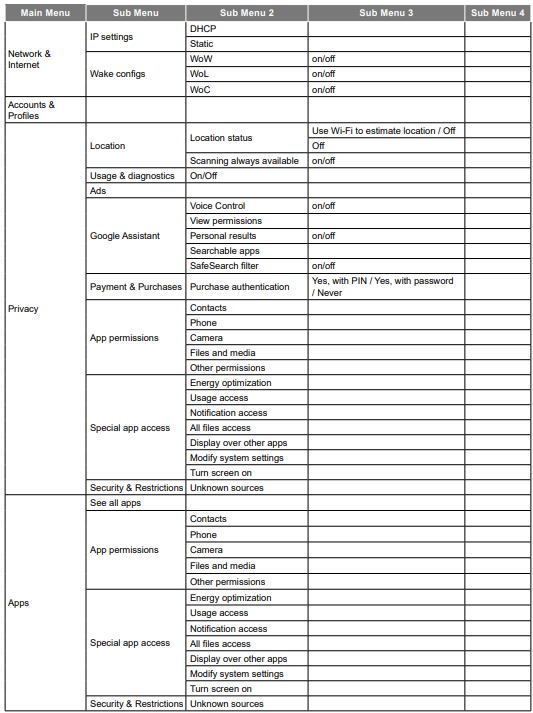
Network & Internet menu
Wi-Fi
Configure the wireless network settings.
Wi-Fi
Enable this feature to turn on Wi-Fi.
Available Networks
Select your desired wireless access point. Select [See all] to display the list.
Add a new network
Manually enter a wireless network name, select the type of security mode, and enter the password.
Data Saver
Enable this option to automatically adjust the video quality to use less mobile data. This function will monitor and limit your network traffic.
Data usage and alerts
View how much data has been used today. You can also set a data alert notification.
Scanning always available
Enable this option to let Google’s location service and other apps scan for networks, even when the Wi-Fi is off.
Privacy menu
Location status
Enable or disable the system to use the Wi-Fi function to estimate the projector location.
Scanning always available
Enable this option to let Google’s location service and other apps scan for networks, even when Wi-Fi is off.
Usage & diagnostic
Enable this option to automatically send the diagnostic information to Google, such as crash reports and usage data from your device, app, and Google Cast. You can adjust these permissions at any time from the device settings.
Google Assistant
Voice Control
Enable this option to use your voice to find what to watch, get information, and control your device.
View permissions
Use this function to review and manage your activity.
Personal results
Use this function to allow Google Assistant to read or show specific results for any shared Google Assistant device.
Searchable apps
Select which apps to include in the search results.
SafeSearch filter
Enable this option to use the SafeSearch filter, which can block inappropriate or explicit images from your
Search results.
App permissions
View the app permissions to access various features such as Contacts, Phone, Camera, Files, media, and more.
Special app access
Energy optimization
Enable the option to optimize energy use.
Usage access
Enable the option to track what other apps you are using and how often.
Notification access
Enable the option to read all notifications, including personal information such as contact names and the text messages you receive.
All files access
Enable the option to read, modify, and delete all files in this device or any connected storage volumes.
Display over other apps
Enable the option to display on top of other apps you are using. It may interfere with your use of those apps or change the way they seem to behave or appear.
Modify system settings
Enable the option to modify the system settings.
Turn the screen on
Enable the option to turn the screen on. If granted, the app may turn on the screen at any time without your explicit intent.
Apps menu
See all apps
View all apps that have been installed in the device.
App permissions
View the app permissions to access various features such as Contacts, Phone, Camera, Files, media, and more.
Special app access
Configure app permissions and access. For more information, see page 46.
Security & Restrictions
Restrict the installation of apps from unknown sources. For more information, see page 46.
System menu
About
Check for firmware upgrades and update the system, view and rename the device, perform a factory reset, view device status, view legal information, view the model name, view Android TV OS related information, and view the software version.
Date & Time
Automatic date & time
Enable or disable automatic date and time.
Set date
If the [Automatic date & time] setting is disabled, you can manually set the date.
Set time
If the [Automatic date & time] setting is disabled, you can manually set the time.
Set time zone
Select the time zone.
Use 24-hour format
Set the time format.
Keyboard
Current keyboard
View the current keyboard.
Gboard Settings
Configure Gboard Keyboard Settings.
Manage keyboards
Manage available virtual keyboards.
Storage
Internal shared storage
View and manage the device storage.
Free up storage
Free up the storage space on the device by clearing cache (temporary files) or uninstalling unwanted apps.
Ambient mode
Start now
Activate a screen saver immediately.
CHANNELS
Select the photo source for the screen saver.
Weather
Display or hide the weather information in the screen saver.
Time
Display or hide the time of day in the screen saver.
Personal photo data
Display or hide the owner’s name and the album name.
Portrait Google Photos
Display or hide the portrait orientation photos from Google Photos.
Accessibility menu
TalkBack
Enable the option to use a screen reader. You can also configure the TalkBack-related settings.
Text-to-speech
Configure Text-to-Speech-related settings.
Accessibility shortcut
Enable the option to use an accessible shortcut.
- Note: To start an accessible feature, press and hold the © and V buttons on the remote control at the same time for 3 seconds.
Switch Access
Enable the option to turn on the switch function. You can also configure the Switch Access-related settings.
Captions
Display
Enable the option to turn on the captions.
Language
Set the subtitle language.
Text size
Set the default font size for the subtitle.
CAPTION STYLE
Set the caption-related settings.
High contrast text
Enable the option to turn on the high-contrast text.
Remotes & Accessories menu
Pair accessory
Search for Bluetooth accessories and pair them with your projector.
- Note: To pair the remote control with your projector, see page 24.
Help & Feedback menu
Send feedback
Use the on-screen keyboard to describe the issue and send the feedback. Otherwise, press and hold the O button on the remote control to easily send the feedback.
- Note: For more information, visit Google TV Help at g.co/tv/help.
Compatible Solutions

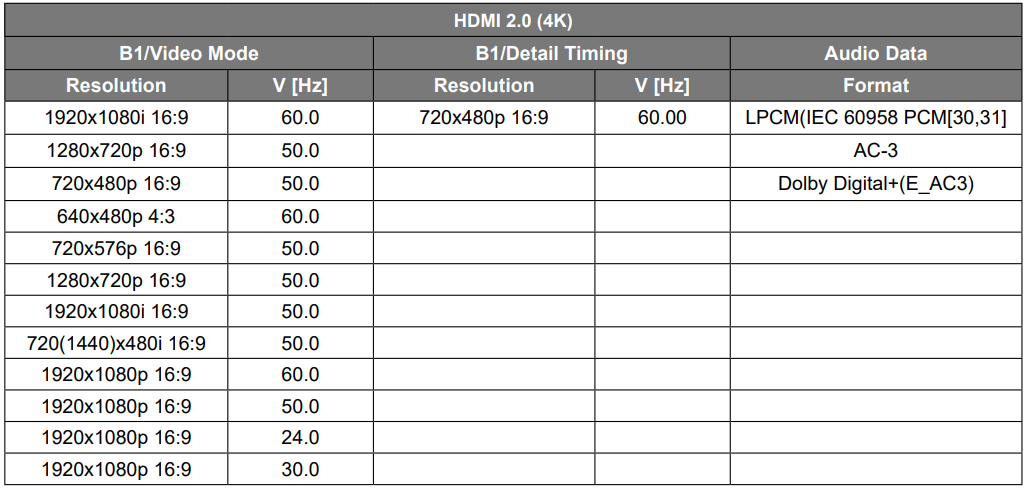
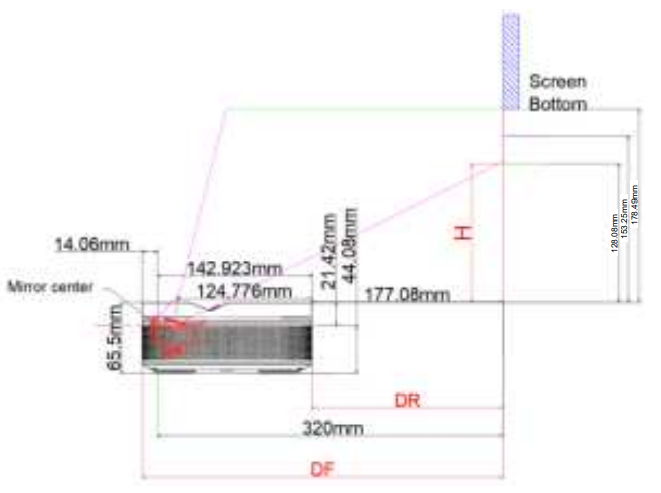
Image Size and Projection Distance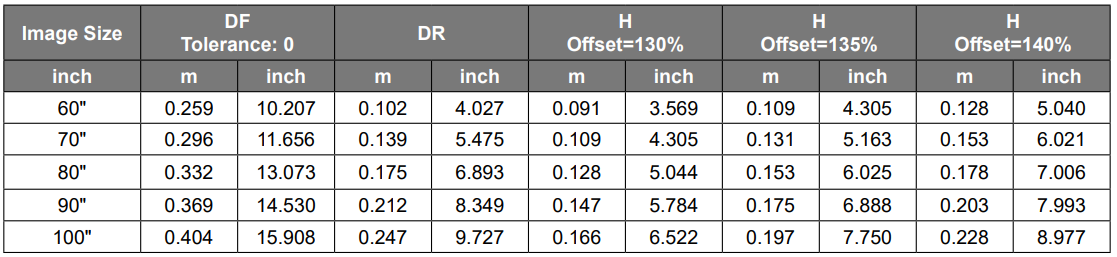
- Note: All projectors will have a tolerance. If you need the most accurate value, please measure the device directly.

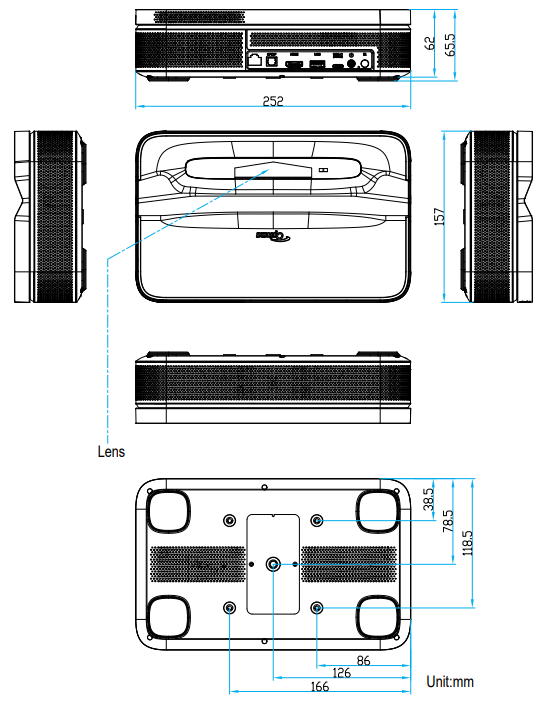
Projector Dimensions and Ceiling Mount Installation
Ceiling screw socket
- Use M5*5mm to fix
PTZ bracket socket
- Use 5mm British 1/4-20*1/4 thread screws to fix
Additional information
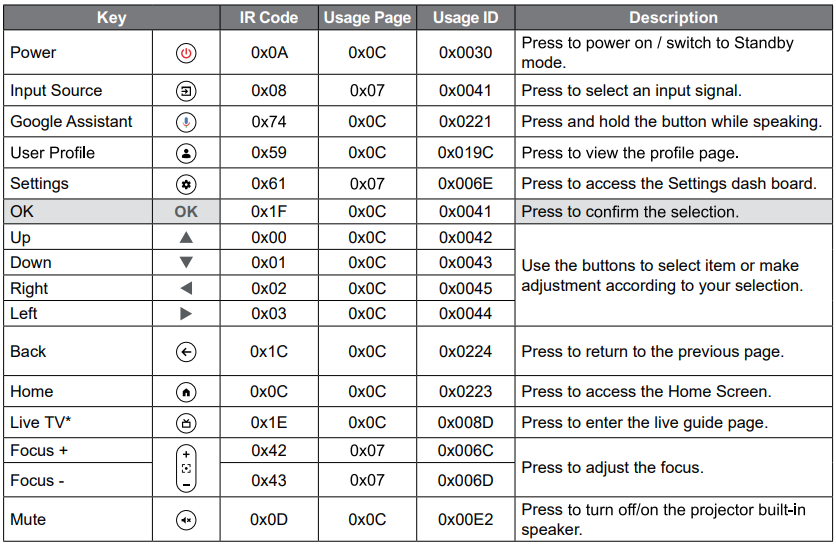
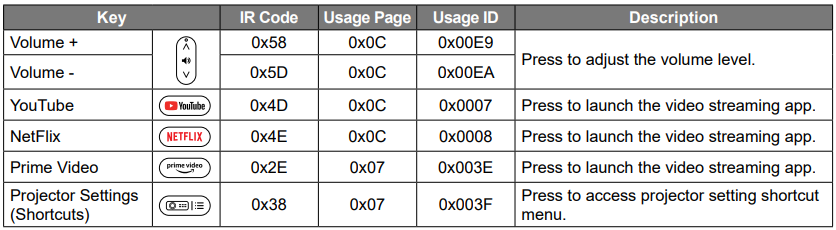
IR Remote Codes
Additional Information
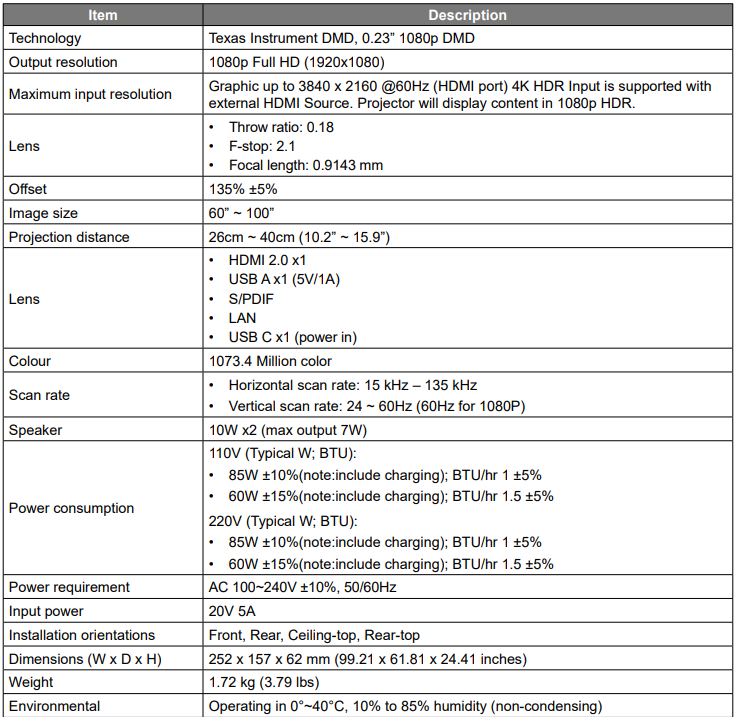
Specifications
Troubleshooting
If you experience a problem with your projector, please refer to the following information. If a problem persists, please contact customer support or the local service center.
No audio output
- Check if the projector is in mute mode. If so, press the button on the remote control again to unmute the projector.
- Check if your mobile device is successfully paired with the projector via Bluetooth. For more information, see page 28.
No image output
- Press the U button at the rear of the projector. The power indicator light will turn on if the projector enters the projection mode successfully.
- Ensure that the power adapter has the specified power output.
Fuzzy image
- Adjust the focus or keystone correction of the projector. Make sure the projection distance is in the effective focal range of the projector. For more information, see page 54.
- Remove the dust or dirt from the lens with a blower or soft-bristled brush.
Non-rectangular image
- Place the projector perpendicular to the screen/wall if the keystone correction function is not used. Use the keystone correction function to adjust the image shape. For more information, see page 27.
Automatic keystone correction failure
- Make sure the TOF module on the front glass cover of the projector is not blocked or smudged. Move the projector until it is perpendicular to the projection surface and try again.
Remote control unresponsive
- Make sure the batteries are installed correctly and not drained.
- Remove any obstructions between your projector and remote control.
- Ensure the remote control is successfully paired with the projector via Bluetooth.
- Make sure no button is pressed or stuck, and check if the power indicator is still on. If yes, please contact the customer support or local service center.
Cannot power on the projector
- The projector will enter the protection mode if the internal battery runs out. In this case, make sure the projector is connected to the power supply and then press and hold the button on the projector or the button on the remote control for 3 seconds to power on the projector. In other cases, please contact customer support or the local service center.
Others
- Please feel free to contact us.
Warning Indicators
Refer to the “Troubleshooting” section for the common issues. If the problem persists, please contact your nearest service center for assistance.
Power LED Indicator Guide
FCC
This device has been tested and found to comply with the limits for a Class B digital device pursuant to Part 15 of the FCC rules. These limits are designed to provide reasonable protection against harmful interference in a residential installation. This device generates, uses, and can radiate radio frequency energy and, if not installed and used in accordance with the instructions, may cause harmful interference to radio communications.
- Reorient or relocate the receiving antenna.
- Increase the separation between the device and receiver.
- Connect the device into an outlet on a circuit different from that to which the receiver is connected.
- Consult the dealer or an experienced radio/television technician for help.
Optoma Global Offices
For service or support, please contact your local office.
Customer Support
Optoma Technology, inc. 47697 Westinghouse Drive. Fremont, Ca 94539
- 888-289-6786
- 510-996-4794
- services@optoma.com
1 Comment
Pingback: CASE Android Phone User Manual & Setup Guide 2025 Today