
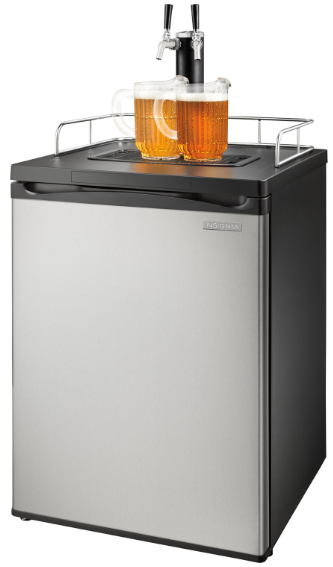
Insignia NS-BK2TSS6 Beverage Cooler
Features
The Insignia NS-BK2TSS6 Beverage Cooler comes with:
- Dual taps for multiple kegs
- Convertible to refrigerator/beverage cooler
- Adjustable thermostat for ideal temperature
Package Content
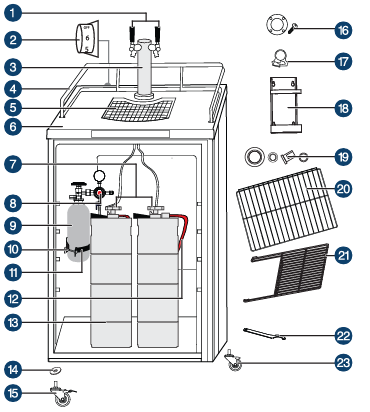
- Beer tap handles
- Thermostat
- Draft arm assembly
- Guardrail
- Drip tray (2 pieces)
- Worktop
- Keg couplers (2)
- CO2 tank regulator
- CO2 tank (shipped empty)
- Bolt and nut for the retainer
- CO2 tank retainer
- CO2 gas lines
- Beer keg (not included)
- Metal washers for locking casters (2)
- Locking casters (2)
- Beer gasket with screws (4)
- Hose clamp
- CO2 back tank retainer
- Extra valve washers (2 of each)
- Wire shelf
- Wire half-shelf
- Metal wrench (for cleaning)
- asters (2)
Assembly
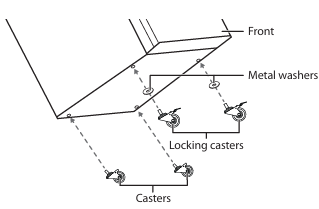
INSTALLING THE CASTERS (OPTIONAL)
To install the casters on your Insignia NS-BK2TSS6 Beverage Cooler:
- Tip the kegerator/beverage cooler onto its side on a soft surface to protect it from scratches.
- Unscrew and remove the black front feet. Keep them in a safe place in case you want to remove the casters and use the front feet.
- Attach the two metal washers (included) to the locking casters to prevent scratching the cabinet, then install the two locking casters in the front positions on the bottom of the kegerator/beverage cooler (closest to the door).
- Install the other two casters in the rear positions on the bottom of the kegerator/beverage cooler.

- With all four casters tightened evenly, stand the unit in the upright position.
- Step on the front of the locking casters to lock the kegerator/beverage cooler into place or step on the back to unlock the kegerator/beverage cooler.
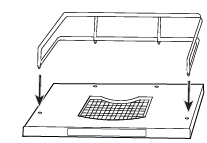
Attaching the Guard Rail
Place the guard rail into the holes on the top of the kegerator.
Installing the Draft Arm
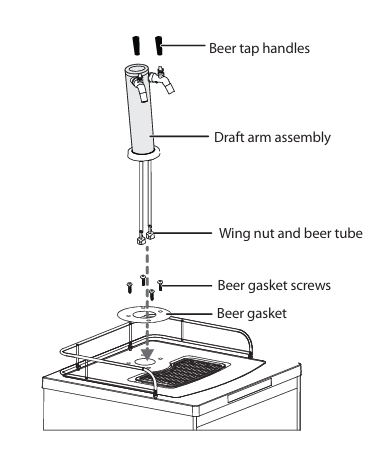
- Remove the cabinet plug from the top of the kegerator.
- Align the beer gasket to the four holes on the top of the cabinet.
- Pass both the wing nut and the beer tube (both are attached to the draft arm assembly) through the hole on the worktop until the draft arm assembly is resting on the top of the cabinet.
- Align the holes in the draft arm with the holes in the gasket, then attach the draft arm to the worktop with the four screws provided.
- Attach the black plastic beer tap handles to the top of the faucet, tightening by hand. Hold the silver ring snug so it does not move.
CO2 Regulator & Tank
The CO2 tank (provided) is empty when you receive it. Visit your local beer keg provider, air/gas or welding supplier, or sporting goods store to get it filled. Before installing the CO2 regulator and tank, be sure to review important safety tips in the manual.
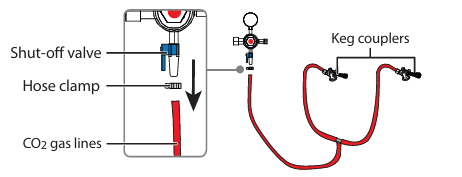
- Feed the hose clamp over one end of the CO2 gas line.
- Attach that end to the gas line connector on the CO2 regulator.
- Tighten the clamp to prevent leaks. Leave about ½ inch between the top of the clamp and the end of the hose. You may need to squeeze with a pliers or a crimper.
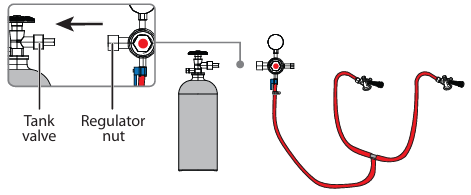
- Attach the CO2 regulator to the CO2 tank by screwing the regulator nut onto the tank valve and tightening with an adjustable wrench.
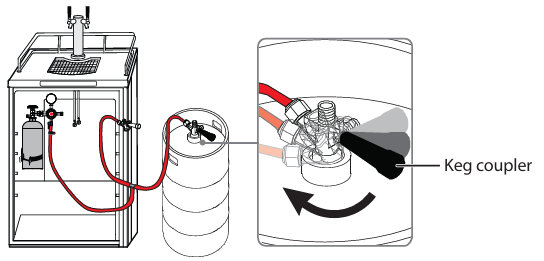
Keg Coupler
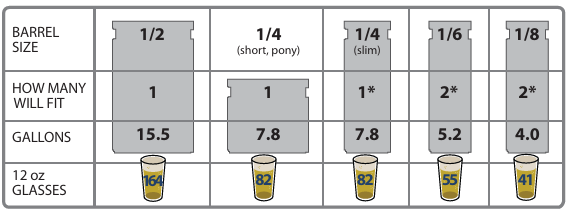
This kegerator accepts almost all brand-name kegs, except for Coors. Here’s what will fit in your kegerator:
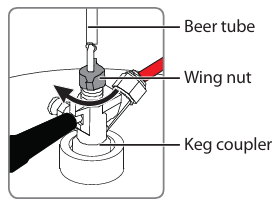
- Insert the keg coupler into the neck of the beer keg and turn it clockwise to lock it into position. Make sure that the washer is in the connector on the top of the keg coupler.
- Insert the beer tube into the top of the keg coupler. Tighten the wing nut.
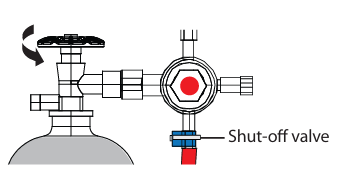
Adjusting the CO2 Regulator
- Make sure that the shut-off valve is closed (sideways if closed, down if open), then slowly turn the main valve on the CO2 tank counter-clockwise until it is fully open.
- Open the shut-off valve to allow gas to flow into the keg.
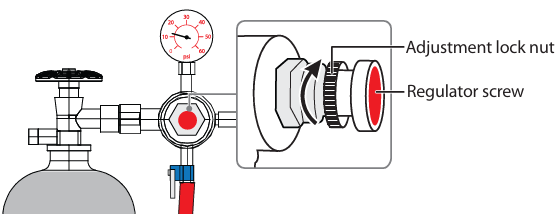
- Release the adjustment lock nut, behind the regulator screw, by turning it clockwise about 5-7 turns.
- Turn the regulator screw clockwise to increase pressure. The needle on the gauge starts to climb. Set the gauge to 10-12 PSI.
- When the tank is at the correct pressure, tighten the adjustment lock nut by turning it counter-clockwise.
- Allow several minutes for the keg to pressurize. The gauge may show a drop in pressure while this happens. Adjust as needed. Note: Listen for a hissing sound at all connections to determine if there are any leaks.
- Plug the kegerator/beverage cooler into a 120V, 60Hz, 15A grounded outlet.
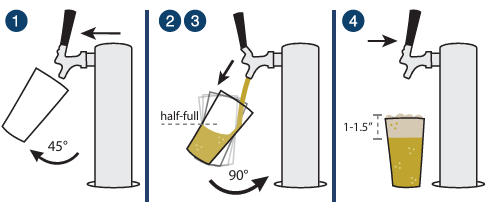
- Hold the glass at a 45° angle.
- Grasp the handle at the bottom and open the tap quickly.
- Once your glass is half-full, Insignia NS-BK2TSS6 Beverage Cooler, gradually bring the glass upright, and aim for the middle to start forming the head. Slowly lower the glass as you approach your finish to improve the head even more.
- When your glass is full, close the tap quickly.

Glasses for Beers
You wouldn’t believe how much a proper glass and temperature will change the taste of your beer.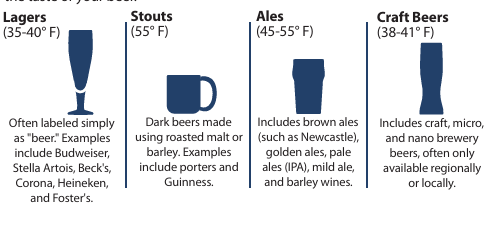
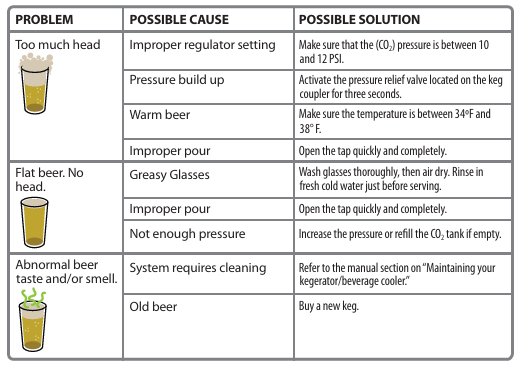
Preventing Bad Beers
One-Year Warranty
Definitions
The Distributor* of Insignia-branded products warrants to you, the original purchaser of this new Insignia-branded product (“Product”), that the Product shall be free of defects in the original manufacturer of the material or workmanship for one (1) year from the date of your purchase of the Product (“Warranty Period”).
How to obtain warranty service?
If you purchased the Product at a Best Buy retail store location or from a Best Buy online website, please take your original receipt and the Product to any Best Buy store. Make sure that you place the Product in its original packaging or packaging that provides the same amount of protection as the original packaging. To obtain warranty service, in the United States and Canada, call 1-877-467-4289. Call agents may diagnose and correct the issue over the phone.
Where is the warranty valid?
This warranty is valid only in the United States and Canada at Best Buy branded retail stores or websites to the original purchaser of the product in the country where the original purchase was made.
Customer Service
- Tel: 1-877-467-4289
- Visit: http://www.insigniaproducts.com
INSIGNIA is a trademark of Best Buy and its affiliated companies. Registered in some countries. Distributed by Best Buy Purchasing, LLC 7601 Penn Ave South, Richfield, MN 55423 U.S.A.
©2021 Best Buy. All rights reserved.
FAQs
Q: How do I power on the beverage cooler?
Connect the cooler to an electrical outlet that is grounded. To begin cooling, turn on the power switch, which is in the back. When powered on, the inside light will turn on.
Q: What is the temperature range of the cooler?
The temperature range maintained by the NS-BK2TSS6 is 34°F to 50°F (1°C to 10°C). To get the cooling setting you want, turn the thermostat dial.
Q: Can I store both cans and bottles?
Indeed. Cans and bottles can be stored on the cooler’s movable shelves. If shelves are needed to accommodate taller bottles, remove them.
Q: How do I prevent frost buildup?
Because it is thermoelectric, the NS-BK2TSS6 generates very little frost. To lessen condensation, make sure the door is completely closed and the seal is clean.
Q: Can I store food items in this cooler?
Although the NS-BK2TSS6 is made for drinks, you can temporarily keep non-perishable or cold-sensitive goods in it. Perishable foods shouldn’t be kept in storage for long.
Q: How long does it take for the cooler to reach the set temperature?
After turning on, it could take two to four hours for the cooler to achieve the ideal temperature. The contents and ambient room temperature may have an impact on performance.
Q: Is the interior light energy-efficient?
Indeed. An energy-efficient LED light that lights the interior without substantially compromising cooling performance is integrated inside the cooler.
Q: Can I leave the cooler running continuously?
Indeed. The NS-BK2TSS6 is made to run continuously. Maintain efficiency by checking and cleaning the interior on a regular basis.