 Water Dispenser User Guide")
![]()
AQUAPHOR H20-C (RO PRO 100) Water Dispenser

Operation
Thanks for choosing our product AQUAPHOR H20-c. In order to use and maintain this product correctly, please read the manual carefully before using it. Keep the manual properly.
- This is a vertical water dispenser. Please place it on the ground firmly to avoid falling.
- Operation conditions:
- Water source: municipal tap water
- Feed water pressure: 0.1 MPa ~ 0.4MPa
- Feed water temperature: 5-38°C
- Altitude: <1500 meter
- Check the product from time to time to see if there is any leakage on the connections or any creepage on the wires. If the product fails, please cut off the water and power supply immediately and contact your dealer.
- If this product won’t be used for a long time, cut off the water and power supply. If it hasn’t been used for more than 3 days, drain off all the remaining water in the tanks and flush the system for more than 5 minutes before putting it into use again.
- This product is strictly forbidden to be operated by children and is designed for indoor use only. Do not use it in an explosive environment.
- Every machine will go through a water leakage test before packing. It is normal to have residual water stains.
- Installation and maintenance should be performed by a professional. It’s necessary to follow this instruction manual strictly; otherwise, our company will not be responsible for any failure or7 consequence.
Features
Water Dispenser with hot, cold, and ambient water. Recommended installation places: office, club, hotel, airport, train station, etc
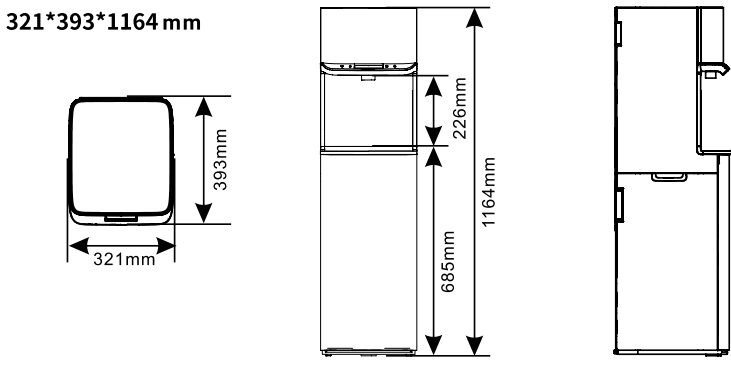
Product Dimension
Water treatment process
- Feed water
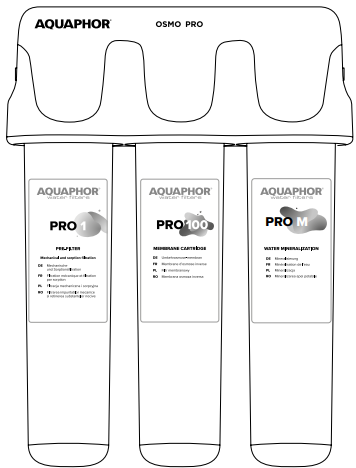
- Pro1
- Pro 100
- Pro M
- Output water
Main Function
| Filter Cartridges | Function | |
| 1s Stage | Pro 1 | Further remove organics, chlorine, odor, color, and turbidity |
| 2nd Stage | Pro 100 | Remove bacteria, heavy metals, dissolved matter, and salinity |
| 3rd Stage | Pro M | Mineralizes water |
| Output Water | Ambient / Hot / Cold | |
Packing List
| Name | Quantity | Name | Quantity |
| Main Body | 1 set | Additional cartridge forthe leak protection valve | 1 pc. |
| Pro 1 | 1 pc. | Tube 1/4″, 4 m | 1 pc. |
| Pro 100 (RO Membrane) | 1 pc. | Flush plug | 1 pc. |
| Pro M | 1 pc. | Drain clamp | 1 set |
| Connecting node | 1 pc. | Instruction manual | 1 pc. |
Technical Parameters
| Model Type | H20-C (5L Pure water tank / 1.8L hot tank / 3L cold tank) |
| Inlet water pressure | 0.1 MPa ~0.4 MPa |
| Inlet water temperature | 5–38 °C |
| Voltage and frequency | 220V, 50Hz / 110V, 60Hz |
| Rated power | 650W |
| Heating power | 500W |
| Cooling power | 100W |
| Purified water flow | 15.6 L/Hour |
| Hot water temperature | 88–93 °C |
| Hot water tank capacity | 1,8 L |
| Cold water temperature | 5–10 °C |
| Cold water tank capacity | 3 L |
| Ambient water tank capacity | 5 L |
| Noise level | 59 dB |
| Dimensions (LWH) | 321 x 393 x 1164 mm |
| Net weight | 22.2 kg |
| Gross weight | 24.5 kg |
Electric Schematic Diagram

Structure Instructions
Installation
- Tools Required:
- Cross screw driver
- Adjustable wrench
- Scissors
- Please check if the accessories are complete as packing list.
- Installation position required:
- Close to a 220V/110V socket.
- Close to municipal tap water source.
- Close to the drain outlet, please note that the position of the drain pipes should be at least 20 cm lower than the water pan.
- Install the connection node.
- In the event of any mechanical damage to the connecting node due to improper installation and use, claims will not be accepted.
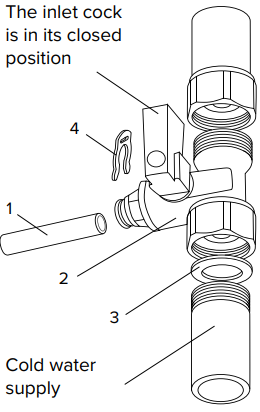
- Shut off the cold water line and relieve excess pressure.
- Make sure that there is a sealing gasket (3) in the clamping nut of the connecting node (2).
- Connect the connecting node (2) to the pipeline. If necessary, use tread seal tape to seal the external thread of the node.
- Close the inlet cock of the connecting node and supply water from the cold water supply line to make sure that the connection is tight (no leaks).
- Take off the front panel and install filter cartridges in the water purifier according to the labels indicated below.
- Install the new cartridges and flush the machine
- Take off the front panel of the dispenser.
- Shut off the water supply (close the inlet tap on the connection unit) and unplug the power cord before installing or replacing new cartridges.
- Remove the required cartridge by turning the cartridge counterclockwise and taking it out.

To replace the PRO 1 / PRO M cartridge, follow the next steps
- Remove the overwrapping film from the new PRO 1, PRO M cartridges.
- Insert the new PRO 1 and PRO M cartridges into the corresponding collectors until they stop and turn clockwise, until a click.
- Insert the service plug into the central slot (the slot of the reverse osmosis membrane unit).
- Open the inlet tap on the connection unit, connect the power supply, and power on; the machine will start producing water. During this period, the switch for heating should be off*.
- After the machine completes water production, cut off the water and power supply.
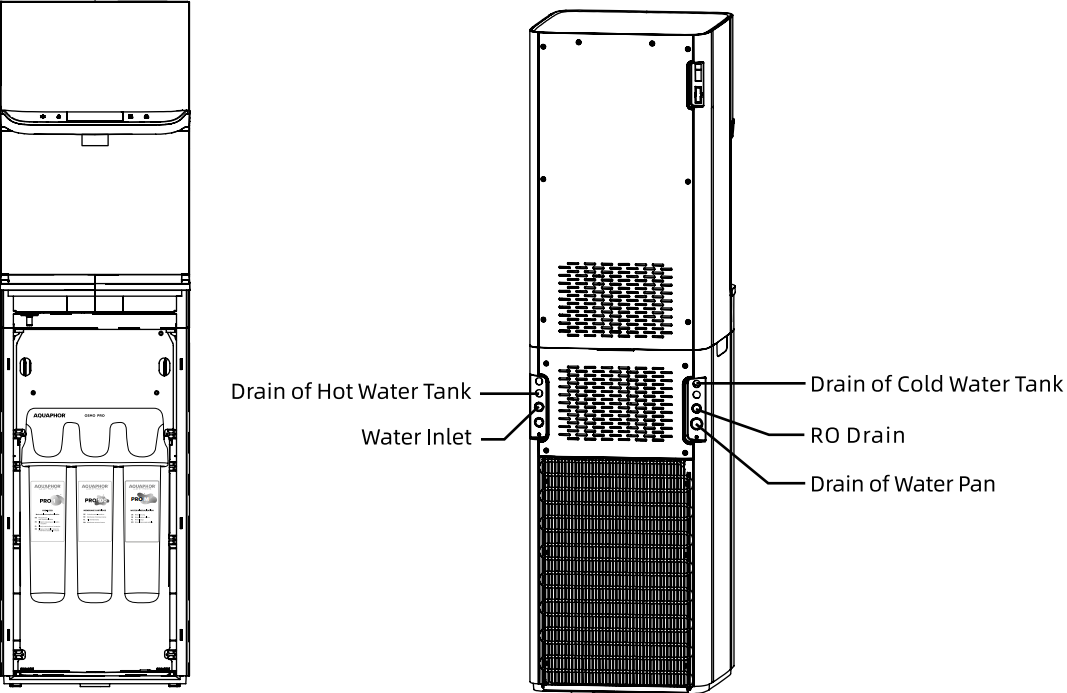
- Connect the silicon tube to the “drain of hot water tank” and connect the other end to the drain of the house or a bucket to drain out all the water in the tank.
- Remove the service plug from the slot of the reverse osmosis membrane unit.
- If the PRO 100 cartridge does not require replacing, take off the silicon tube and insert the PRO 100 cartridge back.
Reset the filter life
- Press the “Ambient Water collection” button and “Сold water collection” button for 3 seconds, and then the machine will enter filter life reset mode.
- Press the “Ambient Water collection” button again to select the filter required to be reset, and the Life indicator of the filter reselected will be flashing. Then hold on to the “Ambient Water collection” button for 3 seconds to complete the reset.
- The machine will exit the filter life set mode if there is no operation within 10 seconds.
- After that, the dispenser can be used.
How to Install
Install the drain pipe:
Firstly, cut two pieces of PE pipes to a suitable length and make sure the notches are flat and smooth. And then, connect the outlet of the RO drain water and the Water Pan to the PVC downcomer.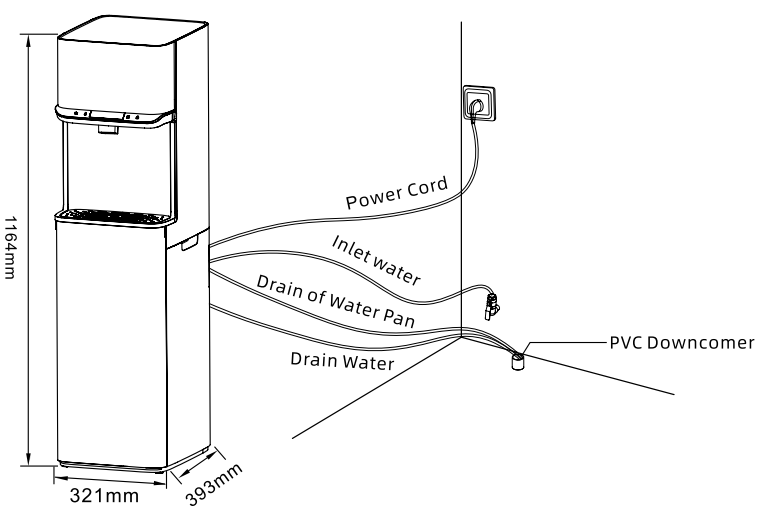
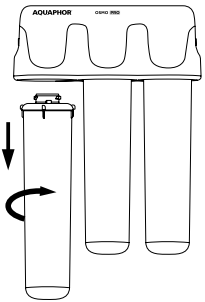
Install the Filter Cartridge
- Take off the front panel of the dispenser.
- Insert the filter cartridge into the cap and then twist the body of the cartridge clockwise until it matches the right position. Please pay attention to the positions of filter cartridges and install them in the right order (see Fig. 6).

Replace the Filter Cartridge
- Take off the front panel of the dispenser.
- Twist the filter cartridge anticlockwise to disassemble it and then install a new one as above.
How to Use
Service Life of Filter Cartridges and Filter Change Reminder.
| Cartridge | Cartridge lifetime | Indicator light status |
| PRO 1 cartridge (K1 on display) | Full life: 150 hours | |
| Remaining life > 0 | 150-100 hours display 3 grids, 100-50 hours display 2 grids, 50-0 display 1 grid | |
| Remaining life = 0 | All filter bars flash | |
| PRO 100 membrane (RO on display) | Full life: 600 hours | |
| Remaining life > 0 | 600-400 hours display 3 grids, 400-200 display 2 grids, 200-0 display 1 grid | |
| Remaining life = 0 | All filter bars flash | |
| PRO M cartridge (K7 on display) | Full life: 300 hours | |
| Remaining life > 0 | 300-200 hours display 3 grids, 200-100 display 2 grids, 100-0 display 1 grid | |
| Remaining life = 0 | All filter bars flash |
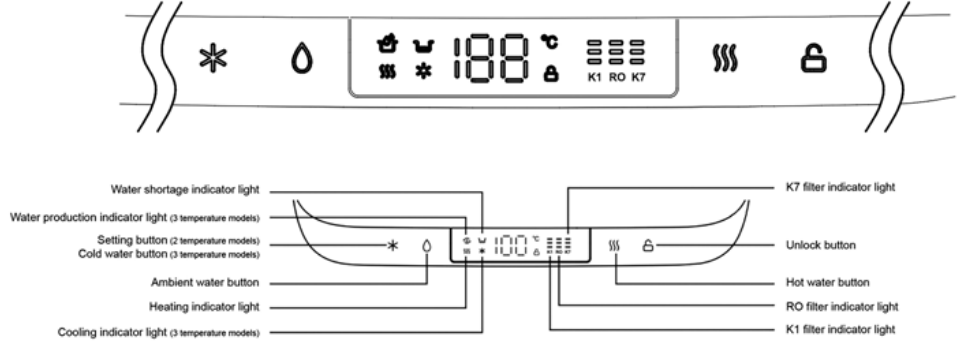
UI: Product work UI interface
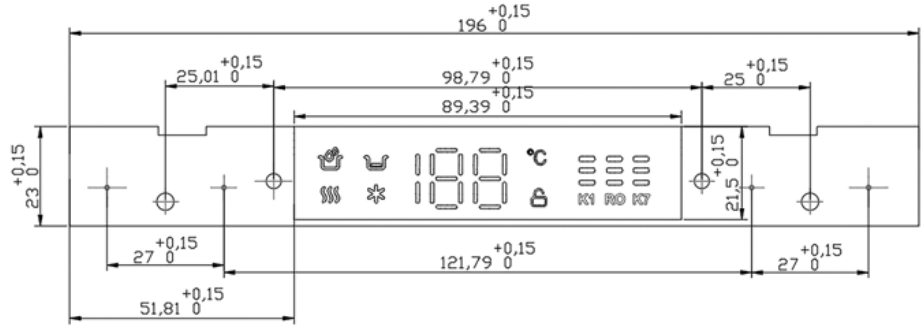
Display size
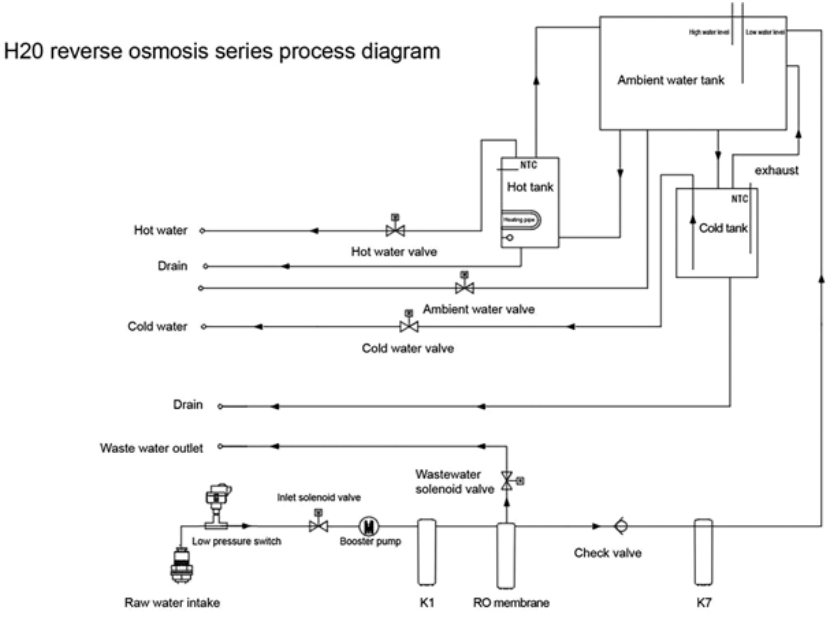
Waterway schematic
Key Icons and Functions
| No. | Icon name | Icon | Icon color | Function Description |
| 1 | Cold water outlet button | White | Touch to get cold water, and then touch to stop cold water. After opening, no one operates, and the water will automatically stop in 1 minute. |
| 2 | Ambient water outlet button | White | Touch to get ambient water, and then touch to stop the water. After opening, no one operates, and the water will automatically shut off in 1 minute. | |
| 3 | Filter display | White | They are K1 (Pro 1), RO (Pro 100), and K7 (Pro M), respectively. Each grid represents 1/3 of the life. When the life is less than 1/3, one grid will be off. | |
| 4 | Water temperature display, child lock | White | Touch the “Cold water” key to display the cold water temperature, touch the “Hot water” key to display the hot water temperature. | |
| 5 | Water production, water shortage, heating, and cooling | White | The “Water Making” icon lights up, indicating that the machine is in the working state of the pump (if it is a reverse osmosis system, the pump refers to the booster pump), extinguished, indicating that water production has stopped. | |
| 6 | Hot water, child lock key. | White | Unlock and click the hot water button, and the hot water will come out. After opening, if no one operates, the water will automatically stop in 1 minute, and it will be automatically locked at the same time. If it is unlocked, there is no operation after that. 10S will automatically lock | |
Refrigeration Switch
Controls whether the machine allows the cooling function to be enabled. The switch is closed: Press from the “О” state to the “–” state to turn off the refrigeration function of the machine. The switch off: Press from the “–” state to the “О” state to turn on the refrigeration function of the machine.
Product Warranty
| Product | Filter Dispenser Aquaphor H20-c (RO PRO 100) |
| Serial Number | ——————————————– |
| Purchase date | ——————————————– |
| Customer | ———————————————– |
| Seller | ———————————————– |
Limited Warranty
Aquaphor products are backed by some of the most comprehensive warranties in the industry. Aquaphor warrants that the Aquaphor water filtration system shall be free from defects in material and workmanship under normal use and service. Filter Dispenser Aquaphor H20-c(RO PRO 100) –Two-Year Warranty from he date of purchase. This does not apply, however, to consumable filters. Exclusions and Limitations
- Aquaphor warrants its products to be free from manufacturing defects under normal use and service. This warranty is extended only to the ORIGINAL PURCHASER.
- Aquaphor’s obligations under this warranty are limited to repairs or replacement, at Aquaphor’s option, of products or parts found to be defective, provided that such products were properly installed and used in accordance with instructions.
- Aquaphor reserves the right to make such inspections as may be necessary to determine the cause of the defect.
- Aquaphor will not charge for labor or parts in connection with warranty repairs for the first full year from the date of purchase on all products except those that may be subject to commercial use, AQUAPHOR H20-C (RO PRO 100) Water Dispenser limitations.
- Aquaphor is not responsible for the cost of removal, return (shipping), and/or reinstallation of products.
This warranty does not apply to
- Damage loss occurs during shipment.
- Damage or loss sustained through any natural or man-made causes beyond the control of Aquaphor, including but not limited to fire, earthquake, floods, etc.
- Damage or loss resulting from sediments or foreign matter contained in a water system.
- Damage or loss resulting from negligent or improper installation, including installation of a unit in a harsh or hazardous environment.
- Damage or loss resulting from removal, improper repair, modification of the product, or improper maintenance, including damage caused by chlorine, chlorine-related products.
- Damage or loss resulting from acts which are not the fault of Aquaphor or which the Product is not specified to tolerate.
Customer Service
- Tel: +372 600 2255
- Website: www.aquaphor.com
- Address: Katusepapi 44, Estonia, 11412, Tallinn, Europe
FAQs
Q: What type of water dispenser is the AQUAPHOR H20-C (RO PRO 100)?
The H20-C is a compact and easy-to-use reverse osmosis (RO) water dispenser that may be used at home or in an office to provide clean drinking water.
Q: How long does it take to produce purified water?
Water pressure and usage affect production time. One to two litres per hour are typical flow rates. Once full, the storage tank enables instant distribution.
Q: Can the dispenser provide hot water for tea or coffee?
Indeed. The H20-C has a hot water tap that supplies water at a temperature that is safe to drink. Take care to prevent burns.
Q: Is the water dispenser energy efficient?
Indeed. Low-power standby mode and an insulated tank are two of the unit’s energy-saving features.
Q: Can I connect the dispenser to a well water source?
Yes, as long as the water has been pre-filtered to get rid of impurities and sediments. Excessive particles or chlorine can harm reverse osmosis membranes.
Q: Is it safe to drink water directly from the dispenser?
Indeed. Although the RO system’s water is safe to drink and has been cleaned, frequent filter maintenance is necessary to preserve the water’s purity.